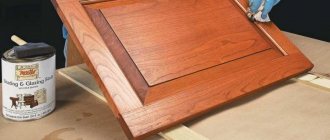
Do-it-yourself wood-look painting + what materials and tools are needed
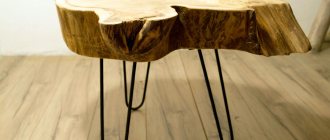
Material such as wood is most often used for a decorative type of design. All this is possible thanks to the unique appearance and large selection of shades.
In the interior of any room, such products look, without exaggeration, magnificently. But, taking into account the high cost in the process of finishing work, other materials began to be used more and more often. In this case, wood staining is required to make the product look rich and luxurious.
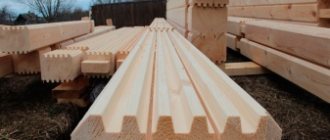
Such building materials will be subjected to special design, which results in imitating the color and texture of natural wood.
Turning metal or plastic into wood is easy
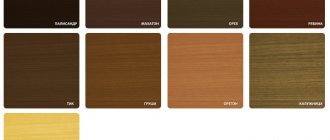
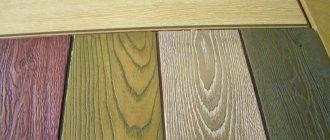
The photo shows a variety of paint colors that imitate wood texture
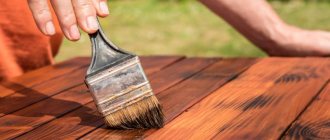
Special paints and varnishes, sold as liquid wood paint, are intended for treating various surfaces with high and medium density. These coatings can be used both for interior finishing work indoors and for exterior finishing.
The paint can be applied with equal success to wood, plastic, metal, ceramic, glass and other substrates with a matte, smooth and glossy surface. Specialized paints to imitate wood texture do not contain wood-based fillers and are therefore resistant to the negative effects of environmental factors.
As already mentioned, the use of special compounds is important when decorating furniture and other elements in the interior with your own hands.
These paints are widely used in workshops involved in improving car interiors. Thanks to special paints and varnishes, unpresentable plastic dashboards, lids of various boxes and other surfaces in the car can be made “wooden”.
Despite the fact that the price of paints and varnishes that imitate the texture of wood is several times higher than the cost of traditional enamels, this method is still more affordable than paying for the services of a professional artist.
Features of applying “liquid wood”
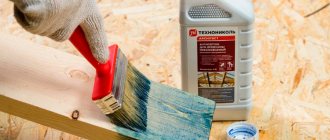
The use of special paints and varnishes is no more difficult than ordinary painting of wood. But there is one condition: you must use the right tool: a hard, flat brush based on natural bristles.
The length of the bristles determines how pronounced the texture of the wood will be. That is, if you need the fibers to be well drawn, use a brush with short bristles. The longer the bristles, the more poorly defined the texture will be.
The paint is applied directly from the can without special preparation and without the use of solvents. It is necessary to decide in advance on the required color, since it will not be possible to change the tone or color of the paint during application.
Important: Special paint designed to imitate wood is not mixed, but only shaken immediately before opening the can.
It is necessary to prepare the surface before decorating in the same way as before applying any paints based on organic solvents. That is, the base is cleaned of unevenness and dirt, primed and only then painted.
If a glossy finish is being decorated, it should be matted with zero sandpaper to ensure maximum adhesion.
Forming veins with a hard brush
The paint is applied in long stripes from one edge of the product to the other. You should not rub the applied layer, as is done with conventional coatings, as the texture of the imitation wood fibers will be damaged. A shiny film appears literally 15 minutes after application, and complete drying occurs in 1-3 hours, depending on temperature and humidity.
According to people who have used KAOWA SEMENTOL in accordance with the instructions indicated, the finished coating is an order of magnitude superior in quality and similarity to cut wood.
What material should I use?
There are various compositions that allow you to paint the door. Each of them has its own advantages and disadvantages. It is necessary to carefully consider the choice of materials.
Nitropaint
The coating obtained by applying such a composition has many advantages. They consist in the fact that the surface is very reliable and resistant to various influences. The service life is calculated in tens of years. During this period, the paint practically does not lose its original color.
Nitroenamel - creating a reliable coating
But such advantages slightly spoil the existing disadvantages:
- A separate room is required for work. If the process is carried out at home, then it is necessary to take into account that the smell will be very pungent, and its weathering time will be more than two days.
- Evaporation that occurs within 2 days is unsafe for humans.
- The cost of the material is very high. Especially if the paint is used with a varnish of suitable quality.
Of course, such negative factors relate only to the technology of use.
Alkyd enamel
A fairly common option that has a rich color palette. Preference should be given exclusively to compounds labeled for interior use. A distinctive feature of the material is its low cost. It is this factor that explains the popularity of alkyd enamel.
Alkyd enamel - a finish accessible to everyone
There is one negative point. It lies in the fact that the paint has a very pungent odor. It should be borne in mind that this unpleasant moment persists even after the coating has dried. This feature makes it difficult to use the material.
Acrylic paint
It is safe to say that this composition is the most versatile. The fact is that painting is quite simple, and the absence of odor only increases the advantages of the material.
Many craftsmen rightly note that this enamel has an insufficient service life. But such an omission can be easily eliminated if acrylic varnish is used as a fixing (finishing) coating. It will not only protect the surface, but also retain its original color for a long time.
Acrylic paint - easy to apply and odorless
On a note! The wooden material (MDF, laminate, timber) from which the door structure elements are made is very unstable to moisture. For such work, you should choose compounds that are marked “waterproof”.
How to do without special paints
In the photo - hand-drawn texture
What to do if there are no special compounds to imitate the texture of wood in the nearest hardware stores, and most likely they will not appear, but it is necessary to decorate this or that surface?
In this case, you will have to awaken your creative potential and get to work.
- In order to paint a wooden surface, we will need acrylic paints and varnish on a similar base . We select paints of two colors: one is dark brown, the other is several tones lighter, closer to beige. We also use two types of flat brushes with stiff bristles. One brush with longer bristles and the other with shorter bristles.
- We prepare the surface . We clean it from dirt and dust and prime it if necessary.
- Apply dark paint as the first layer . The layer should be uniform and should be applied with a long-bristled brush. When the first layer is completely dry, you can begin applying the texture.
- Apply light paint as a second layer, also using a long-bristled brush..
In the photo - a tool for simulating wood using simple paints
- Then we wait until the second layer begins to dry, take a short-bristled brush and draw one line across the coating from side to side . Veins resembling wood fibers will appear on the surface of the painted coating.
Tip: If the brush is not hard enough, you can use a clothes brush to apply texture.
- After the second coat of paint has completely dried, you can apply varnish..
CLEANING
The very first thing you need to do before cleaning any piece of furniture is to give it a thorough cleaning. No matter what type of paint you use, it will not stick to grease, dust or other dirt. Another option is to just use warm water and dish soap because it's cheap, easy to have on hand, and amazing at removing grease and dust.
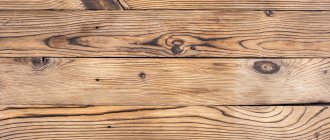
Imitation of wood texture on the floor
You can imitate the rich patterns and colors of natural wood using a method that dates back to the Roman Empire and was especially popular at the end of the 19th century. For a long time considered accessible only to highly skilled craftsmen, this method has now been revived again, because... new tools appeared, such as rocker to imitate wood texture. The method of simulating wood texture is suitable for applying a topcoat to any flat surface. To create a finish that imitates wood grain, a thicker paint glaze is applied over the first coat of low-gloss latex enamel paint. The rocker side of the wood grain tool is pulled across the wet glaze, rocking the rocker back and forth. The simultaneous pulling and rocking of the tool creates elongated oval marks that imitate the characteristic grain of pine and other trees. Get familiar with this technique by practicing applying a wood grain finish to a large piece of cardboard until you achieve a realistic look. This will also help you test the resulting finish before you use the technique on a real project.
To create the impression of wooden parquet, apply a grid of squares with a side of 10 or 20 cm on the first layer. You can center the pattern or start in one corner with a whole square. Close one square at a time in the grid and apply the coating alternately in the horizontal and vertical directions.
TOOLS AND MATERIALS
- Artificial bristle brush, sponge applicator or paint roller for applying the first coat
- Artificial bristle brush - additionally for applying glaze
- Rocker to imitate wood texture
- Soft natural bristle brush 7-10 cm wide
- Pencil, ruler, masking tape, narrow spatula - for applying a decorative coating that imitates parquet flooring
- Low gloss latex enamel paint - for application as a first coat
- Artistic acrylic paint or latex paint - for glaze
- Thickener for acrylic paint
- Rags
- Cardboard - for practice with coating
- Semi-gloss or high-gloss clear topcoat or clear acrylic spray sealer
How to imitate wood texture
The final color of the coating, imitating the structure of wood , depends on the combined action of the first layer and the glaze layer. The first layer should be lighter, and it will be covered with a darker colored glaze. Suitable colors for the first coat are: natural sienna, iron oxide red, burnt sienna, burnt umber and beige tones. Good colors for glazes include: burnt umber, black, red iron oxide, burnt sienna. Since various stains are commonly used when working with wood, there is no need to repeat both the texture and color of all trees.
GLAZE FOR APPLICATION OF COATING IMITATING WOOD TEXTURE
Mix the following ingredients:
2 parts art acrylic paint or latex paint of desired sheen 1 part acrylic paint thickener
Apply the first coat of low-gloss latex enamel paint in the desired color, using strokes in the desired direction. Use a brush or sponge applicator; For large surfaces, use a paint roller. Let the paint dry
Mix glaze for decorative coating. Using an applicator with a sponge or an artificial bristle brush, apply an even layer of glaze over the first layer, working a small area at a time.
Run a rocker over the wet glaze to imitate wood texture ; The rocker movement is done slowly to achieve the desired effect. Start from one corner; the work is performed in one continuous movement, while simultaneously with the movement of the rocker it rocks back and forth (photo above). As you can see from this picture, the position of the rocker determines what marks it leaves, imitating the texture of wood.
Repeat step 3 for subsequent rows, varying the distance between the oval marks. Use a dry cloth to wipe off any glaze that has accumulated on the instrument when necessary. On some rows, run the ridged or grooved side over the glaze instead of the rocker itself. This will change the appearance of the coating and imitate continuously stretching wood fibers.
Before the glaze is completely dry, brush the surface with a dry, soft natural bristle brush (7-10 cm wide). Brush lightly in the direction of the wood grain to soften the resulting finish. Clean your brush to remove excess glaze as needed. Let the glaze dry. If you prefer, you can apply a clear topcoat or clear acrylic spray sealer.
Imitation parquet
Using a brush or roller, apply the first coat of low-gloss latex enamel paint. Let the paint dry. Measure and draw a grid on the first layer using a ruler and pencil. Center the grid or start at one corner with a whole square.
Apply masking tape to the squares one at a time. Using a narrow spatula, as shown in the picture, trim the masking tape diagonally at the corners. Press the tape firmly along the edges to prevent the icing from flowing underneath. Mix decorative glaze.
Spread frosting onto open squares; movements of the hand should be made in a horizontal direction. To create an imitation of straight wood grain in individual squares, stretch the rocker horizontally through the wet glaze. In the remaining squares, rock the rocker horizontally, changing the location of the oval marks. Work only a few squares at a time as the glaze dries quickly.
Before the glaze is completely dry, brush the surface with a dry, soft natural bristle brush (7-10 cm wide). Brush lightly in the direction of the wood grain to soften the resulting finish. Clean your brush to remove excess glaze as needed. Let the paint dry and then remove the masking tape. Apply new strips of masking tape to the coated squares. Spread frosting onto open squares; movements of the hand are made in the vertical direction. Repeat steps 3 and 4, working in a vertical direction. Let the paint dry and then remove the masking tape. If you prefer, you can apply a clear topcoat or clear acrylic spray sealer.
Variations of coatings imitating wood texture
By choosing specific paint colors for the first coat and glaze, you can create finishes that resemble typical wood grains such as cherry, honey oak, and walnut.
For a decorative floor covering imitating cherry wood, a dark reddish first layer and a burnt umber colored glaze are used.
wood is imitated by applying a light tan first coat and a golden tan glaze.
The walnut finish is done using a dark golden first coat and a burnt umber glaze.
Preparing furniture for decoration.
Note that most of the steps described in this section are the same for any surfaces that you plan to paint. The final result and durability depend 80% on the thoroughness of the preliminary preparation. Don't neglect it.
First of all, take care of protecting the premises in which you plan to carry out work. Lay a protective material - for example, film. Old furniture must be washed with soapy water and dried thoroughly. Handles and all fittings are removable. Disassembling furniture or painting it in assembled condition depends on the specific item. Do what is most convenient for you.
Tip: Look at flea markets for vintage furniture handles. Sometimes they can be purchased for pennies. They will perfectly complement artificially aged furniture.
Sanding and putty.
Arm yourself with sandpaper and carefully sand the furniture. If the furniture has been painted, start with a coarse sandpaper, and then move on to smaller ones. For painted furniture, fine sandpaper is suitable - it will help remove dirt that has become ingrained over years of use. Antique painting of furniture does not require puttying, since scratches and other traces of use are the main feature of this decor. After sanding, you can immediately move on to primer.
Tip: When sanding, a lot of dust rises into the air. Wear a respirator.
Padding.
We have already written many times about the need and importance of primer. This work is a rare case when this stage can be skipped. It is important to use only special chalk paints. They are available in different brands and are designed specifically for home use. If you are using regular matte paint, apply a coat of wood primer to the item first. This will ensure better adhesion of the paint to the surface and extend its service life. Wait for the primer to dry before you start painting!
Article on the topic: How to cycle parquet without removing furniture
Why imitate wood?
Imitation allows you to create a variety of wood textures, cuts in longitudinal and transverse sections, the structure of old petrified rock or eaten away by insects, as well as make spectacular stylistic variations. After all, the use of natural wood varieties is in many cases impractical and unjustified.
Patterning tools
You can apply the selected material to the wall using a spatula or trowel. To develop a drawing, the following tools are required:
- palette knife;
- textured roller;
- video with the image of a wood cut;
- rubber spatula with a pattern;
- various models of spatulas;
- stencil.
How to make a wood-look spatula with your own hands
There is no need to buy an expensive spatula. It can be cut from ordinary plastic packaging from construction or other materials. First they draw a shape, and then cut it out with well-sharpened scissors and form notches. The following types of spatulas will be needed:
- wide with large teeth;
- medium with sparse serrations;
- small smooth.
Facade painting technology
When the primer has completely dried (a couple of days after treatment), you can begin painting the facade.
For work it is best to use a brush. The coating is applied in the longitudinal direction, trying to avoid excessively thick layers. Start painting from the very top of the wall to prevent drops from falling onto the already covered area. During operation, the paint must be stirred periodically. This allows you to achieve the most even color over the entire surface.
Particular attention should be paid to the ends of boards and logs, as they most need reliable protection
It should also be taken into account that the quality of the work performed is highly dependent on weather conditions. Coating of the facade with paints and varnishes should be carried out at an air temperature of at least +5 degrees. At the same time, the scorching sun will cause the paint to dry too quickly, and high humidity will not allow the composition to be applied properly.
Imitation of wood texture with plaster
One of the inexpensive and proven ways to obtain an effective wood-look finish is decorative plaster. Types that imitate the texture of trees such as oak, ash, cherry, and walnut are sold. Plaster has significant advantages over other materials:
- suitable for most surfaces;
- you can cover both small pieces and the entire area;
- withstands adverse conditions, temperature changes and is therefore suitable for outdoor use;
- non-flammable;
- You can easily and quickly restore the damaged area.
The main disadvantage is that the imitation only looks good from a long distance. In addition, unlike real wood, the strength and wear resistance are several times less.
Which plaster is suitable
The choice of material depends on the further conditions of use of the surface. For example, the façade of a building is made of putty. Cement plaster works well on concrete. Indoors, you can give preference to materials based on gypsum, acrylic or silicone. The bark or wormholes made by beetles are well conveyed by relief structural plaster with coarse granules. Ready-made mixtures of acrylic and silicone are practical to use. They do not harden instantly and allow you to adjust the process.
Required Tools
The range of devices is determined after choosing the breed that needs to be created. You may need:
- squeegee spatulas with different notches;
- various spatulas (metal, rubber, flexible and others);
- rollers with relief patterns;
- brushes with hard bristles;
- trowel.
It is advisable to purchase expensive equipment only for large volumes of work or when they are carried out to order. In most cases, you can get by with improvised means. So, it’s easy to add texture to a regular paint roller by wrapping it with tape, thread or film.
The procedure for creating wood texture
At first glance, the work may seem quite painstaking, but understanding the technology will not be difficult. Before you start working, you should practice on a piece of cardboard. Follow the following sequence of actions:
- Treat a small area with putty and level it to a thickness of 6 mm. Carefully smooth the surface with a spatula.
- Next, apply wavy grooves in a vertical, horizontal direction or at an angle. After each pass, the instrument is cleaned.
- Then we form a glossy base on the wall with a hard spatula.
- The plaster should dry for 30 minutes.
- Using a brush, distribute the primer over the surface. It is important that it gets into all the cracks.
- Then the surface is coated with paint, dried and, if necessary, smoothed.
What is the best way to apply stain?
Wood staining is done with the following tools: a brush, a foam rubber or fabric swab, a roller and a spray gun.
When tinting the surface with alcohol-based stain and nitro stain, use a spray gun. These liquids dry out quickly, and brushes on the surface leave stains. The spray gun is also convenient to use for treating large areas.
Tools for applying stain to wood
For other types of stain, use a swab, rag and brush. It is necessary to choose a brush with strong bristles so that no hairs remain on the painted wood. Rags and tampons should also be of high quality, since lint and threads remaining on the surface will create an unattractive appearance of the paint.
Oil stains are used to paint wood with brushes with natural bristles, while water-based stains can also be used synthetically.
Return to content
Imitation of wood using polymer clay
The texture of the clay resembles plasticine in appearance. Thanks to the variety of shades and reasonable price, it is gaining popularity as a universal finishing material. Sold in small rectangular pieces. The advantage of the method is the ability to obtain the desired structure without the use of coloring compounds.
Sequencing
The order of working with clay is as follows:
- First you need to take several types of material and cut the same piece from each.
- Each piece is kneaded and a sausage is formed from it.
- Next, the sausages are divided into several slices and mixed together.
- Several different pieces (4-5 pieces) are connected together and balls of a uniform shade are obtained.
- The balls are rolled into thin slices and placed in a pack.
- The edges of the resulting stack are cut off and cut into two parts.
- The two halves are placed on top of each other and rolled. This procedure must be done several times.
- The resulting layer is cut into strips 3 mm thick and connected to each other.
- The strips are laid out with the cuts facing up and rolled out until the required imitation is obtained.
Why do this at all?
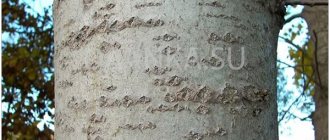
- Wood is, first of all, a living material and, like any living organism, it lives, ages and dies. If you do not care for it and do not treat it in time, then these processes will go much faster, especially for wood that is in the open air and experiences the whole range of negative weather surprises.
- In addition, this living material is fertile ground for the development of various types of mold and mildew; whole hordes of pests enjoy it.
- Based on the colossal experience of human use of wood, modern science has developed many different compositions that not only improve the appearance of the material, but also make it possible to extend the decent life of wood for decades. Moreover, for each type of wood and type of its use they are different.
Wood imitation paints
Many designers and artists practice the use of paints and varnishes. The most popular method is to sequentially overlay contrasting shades on top of each other and then process them with special brushes . This method is more realistic.
Tools for work
To work you will need:
- tools for applying the first layer - brush, sponge or paint roller.
- brush with artificial bristles for glazing;
- rocker to create a pattern;
- soft brush made of natural fibers;
- pencil, ruler, tape;
- piece of fabric;
- thickener for acrylic;
- finishing coating.
Shades for the first layer
For the base, regular white acrylic paint is suitable. In stores you can find special tinting compounds and by mixing to achieve the desired shade. The easiest way is to use gouache paints. It is better to conduct color experiments on sheets of plywood or MDF. It is important that the initial layer is a couple of shades lighter than the glaze. Manufacturers offer a wide range of shades for the base layer:
- iron oxide is red;
- burnt umber or sienna;
- natural sienna;
- milky beige.
Shades as glaze
The final color will depend on the compatibility of the first layer with the color of the glaze. The composition should include two parts acrylic or latex paint and one part thickener. The following shades can be used as glaze:
- burnt umber and sienna;
- black;
- red iron oxide.
Work order
Many people note that the method of simulating texture using paint is the most familiar and understandable. To properly make the coating, follow these steps:
- First you need to apply a light color using a brush or sponge.
- Wait for the paint to dry.
- Next, mix the glaze to apply a decorative coating.
- An even layer of glaze is applied on top of the first layer. It is better to work with a small area of the area.
- Then slowly run a rocker over the wet icing, creating rows.
- To achieve the best effect, periodically remove dirt from the instrument.
- Occasionally, you can move along the surface not with the tool itself, but with a comb or grooves.
- Before drying, the layer is treated with a soft brush along the direction of the wood fibers.
- Wait until the surface is completely dry and use it for its intended purpose.
It is advisable to try the technique on a cardboard sheet of medium configuration. Only after achieving the desired effect can you begin to work on the real surface. It’s also worth trying the topcoat so that unexpected nuances do not arise in the future.
Thus, there are proven ways to create realistic wood imitations. Using the recommendations proposed in this article, you can make a unique wood-look material with your own hands and without the help of specialists. The main thing is to prepare the necessary tools in advance and choose a more understandable method.
The necessary conditions
Restoring a door that is “walking” in the opening is a thankless task; and it doesn’t take long to touch the fresh paint, and it’s generally inconvenient.
To work comfortably and get decent results, do not forget:
- remove the door from its hinges and place it on a stable support (a table or a couple of stools),
- dismantle all fittings; if you don’t want to, or it’s impossible to remove the lock, you can cover it and the handle with masking tape or wrap it in foil;
- provide free space to have access to the workplace from all sides.
Wood processing
To ensure that the paint applies evenly to the product and that no flaws appear after some time, the product must be carefully prepared before painting.
The main thing is to completely remove old layers of paint and various contaminants.
It is difficult to do this exclusively with your own hands, so modern methods are used:
- Removers are materials that are applied to old paint, after which it is quickly and easily removed. The composition has a toxic chemical formula, so you need to work with removers delicately.
- Sanding machine - uses a special wood attachment that removes old paint without touching the layers of wood.
- Construction hair dryer - directs a warm stream of air onto the layer being removed, under the influence of which it lags behind the wood.
After cleaning the surface of old compounds, the wood must be cleaned of dust and grease - for this a classic solvent is used - this point is important, and the price of the solvent is not high, so it is better not to neglect this procedure.
Fallen knots and other defects are covered with wood putty. Next, the putty is cleaned off, and the product is again cleaned of dust.
At the last stage, the wood is primed and dried well, and the paint will not lie evenly on the undried product.