Unique designer and unusual items are and will continue to be in high demand. It's all about their uniqueness - only with your own hands or the hands of a skilled designer can you bring to life something that no one else will have.
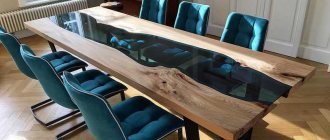
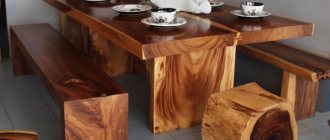
These things include a table made from cut wood, which you can make yourself . And despite the fact that many people have already brought this idea to life, such a table will still be unique and one of a kind, because nature will certainly not repeat the pattern of the inside of the tree.
Table made from cut wood
Advantages of wood slabs
- Solid structure. No gluing or joining.
- The thickness of the workpiece is from 50 to 150 mm, which has a direct impact on strength.
- Unsanded edges give the cut a unique texture.
- One of a kind form. Any cut has original elements and a heterogeneous texture.
Varieties of blade cutting technology
The classic version involves creating blanks of identical thickness. They are obtained by cutting the trunk with an additional thickening in the middle, since this area is then susceptible to cracking.
A less traditional cutting option is to form a single sheet from several blocks by gluing. This technology is used by some specialists.
Can you do it yourself?
Before becoming a unique product, a slab goes through several stages. This is a saw cut that has gone through all stages of processing and is used as furniture or additional decor.
Most often, saw cuts are used as a countertop or table.
Making a slab is a labor-intensive job that takes a lot of physical effort and requires a large amount of financial costs. Before starting the manufacturing process, you need to think about the entire process. The process of creating a slab yourself is the key to obtaining an exclusive product.
general description
Wood slabs are fantastically beautiful, unique products from.
For production, the widest part of the tree trunk of the following species is used: ash, elm, oak. The classic slab is a longitudinal section, but with us the buyer can find cross sections, for example, oak slab , which are produced individually and not only. They are used both as an independent element for decoration and for the production of furniture.
Slabs are works of art created in collaboration with nature; in Moscow they can be purchased in the store.
Delivery is carried out by company transport throughout the Moscow region.
The principle of choosing wood for a slab
Not every type of wood is suitable for creating slabs yourself. The following types of wood are best suited:
- Elm is an excellent material for creating slabs. Can be used in both dry and wet rooms.
- Oak slabs amaze with their excellent color palette: from light brown to straw-yellow shades. Thanks to its straight grain, oak wood is much easier to work with than other types of wood.
- In the color scheme of elm, light shades with red-brown specks are more common than others. Fine-pored texture is a distinctive feature of wood.
- The color palette of larch depends on the age of the tree. Sand and amber are the leading shades. Easy to use thanks to the high concentration of essential oils.
- Walnut wood has a wide range of colors. Dark chocolate shades are in the lead. A significant disadvantage is that the texture is susceptible to cracks.
- Maple saw cuts in beige shades. The colors are practically independent of the age of the tree.
- Cherry cuts are distinguished by chocolate and soft pink shades. Suitable for creating decorative elements.
Features of wood processing technology
Proper cutting is carried out using a special method that ensures the preservation of the natural texture, including all roughness.
Large-scale procurement of blanks involves the following activities:
- An expert selects suitable tree trunks. The choice is made taking into account the terrain and growth parameters of plant materials.
- Special equipment delivers selected options to the processing site, to programs equipped with a variety of plumbing equipment.
- The trunks are sawn into a certain number of blades.
- Drying of materials is carried out artificially or naturally.
- Processing of wooden sheets with a special composition, their delivery to the assembly site.
Transportation of lumber
To transport timber you will need large loading equipment. In particular, this is necessary for transporting entire trunks. If you intend to transport small pieces of wood, then large equipment is not required; it is possible to carry out the loading yourself.
You will need a cable, trailer and ramps. It is necessary to monitor the balance and measured distribution of the weight of the barrel. To secure the slab you will need strong straps.
Log sawing
Dissolution is a labor-intensive procedure, but it can be implemented without large-sized equipment and lifting machines, carried out using mobile sawmills.
It will not be possible to organize large-scale production in this way, but creating slabs yourself in this way is a completely feasible thing.
Methods of dissolution
A template wooden cut does not exceed a thickness of 5 cm. The standard scheme for dissolving slabs is that when dissolving the core remains 10 to 12 cm thick.
This is a necessary measure because stress in the barrel leads to the formation of cracks. But the production of wooden cuts 12 cm thick does not guarantee that the output slab will be intact.
- To form a wide blank, you need to glue two cuts.
- Creating glued forms goes against the principles of creating solid slabs, but such actions make it possible to create a workpiece with certain parameters.
- The technology helps reduce stress in the barrel, thereby increasing the quality and service life of the product.
Features of the material
The use of various methods for highlighting the natural origin and imperfections of wood makes such slabs especially popular for the production of furniture and interior decor items.
- Connoisseurs of eco-friendly materials choose this material due to its unique shape and pattern created by nature.
- The long service life of professionally processed canvas and its ability to harmoniously combine with any interior style attracts many designers.
- The technology used by craftsmen makes it possible to produce slabs from almost all types of materials.
However, often valuable wood species are used, which belong to the premium price category.
Drying process
After carrying out the procedures for dissolving wooden cuts, you need to carefully study the drying methods. The process is extremely necessary; it is the one responsible for the quality and service life of the future slab.
Drying occurs naturally in special drying boxes. You can dry the wood yourself, without using special chambers.
Certain conditions must be met:
- Choose a place where the sun's rays do not reach. Dry indoor air will speed up the process.
- Build the canopy so that there are air gaps in it.
The process of drying the blanks takes place over the course of a year by about 2-2.5 cm. A wooden cut, 5 cm thick, will dry for about 2 years.
How to make a small table for coffee from sawn wood?
Let's see how to make a simple small coffee or coffee table from a medium-diameter end cut. As we remember, to make tables you can use many cuts at once, but in this case you will use one, but a large one, which will become a full-fledged tabletop.
Step 1. First of all, you need to get the saw cut itself. The easiest way is to buy a ready-made one, but in this case the master decided to go into the forest and prepare it himself. It is best to do the cutting in the summer in very dry weather. “Winter” cuts may become deformed during drying or crack. So, you need to find a large and beautiful tree - walnut or oak, etc. And then you need to use a chainsaw to cut off a section from the trunk in the thick part of the required thickness. The saw chain should be sharp and the wood should not be rotten. The cut itself needs to be dried well for some time and only then can you start creating the table.
Suitable wood is being cut
Preparing a tree cut
Step 2. Next you need to carry out rough general processing of the cut. You need to use a plane to cut off all the irregularities from the surface and remove the bark.
Rough processing of the cut. Bark is removed.
Step 3. After roughing, you need to sand the surface of the future table well.
Sanding the saw cut
Step 4. There may be cracks on the saw cut, and in theory such a cut is not used. But sometimes the problem can be solved - the cracks just need to be strengthened. To do this, you need to purchase a small piece of wooden board and cut out “butterflies” from it, as shown in the picture.
The butterfly is marked, then it needs to be cut out
Step 5. Next, the butterflies need to be attached to the cut in the area of the cracks so that both sides of the tree relative to the crack look like connected butterflies, and then you need to outline them with a pencil.
The butterfly is outlined with a pencil
Step 6. Now you need to cut out the notches for the butterflies on the cut itself.
You need to cut notches on the saw cut Another photo of the process
Step 7. All that remains is to insert the butterflies into the places prepared for them and cut off their upper part so that it does not protrude above the cut surface (if necessary).
Excess butterfly is cut off
Step 8. Now you need to secure the butterflies with epoxy resin. You can also glue them with any wood glue.
Fixing the butterfly with epoxy resin
Step 9. After this, the tabletop must be carefully sanded again until perfectly smooth.
Re-sanding the countertop
Step 10. Next you need to coat the wood with a layer of varnish or epoxy resin. Can be applied with a brush. After applying the paint and varnish material, its layer must be thoroughly dried before further work.
Wood is varnished
Step 11. Now you need to drill holes in the underside of the tabletop to fix the legs. The markings must be applied in accordance with the location of the holes on the leg mount.
Holes are drilled in the tabletop
Step 12. The final stage is attaching the legs for the table themselves. In this case, metal ones were used. They need to be screwed to the tabletop, and the table is ready.
This is where the leg will be attached. Attaching the legs
Making your own table
After purchasing a slab, you need to prepare it for work. In the absence of special equipment, you can use a manual milling cutter mounted in a movable platform. After processing with a milling machine, small irregularities can be removed using a grinding machine.
It is extremely important to remove bark and minor defects on the workpiece. Further work depends on what kind of countertop you plan to create in the end.
The slab can be sawn lengthwise to create two parts of the future tabletop. The resulting halves must be placed on a flat surface. The workpieces need to be based, and the space from below must be sealed with a smooth board.
- Next, you need to choose the appropriate color of epoxy resin. It has no color, but it is easy to give it a tint by adding color.
- Resin must be poured into all cavities on the workpieces. It is advisable to warm it up before use.
- Filled cavities can be further decorated by filling them with pebbles, branches or even insects.
- But, it is necessary to take into account that objects will float up, so they need to be sunk.
- A hardener must be added to the solution. When the resin has hardened, you need to cover the boards with a layer of resin or varnish.
Where can I get the saw?
Having decided on the basic parameters of the future table, you need to prepare the necessary materials. And the most important material that will play a decisive role in the process is a good quality cut of wood that fits the size. It seems that everything is simple here - I went into the forest, took the first log I came across and sawed off a round piece from it. But in reality everything is much more complicated.
Safety precautions when working with a chainsaw
Preparing saw cuts is not entirely easy. First, you need to find a good tree of the required diameter as well as quality. Secondly, mistakes should not be made during sawing. The slightest mistake - and you will have to look for a new tree and do all the work over again.
Wooden cuts
For the manufacture of tabletops, saw cuts with cracks are almost unsuitable (except in certain cases). Also, the wood must be treated before use. The easiest way is to buy ready-made saw cuts - it turns out that they are sold, but finding a supplier is not so easy.
Table made of saw cuts and epoxy resin
If you prepare saw cuts yourself, then you need to look for one that will have a beautiful wood color, will not be cracked, and will have a beautiful pattern. If several cuts will be used for the tabletop, then it is important to ensure that the pattern is similar, or at least use cuts from the same type of wood.
Important! The pattern of the tree on the saw cut is the highlight of the future table. And therefore, the selection of wood patterns must be treated with utmost care.
Wood cuts
It is best to take wood cuts that are already dry for making a table, moreover, they should be made from a type of wood that is less afraid of moisture than others. It is better to choose those that do not have knots and other defects that can break off over time and ruin the product. The cuts must be of sufficient thickness and not too thin or too thick.
Thus, only at the stage of preparing the cuts can you stall. But it’s worth it - a unique table made from sawn wood, created by yourself, can become the highlight of the interior. In addition, as a rule, such tables are very durable and can serve for many years without complaints.
Coffee table made from cut wood
Types of furniture made from slabs
In addition to tabletops, completely unexpected pieces of furniture can be made from wooden blanks.
- The benches will look original, especially in a large hall or in the local area.
- An impressively sized table with an original tabletop will fit perfectly into the living room.
- Coffee tables with irregular geometry diversify the room and fit into almost any style.
- Kitchen furniture with horizontal surfaces made of slabs will fit perfectly into the Loft, Provence or Country style.
- A slab desktop diversifies the usual geometry of space.
A little about forms and parameters
The first step is to decide what shape the table will be made. This will largely determine what shape of saw cut will need to be found, and how the work itself will be carried out. So, as for the countertop, it can be:
- round , which will require quite a lot of space around the table. But this furniture looks great. However, it is important to take into account that to make such a table you will need to find either a very large saw cut in diameter, or you will need a lot of end cuts of more modest parameters. These tables look best in spacious rooms;
Coffee table made of natural wood
- oval , which is perfect for use in a large family. It is comfortable to sit at the oval tabletop, and due to its large size, you can place a lot of things on it;
- rectangular , which means the table will fit perfectly against the wall and take up less space than a round one. But in this case, the cuts will have to be taken not end-wise, but longitudinally. Although you can make such a tabletop from many small cuts, choosing the optimal shape. The same can be said about square tables.
Wooden coffee table
On a note! It is not necessary to make a large dining table from sawn wood. You can limit yourself to a small magazine or coffee one. It all depends on the desires and capabilities of the person who will make the furniture and then use it.
Also, immediately “on the shore” you need to think about the number of legs. So, round, square and rectangular tables usually have 4 supports. But there are variations using three legs located at a certain angle, or even one support, but with a wide, stable base. Whatever one may say, the most stable option will still be a table with 4 legs.
Cross-cut oak table