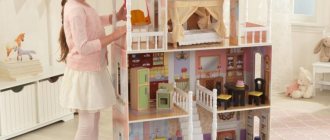
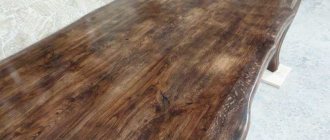
An increasing number of homeowners, when choosing a finishing coating for interior walls, give preference to a natural material - wood. This choice is not surprising, because wood combines many useful properties: environmental friendliness, health benefits, beautiful appearance. These qualities are complemented by excellent performance characteristics: low weight, good sound and heat insulation. The simplest and most affordable wooden finishing material is considered to be lining, a thin cladding panel with a tongue-and-groove joint. Painting the lining inside the house is a necessary stage in the finishing of the home, allowing you to give the interior a complete look and solve several additional problems.
Lining in the interior: stylish living room of a country house Source de.decoratex.biz
How to paint lining like bleached oak
Often it is necessary to paint the wood white, but so that the veins are visible. They also say to create the effect of bleached oak. There are several ways:
- Use tinting with the appropriate name, which is also called stain. Different manufacturers have these. They usually have the names "frost", "bleached oak" or something like that. Application feature: do not pour too much composition. If you overfill it, the surface will begin to peel off over time. To achieve the desired degree of coloring, apply several very thin layers. After each, give it time to dry thoroughly.
Whitewashed lining looks great both on the walls and on the ceiling
- Oil with wax with a similar name. The application technique depends on your desire: one or two layers for an almost opaque coating, or one layer followed by rubbing with a rag for a pronounced texture.
- Pigmented polyurethane primer called “white” or “bleached”. To obtain a translucent coating, the composition is diluted with a large amount of thinner. Its amount can be 80-100% of the volume (determined by samples). The disadvantage, like all polyurethane paints and varnishes, is that they turn yellow over time.
- Pigment acrylic primer, also diluted by 80-100%. The color remains white for a long time, but this primer costs more than polyurethane.
It’s difficult to say which composition to choose - you need to try. It is advisable to paint the lining with several compositions and compare the results. The effect when using different products is slightly different, but it also greatly depends on the wood. The reviews are also very different - some whitened with tinting, others with oil. Soils are rarely used for these purposes, but mainly because not everyone knows their properties.
Technology for painting lining: step-by-step instructions
Regardless of what paint you choose, painting a house in which lining is the main finishing material requires compliance with the technology for applying paint for lining. An important role in this process is given to preparatory activities.
What are the preparatory activities: preparing the lining for painting
- First of all, you need to clean the lining from the old paint. If the layer of paint and varnish material is held firmly enough, the painted lining must be cleaned with a 2% soda solution, which will help effectively remove the layer of old paint. If there are still fragments of paint left on the surface of the lining, they do not need to be removed, as they make it possible to give the lining a new, original texture;
- After cleaning the lining, it is necessary to grind it, for which it is recommended to use not a specialized grinding machine, but traditional sandpaper or even pumice;
- After sanding, treat the lining with drying oil;
Lining painting technology
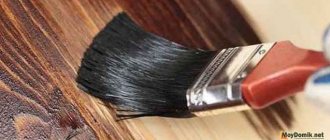
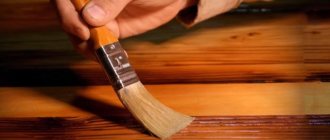
Painting the lining, video instructions for which are attached below, is a process that is not difficult and can be carried out even by a beginner. But, despite this, experts recommend following some tips, which can also be found in this article. Paint must be applied in a thin layer, making continuous movements along the wooden panel
It is important that during the process of painting the lining, only the tips of the bristles of the brush pass over its surface, but not its base; Even if the paint or varnish does not completely cover the surface of the lining, it is not recommended to apply too thick a layer of paint and varnish composition, since several thin layers will provide a more durable coating than one thick layer; To effectively paint the lining in hard-to-reach places, as well as in the area of skirting boards and platbands, experts recommend using a thinner brush, the diameter of which does not exceed 5 cm; The following advice will help you avoid the appearance of marks on the surface of the newly painted lining. To do this, the finishing coat of paint must be applied from top to bottom, which will allow the surface of the freshly painted lining to be smoothed as efficiently as possible.
Painting: features and nuances
Having chosen what to paint the wooden lining inside the house with, they begin the painting process. In order for the result to be of high quality and delight the owners for many years, the following preparatory work must be completed:
- Stock up on tools . You will need paint brushes and a tray, the chosen paint material, a roller with interchangeable attachments, a bucket, fine-grained sandpaper and protective gloves.
- Clean the surface . The lining is cleaned of dust, dirt, and old coating with a stiff brush or pumice stone, then treated with sandpaper.
- Degrease the wood . Treating the surface with an alkaline detergent will improve the adhesion (adhesion) of paint to wood.
- Carry out grinding . You can level the surface using pumice, sandpaper or sanding mesh. The defects are first filled with putty, and the resin is removed with a solvent.
Minimum set for painting wooden panels Source sovkalmykia.ru
- Pre-treat the lining . A primer is applied, and after it dries, an antiseptic impregnation is applied. The process can be accelerated if you purchase a combination composition that combines both products.
- Paint the walls . After waiting for the primer and antiseptic to dry, begin painting. Paint for lining inside the house is applied in two or three layers. The number of layers depends on the selected material and is indicated in the instructions. It is possible to paint wooden panels well before installing them on the walls, but this is not always possible (the procedure requires a large awning or canopy).
Required tools and materials
In addition to the impregnating composition itself, you need to prepare tools for application. This could be a spray gun or a set of brushes of different sizes. The product packaging provides detailed application instructions and recommended tools.
Also useful for work:
- construction tape;
- absorbent wipes;
- container for coloring product;
- sandpaper No. 240.
To coat the joint areas, it is better to prepare a separate small brush. To prevent lint from sticking to the surface, instruments should be periodically rinsed in a soapy solution. It is worth doing this before you start applying the product.
Choosing a decorative coating for lining
After pre-treatment, we protected the wood and prepared it for painting. Now it's time for the finishing coat. Depending on the desired appearance and the effect created, we choose how to treat the lining inside the house. The main types of decorative coatings for lining include:
- Dye;
- Stain;
- Varnish;
- Oil-wax;
- Liquid plastic.
Let's take a closer look at each of them. One of the most popular and affordable processing methods is painting with oil paint. Despite the seeming unpretentiousness of such a choice, it has a number of undeniable advantages. The main thing is the ability to choose any color to create the desired decor in the room. In addition, the paint reliably protects from moisture and does not fade for a long time. In five years, you can restore the former shine or change the color by simply applying a second coat.
As an alternative to oil paint, you can use acrylic paint. It is distinguished by its lack of odor. In addition, it dries much faster. It can be applied at low temperatures. Acrylic paint should be given preference if you are choosing how to process the lining on the veranda or inside the house in the country during the cold season. Or in other unheated rooms.
With all the advantages of paint, it has a significant drawback. It hides the natural structure of the tree. Wood stain does not have this drawback. It is possible to choose the desired shade of impregnation. At the same time, the appearance of the natural material is preserved. The stain can be used both as an independent decorative coating and as a primer before applying clear varnish.
Varnishes for lining are available in acrylic and alkyd. These are transparent decorative coatings. They, like paint, create a film on the surface of the board, but at the same time the natural appearance of the wood is preserved. You can choose a colorless composition or with the desired shade. Acrylic varnish has a high drying speed. Alkyd varnish has high wear resistance.
The coatings discussed above are classics. However, there are also more modern materials that are gaining popularity. Relatively recently, two-component wax paints appeared on the market. Oil-wax is a natural composition of linseed oil and waxes. This coating penetrates deeply into the wood, protecting it from moisture. This gives the lining a beautiful glossy appearance.
Liquid plastic gives wood a modern, and even futuristic, look. However, it has significant drawbacks. It completely deprives wood of the ability to micro-ventilate. Accordingly, the durability of the facing material is reduced. This coating will hide the natural texture of the natural material. In addition, you will not feel the aroma of natural wood in your home.
When choosing a coating, pay attention to the possibility of its use indoors. It’s good if the name contains the prefix “bio”
Many people mistakenly believe that exterior paint can be used indoors without restrictions. However, materials for facades, although they have increased resistance to aggressive influences, often emit harmful and toxic substances.
Useful tips for painting lining
Some subtleties of the workflow will help make the painting better. When processing wooden panels, the following points are taken into account:
- reduce the cost of painting . Tinted varnish or oil-wax is more expensive, but the effect of its use will be greater.
- Pre-impregnation of the lining should be done on all sides , this will significantly enhance the protective effect.
- When working with oil paint, you should take into account its tendency to change color (fading). To prevent color changes from becoming noticeable over time and spoiling the interior, you should choose darker, more saturated shades .
- It is better not to paint on a hot day , as the coating will dry too quickly and apply unevenly (spots of varying saturation may remain).
- In order for the coating to be uniform in color be stirred periodically during operation .
The coating is applied along the fibers of the lining Source nauka-i-religia.ru
- To ensure that the color of the walls is uniform , you can add the color of the finishing material (paint) to the primer.
- When choosing a paint composition, total costs are taken into account : not only its cost, but also the recommended number of layers, as well as paint consumption per 1 m².
Choosing paint for a wooden facade
One mistake many homeowners make is not reading carefully, or not reading at all, what is written on the paint can. This information contains instructions and recommendations from the manufacturer, following which you can achieve the desired result. But before it comes to them, you need to decide on the type of paint. After this, you can begin to familiarize yourself with the nuances of its application.
It has been noticed that oil paints lose their color saturation the fastest. They become covered with cracks faster than others. The reason is the composition of these coatings and their viscosity. The latter property provides high covering ability, but does not guarantee the quality of the coating. Therefore, oil compositions are not often used for finishing facades.
Oil paint MA-15 “Economy”
The best choice for outdoor work is quick-drying water-soluble acrylate paints.
You can pay attention to the products. This manufacturer has a wide range of paints and varnishes for facade work
Excellent reviews of Ultra and Pika Techo paints.
"Pica-Techo" acrylate paint
Paint for wooden facades Tikkurila Pika-Techo
For regions with unstable climatic conditions, characterized by temperature changes and cold winters, silicone-based façade paints are suitable. These compositions successfully withstand low and high temperatures, have a high degree of moisture resistance, and at the same time remain vapor permeable. Silicone facade paint combines the best properties of acrylate and silicate compounds and forms a durable, uniform coating.
Facade silicone paint
Prices for different types of construction paints
Construction paint
Characteristics of facade coatings
| Type of paintwork | Working temperature | Drying time | Consumption |
| Acrylic | +5°С – +20°С | 12-24 hours | 115-120 g/m2 |
| Oily | +5°С – +20°С | At least 72 hours | 110-130 g/m2 |
| Alkyd | +5°С – +20°С | 24 hours | 140-150 g/m2 |
| Silicone | +5°С – +20°С | 24-48 hours | 150-180 g/m2 |
The lining can be painted with stains, tinting impregnations and oils. Wax or varnish is used as a finishing coat.
Samples of shades of applied stains
Wood stain, shades
Why do you need to paint?
A room decorated with clapboard looks neat, is filled with a pleasant aroma and has a comfortable atmosphere supported by wood.
Delighted by this effect, the owner is in no hurry to take up a brush or roller and apply any “chemical” substances to the natural luxury. But not all of them spoil the coating - most, on the contrary, improve it. The following factors predispose to finishing the lining:
- Fire hazard. In the event of a fire, fire-resistant impregnation can delay the development of the disaster and give residents the opportunity to safely evacuate. Unfortunately, no such composition is capable of completely blocking the spread of flame.
- Ultraviolet. The room is never evenly lit. In those places where sunlight falls from the windows, the wooden covering will noticeably darken within a couple of years. To prevent this from happening, you must apply at least varnish.
- Microclimate. Lining is often used to decorate utilitarian premises: kitchens, balconies, verandas, baths. There, the slats are constantly exposed to changes in temperature and humidity. Dryness and cold cause them to shrink, and dampness and heat cause them to swell, turn blue, rot and mold. Antiseptics and moisture-protective agents help neutralize the negative impact of the environment.
- Pests. Insects like to eat wood: bark beetles, termites, wood borers. Antiparasitic compounds, which have to be applied repeatedly, can protect property from attacks.
- Wear. Over time, even walls and ceilings wear out, not to mention the risk of impacts, scratches and chips. To make the lining resistant to damage, it must be provided with an appropriate coating.
- Design. No matter how beautiful wood cladding may seem to you at first, it will lose its original luster or simply become boring. And then you will want to refresh it, elevate it with a new texture or shade.
Types of funds
Coverings for lining are divided into two main groups: protective and finishing (decorative). The first group includes compounds that have different working functions. Some are impregnations, others are covering materials. Both of them create a barrier against negative external factors.
Impregnations suitable for lining:
- covering soil;
- stain;
- wax;
- oil;
- specialized impregnation;
- antiseptics;
- drying oil;
- bleach;
- fire retardant
Several layers of stain with and without the addition of toners look different Source elka-palka.ru
Covering finishing materials act as a decorative layer, simultaneously serving as both protection and decoration. When there is no desire to cover up the wood pattern and its color, the coating composition is chosen from among the following translucent options:
- glossy or matte clear varnishes;
- tinted clear varnishes;
- translucent varnishes;
- wax;
- aqualak on acrylic;
- translucent enamel;
- decorative azure.
Brushed lining is coated with water-soluble transparent varnishSource 1povagonke.ru
For other cases, in which the natural color, texture and pattern of the board are unimportant, the lining inside the house is processed using covering materials. These include:
- acrylate, acrylic paints;
- oil paints;
- water-based paints.
Painting new lining with acrylic paint - the first layer of light green colorSource sparta-stroy.ru
Wax belongs to the group of coating materials and impregnations. It all depends on the technology and the thickness of the applied layer. The degree of gloss of the coating depends on the duration and technique of polishing during waxing. In this case, wax can be called a coating material. The longer the procedure is carried out, the more the working wax surface approaches gloss. The less and less intensive grinding is done, the more the matte structure of the wax coating is preserved.
Rating 2022: TOP 3 paints for lining
| Photo | Name | Rating | Price | |
| #1 | Acrylate latex paint “Harmony” | ⭐ 4.2 / 5 4 - votes | More details | |
| #2 | Water-based paint TEX washable Universal | ⭐ 4.5 / 5 | More details | |
| #3 | “BELINKA WASHABLE” paint for interior walls | ⭐ 4.7 / 5 5 — votes | More details |
What would you choose or recommend?
Take the survey
Acrylate latex paint “Harmony”
Paint “Tikkurila Harmony”
Pros
- High resistance to cleaning
- Gives the surface a velvety effect
Minuses
- Not suitable for doors and furniture
- Takes a long time to dry
Prices for paint "Tikkurila Harmony"
Tikkurila Harmony paint
Water-based paint TEX washable Universal
Washable paint "TEX"
Pros
- Great for wet areas
- Drying time only 1.5 hours
Minuses
- Not recommended for surfaces subject to frequent contamination
Prices for Tex Universal paint
Tex Universal paint
“BELINKA WASHABLE” paint for interior walls
Belinka Washable
Pros
- Designed for surfaces subject to heavy wear
- Environmentally friendly
- Without smell
Minuses
- No
Prices for paint BELINKA VD WASHABLE B1
Paint BELINKA VD WASHABLE B1
Protective compounds
There are many ways to protect a wooden surface from the damaging effects of external factors. The following substances can be used to protect the panel covering:
Fire retardants. This group of compounds is recommended for use in rooms with wooden walls or coverings. Fire retardant impregnation is not capable of stopping combustion, but can significantly delay the spread of fire. This time will be enough to leave the room and call the fire department, and maybe even handle the fire yourself.
Painted lining is protected from solar ultraviolet radiationSource rmnt.mirtesen.ru
Fire retardants practically do not change the appearance of a wooden surface, and during operation they do not emit harmful substances.
- Antiseptics
. Products with bactericidal properties are used in the fight against biothreats - they are used as a preventive measure, but they are also effective if fungal infection has already begun. The inconvenience of antiseptic treatment is that it must be repeated periodically, since the compositions tend to evaporate. Recently, complex impregnations have appeared that not only cope with mold and wood-boring beetles, but also perform the functions of varnish and stain. Such “three-in-one” antiseptics create a film on the surface, are more expensive, but additionally protect the lining from moisture and give it an impressive look.
- stain
. A type of antiseptic impregnation that can penetrate deep into the structure of wooden panels and protect them from unwanted parasitic guests. An additional advantage that makes stain popular is its ability to paint the surface a deep dark color. The downside of the product is that panels soaked in it will appear dull and dirty if you do not apply a layer of varnish on top.
Processing lining with stainSource nastroike.com
- Linseed oil
. It is used both for the production of quick-drying varnishes and drying oils, and as an independent impregnation with valuable qualities. Oil is a natural agent that gives the lining water-repellent properties and makes it insensitive to microorganisms. The oil penetrates deep into the material without creating a film on the surface and allows the wood to breathe. A surface impregnated with linseed oil reveals its texture more clearly and acquires a light tint. Impregnation with linseed oil, although relatively inexpensive, will cost more than treatment with stain or varnish.
- Drying oil
. There are natural, synthetic and combined drying oils. Every year they are used less and less - this is not the most attractive set of qualities: over time, the surface impregnated with drying oil turns yellow and becomes sticky.
- Primer
. Before using varnish or paint, the wooden surface is treated with a primer. This base protects the wood from moisture and reduces the consumption of paints and varnishes. The decorative layer is more even and attractive in appearance.
Using a primer improves the quality of the base coatSource dekoriko.ru
- Bleaches
. A group of products that allow you to get rid of stains of various natures that appear on wooden surfaces. Bleach is applied to the problem area and then washed off with water.
- Lucky
. The varnish has not only protective, but also decorative functions, which is why it is often chosen for treating lining walls and ceilings. One of the best options for indoor use is acrylic varnish. It is usually applied in two layers - the first is transparent, and the second can be tinted. Water-based varnish (aqualak) can create different effects - after using it, the walls become glossy, matte or semi-matte. Aqualak creates a vapor-permeable film on the lining, often with protection from ultraviolet radiation and microorganisms.
- Wax
. Wax mixtures are a classic product with effective protection. They give the wood a semi-matte shine and serve as a good alternative to varnish. Manufacturers offer hard wax (heat it up before use), as well as liquid and water-based wax (ready-to-use). The wax composition is difficult to distribute evenly, but preliminary application of the primer significantly facilitates this process.
Wax-polished lining is always in fashionSource opora-stroy.ru
About the need to process the lining
Many people sincerely believe that walls covered with wood panels are beautiful in their natural appearance and do not require additional processing. Knowledgeable people have several reasonable objections to this; they indicate the need to protect sheathed walls from the following factors:
- Actions of ultraviolet radiation . If a wall covered with clapboard is regularly exposed to sunlight, over time the wood will darken and the walls in the room will begin to look different.
- Color changes . If the ventilation system in the house is poor, the air begins to stagnate. In places of high humidity, microorganisms develop and wooden lining may turn blue.
- Damage to the structure . In a room with excess humidity, wood easily harbors pests and mold; this causes rotting and destruction of the finishing layer.
- Mechanical damage . A layer of paint and varnish will absorb scratches and impacts and will not spoil the beauty of the walls.
- From fire . It is considered reasonable and prudent to protect wooden surfaces from the rapid spread of flame.
Unprotected lining is an easy target for destructive factors. Source drewinwest.com
Sometimes owners think about changing the interior. Lining can be easily updated - there are dozens of coating options and hundreds of shades that make it possible to make familiar rooms unrecognizable.
There is no clear answer to the question of how to paint wooden panels inside a country house. The choice is determined by the goals - whether the owners only want to protect wooden walls, refresh tarnished surfaces or radically change the color. Materials suitable for processing lining can be divided into two types: protective and decorative.
How to properly paint the inside of the lining: technology
To paint lining in “dry” rooms inside the house, you can use any type of paint. Here you simply decide on the requirements for the decorative appearance of the surface. If the lining is dry, it can not be impregnated with protective compounds, or you can choose paint/varnish/wax with appropriate additives. You can paint it only on one side, leaving the back side untreated.
Paint each panel of the lining separately
If the lining will be used in damp or unheated rooms, on a balcony, it must first be thoroughly impregnated with protective compounds on all sides, maybe twice. Only after the impregnation has dried can it be painted, varnished, or, in general, given decorative properties. Another point: when installing the lining on a wall or ceiling, it has to be cut into pieces. Places of cuts in damp rooms must also be coated with the composition. It is not necessary to wait until it dries, but it is necessary to process it.
There is one very important nuance that many amateur decorators overlook. If you want to get a professional-level painting of the lining, you need to process each board separately: sand, paint, dry, and only then assemble the surface from the already painted lining. That is, mount already fully processed boards on the wall or ceiling. Only with this approach will the surface of the lining have the same color from any point.
It’s difficult to paint the entire surface of a clapboard wall well
If you paint an already assembled surface, unpainted areas remain in the grooves and recesses, making it difficult to sand large areas. You definitely won't get a perfectly flat surface. The quality of finishing in this option is not above average. It is permissible to paint a finished surface if you are renewing the paint job. This must be done at different intervals, depending on the operating conditions and the properties of the paintwork material.
Correctly, the painting technology looks like this.
- The lining is checked and sorted. All bent, bent or cracked boards are rejected. They can be used to test color, select color, number of layers, practice technique and painting sequence.
- Boards that have been sorted are sanded until completely smooth. It is most effective to work with a sanding machine, but you can also use a block with sandpaper attached to the surface. Sandpaper grit - 250-280. When grinding, circular movements pass through the face, tenon and groove. The back part of the lining can be left without treatment.
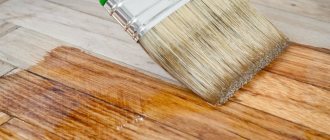
- Apply the composition with a roller or brush. Each type of coating has its own points and features - they are written on the can or in the accompanying instructions. In general, the rules are simple: take a little paint and apply it in single strokes along the entire length of the lining. Then rub thoroughly and shade until a uniform color is obtained.
- Having achieved uniform coloring, leave to dry.
- After drying, sand again if necessary. This step is often necessary when working with opaque paints and varnishes. The first layer of paintwork raises the pile of the wood, which is why it becomes rough in places. This pile is removed by repeated sanding.
- The second layer of paintwork is applied. Drying.
There can be many layers: it depends on the hiding power of the paint and on what effect you want to get. But in any case, one rule remains: there should be little composition on the brush. The exception is impregnation or primer. They are applied with a well-moistened brush, but only those without pigment. When applying pigmented protective compositions, the rules for paints apply - the minimum required amount of the composition is well shaded.
Sometimes, even with careful rubbing of the paint, stains are clearly visible. This is not a bad paint, but the properties of wood: in some places the pores absorb better, in others worse. In order to achieve an even color in this case, the surface is first primed. You can use any wood primer or colorless matte varnish (can be water-based). After drying, the surface is sanded (yep, again) and then the required number of layers of paint are applied. Only in this case, after the first layer of paintwork, grinding is rarely required, and if necessary, then in some places, more often on a tenon or groove.
Watch the video to see how to evenly apply glaze, oil or wax.
If furniture quality painting is required, there are even more layers: first a stain is applied, then two layers of primer. After drying, the surface is sanded until the surface is completely matte, first with grain 280, then 320, after removing the dust, a finishing layer is applied - varnish. An example of such work is in the video.
Secrets of decorative wood staining: techniques and tricks
City dwellers want to preserve the natural color of wood as much as possible. For those for whom wood in the house is a boring everyday thing, paint the interior lining in some unusual color. Modern paintwork materials allow you to achieve different effects. For example, textured or brushed lining, but in two colors. This technique is often used in loft style interiors.
Brushed lining in two colors is an excellent choice for decorating walls
The trick is to apply two layers of different colors. The first layer is a dark color, the second is a light or brighter color. After playing with colors and the order of their application, you can create your own version. Watch the video - how to get lining brushed in two colors.
Painting in two colors may not be the same. You can make the recesses a darker color, and only slightly tint the face (front part) or do everything exactly the opposite. The result is a striped wall made of clapboard - the effect of a slatted wall.
Painting rooms with a unique microclimate
How to paint the lining in the bathhouse? In addition to antiseptics and antipyrine, the wood is coated with water-based varnishes, which do not emit toxins and do not “melt” from high temperatures. These are water-based paints with high temperature resistance. In addition, the paint layer must be renewed every 2-3 years in order to provide maximum protection to the wood.
How to paint the lining in the kitchen? There are many more answers to this question. The main protective composition will be antipyrine, and water-based paint or colorless varnish (with the addition of color, if desired) is suitable as a coating. For the kitchen, the main features will be protection from harmful odors, open fire, and the ability to quickly clean the surface from grease and dirt.
Paint for the bathroom is alkyd and yacht varnish (especially if the walls and floor are covered with wood). The main task is to protect the wood from moisture, which means to minimize the likelihood of liquid getting between the joints of the lining.
The choice of paint and varnish materials for non-residential rooms is much larger. The dining room and living room can be covered with any type of lining. However, it is worth knowing a few characteristics of wood species.
Slats made of coniferous or soft wood should not be coated with oil paints. Coniferous pine oils will prevent the paint from being deeply absorbed. Soft breeds, on the contrary, will take more paint than needed, which means removing the used paint layer will become difficult.
Hardwoods do not take well to unnatural colors. In order to cover natural oak with red color and preserve its natural texture, you will need several layers of water-based paint with the addition of a large amount of dye.
Before painting any type, it is necessary to completely remove the previous layer - to do this, use chemical removers and a grinder with fine sandpaper. Removing oil paint is possible using a regular spatula - it “breaks off” with a little impact. If it is impossible to remove paint in this way without damaging it, you should place a piece of food foil on the area with paint and press it on top with a hot iron. The paint will come off and remain on the foil.
Additional recommendations
- To ensure uniform application, the selected composition should be carefully moved.
- Draw a test line across the panel. This is done in order to examine the color of the material and make sure that the tone matches the desired one.
- The lining is painted in a thin layer using a suitable brush.
- Chain-length gloves will be useful when alternating between cladding boards and elements made of metal.
- The primer must be tinted to match the paintwork.
- It is better to apply paint in warm weather, without high humidity and gusty winds. Exposure to high temperatures leads to rapid drying of the product, which in turn is an unfavorable factor for this type of work.
- To fully use the coating remaining in the jar, you will need a bent piece of iron, which will subsequently be used in the form of a scraper.
- You can slow down the drying of paint by placing thick paper on the surface and dousing it with drying oil.
- If a film has formed in the jar, then dip the brush through a piece of nylon.
Applying paint
To paint the lining, use a small or medium-sized paint brush and a spray gun (this device allows you to cover large areas in a short time, but is used only by professional builders). The first option is considered more popular when doing DIY painting due to the availability of tools. Work begins with painting hard-to-reach places. First, the composition is applied with a narrow brush, then with a wide one.
The dye is applied 2-3 times, allowing the solution to dry. Work on painting lining can be divided into several simple stages:
- thoroughly mixing the paint in the original container;
- pouring part of the dye into a small plastic container;
- dipping the brush into the composition for half the bristles;
- applying the painting tool to the panel, carefully moving along the surface along the boards.
All movements with the brush are performed in one direction, while it is necessary to slightly overlap the already painted areas. To process the finishing material at the joints, at the corner of the room, as well as in areas adjacent to window and door openings, use a narrow brush.
Each subsequent layer is applied after the previous one has dried. The last time the surface is covered from top to bottom with uniform light movements of the brush. When applying the finishing layer of aqualak, it is necessary to periodically stir the composition.
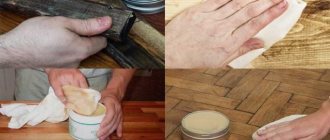
If you need to get a natural wood texture, you need to use wax, pigmented oil or glaze. Any of the compositions is applied along the entire length of the lining, then the strokes are shaded and the solution is left to soak in for 5-10 minutes. After the specified time, remove part of the dye with a lint-free cloth, which allows you to highlight the structure of the wood. A significant portion of the pigment remains in the grooves of the wood, while there is little dye in the protruding areas. At the final stage of work, after the layer has dried, the boards are coated with colorless varnish.
Photo ideas
Polar color - painting brushed wood in two layers - Exclusivewood.rf
11. We paint the lining with oil brushing with our own hands!
How to properly paint the inside of the lining: technology
To paint lining in “dry” rooms inside the house, you can use any type of paint. Here you simply decide on the requirements for the decorative appearance of the surface. If the lining is dry, it can not be impregnated with protective compounds, or you can choose paint/varnish/wax with appropriate additives. You can paint it only on one side, leaving the back side untreated.
Paint each panel of the lining separately
If the lining will be used in damp or unheated rooms, on a balcony, it must first be thoroughly impregnated with protective compounds on all sides, maybe twice. Only after the impregnation has dried can it be painted, varnished, or, in general, given decorative properties. Another point: when installing the lining on a wall or ceiling, it has to be cut into pieces. Places of cuts in damp rooms must also be coated with the composition. It is not necessary to wait until it dries, but it is necessary to process it.
There is one very important nuance that many amateur decorators overlook. If you want to get a professional-level painting of the lining, you need to process each board separately: sand, paint, dry, and only then assemble the surface from the already painted lining. That is, mount already fully processed boards on the wall or ceiling. Only with this approach will the surface of the lining have the same color from any point.
It’s difficult to paint the entire surface of a clapboard wall well
If you paint an already assembled surface, unpainted areas remain in the grooves and recesses, making it difficult to sand large areas. You definitely won't get a perfectly flat surface. The quality of finishing in this option is not above average. It is permissible to paint a finished surface if you are renewing the paint job. This must be done at different intervals, depending on the operating conditions and the properties of the paintwork material.
Correctly, the painting technology looks like this.
- The lining is checked and sorted. All bent, bent or cracked boards are rejected. They can be used to test color, select color, number of layers, practice technique and painting sequence.
- Boards that have been sorted are sanded until completely smooth. It is most effective to work with a sanding machine, but you can also use a block with sandpaper attached to the surface. Sandpaper grit - 250-280. When grinding, circular movements pass through the face, tenon and groove. The back part of the lining can be left without treatment. It is more convenient to work with a grinding machine
- Apply the composition with a roller or brush. Each type of coating has its own points and features - they are written on the can or in the accompanying instructions. In general, the rules are simple: take a little paint and apply it in single strokes along the entire length of the lining. Then rub thoroughly and shade until a uniform color is obtained.
- Having achieved uniform coloring, leave to dry.
- After drying, sand again if necessary. This step is often necessary when working with opaque paints and varnishes. The first layer of paintwork raises the pile of the wood, which is why it becomes rough in places. This pile is removed by repeated sanding.
- The second layer of paintwork is applied. Drying.
There can be many layers: it depends on the hiding power of the paint and on what effect you want to get. But in any case, one rule remains: there should be little composition on the brush. The exception is impregnation or primer. They are applied with a well-moistened brush, but only those without pigment. When applying pigmented protective compositions, the rules for paints apply - the minimum required amount of the composition is well shaded.
Sometimes, even with careful rubbing of the paint, stains are clearly visible. This is not a bad paint, but the properties of wood: in some places the pores absorb better, in others worse. In order to achieve an even color in this case, the surface is first primed. You can use any wood primer or colorless matte varnish (can be water-based). After drying, the surface is sanded (yep, again) and then the required number of layers of paint are applied. Only in this case, after the first layer of paintwork, grinding is rarely required, and if necessary, then in some places, more often on a tenon or groove.
Watch the video to see how to evenly apply glaze, oil or wax.
If furniture quality painting is required, there are even more layers: first a stain is applied, then two layers of primer. After drying, the surface is sanded until the surface is completely matte, first with grain 280, then 320, after removing the dust, a finishing layer is applied - varnish. An example of such work is in the video.
Methods for painting lining
Before choosing a painting method, you need to learn about the rules for performing work, without which it will not be possible to achieve high quality surface finishing. The main point is the timing of the work. The lining is painted no earlier than 3 days after the last rain. During this time, the wood will be able to dry completely.
The air temperature must be positive. The limits recommended by paint manufacturers are +5°С – +20°С. It is also important to consider the time of day. It is best to start coloring at 10-11 am. By this time, the lining will be completely dry from the morning dew.
Selection of necessary materials
Oil-wax impregnations to match the color of any wood
The choice of product depends on the expectation of the final result. New wall decoration is treated with protective compounds to prevent fire, discoloration, and destruction. Paint and varnish compositions are used to change the color of walls, to hide the repair of cracks, chips, and knots.
There are preparations for a more vivid expression of the wood-fiber structure. Rosewood, larch, walnut, Karelian birch have an original pattern that needs to be preserved and enhanced. They use glaze, wax, pigmented drying oils, oils, and various varnishes. As a result, the fibrous pattern becomes brighter than in the raw form; a larger volume of pigment accumulates in the grooves of the texture, but not on the protruding parts. The technique is called texturing or brushing the lining. Wood painted this way looks attractive on the ceiling and vertical surfaces.
For humid operating conditions in unheated rooms, on verandas, terraces, treatment with agents to increase moisture resistance is required. Only after this is varnished, painted or decorated using certain techniques. Some types of wood require re-application of a preservative.
Protective compounds
Coating the lining with an antiseptic
Products are divided into impregnations for internal and external use. External compositions have a wider range of protective characteristics, include chemical components harmful to the body, and are more expensive, so there is no point in using them indoors.
Types of protective equipment:
- Oils for wooden surfaces. They are produced completely transparent or with pigment. The product does not create a film on wood, but is absorbed into the fibrous structures. The composition protects against the absorption of dirt and abrasion. The result is a matte surface without pronounced gloss; the layer simultaneously protects and emphasizes the design.
- Wax compounds. Available in solid, liquid and water-based forms. The last two types are ready for use, and the solid form is heated to soften before use. Wax protection is considered the most effective against moisture absorption, dampness and microorganisms. The downside is that you have to work hard to apply an even layer.
- Antiseptics for wood. Before painting the lining inside the house, in the country, you need to use impregnation to improve the positive characteristics of the wooden cladding. Preparations for treatment are oil-based (exterior work), fire retardants (fire protection), water-soluble impregnations against fungal damage.
Antiseptic preparations based on organic solvents form a durable, high-density film on the boards with a long service life. They produce combined versions that simultaneously protect against moisture, combustion, microorganisms, and burnout.
How to cover the lining
In total, there are six types of wood protection products.
Products with a protective effect: such compositions are also divided into two groups (for external and internal painting) and their tasks include:
- Protecting the material from sunlight;
- Preventing wood aging;
- Direct coloring.
Stains with tinting effect
Such products do not completely hide the texture of the wood, but rather, on the contrary, with the help of an additional shade they give the surface some depth.
- This, in turn, looks quite attractive.
- Such compositions contain weakly and highly pigmented particles.
- Therefore, if you want to leave the texture of the wood at its most pronounced, choose stains or tinting compounds with weak pigments.
Varnish
The most popular varnishing compositions are considered to be aqualacs.
- They can give the surface a matte, semi-matte effect or a glossy sheen.
- In addition, there are tinting varnishes, that is, those that change color.
- They are not able to make the tree vapor-tight, but they are able to protect against dust particles and small pests.
Dye
The coloring composition forms a dense film on the surface of the material. It hides the structure inherent in wood.
Oils
Here, too, a distinction is made between pigmenting and colorless oils. They are perfectly absorbed into wood fibers and perform the same functions as varnishes. Oils give the surface a matte effect. The wood becomes silky to the touch.
Wax protection: There are three main types of wax used:
- In solid state;
- In liquid;
- In watery.
Hard wax must be heated before use. This type of protection is, in principle, completely traditional. However, the disadvantage of using wax is that for uniform application the surface must be primed in advance.