Do you want to please your daughter and give her a doll house? Read how to make a house for Barbie, Monster High with your own hands from cardboard, plywood and MDF.
What girl doesn’t love dolls and doesn’t dream that they have a real house with spacious rooms and furniture? Such a toy will not only entertain the baby, but will also make her director's play more complex and varied. As you know, while playing, children learn and develop, and parents must make an effort to organize the conditions for this development.
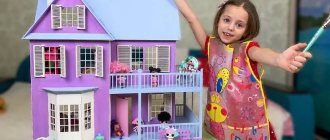
Do-it-yourself dollhouse for Barbie: diagram, photo
Of course, there are simpler options for making a doll house for your daughter:
- Buy ready. But they cost exorbitant amounts of money. At the same time, the plastic parts turn out to be fragile, they are poorly attached to each other, and the house constantly falls apart.
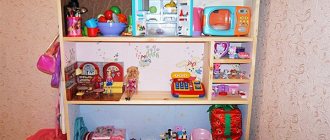
- Organize your home in a closet, nightstand or bookcase. Probably, my parents did this themselves in their early childhood. The good thing about this option is that, firstly, there is no need to spend extra money, and secondly, the child will learn to use substitute objects in the game. The downside is that sooner or later the daughter will say that the house is not real, she will want to have something more believable, with wallpaper, windows, etc.
Then mom and dad will have to decide how to make this toy themselves. First of all, decide on the sizes. If the house is intended for a doll like Barbie or Monster High, it will turn out to be oversized. The height of each room will be at least 30 cm, the width, so that you can put a doll bed in the house, 40 cm or more. For baby dolls and toys-figurines, you can make a more compact “housing”.
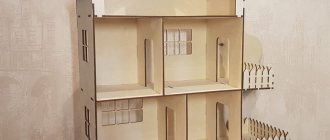
DIY plywood house for Barbie.
IMPORTANT: In practice, a doll's house takes up space as a full-fledged piece of furniture. Having decided to make one, you need to think about where it will stand in the room.
The next stage is the selection of materials. As a rule, dollhouses are made from:
- Cardboard boxes and cardboard. This is a budget option; you don’t need to spend a lot on purchasing materials. Also, you don’t need to think about what kind of fastenings to assemble the house with; you only need any glue and adhesive tape. The big disadvantage of the house is that it is fragile, hygroscopic, and gets dirty easily. You cannot place heavy furniture on thin shelves. A cardboard doll house is not suitable for small children who do not know how to calculate strength during play.
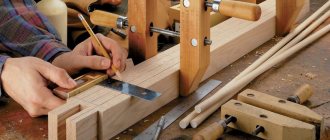
- Plywood. A more practical and also cheaper option. A sheet of plywood is applied to parts for a toy house with your own hands using an ordinary jigsaw. The toy turns out better. But porous plywood must be painted or glued so that it does not absorb dust and moisture, does not swell, and fungus does not grow in it. Another disadvantage of this material is that thin sheets of plywood are not easy to connect together so that they hold tightly and the house does not fall apart.
- Wood, MDF. The most practical and expensive option. The house will be of very high quality and durable, stable and safe. It will not fall apart, even if a child hangs on it with all his weight. MDF is easy to process, the structural elements are firmly connected to each other with self-tapping screws, and their caps can be recessed into the thickness of the material. MDF gives absolute freedom to house decor ideas.
An interesting dollhouse made of cardboard with lighting.
IMPORTANT: You need to remember that a child will play with the house, and, most likely, this large toy will be in the children's room. Materials for it must be hygienic, environmentally friendly, hypoallergenic, and non-toxic. If after priming or painting the house emits an odor, you need to let it air out.
Beautiful homemade doll house.
Although the house is intended for children from 3 years old, that is, the age at which the director’s play has already been formed, you need to pay attention to the presence of small parts in it that can cause choking. Before you start purchasing materials for a dollhouse and directly move on to assembling it, you need to make a plan or diagram. It will help you calculate how much material you will need to buy. The parts will correspond to each other, they will be firmly connected. A stable and beautiful house for toys will delight the child and will not spoil the interior of the apartment.
Scheme of a doll house with dimensions.
Fundamental rules of construction
Without exception, all doll houses are built according to the same canons. They should be constantly kept in mind in order to make a comfortable and aesthetically impeccable toy that can please the child with many pleasant emotions and give parents a reason to be proud.
One of these rules suggests abandoning the idea of equipping the building with a permanent façade. Otherwise, children will have to place dolls and animals through windows and doors with two fingers, tweezers or laundry tongs.
In a number of cases, the facade wall can be equipped with latches or hinges, allowing it to be installed or removed if necessary.
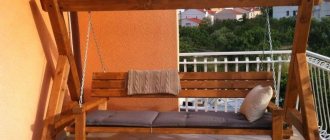
An excellent replacement can be a light tulle curtain, which will effectively protect the house from room dust, drops of tea and cookie crumbs.
How to make a dollhouse from a box?
The girl is really asking for a dollhouse, have you decided to urgently and cheaply make it out of cardboard boxes? Well, then you will need:
- the actual boxes (according to the number of rooms, from 2 to 6 pieces)
- thick cardboard
- scissors
- stationery knife
- ruler
- PVA glue or any other for paper
- paints, colored paper, self-adhesive wallpaper, kitchen oilcloth, corrugated paper, ribbons, braid, bows, other available materials for house decor
IMPORTANT: Any boxes will do, as long as they are the right size and thick enough. For dolls the size of Barbie (29 cm or 31 cm, scale 1:6) or Monster High (26 -28 cm), the most common ones to take are drawers from under household appliances.
A beautiful home for toys made from boxes.
- The boxes are stacked on two floors of two rooms. On the second floor you can also arrange one room and a veranda.
- The boxes are fixed with glue and adhesive tape. To ensure that the parts stick well, use a press made of ordinary clothespins.
- The roof of the house can be made from a box, cut in half diagonally, or cut out from sheets of cardboard.
- Windows are measured, drawn and cut out in the side walls with a utility knife.
- The interior decor of the house is being completed. Ceilings, floors and walls are covered with colored paper, remnants of wallpaper, self-adhesive or oilcloth. You can also make cornices, window sills, baseboards, and other surroundings from available materials.
House for a doll from boxes: tools and materials.
House for a doll from boxes: stages of production.
Self-production
Here are a few arguments in favor of making your own dollhouse:
- Saving. Store-bought or custom-made dollhouses cost a lot of money. Doing it yourself will save you a certain amount.
- Individuality and uniqueness.
- The ability to create a house of the required size and shape.
- Develop design qualities and creativity by designing the interior decoration of rooms.
- Have a nice time with your child. After all, joint activities strengthen family relationships.
How to make a doll house with your own hands from cardboard?
Parts for a doll house can be cut out of thick cardboard, perhaps all from the same boxes of household appliances. Here you definitely need a drawing, for example, like this:
Cardboard house diagram for Barbie.
This house will look like this.
You will need:
- cardboard
- scheme
- pencil and ruler
- glue, tape, electrical tape
- stationery knife
- paints, felt-tip pens, old wallpaper, oilcloth, corrugated paper for decorating the interior and exterior of a house
Three-story toy house made of cardboard.
- The drawing is drawn or found on the Internet and printed. The details of the house are cut out.
- Make markings on cardboard. It is better to cut cardboard parts not with scissors, but with a knife, then their edges will be smooth.
- Sections that will not join together can be trimmed with tape or tape.
- The cut out parts of the house are assembled into grooves or glued together.
- Create the interior decoration of the house. If mom and dad are creative, they can paint the house by hand.
A simple cardboard house. Cardboard house for toys.
Cardboard house.
A house made of cardboard, assembled into grooves.
Cardboard house for small toys with a drawing.
Drawing of a plywood dollhouse with dimensions
Making houses out of plywood is no longer so easy. Most likely, mom can’t cope alone. You need to attract dad, the little princess will definitely thank him for the unique toy with her incomparable happy smile. To make a house for Barbie prepare:
- plywood
- jigsaw
- hammer
- sandpaper
- wood glue or PVA
- masking tape
- nails
- wood primer, paint
- scissors, pencil, ruler
- materials for house interior decoration
Drawing of a dollhouse made of plywood.
Assembly diagram for a plywood dollhouse.
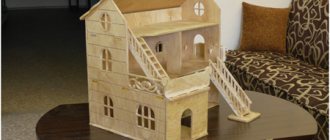
The final version of assembling a dollhouse from plywood.
- The details of the house are very carefully cut out of plywood. They must correspond exactly to the drawing. Window and door openings are also cut out, if provided. Windows can be made rectangular, round or triangular.
- All plywood parts are carefully sanded with sandpaper to prevent the child from driving in a splinter while playing.
- The parts of the house are connected using construction glue, PVA glue or nailed together. It is necessary to make a reservation: a glue gun with silicone will not hold plywood.
- Prime and paint the plywood.
- They think over and create the interior of a dollhouse. The walls in the rooms can be hand-painted, painted in one color, decorated with leftover wallpaper or wrapping paper.
- The floor is also painted, pieces of carpet are laid on it, etc. It is recommended to make a staircase to a two-story house for dolls from wooden rulers cut to size.
- Any furniture for a plywood house will be available - purchased specifically for dolls in toy stores, made with your own hands from cardboard, the same plywood, or improvised means.
Making a house for Barbie from plywood: stage 1.
Making a house for Barbie from plywood: stage 2.
Making a house for Barbie from plywood: stage 3.
Making a house for Barbie from plywood: the back side.
Making a house for Barbie from plywood: rooms.
Features of product decoration
Paint the dollhouse with environmentally friendly paint, such as acrylic. You can get a bright, rich or soft, pastel shade by adding tinting paste to the base composition.
Material for painting plywood
After the house is assembled, you can begin to decorate the interior walls, floors, and arrange plywood doll furniture.
Internal filling of the dollhouse
To make the structure more realistic, it is electrified using autonomous lamps powered by batteries, which are secured with double-sided tape.
Autonomous lamps
Do-it-yourself wooden doll house: drawings and dimensions
A girl from 3 to 10-12 years old will play with a dollhouse. This toy, if it is beautiful and of high quality, will stand in the house for many years, constantly delighting the baby and surprising guests. It is definitely worth the effort and investment. Therefore, the best option would be to make it from MDF.
- At the first stage of work, the design of the house is thought out. You need to decide on the size, number of rooms, their shape, and roof configuration. A universal solution is a two-story house with 4 rooms with a pitched roof and an attic.
- For such a house you need the main parts: a back wall, two side walls, two planks for the ceilings of the first and second floors, two vertical lintels between rooms, a plank for the roof slope. It is better to order cutting of these parts from a furniture or carpentry workshop. MDF of the same thickness is used for all of them. Or you can make the back wall and sides, that is, the load-bearing parts of the structure, thicker, and the rest, the auxiliary ones, thinner.
- Window openings are cut in the side walls, and, if desired, in the back walls.
- It is better to order window frames laser cut, then they will turn out perfectly smooth and already trimmed. MDF is a heavy material; glue or ordinary screws will not take it. The parts of the house are connected with self-tapping screws. The caps are sunk into the material and then masked with shavings and glue or polymer clay.
- The attic with a round window looks beautiful on the roof. It is also better to order it laser cut. The plywood attic is attached to the roof of the house using glue.
- To imitate tiles and beautifully decorate the roof, buy thin bamboo roller blinds, cut them to the size of the slope and glue them onto it. The attic is decorated in the same way. If the roller blinds are on one thread, they may fall apart when cut. Then they need to be pre-glued with regular PVA.
- It is convenient to mount the roof of the house on hinges so that it can open. In the “attic” it will then be possible to store the dolls and their dowry.
- Window frames are placed in the openings.
- Next, we move on to decorating the walls. The simplest thing is to prime them and paint them one color. You can also make an imitation of brickwork. The bricks are first marked with a pencil, then cut out with a wood router. MDF is primed and painted in the desired color. After the soil has dried, the recesses between the bricks are marked out using a simple pencil or marker. To make the masonry look natural, the heterogeneity of color is created using crayons.
- “Bricks” of different sizes are cut out of porous egg trays and glued around the windows.
- The exterior decor of the house is completed with artificial small flowers. They are glued at the base of the side walls, on the roof and attic.
- The ceilings and floors of the house are painted in the desired colors.
- The Barbie doll is a conventional model of a person 1 to 6, respectively, and her house. Scraps of old wallpaper or gift paper will look rough in it. A good solution is for everyone to find wallpaper with a design they like on the Internet, reduce it proportionally in a photo editor and print it in a printing house. It is important to choose good paper. A regular Xerox machine will soon be worn out, glue may appear on it, or it will wrinkle during pasting. Photo paper may not adhere well. Wallpaper is glued using PVA.
Blanks for a dollhouse made of MDF.
Window markings.
Assembled house frame.
Laser cut window frames.
Round attic window.
Attic on the roof.
Design of window openings and imitation brick.
Wallpaper 1:6 in a children's doll's room.
House interior decoration.
Finished roof with imitation tiles and flowers.
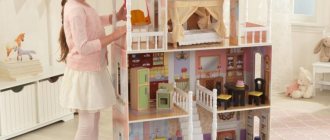
The girl will play in such a house for hours.
IMPORTANT: The girl will play in the Barbie house for a long time. To make it more comfortable for her, it is better to make it on a leg. The raised design above the floor also makes the toy easier to clean.
Material selection
Any sheet material is suitable for making a dollhouse.
| Material | Description |
| Cardboard is the most accessible and cheapest of them, but at the same time the most fragile. For “construction”, multi-layer corrugated cardboard from boxes or thick cardboard for scrapbooking is best suited. The parts are connected with glue, tape, masking tape or a stapler. To strengthen the structure, you can glue several identical blanks into one, or first make a frame from wooden slats and then line it with cardboard. |
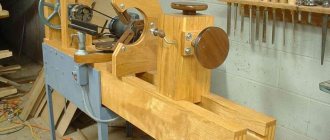
| Plywood is the most suitable sheet material for this purpose. It is durable, not very expensive, harmless, easy to process and lends itself to various types of finishing. It is connected with nails, self-tapping screws, furniture confirmations, and also glued with carpentry or universal glue. To cut a sheet into parts you need a jigsaw or a hacksaw, and to process the cuts you need a grinding machine or abrasive paper. |
| A controversial material with one great advantage and several disadvantages. Its advantage is the ready-made finishing of surfaces, which can have different colors and textures. Construction stores also sell already edged panels of different sizes, from which you can design a house without cutting blanks or order cutting and gluing of the edges right there; at home, all that remains is to assemble the structure using furniture fittings. The disadvantages include heavy weight, fragility and the presence of toxic substances - formaldehyde. |
| OSB is an analogue of plywood in terms of properties, processing and assembly methods. But it looks rather unpresentable, so it requires mandatory external finishing. |
| Wood – solid wood or glued furniture board. The most environmentally friendly material of all, but not the cheapest. Easily processed, glued, twisted. Wooden parts can be decorated with carving or burning. |
Also, other materials can be used in the construction of the dollhouse. For example, the back wall or roof can be made of plastic panels or fiberboard, and the ceilings can be made of laminate or wooden lining.
Fiberboard
In a word, if after renovation there are a lot of different scraps left in the house, you can use them to assemble an excellent house for dolls, spending a minimum of money.
How to make a doll house for monster high with your own hands?
Moms and dads have mixed feelings about Monster High dolls. Some people can’t stand them and consider them crippling to the child’s psyche. Others are inclined to think that stylish monsters stimulate a child’s cognitive interest in myths and legends, and also raise his self-esteem. Be that as it may, girls love monster dolls. And at some point, the daughter may ask her parents to make her a house for them.
House for Monster High from whatnot.
IMPORTANT: The dimensions and design of the Monster High house are different from what is intended for Barbie. But you will have to tinker with the finishing.
- Before you decorate a house for monsters, you should learn more about the Gothic style.
- Monster High likes an interesting color palette: they combine gloomy black with rich pink, fuchsia, neon yellow and green. The same combination of colors should be used in the interior of the doll house.
- You need to think about how to play up the glitter and black lace. There should be gold and silver in the monsters' rooms.
- The interior of the Monster High doll house is also complemented by elements that imitate artistic forging: chandeliers, candelabra, fireplace grates, stair railings.
- Monster High symbols are used in the interior and exterior of the house.
House with Monster High symbols.
Interior in the Monster High house.
House - panorama for Monster High dolls.
How to make light in a dollhouse?
A toy house will look just like a real one if you make light in it. Thanks to master classes on the Internet, you don't need to be an electrician for everything to work.
Lighting in a doll's house.
Typically, lighting for doll rooms is done:
- from Christmas garland
- from flashlights
- from LEDs
The lighting can be powered from a general network or from batteries.
Light bulb in a doll's house.
Wiring in a doll house.
Doll house lighting diagram.
conclusions
Making and decorating a dollhouse yourself, from creating a diagram to finishing it, is quite a labor-intensive but exciting activity.
The child will undoubtedly be proud of his father, who can make a house for his child. After all, such an original toy will delight you for many years.