Rafter legs are responsible for the integrity of the roof, so the quality of the material and its resistance to loads and bending resistance are important indicators when installing roofs. Splicing rafters along the length should not affect the strength of the structure. Let's figure out how to do this correctly, consider the types of wood from which rafters are made, and show how to calculate their length.
Rafter system Source www.stroimdom.com.ua
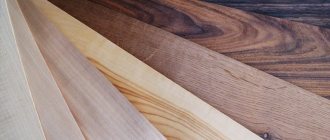
Types of wood for roofing
For rafter installation, depending on the purpose of the object, the following types of lumber are used:
- Clean-edged timber, two-edged and four-edged.
- Edged board.
Coniferous wood, for example, larch and pine, is most often used in the construction of rafter systems. It has sufficient strength, is easy to process and resists rotting. Before laying on the roof, the material is treated with a special impregnation.
A standard board is 6 meters long, a beam is 3 meters long.
Defects affecting the quality of lumber:
- Knots – technical conditions regulate the number of knots in the board, which does not affect the strength of the structure.
- Wane - for rafter structures it is completely cut off.
- Cracks - occur from improper drying or cracking in the cold. This material is not suitable for roof installation.
- Rot and fungus - from improper storage in damp conditions - are rejected.
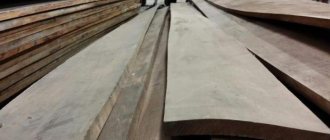
The edged board must be free of defects Source yandex.net
Having chosen the right lumber, we begin measuring and splicing the rafters.
Connecting boards together in width and length. Basic workflow requirements
Sometimes, when carrying out construction and other work using wood, it is necessary to make elements longer or wider, but very few people know how to do this correctly.
That is why we will look at how to splice boards yourself and what methods and techniques exist. It is important to choose the option that is best suited in a given situation and requires minimal investment of time and money. In the photo: microspike joints are widely used by manufacturers of various wood products
Basic workflow requirements
Before we begin to consider specific options for carrying out work, it is necessary to understand what factors will ensure that we obtain the expected result:
| Material quality | Everything is simple here: it is impossible to make durable structures from low-quality wood, especially with regard to joints; if they have knots, damage from woodworms, mold and other problems, then there can be no question of any reliability and durability. Select the best elements so as not to waste effort and money |
| Humidity | Another most important parameter that should always be taken into account. Only dry elements are suitable for work, since high humidity, firstly, reduces strength, secondly, reduces the adhesion of the adhesive composition when using it, and thirdly, after completion of the work, no one will guarantee that in a week or month the structure it won't move or it won't crack |
| Connection Loads | The choice of one or another connection option largely depends on this indicator; the greater the load, the higher the requirements for the quality of the connection and the more complex the process. Therefore, decide in advance which option will be used to ensure a good result. |
| Using a quality tool | A lot also depends on this, especially when it comes to complex options when the connection is cut with special devices. They must ensure maximum cutting quality and maximum joining accuracy, since reliability largely depends on this |
Important! Remember one simple rule that experts always use: to get the best result, the parameters of the elements being joined must be similar; in other words, the same type of wood must be used.
The simplest example of structures where width jointing is used is a tongue-and-groove floorboard
Work options
All events of this kind can be divided into two large groups - joining boards in width and length; we will consider them separately and tell you which techniques are the most popular and how to implement them correctly.
Width connection
Of course, the simplest solution would be a panel splice option, so we will start with it, first present a diagram of the main options, and below we will describe them in detail:
These are the main types of work, if you can use the panel connection option
- The first method involves cutting out a cavity using a milling machine, which has a trapezoidal shape and allows the key to be used as a retainer. The advantage of this solution can be called reliability, and the disadvantage is the need for a milling machine or the presence of a manual milling cutter to carry out the work; you can’t get by with hand tools here;
- Joining using an end block, which is connected to the ends of the board using the tongue-and-groove method, is used for elements of short length, since this option ensures high reliability of small structures. To work, you will again need a router for wooden products. With its help, it will be carried out quickly and efficiently;
- You can make a cutout along the end, fit a strip under it and place it on wood glue, this is also a rather interesting option that is suitable for small-sized structures;
- The last two options involve gluing a triangular strip, only one of them cuts into the end, and the second option involves cutting the end at an angle, you need to choose what is best suited in a given situation.
But if you want to connect the board more securely, then one of the following methods will do:
These options have proven to be the best
- The first option is called a smooth joint, which requires very careful grinding of the ends for a tight fit, after which they are lubricated with glue and connected under a press or using special ties. This solution is suitable in cases where high load-bearing capacity is not needed;
Smooth joints are often used in the manufacture of furniture panels
- The second solution is quarter splicing, for this purpose grooves of approximately half the thickness are selected at the ends, this option is more labor-intensive, but its reliability is noticeably higher than that of the previous one, the instructions for carrying out the work are simple: grooves are selected using a router, after which the ends are lubricated with glue , and the structure is tightly compressed until the composition dries;
This is what the connection looks like in the diagram
- You can cut grooves on both sides and insert a strip inside, which is again lubricated with glue for reliability. This solution has proven itself well on elements of large thickness, since in this case the thickness of the wooden slats will be significant, therefore, it will be able to withstand even heavy loads without any problems. Accurate fit of all elements is important, so milling equipment is used for the work;
Example of a keyed connection
- The tongue-and-groove connection is well known to many from floorboards and finishing materials made of wood; here it is important to cut the connection correctly so that the elements fit together as accurately and tightly as possible; a separate option is the triangular tongue-and-groove, it differs in that one end is made in the shape of an angle, and the second has a recess in the shape of a protrusion;
- The last of the options being considered is a dovetail; this type assumes the presence of a groove that expands in depth; due to this feature, the boards are inserted from the end and slide as if on a slide; they cannot be separated without applying significant force, which is also important.
Length connection
Splicing boards along the length is also used quite often when carrying out work, so we will also pay close attention to this aspect.
- The simplest is overlapping fastening, when the ends are placed on top of each other and twisted with self-tapping screws, knocked down with nails or screwed together. The design is not very attractive, but you can do it yourself in a matter of minutes;
The fastest way to get the job done
- The second solution is joining into a so-called mini-tenon, this is a very durable and reliable option, but to carry out the work you will need a special cutter, the price of which is high, so this method is chosen by those who have to splice elements frequently;
With this cutter, connections are made very quickly.
- If the elements are connected along the length not in one, but in two or more layers, then you can use the end-to-end option, such a connection of boards along the length is well suited for multi-layer systems, in the figure it is under the letter A;
Some ways to connect along the length
- The traditional tongue-and-groove option is often used, here it is important to ensure the optimal configuration of the connection, so the width of the groove and, accordingly, the tongue should not be more than a third of the total thickness of the board, it is important to do the cutting very accurately so that the elements match perfectly, this will significantly increase the strength of the connection;
Important! When working, a milling cutter is most often used, but cutters can have different configurations; you should monitor the condition of their cutting edges and sharpen or replace them in a timely manner, since the quality of the connection largely depends on the cleanliness of the processing.
- You can use the option of cutting at an angle; it is well suited where special strength is not required, but elements that can be used for finishing, etc. need to be well connected;
- The triangular tongue and groove is in many ways similar to a regular one, only the configuration of the ends differs. It is also important here that the elements fit perfectly together, as this will ensure both the accuracy of the pairing and its maximum reliability;
- The quarter connection is simple - cuts are made at half the thickness, the length of the protrusions should not greatly exceed the thickness, the elements are lubricated with glue and compressed until the composition dries, this is a standard procedure for almost all options;
- The last type is keyed joining, it does not differ from the option described above when carrying out work along the width, the requirements are the same.
Conclusion
Connecting the board correctly and securely means ensuring its maximum strength; it is important to follow all recommendations and use only high-quality materials. The video in this article will show some options for carrying out the work visually, and if you have questions or additions, please leave a comment.
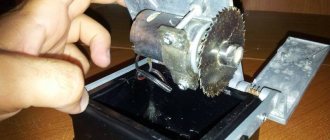
Getting a smooth, straight edge is not difficult using a jointer, see fig. 5. The jointer removes one amount of chips and you do not have to adjust the fence with each pass. Slowly feed the workpiece to the cutting head, taking into account the direction of the wood structure, see fig. 5a. After passing, you will get a straight and even edge ready for gluing.
Calculation of rafter sizes by length and cross-section for the correct selection of lumber
At the design stage, the rafter system considers the options for lumber and the layout of their arrangement in the rafter structure. Further work on laying insulation, insulation and roofing depends on correct calculations. Resistance to loads during operation of the facility, resistance to atmospheric changes and tectonic influence also play a significant role. Therefore, the calculations and selection of high-quality lumber are approached very responsibly.
To calculate the required length of the rafters, determine the angle of inclination of the roof slope and calculate the height of the roof. The small size of the house will allow the use of solid boards and timber to create a rafter structure. With a wider bevel in a large structure, the length of the lumber may not be enough. Then they use splicing of two pieces of wood to make a rafter leg of the appropriate size with a small margin.
Calculation formula for calculating the length of rafters Source orchardo.ru
The size of the span between the ridge of the house and the top of the wall corresponds to the length of the rafter. The cross-section of the beam is determined based on the size of the loads and the distance between two adjacent rafter legs.
The load on the elements is created by the weight of the roof, for example, made of ceramic tiles or asbestos-cement slate. Such materials require an increased cross-section of the timber.
Example:
- The length of the beam is 6 meters.
- The end section is 10X20 cm.
- The distance between adjacent bars is 140 centimeters.
Laying out the blanks
After selecting the blanks, arrange them in the form in which they will be located in the array. Try mixing the pieces by changing places and turning them over. Select wood grain patterns so that they match each other as closely as possible. This will make the array look more beautiful. So, the curved structure must be next to the curved structure of another workpiece. And a straight line is a straight line.
To make sure there are no surprises, assemble the panel dry before gluing. When preparing the glue, make sure it has good viscosity.
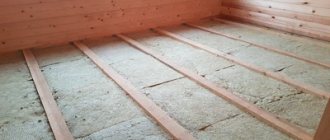
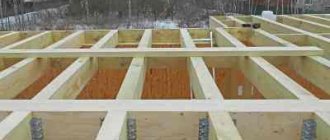
Scheme of the truss structure
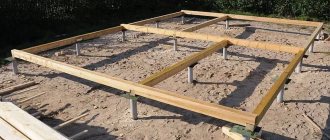
Along the perimeter of the wall, a mauerlat is laid - a beam, which takes on part of the load-bearing function, evenly distributing it onto the load-bearing walls. The bases of all structural elements will be placed on it.
Purlins are laid across the building; the same purlins will serve as support for the rafter legs in the middle of the structure.
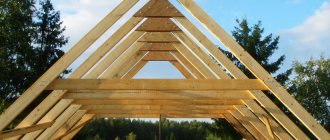
They raise trusses, pre-installed on the ground, that will hold the ridge and attach them to the mauerlat.
They install supports for the ridge, lay the ridge and attach diagonal, intermediate rafters to it.
Strengthen the structure with the help of struts, supports and crossbars.
Racks for rafters Source domdkm.ru
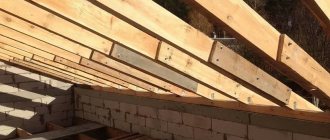
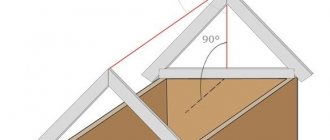
Rafters are laid on the structure, taking into account the design distance between the individual beams. The ends of the legs rest against the mauerlat, and the top is sawed off and connected with metal fasteners at the beveled corners. Waterproofing, insulation and roofing are laid on the finished base.
The correct location and methods of connecting the beams guarantee stability when laying insulation and roofing. Further operation of the facility largely depends on accurate design and correctly selected lumber.
It is preferable to lay spliced rafters when installing steep roof slopes, where atmospheric loads are several times lower than on flat slopes. Flat slopes in winter are loaded under the influence of snow, which puts pressure on the lumber under the roof.
STICKING.
There is no need to take risks when gluing, at this point a lot of time and energy has been invested in selecting and preparing the splice boards for the solid. So, to make sure there are no surprises, assemble the panel dry before gluing. When preparing the glue, make sure it has good viscosity. APPLYING GLUE. Some craftsmen apply glue only to one edge of each board. This is quick, but not practical, applying glue to two edges will remove air during gluing and fill all the pores. Note: If the coated surface does not look glossy, then the glue has been absorbed into the wood and needs to be added. REMOVING EXCESS GLUE. Many people suggest removing excess glue with a damp cloth. Do not rush to do this; removing the glue will open the joining seam in the bars and break the seal at the joint. Leave the panel for several hours or even overnight, by which time the glue will dry and can be scraped off.
SCREAD.
When assembling the array, I use clamps from 3/4″ pipe to level, apply pressure and prevent the formation of a cup, see fig. 7. Note: Metal pipes may leave a rusty stain on the wood. Add duct tape spacers under each clamp to prevent this from happening.
ALIGN THE PANEL.
There are two ways to level the panel. If in the middle of the array the joint of the board bulges upward, take a hammer and a wooden spacer, lightly tap the hammer through the spacer on the array, see fig. 8. The boards are heaving downwards, place spacer bars along the edges of the array and clamp them together with the panel with clamps, see fig. 9. (Note: Be sure to use wooden spacers under the clamps to prevent the clamps from leaving dents.)
UNIFORM PRESSURE.
Once the boards are assembled into a panel and level, tighten the clamps until tiny beads of glue appear along each joint line. The clamps should be tight, but most importantly, equalize the pressure of the clamps along the line. Make sure that the pressure on the panel is uniform, look at the drops of glue, if the pressure is uneven, add or remove clamps.
Design features of splicing rafter legs
The rafter leg is the distance from the top level of the wall of the building to the ridge of the roof. If overhanging rafters are provided, the length of the board or beam should be increased to the specified length.
Table of length and thickness of rafter legs Source postroyka-dom.com
By connecting pieces of plank, the required size of rafter legs is achieved. It is taken into account that the connection node behaves like a bending hinge, so the joint should be located in an area where there will be no bending stress. The calculated location of the joint near a support, crossbar or other element that relieves the load. The beam must have a sufficient margin of rigidity along its entire length.
Additional support is provided between the Mauerlat and the ridge. The connection distance from the support is 1/6 of the length of the entire board. Adhering to the specified parameters, they ensure uniform rigidity on the supports.
Hip and half-hip roofs with diagonal rafters are mounted from longer and stronger timber, which serves as a support for short roofs. You cannot splice splices, only solid timber.
Rafters are increased in length in several ways, which are used taking into account the construction features and the need for load resistance.
Splicing methods:
- Direct docking - on short slopes;
- Oblique cut - for timber;
- Overlapping - suitable for boards;
- Double splice - board only.
Joining with an oblique cut Source build-experts.ru
See also: Popular designs of houses with a gable roof and an attic.
For work, a miter box is used that ensures precise cutting at a given angle.
Direct docking
The method allows you to build up an element of any length using different overlays. Parts of the overlays can be removed from disassembled formwork, trimming lumber or remnants of laid rafters. It is allowed to choose a board or three-layer plywood as an overlay.
Direct docking Source blog-potolok.ru
Sequence of work:
- The joint is cut strictly at a right angle to ensure the most even joining and to prevent deflection under full load on the connecting unit;
- The cuttings of the board serve as overlays, which are secured to the timber with pins.
- Prepare a level area of sufficient length in advance. The beam or board is placed on a flat surface, placing bars under it, 30 centimeters high, so that when cutting with a circular saw it does not touch the ground;
- Select overlays. For overlays, cut boards or three-layer plywood are used after removing the formwork. The length of the overlay is calculated as four times the width of the board. And if the roof is planned to be insulated with mineral wool or it will have a slight slope, then the loads on the structure will increase, and the length of the linings should also be made longer;
- The cut part is joined to the second half, pressed tightly and covered with connecting pads. The boards usually vary slightly in thickness, so during the preparation process, the edges are lightly filed or sanded.
Joining and connecting boards with overlays Source obustroeno.com
Important ! When cutting, the board should not delaminate or break; the cut should be smooth, without nicks or burrs.
- The entire structure is clamped with clamps and the studs are driven in, tightening the nuts until they cut into the wood. The use of nails is not recommended due to cracking of the wood and weakening of the tensile properties of the finished element. The studs take at least 8 mm; a smaller size will not sufficiently strengthen the joints, and a larger size will push the layers apart;
- It is recommended to take wide washers and recess them into the wood;
- The amount of fasteners should not weigh down the element too much, otherwise you will have to order a recalculation of the project;
- It is permissible to additionally glue the plywood onto the board and compress it with clamps until the glue dries completely.
See also: Companies specializing in attic reconstruction and roofing materials.
Oblique cut
A beam with a large cross-section does not lend itself well to direct joining, so the beams are joined together along the length using the oblique cutting method. The name of the technology comes from the type of trimming of the ends of the timber.
Rules for splicing with an oblique cut Source krovgid.com
Stages of oblique cutting:
- Measure the distance at which the cut will be made. This is necessary so that the finished elements match as much as possible without the slightest gap. Mark the cut location on both ends of the beams with a pencil;
- The ends are cut at a certain angle, using a miter box, so that the angles coincide as much as possible along the cut, usually this is an angle of 45°;
- The beveled ends are joined, achieving maximum coincidence of the planes. Secure with a clamp;
- Drill a through hole, one millimeter smaller than a pin or self-tapping screw, so that it enters with difficulty, without moving the wood fibers apart. This condition will allow you to avoid play during installation and subsequent operational loads;
- The cut is tightened with self-tapping screws or pins and washers of sufficient width so that they do not subsequently become buried in the wood and lead to weakening of the structure. It is recommended to place a ring under them.
Overlapping
The method is suitable if the question arises: how to join two boards. The rigid connection of the structure makes it popular in many construction operations. The method is quite simple - two boards are laid overlapping one on top of the other.
Overlapping splicing Source obustroeno.com
Errors during the connection process
The greatest attention in this work requires the calculations themselves when creating the castle, as well as the accuracy of its cutting.
Before lengthening, it is necessary to inspect the timber or board and discard it if there are cracks at the places of the planned connection.
While the wood is monolithic, they do not affect its integrity, but if it is damaged in a vulnerable place, when cutting, this chip will fly off and create an unnecessary gap.
The second point is related to the choice of tool. This should be a high-precision electric or gas-powered device that can create an even line without catching or cutting off an excess area. The most accurate and trustworthy tool is a sharp handsaw .
You also need to consider the length of the lock. It should not be too small so that the structure holds tightly. To avoid mistakes, it is necessary to use ready-made projects and calculations for a certain length of the castle in relation to the beam.
Video description
This video will tell you how to join rafters and make calculations:
The advantages of such joining are the simplicity of the operations; it can be done even by a non-professional at a home construction site.
Double splice
There is also a rather interesting method of lengthening - composite rafters. It is performed using boards and short pieces of boards. The advantage of this method is virtually waste-free construction when the shortest elements are used.
Double splicing method Source yandex.net
Right angle and butt splicing
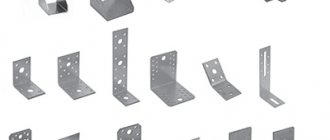
The connection of elements must be made at an angle of 90 degrees. The butt method involves the use of nails. Splicing is carried out using tools, building materials: hammer, pencil, lumber, metal corner, glue, putty, workbench, plates in the form of a triangle, letters G, T.
You can connect products end-to-end by fixing one element on a workbench, then placing it on another. Then you need to secure them with nails. To prevent the caps from being noticeable, putty should be used.
Reliable fastening is performed using T-shaped fasteners, which involve laying the plate in the center of the boards. Afterwards the holes are drilled and the screws are screwed in. Another way to firmly join boards is to use metal corners, which need to be secured on both sides of the boards.
You can buy high quality boards in Ivanovo at.
Video description
In this video you will see what methods of connecting rafters can be used:
Connection of logs and beams in length
Splicing timber and logs along the length has deep roots in ancient methods, when only log cabins were built. Our ancestors knew how to extend the rafters correctly. This is evidenced by ancient wooden buildings that have survived to this day.
Stages of connecting logs:
- Trim the edges of the logs so that they fit snugly together;
- Drill a hole for the pin at the ends;
- The size of the hole should be 1-2 mm smaller than the insert so that the pin fits tightly into place without splitting the edge;
- Insert the pin and connect the logs tightly.
Connecting logs and beams with a direct lock:
- Cut out grooves at the end of the timber being joined;
- Carve out the corresponding size in another;
- Connect the grooves and secure them with studs or clamps.
Connecting beams to each other Source masterbrusa.ru
They also join together with an oblique lock and a wedge.
Each connection is very strong and can be used in rafter legs. The fit must be precise. Filling cracks and chips with wood chips or other material will reduce the durability of the timber. It will become unsuitable for laying rafters. For a clear result, the cutting locations are measured and marked in advance.
Selection and selection of blanks for joining boards.
The very first step is choosing wood. The selection and selection of boards into panels is important; choosing a straight and even board makes the gluing process much easier; in any case, the workpieces have minor flaws that are not difficult to eliminate. Do not use a twisted board, as it will continue to be subject to deformation in the future. After selecting the lumber, I lay out the boards as they will be arranged in the array.
APPEARANCE.
First, selecting the colors in each piece, move and turn them over until the wood grain patterns match. The straight structure must work next to the straight fibers. The curved grain of the wood should blend with the curved grain of the wood.
FIBER DIRECTION.
Before gluing the array, the workpieces must be leveled using a grinder, jointer or manually with a plane. Determine the direction of the wood grain by looking at the edge of the board joint, see fig. 1, selecting a wood structure with smooth curves, as well as straight ones, also gives a beautiful result. Tip: Draw an arrow on each board in the direction of the grain, see pic. 1. This will be a pointer on the board later on.
FIBERS FROM THE END OF THE BOARD.
There is one more condition in solving this puzzle: how will the panel warp with changes in humidity? For panels whose ends are rigidly fastened with a strip, warping of the array is not a problem. But arrays that do not have rigid fastening of the ends are subject to warping. Those massifs that do not have alternation of growth rings in the opposite direction warp and they take on the shape of a bowl, see fig. 2. You can avoid warping of the array by changing the direction of the growth rings in the bars across the entire width of the array.
MARKS ON THE BOARDS. After the boards are laid out in panels, chalk Roman numerals along the seams, see fig. 3. Roman numerals prevent the possibility of confusing the bars. So, which criteria are most important: appearance, color and grain direction? I try to combine the direction of the grain and the structure of the wood in the panel, but often these are compromise solutions.
Briefly about the main thing
Splicing rafters provides significant savings in construction wood. There will be a minimum of wood waste left on the construction site.
There are several practical options for splicing rafter legs, each of which can be used during the construction of a house:
- For boards: overlap or double splice method;
- For a log house: direct joint or oblique joint.
When installing a rafter system, it is important to remember that the connection with fasteners should not weigh down the elements so much as to become problematic for the overall weight of the structure under the roof.
Proper rafting provides the same load resistance as solid timber.
Pin connection
Dowels or dowels are round wooden tenons that increase the shear strength when connecting two boards. Most often, dowel joints are found when assembling furniture or drawers.
Algorithm of actions:
- along the cut of the board, mark the end line along which the dowels will be fixed in the future;
- using an electric drill with a special pen or twist drill with a center point, make several holes along the marked line;
- A dowel is inserted into the prepared hole, after which the two boards are joined together.
Advice: in order to strengthen the strength of the connection between two wooden elements with dowels, the cut of the board is first lubricated with an adhesive composition, and then the jointed boards are clamped for a while in ticks.
WHAT YOU NEED TO GLUE WOODEN BOARDS INTO A SHIELD
- Plane;
- A circular saw;
- Clamps;
- Hammer;
- Gauge for marking;
- Measuring and drawing instruments;
- Equipment for wood processing (surface grinding and belt units). If they are not available, then you can use sandpaper, but then leveling will take longer;
- Wood material;
- Wood glue;
- Electric planer.
IMPORTANT: You need to use good glue to ensure that the boards are joined together well.
- Impeccable high-quality wood glue Kleiberit 303.2. It has excellent moisture resistance and is characterized by powerful fixation. Suitable for both indoor and outdoor use, for gluing various types of wood. Product price starts from 6,600 rubles per unit of 28 kg.
- Kleiberit pur-glue 501. Excellent quality glue suitable for all types of wood, slabs, and ceramics.