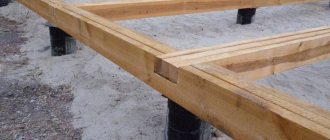
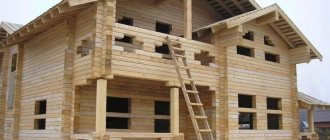
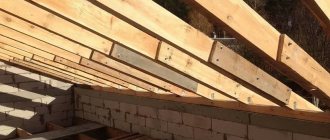
The growing popularity of frame construction is explained by the fact that this method allows you to build houses in a very short time. To speed up the work even more, pile-screw foundations are used as the foundation. The fact is that in the process of their arrangement there are no wet processes. To provide the foundation with proper stability, you will need proper tying of the pile foundation.
For the stability of a wooden house, it is not enough to drive the piles into the ground - they also need to be fastened together from above Source fucbgik.kal.ru.net
Features of a pile foundation
Pile-screw foundations are very common in low-rise construction. This is especially true for the construction of frame and timber houses, which are lightweight.
This is explained by the following advantages of pile structures:
- Possibility of use on difficult soils. This refers to weak, heaving and frozen soil. The same applies to uneven areas, when, due to the characteristics of the topography, this type of foundation is the only possible solution.
- Long service life. Compliance with construction technology, the use of high-quality materials and proper operation ensures a long service life of the pile foundation (at least 100 years).
- Cheapness. Other types of foundations are much more expensive.
- Simple and fast construction. Special equipment is usually used to immerse screw supports, which allows this procedure to be completed in a few hours. There is also a manual screw option that can be handled by 3-4 people.
Screwing in screw piles using special devices will significantly save time Source clubwell.ru
When laying a foundation from screw piles, labor-intensive excavation work will not be required. The main thing is to correctly calculate the depth of screwing and the distance between the supports.
The determining factors in the calculations are the massiveness of the future building and the characteristics of the soil - its composition, the depth of groundwater and the degree of freezing.
When considering the possibility of using a pile foundation, it is important to take into account the fact that the structure does not have a continuous supporting surface. This causes known difficulties when using materials for small format walls. The current problem is solved by tying screw piles, for which several technologies can be used. The correctness of this procedure directly affects the strength qualities of the finished building.
The reliability of the entire building will depend on the strength of the pile foundation Source kursremonta.ru
Method of bundling with a profiled pipe
A profiled pipe has a structure similar to a channel, but in terms of strength it is much inferior to it.
This is due to the less durable metal used to make the profile pipe, thinner walls and other features of the material. To achieve maximum strength, corner joints are made overlapping or overlaying.
As an option, the ends are trimmed at 45°, welded, followed by strengthening the joint with an oblique angle for bolted joints.
Procedure:
- Trimming piles, installing caps.
- Laying beams along the outer perimeter, connecting corners.
- Laying internal beams, welding with external elements.
- Tying the remaining supports to obtain maximum rigidity.
- Applying a layer of protective anti-corrosion coating.
IMPORTANT! If possible, all connections are reinforced with metal gussets installed on bolted connections.
Thermal and waterproofing when closing the base
All types of basement finishing require the installation of a heat- and waterproofing layer, which is covered with asbestos-cement slabs, decorative thermal panels mounted on a sheathing of boards or a slate slab, or bricks. All these materials have their pros and cons:
- Asbestos-cement boards do not look very attractive and are characterized by increased fragility, but they are inexpensive.
Asbestos cement slabs - Decorative panels, cement-sand or clinker tiles are resistant to atmospheric influences, and some types of them can even easily withstand high humidity. However, to lay them, a perfectly smooth and even surface is required, so the base around the perimeter will have to be covered with sheet material, for example, asbestos cement.
Clinker tiles - It is advisable to use brick laying or pouring concrete only when the height of the above-ground part of the base is at least 30-40 cm, which allows you to equip a real basement floor.
Decoration of the base with decorative bricks.
Tying and closing screw piles is a very important stage in the construction of a house, which determines how soon it will need major repairs.
Why do you need a harness?
The function of the strapping is performed by the upper element of the base - the grillage, for the arrangement of which you can use several methods (the choice depends on what the house is being built from). The grillage cannot be considered a mandatory structural element of a pile foundation. Despite this, it is recommended to use it in every case, which guarantees the reliability and stability of the structure.
The grillage performs the following functions:
- Evenly distributes the load on the piles. This is especially true for situations where, due to the characteristics of the soil, the supports have different immersion depths. This state of affairs can cause distortions and shrinkage of the building. Thanks to the grillage, the risk of such situations is minimized.
- Creates an overall structure from individual piles. After this, the supports stop “living their own lives”, forming a reliable frame for the house. As a result, the spatial rigidity of the structure and its service life increase by 2 times.
- Ties the foundation around the perimeter. A shallow and recessed grillage helps to increase the area of support on the ground and creates protection for the underground area from influences from the street.
Diagram of a pile foundation with a shallow grillage Source pobudova.in.ua
See also: Catalog of companies that specialize in foundation repair and design.
Foundation piping is classified according to the type of material used:
- Wooden from timber. It is used in the construction of wooden frame houses and timber buildings. The arrangement procedure is inexpensive and can be carried out alone or with one assistant.
- Boardwalk. Small wooden and frame buildings are equipped in this way. To construct a grillage, the so-called a composite beam made from several wooden planks.
- Metal. A channel grillage can provide stability for a two- or three-story wooden house.
- Reinforced concrete. This design demonstrates the greatest reliability and durability, and can be used in capital construction. During the construction process, the concrete solution is poured into pre-assembled formwork equipped with reinforcing mesh.
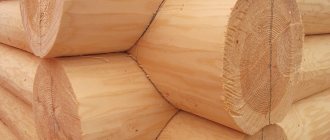
Tying a pile foundation with timber is most popular in the construction of country houses and cottages. This is especially true in regions with harsh climates and permafrost.
Wooden strapping is used only for frame buildings and houses made of timber Source postroifundament.ru
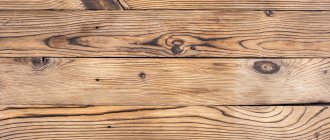
Requirements for wood
When choosing timber for building a wooden house, you should proceed from building codes and regulations, and specifically from GOST 2695-83. The first crown of timber must be laid on a foundation made of larch or oak. These materials have good strength and durability. To extend their service life, they must be treated with an antiseptic.
When choosing wood for building a frame house, the following points are taken into account:
- The cross-section of the timber is 20 × 20 centimeters; the lumber should not have any bending, falling knots or other defects.
- The maximum wood moisture content is 20%. It is best to take logs from winter felling, which took place from December to March. The tree should be aged under a canopy or in another room with natural ventilation. Decks are placed in piles in accordance with the rules of storage.
- Absence of defects allowed by state standards. These include damage to wood from bark beetles, mold or mildew.
- Absence of defects that may remain after processing the material on a sawmill.
The quality of the timber is assessed by a specialist based on the worst edge of the layer; inspection of flaws should be done at the ends, as well as along the entire length of the workpiece. After installing all the necessary cutouts and tongues, the product is impregnated with an antiseptic. If possible, store-bought solution is replaced with used machine oil. The quality of the log, the thoroughness of processing and the correct fastening of the strapping to the base affect the reliability and durability of the entire building structure.
Preparing the base of the heads
For the convenience of subsequent construction procedures, the tops of the piles are equipped with special square plates (heads) measuring 250x250 cm.
They must be prepared accordingly:
- Drill several holes (usually 3-4 pieces). They facilitate the procedure of attaching wooden frames with plumbing screws. The size of the screws is 10x120 mm.
To attach the harness to the heads, holes are made for self-tapping screws Source svaybur.ru
- Waterproof the caps with roofing felt or innovative bitumen material. When cutting pieces for each head, make a margin of 20 mm per side: this makes fixing easier.
Thanks to waterproofing gaskets, protection is provided for wooden framing elements from the damaging effects of moisture. Its source is condensation that forms on a cold metal surface during temperature fluctuations. Every effort should be made to keep the wood dry at all times.
The waterproofing layer between the sole of the head and the beam prevents condensed moisture from penetrating the frame. This significantly increases its service life and prevents rotting. To prevent the waterproofing sheets from moving, the base of the cap is coated with bitumen mastic.
Waterproofing between the head and the timber is mandatory, otherwise, due to exposure to moisture, the strapping can quickly “wear out” Source stroy-dom-pravilno.ru
Timber or board - which is better?
Let's talk about what material is best to use to create a wooden frame. Construction regulations allow the use of solid wooden beams (150x150, 150x200, 200x200) or timber sewn from several boards (50x200). Laminated timber qualitatively replaces solid timber and even surpasses it in some characteristics. Three boards sewn together replace a beam with a section of 150x200, while four boards are similar to a beam of 200x200.
The beam, one side of which is 200 mm, is laid on the heads with the smaller side. The height of the strapping is equal to 200 mm.
Both options (both with timber and with boards) are popular and both are correct. At the same time, having studied the advantages and disadvantages of each material, many developers make their choice in favor of stitched boards.
AlexSpb User FORUMHOUSE
Why do you need to use 150*200 timber? Knock down 3 50*200 boards instead and don’t bother with this log. This topic constantly comes up on the forum.
The word “log” was not mentioned by the user by chance. Solid timber is a relatively heavy building material and, with a limited number of workers, moving it from place to place (even on a small construction site) will be very difficult. In addition, solid timber does not resist bending well (worse, in any case, than boards placed on edge), which makes its use less practical.
Boards, unlike timber, must be firmly connected to each other before installation on piles. And these are additional costs, and this, perhaps, is their main drawback.
builder FORUMHOUSE user
The boards are nailed together with nails in two rows with a pitch of 20 cm. At each head they are fastened not with one wood grouse, but with four.
As for the length of the nails: for a composite beam of three boards (50x200), nails with a length of 90 - 120 mm are sufficient. They are made on both sides in a checkerboard pattern, as user builder indicated. The distance between the nails is 20...45 cm. If the beam is made up of four boards, first 3 boards are knocked together, then the fourth is attached to them (with the same nails).
Now let's talk about the "grouse" mentioned in the quote. “Capercaillie” is a fastening element - a self-tapping screw, the head of which is made in the form of a hexagon (for a wrench or impact driver).
With the help of a capercaillie, the beam is attached to the head of the pile (the capercaillie is screwed in from below).
The diameter of the capercaillie for attaching the strapping beam is 8...10 mm, its length is 100...150 mm.
To prevent the beams or composite beams from splitting while screwing the wood grouse, a hole must be pre-drilled in the wood.
A small table will help you determine the diameter of the drill.
| Thread diameter, mm | 6 | 8 | 10 |
| Drill diameter, mm | 4,5 | 6,5 | 8 |
Fastening the bars
To facilitate installation, preliminary laying of timber around the perimeter of the entire structure is used. This makes it possible to comply with all design parameters for tying the foundation with timber. The laid beams must have a right angle to each other. To check perpendicularity, measure the diagonals of the corner sections - they must be identical.
The procedure for installing the timber:
- The starting point for installation is chosen to be fastening units in areas where the beams intersect with each other.
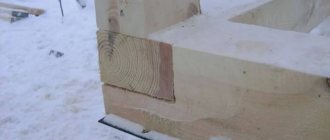
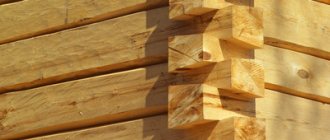
- The joining of timber is usually done “in half a body”. Less commonly, a more reliable “claw” connection can be used. To ensure a tight fit of the timber, its ends must be cut as evenly as possible. The connecting areas are additionally coated with wood glue.
- The timber is fastened to the base of the heads using self-tapping screws with a hexagonal head, which makes it possible to screw them in from below. The screwing procedure is facilitated by pre-drilling small diameter holes at the attachment points. A socket wrench is used to tighten the screws.
- The beam inside the perimeter of the grillage is also cut into half a body. Before this, the timber in the connecting areas is equipped with grooves.
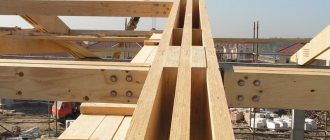
Connection of grillage beams at the corners of the foundation perimeter Source stroyfora.ru
After this, it is cut to a part of the end, which is immersed inside the main frame. It is necessary to ensure that the embedded fragment fits inside the equipped seat as tightly as possible.
Expert advice
To find out how to properly tie a pile foundation with timber, study the recommendations of experienced builders:
- Before starting strapping work, you need to make sure. That all piles are installed at the same height. If this condition is not met, the end sections of the supports are trimmed, or grooves are made in the beams;
- fastening elements are located along the longitudinal axis of the beam, displacements from this direction are not allowed, because this will cause an uneven distribution of load forces and a decrease in not only the safety factor, but also a violation of the integrity of the wood;
- in a pile foundation, the grillage made of wooden beams should be twice as wide as the cross-section of the pile support. This requirement must be taken into account when selecting building materials;
- To facilitate fastening the wood to the supports, when constructing the base, embedded elements are installed in advance, onto which the wooden frame is then attached.
Additional fastening
For reliability, the elements of the connecting nodes are additionally fastened with steel brackets made of a metal rod with a diameter of 8 mm. This must be done when the length of the screws is not enough to firmly fasten thick beams. The location for installing the brackets is chosen to be the top part of the beam, opposite the connecting nodes. The sharp ends of the fasteners must be driven into solid sections of the timber that are not equipped with half-tree recesses.
It is not always easy to completely hammer an 8 mm thick staple into wood, so this procedure is implemented as follows:
- Markings are applied. To do this, simply attach the fastener to the surface of the beam and trace it with a marker.
- A groove 10 mm deep and 8 mm wide is cut along the marking line.
- The points on the surface where the legs will be immersed are equipped with holes with a diameter of 5-6 mm. This will protect the timber from cracking while driving the staple.
- Holes and grooves must be treated with antiseptic impregnation.
Hammered staples should not rise above the surface of the beam Source zen.yandex.ru
- The staples are being driven in. They must be immersed flush into the surface of the timber
- At the intersections of two beams, a “half-tree” joint is used. The self-tapping screws are screwed in from below. The staples (4 pieces) hammered in from above should form a square shape.
The installed brackets should not protrude above the general surface, otherwise this will create difficulties for subsequent construction work.
Scheme selection
Scheme of rigid beam fastening
You have two options to choose how to attach the prepared timber to any type of foundation:
- Hard. The fixed connection between the upper plane of the support and the lower part of the house is achieved by metal coupling bolts or anchor bolts (studs), clamps.
- Overlay. The adhesion is determined by the weight of the entire house, distributed over the contact area with the structural components of the foundation of the selected type.
A rigid scheme during soil movements prevents relative displacement of the elements of the crown and base, which is unfavorable for the entire house. In the pile type, the logs serve as a variation of the grillage, tying all the columns.
In construction sites where there is no reason for such concerns, the second option prevails. The first belt is laid on slats no more than 15 mm thick, treated with bitumen on 2 wide sides. The corners of the perimeter of the house need additional reinforcement with brackets and steel plates.
In any option, a layer of waterproofing material (roofing felt) is made between the surface of the log and the cement/metal support.
Checking the horizontal structure
When the beam tying of the screw piles is completed, the finished structure is checked for horizontalness. To do this, use a water or building level. The permissible diagonal difference between opposite corners is no more than 5 mm. All parameters of the finished harness must correspond exactly to the instructions in the design documentation. The observed errors must be taken into account during the construction of wall structures.
Checking horizontality is a mandatory step, bypassing it can lead to many problems with the house in the future Source vse-pro-stroyku.sqicolombia.net
Tools and materials
To install the beam vertically on the foundation, you need to prepare the following tools and materials:
- building level;
- cement M500;
- sand cleared of impurities;
- antiseptic for treating wood against mold and mildew;
- roll of roofing felt for waterproofing;
- anchor studs;
- wooden beam.
Important! The timber is laid on a concrete foundation if it has stood for 7 days or more.