A light extension to a house is not always included in the original project. Often a veranda or terrace is built at the exit to the courtyard. And if this door leads from the living room or kitchen, then the extension turns out to be much more convenient than a separate gazebo. Usually wood is chosen for construction, and the structure is light. And since this is not a living space with thick walls and insulated floors, the foundation for the terrace to the house is not as “powerful” as that of the main building. But it must be done as required by building codes.
An open terrace is like a small living room in the fresh air Source pinterest.co.uk
How to build a terrace at your dacha with your own hands: posts and beams (with photo)
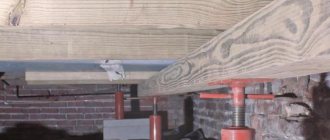
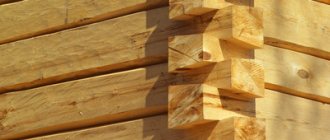
Before you make a terrace with your own hands, you need to install racks. Posts are beams (pillars) that evenly distribute the weight of the terrace onto the foundation. They usually have a cross-section of 100 x 100 mm, but they can also be larger, depending on the size and design of the terrace. The terrace posts should be secured to the foundation using brackets and not poured with concrete. In the latter case, the lower end of the rack will quickly rot.
When building a terrace to the house with your own hands, the posts can support the beams or pass upward through the flooring, forming fence posts or, for example, benches.
The beams rest on posts or are attached to them with screws or bolts. They should first be set strictly horizontally in the frontal plane. To do this, if necessary, place pads under the beams on separate racks. In addition, before building a terrace with your own hands, if you plan to use not a boardwalk, but a continuous covering of the terrace, you should ensure that its surface slopes slightly away from the house. A slope of 1:100 will be quite enough.
The larger the cross-section of the beam, the larger the span can be between the posts - this allows you to use fewer blocks of the terrace foundation for the house, built with your own hands. It should also be noted that if you plan to use beams with a cross section of 100 x 150 mm, then they can be assembled by bolting two 50 x 150 mm boards.
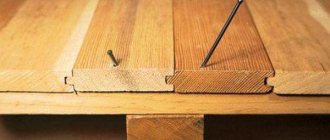
Joists, usually made from boards with a cross-section of 50x150 mm, connect the beam and the support beam, which is attached directly to the building, which gives the entire terrace structure a certain rigidity and stability. To build a terrace for a house with your own hands, the logs are laid perpendicular to the beams in increments of 400,600,800 and even 1200 mm, depending on the thickness of the flooring boards. When the thickness of the flooring boards is 50 mm, the distance between the joists should not exceed 800 mm; when using boards 25 mm thick, the distance between the joists should be no more than 400 mm.
The boardwalk is the uppermost, visible part of the manufactured terrace. The logs are not visible, but they must be spaced at the same pitch and parallel to each other. This will make the subsequent installation of the railing easier. In addition, the location of the joists determines how the screws securing the boards will be visible on the deck. Placed in one straight line, they will look much neater.
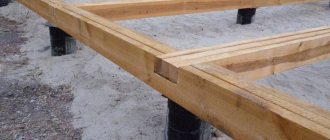
As you can see in the photo, on terraces in the country, built with your own hands, the support beam usually has the same width as the logs:
It is attached with screws (bolts) to the wall of the building, and one end of each joist rests on it. The support beam must be placed in such a way that there is a gap of 30 mm between the top of the deck and the bottom of the doorway. This will prevent rainwater from entering the room through the threshold.
The video “Do it yourself terrace” shows how the posts and beams are attached:
The following describes how to build a terrace with your own hands in stages.
About the construction procedure
A wooden beam with a cross-section of 100 by 100 millimeters will become the main assistant in the construction of the frame. The grounds are already there, all that remains is to supplement the work with the following instructions:
Grooves are cut out in the beam of the lower trim, where vertical supports are placed. The main thing is to maintain a half-meter step.
Next we move on to the installation of vertical racks. The entire structure is attached to elements such as brackets with screws or nails.
Standard verandas are complemented by pitched sloping roof types. Therefore, compared to the opposite sides, the beam of the vertical plane should be lower, at least 50 centimeters.
Installation of timber connected to the top trim
This is important if you want to create truly beautiful verandas
Additional recommendations help in the case of installing lower supports. The strapping beam goes first, as a support for the connection along.
Then they move on to fixing the crossbars, at the height of the low racks they will connect the high racks with the low ones. Preliminarily, samples are created with nails that ensure fastening of high-type racks with crossbars.
The strapping at the top is prepared for this stage. The result is a slope, which makes it much easier to lay the rafters for the roof. The girder is attached next to the roof slope. Anchor bolts are needed for fastening between beams and all supports.
Installation of rafters, the standard pitch for which is 50 centimeters. The optimal solutions are wooden beams, whose cross-section will be 100 by 200 mm.
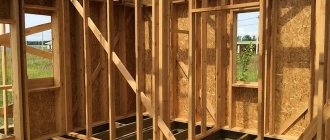
At one of the last stages, the frame is sheathed. Lining is most often chosen for cladding inside, and siding is most often used outside. Between the parts inside and outside it is necessary to place hydro and thermal insulation.
The frame is connected to the film. Cross slats make fixing the insulation easier. You can’t do without a connection with finishing
It is important not to forget about window and door openings
Which foundation to choose
To determine the type of foundation, it is important to do a competent analysis of the soil on the land plot, determine the degree of groundwater, and the level of soil freezing. For high waters, a columnar and screw or pile foundation for a veranda is suitable
For stable and non-heaving soil, choose a strip base. Which foundation to choose for a country house, see here. We will look at the types of foundations for the veranda.
A columnar foundation for a terrace or veranda is the most common option due to its cost-effectiveness and accessibility, speed and ease of construction. You can easily install the poles with your own hands on lands with high humidity and frozen soil. In addition, such a base is characterized by reliability, strength and durability.
A screw or pile foundation consists of piles that are screwed into the ground. This is a universal design that is suitable for every type of soil. A suitable option for installation on uneven terrain, which is characterized by accessibility and low cost, easy and quick installation.
A strip foundation will allow you to build a veranda or terrace of any scale, size and design. Such a foundation will support a heavy structure made of brick, concrete or natural stone. It easily tolerates ground movements and various soil loads, does not deform and is highly stable, durable and strong. In addition, it will allow you to insulate the walls and floor.
Influence of soil freezing depth and groundwater level
Since the properties of frost heaving of soils appear during their seasonal freezing, the base of the foundations must be located at a depth exceeding the freezing depth by 150-200 mm, then the negative impact of heaving will manifest itself to a minimal extent.
If there is groundwater on the site, then special measures are used to drain water from the construction site and subsequently from the foundations of the constructed structure - closed drainages of various types - wall, trench or reservoir with laying drainage pipes and discharging water to a designated location.
Step-by-step construction of a strip concrete foundation for a veranda
- We make markings for digging trenches under the tape. The pegs are driven not into the supposed corners of the foundation, but so that these corners are formed by the intersection of the cord. The height of the pegs should correspond to the height of the future base.
The corners of the tape are at the intersection of parallel cords
- We dig trenches according to the width and depth planned according to the plan.
The dimensions of the trenches are determined according to a pre-drawn plan
- We fill the bottom of the trenches with sand for a drainage cushion to a height of approximately 0.3 meters.
Sand is poured into the bottom of the trench and compacted until a flat bottom surface is formed.
- Lightly fill the sand with water and tamp it down - manually or using a mechanism called a “vibrating tamper”.
Then add gravel and repeat the procedure. A layer of gravel is poured onto the compacted sand and compacted with a vibrating plate. - For formwork, we cut the boards with a circular saw into elements of the required length according to preliminary calculations.
- We put together the formwork. It must correspond in height to the future base; its horizontalness is checked using a hydraulic level.
The height of the formwork is set using a cord that determines the height of the future plinth
- We lay the reinforcement in several layers with the calculated frequency of installation of vertical columns.
The reinforcing frame consists of several horizontal rows mounted on vertical posts, which are installed at a calculated frequency
- We mix the concrete solution from cement, sand and crushed stone. If you have a construction mixer, the process becomes much easier.
Large volumes of concrete are much easier to produce using a mixer
- Pour the solution into the formwork. To ensure that there are no voids or bubbles in the hardened concrete, you need to stir it in the formwork with a stick. The pouring must be done in one day, otherwise the foundation will be divided into layers that are poorly bonded to each other due to the difference in the “setting” time.
- Using a trowel, smooth out the filling flush with the formwork.
The pouring surface is leveled with a trowel
- We cover the foundation with film. We must not forget about the need to constantly moisten its surface under the film.
- We dismantle the formwork in five to seven days. But the cement will gain the calculated hardness only after 28–30 days.
The cement will reach its maximum strength only in a month
- After the specified period, we strengthen the roofing material for waterproofing. You can get by with roofing felt alone, or you can also coat the surface of the foundation with hot bitumen by placing roofing felt on it. The joints are overlapped. We trim the edges.
After a month, you can make waterproofing from bitumen and roofing felt
Video: construction of a strip concrete foundation
You have completed a difficult task - you have built the foundation for the future veranda. Now we need to continue to improve in home construction and try to build the veranda itself.
Stage two - construction of the building frame
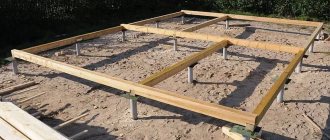
The structure frame is installed on the finished foundation. A wooden terrace can be made with your own hands quite quickly, even alone. For work you will need construction timber with a cross section of 150x150 and 100x100 mm. The first beam will fit on the lower frame - the base of the veranda floor, the second - on the racks and supports for the railings.
Laying the bottom trim
We lay the timber with a section of 150x150 on a foundation for the terrace pre-lined with roofing felt. If the dimensions of the extension exceed 6 meters - the standard length of lumber in our country - you will have to splice the strapping elements. The technology for corner and longitudinal connection of timber is as follows:
- Select the most even, undisturbed lumber.
- At the ends, mark cuts for half the thickness of the timber. The length of the future groove is in our case 150 mm.
- Saw the timber along the markings using a hand or mechanical tool - a hacksaw, circular saw or chain saw.
- Connect the parts groove to groove at an angle or lengthwise.
- Additionally strengthen the connection by driving in 2-3 nails No. 150.
To avoid possible displacement of the terrace frame relative to the base (this should be thought about at the stage of foundation construction), several scraps of steel reinforcement with a diameter of 8 or 10 mm and a free end length of 200-250 mm are left at the top of the pillars or tape. Before laying the strapping, holes of larger diameter are drilled at the exit points of the steel rods, and the timber is laid on the pins, which are then bent flush.
After completing the timber lining of the terrace floor around the perimeter, lay several transverse beams of the same section in the same way, installing them in pre-marked and cut grooves in increments of about 1 meter, fastening them with long nails.
Installing racks
To support the roof of a wooden veranda, it is necessary to install several vertical bars at the outer corners and along the long side parallel to the wall of the house. The length of which is chosen in such a way that the height of the terrace roof from the floor is at least 2 meters, and the slope of the roof from the main building is maintained.
Connection diagram of harness and racks
If the terrace framing timber is allowed not to be planed, then the racks must be pre-planed with an electric planer. This will give them a more aesthetic appearance and will simplify further finishing and processing of the veranda. The racks should be secured to the frame with self-tapping screws using reinforced steel corners. In the upper part, the ends of the beams are attached to the terrace frame, which is a frame element that serves to increase the strength of the veranda structure.
It is better to make the top trim from planed timber 100x100. Assembly is carried out on the ground in detail, after which it is installed on the ends of the racks and attached to them. In this case, it is necessary to ensure that the vertical parts are perpendicular in two planes. To do this, use a plumb line or a building level.
Wood
Although this type of foundation is used extremely rarely, it is sometimes used when building a wooden house. This is the most environmentally friendly option of all those presented above. The work can be done in the following way:
- We dig holes.
- We pour 10–15 cm of concrete onto the bottom and, without waiting for it to harden, install wooden piles.
- To install corner posts, you need to use wood at least 30 cm in diameter.
- For installation of auxiliary ones – 15–20 cm in diameter.
- The installation of piles must be carried out below the freezing point.
- The top should rise 30 cm above the ground.
- For greater strength, you can make a tenon connection between the pile and a horizontal log.
- After installation, the piles can be filled with concrete or covered with sand.
Monolithic
Although this type of foundation is quite expensive, sometimes the surface requires just this type. It is ideal for areas where groundwater is close. In addition, it perfectly withstands stress and moisture.
The work is carried out in the following order:
Columnar foundation for the veranda
This type of foundation is most suitable for lightweight structures. It's easy to do, no skills required. To build such a foundation, you can use some blocks or bricks. To build a light veranda we will need to make 3 to 5 supports. These supports are not connected to each other in any way. A columnar foundation involves free-standing supports that do not depend on one another. It is worth remembering that such a foundation must be made to the depth of the foundation of the house or building near which the construction of the veranda was started.
STEP 1: materials. What materials and tools will be needed when building a columnar foundation? Everything is banally simple. Reinforcement with a cross-section of 0.7 - 1.0 cm, concrete mortar, roofing felt, rope for marking.
STEP 2: territory. First, you need to clear the entire area of debris and foreign objects, then we make markings and hammer in pegs. The distance between supports should not exceed 1.5 meters. It is at this distance that we hammer in the pegs. These will be the supports of our columnar foundation.
STEP 3: indentations. In place of each peg, you need to make holes 70 - 100 cm deep (depending on the depth of the foundation of the house). To do this, you can use a garden drill, or any other device that can easily cope with the task. We fill the bottom of each hole with an even layer of 15 - 20 cm of sand and tamp it down.
STEP 4: support frame. At this stage of the instructions on how to make a columnar foundation for a veranda, you need to install the frame of the future support. To do this, according to the size of the future pillar, you need to make a frame from reinforcement and place it in the center of the finished pit. You cannot weld rods together. A special knitting wire is used to connect the rods.
STEP 5: formwork. In order not to make formwork from wooden boards inside the hole, you can use roofing felt as a form for the future columnar foundation. This roofing material will be an excellent waterproofing for the base of the foundation.
STEP 6: supports. Next, you need to make supports from blocks or bricks, the required height and the required area. First you need to make a small pillow of sand and compact it well. Basically, an ordinary cinder block is used, which is laid using a special technique. Only then can you cover it with facing bricks or decorative tiles. Don't forget about the building level.
Such a columnar foundation will help you save time and money by performing the same function as, for example, a strip foundation. You will only need to spend 1 – 2 weeks on its construction. And the columnar one can be made in 2 – 4 days. Such a foundation is used for the construction of light verandas and extensions (wood, profile pipe).
Choosing suitable types of bricks
Red fired solid (ceramic) is best. If we are talking about the construction of a furnace, then fireclay (fireproof).
Photo: construction of a brick plinth
Most often these types of raw materials are used because they:
- have a clay base;
- resistant to moisture;
- durable;
- durable.
They have no obvious shortcomings.
But it is important to pay attention to the quality of the material purchased. If the raw material is overcooked or not kept for the required time, it will take on a dull scarlet color and will have concave edges; over time it will begin to crumble, which will lead to the destruction of the foundation belt.
Clinker is suitable for cladding the facade. It is resistant to any manifestations of the external environment, lasts for decades, but its price is quite high.
White sand-lime brick should be used exclusively for finishing the basement of buildings made of block or wood. Despite its strength, it has high hygroscopicity and low frost resistance. The situation is the same with red hollow.
If you lay the base from silicate, then under the influence of moisture, after a few years, individual sections will begin to crack.
Brick veranda attached to the house
If a metal or wooden structure is considered universal and can be used for almost any type of private house (frame, log house, permanent), then a brick veranda with plastic windows is suitable only for permanent construction.
Here, unfortunately, it is not possible to provide a diagram or sketch with a layout of materials - construction from brick or block is too individual. However, we can highlight the main stages and nuances:
- For such a structure, columnar and pile foundations are not suitable; a serious strip foundation with good waterproofing is required. It can be made monolithic or block, the depth is calculated depending on the depth of soil freezing in a given region. Read more about the design and waterproofing of foundations in the article;
- the structure can be solid - with full walls that take the load from the roof - or with column-shaped supports. The second option is more economical in terms of materials and time. Columns with 4 bricks or more in a row of masonry must be placed in the corners of the veranda and, if its area is large, additionally in the gaps. The photo above shows just such an option, with columns, the space between which is filled partly with metal-plastic windows, partly with single-row brickwork;
- the covering of a brick veranda can be arranged on wooden beams or on metal trusses, depending on the weight of the roofing material;
- The installation of metal-plastic windows in this case is carried out after the initial finishing of the walls and installation of the roof. Otherwise, there is a high risk of damage to frames and sashes under the influence of a suddenly increased load or during construction work;
- The best finishing option for a brick veranda is considered to be facing bricks and tiles, including those imitating wild stone, plaster, and painting.
To build a veranda that is combined with the house as successfully as possible, you will have to use mortgages - metal parts that will connect the main wall of the house with the new extension.
The main connection is at the foundation level; the reinforcement of the strip base for the veranda is connected to the foundation of the house.
Similarly, the connection is made between the walls/columns of the veranda and the wall of the building.
If possible, roof trusses/rafters are also driven into the main wall of the house. This will allow for better waterproofing of the seam between the wall and the canopy, and will increase the stability and strength of the structure as a whole.
Extension on stilts
Light buildings, regardless of the nature of the base of the main building, can be erected on stilts. Various combinations and options for junction points are possible:
- Tape - piles. It is impossible to rigidly connect a “hanging” grillage to a monolithic structure, and the abutments of the facades are separated by a “warm” expansion joint.
- Piles - piles. For example, this is a common type of foundation for a foam block or frame house. Technically, grillages can be rigidly tied under the “boxes” of buildings. With wooden beams and metal profiles there are no problems with tying. And reinforced concrete beams can be tied together with reinforcement bars if their thickness allows holes to be drilled.
Finally. The connection between the extension and the main building can be done in several ways. And the choice of a particular one depends on many factors: type of foundation, nature of the soil, groundwater level, cumulative loads. It is also worth taking into account the rafter systems of both buildings, the type of roofing, and even the construction budget.
Preparation for construction
First, the landowner needs to think about the size and shape of the future terrace:
- You can independently transfer all the numbers to paper - draw a diagram of the future construction. In the future, this drawing can be loaded into a computer drawing program.
- A ready-made, and most importantly, correct drawing in all calculations can be ordered from specialists. True, this will require additional costs.
- Ready-made drawings of verandas can also be found on the Internet.
Calculations and drawing
The structure on supports is classified according to the depth of the pillars and depends on a number of conditions - the type of future construction and soil characteristics. Requirements for construction, depending on the type of soil, are specified in SNiP 2.02.01-83.
For lightweight free-standing verandas, non-recessed and shallow-recessed bases are more often used. For extensions to a house, the foundation must be more solid, especially if the building stands on heaving soils.
Based on the weight, including the snow load on the roof, and the dimensions of the building, the number of supports, the distance between them, and the total amount of materials are calculated. If the veranda is built on a turnkey basis, its cost will be calculated free of charge by specialists.
When constructing it yourself, you can use online calculators on construction sites. You will need to enter the initial data of the desired structure and soil type.
Tools for work
To build this base you will need:
- laser level or hydraulic level;
- shovels;
- rubber hammer;
- tamping;
- trolley on wheels;
- measuring tape;
- construction mixer and/or concrete mixer for self-mixing;
- screwdriver
You also need to purchase:
- reinforcement, ready-made concrete (or its components for self-mixing);
- sand;
- crushed stone;
- wire;
- waterproofing material;
- plywood or boards;
- screws and other fastening materials.
Installation of a shallow structure
This type of foundation is installed 0.4 - 0.7 meters deeper than the soil surface. It is used quite often when constructing a veranda. The formwork is made of brown concrete, plastic and metal pipes.
For a brick veranda, a pipe diameter of up to 0.2 meters is suitable; for lighter variations, a diameter of up to 0.1 meters is sufficient.
The construction of a shallow foundation consists of the following stages:
At the preparatory stage, we clear the area of rubbish and carry out markings. Places for installing poles are marked with stakes and rope. Holes are dug in designated locations to a certain depth.
It is important to add 0.15 meters for the arrangement of the sand cushion (the sand is watered and compacted). The bottom is covered with roofing material. Then, using a building level, the pipes are leveled
If the water is shallow in the soil, they are treated with a waterproofing base. Next, the pipes are filled with a concrete-gravel mixture to a depth of 0.3 meters. After which the support will rise by 0.15 meters, which will further protect the pillars from deformation when the ground moves. After the concrete has set, the pipes are lined with roofing felt and the holes are compacted with sand. At the end of the process, reinforcement is carried out and concrete is poured to the surface of the supports.
Installation of a non-buried base
Located at ground level. The difference between the installation of pillars varies from 1.5 to 2.5 meters. The sole, provided it is easy to construct, can be erected on non-heaving soils.
During construction, blocks with dimensions of 0.2x0.2x0.4 meters are usually used. Finding out the price of such a foundation is easy. The total amount of material required is multiplied by the cost of one block. Concrete and rubble stone are also used in construction.
The sole can also be made from brick, but we must not forget that ceramic and silicate bricks can be deformed at low air temperatures.
The construction of this type of foundation takes place in several stages:
- First, we clear the construction site and make markings.
- Then, by calculating the load on each support, we determine the number of pillars and the area on which they will be located.
- We carry out excavation work - remove 15 mm of the top part of the soil.
- We create a sand cushion under each support and install pillars. We apply plaster to their upper part.
- Finally, we protect the pillars from moisture with bitumen resin or roofing material.
How to make calculations
Calculating material consumption is very important. This will help not only not to make a mistake in the number of tools purchased for the job, but will also provide an opportunity to save money when purchasing everything you need. We recommend using special online calculators. Modern programs have simplified the calculation process to the point of automation.
For example, there is an extension size of 6x8 m. Let's enter the dimensions of the veranda strip and the brand of concrete. We carry out the calculation. The calculator shows us a complete list of materials, and even a reinforcement diagram that we need in our work.
There are many ways to build a foundation for extensions. The foundations presented in the material gave you the opportunity to familiarize yourself in detail not only with their varieties, specifics, advantages and disadvantages, but also with the methods of constructing each of them.
Tape base - can withstand any weight
A similar foundation is erected for verandas and terraces with a large mass, built of stone or brick. It is not difficult to equip it with your own hands, but you will have to focus yourself on labor-intensive work. The technology for constructing a strip base is as follows:
Mark the foundation (take into account its internal and external parameters)
Important! You need to retreat 2 cm from the base of the house. These centimeters are required to make a special expansion joint
It will smooth out the difference in loads on the main and foundations under construction, protecting them from the appearance of cracks. Dig a trench, cover its bottom with 20 cm of sand, which you must compact. You make a formwork structure and place a frame of reinforcement in it. It is installed 5 cm below the planned concrete pouring line. Fill the structure with a solution of crushed stone, sand and cement M300–M500 (proportions – 3:5:1).
Strip foundation for terrace
If you make a concrete composition with your own hands, consider these recommendations. First you need to mix 10 liters of water and cement in a large container, and then add sand and crushed stone to it. It is advisable to carry out mixing not by hand, but using an attachment on an electric drill.
When using a concrete mixer, the mixing sequence is different. The first step is mixing all the dry ingredients, the second is adding water. The liquid is added as needed in small portions. You should get a composition similar in consistency to thick sour cream.
A small nuance. Do you want to make a truly high-quality concrete solution with your own hands? Add 70 grams of a special plasticizer to the concrete (sold in any construction store). This ingredient will give the foundation maximum strength by removing excess moisture from the base. Concrete with a plasticizer allows the masonry to easily withstand even very severe frosts.
The strip base is made without constructing a formwork structure. The technology is like this:
- lay out (without using mortar) a row of red bricks at the bottom of the trench;
- The second and subsequent lines of brickwork are installed with a solution of cement, water and sand (no need to add crushed stone).
Brick can be replaced with natural stones. In this case, they are filled with a mixture of sand (3 parts), cement (1) and water (1.5).
Sizes, brands
The required type of raw material must meet the following requirements:
- to be whole, without voids;
- frost resistance level – from 35 cycles and above;
- water absorption – no more than 16%;
- compressive density – 1600 kg/m3.
Photo: masonry process
Ceramics should be of the following brands: M150, M200, M250.
Suitable brick sizes:
- 25*12*6.5 cm – single;
- 28.8*13.8*6.5 cm – modular;
- 25*12*8.8 cm;
- 28.8*13.8*8.8 cm.
We recommend that you read the article: “Lime mortar”.
It is important to know
To ensure that the foundation for a summer veranda with your own hands serves you for a long time, you can install not only the foundation on pillars, but also on tapes. The strip base is suitable for heavy buildings with massive wall materials. Also, if there is slate or metal tile on the roof of the veranda, then your choice should also fall on a strip foundation. If the terrace is made of wood, then pillars are suitable for support.
How to properly tie the foundation of the veranda to the house? The answer is no. These two bases cannot be connected with each other. Each building must have its own separate foundation. Therefore, the foundation for the veranda at the dacha is placed with your own hands about four centimeters from the house.
If you doubt your choice, do not know what kind of soil you have, then it is better to seek the help of craftsmen who will tell you exactly how to properly pour the foundation for the veranda.
Two depths of the base - terraces and houses must be identical in size
It is very important. But as mentioned above, there should be a small gap between them, but the roofs should be laid with an overlap so that water does not flow into the gap
Open area around the pool
A terrace in a private house is often located next to or around the pool. This is especially useful for pools made from large, prefabricated fiberglass tanks. In this case, the terrace performs two functions at once - it provides a comfortable place to relax near the water and hides unaesthetic details (the side of the container, pipes for supplying and draining water, aeration, cleaning devices, and so on).
The principles of arranging the structure are the same as in previous cases: screw piles as a foundation, a cellular frame as a support for the flooring. In this case, the frame is made of metal; wooden elements near water require too serious and expensive protection from moisture
The installation process is discussed in more detail in the video below, but there are some nuances that are worth paying attention to:
- such large containers must be concreted, and the first row of piles (located closest to the side of the pool) may not be screw, but ordinary - installed in concrete;
- the metal frame is necessarily protected from corrosion, galvanized screw piles and stainless steel fasteners are used;
- the frame is positioned so that the flooring hangs over the water and at the same time it is possible to line the vertical fragments of the platform;
- For flooring, a special material is used - the so-called deck board (decking). It can be natural wood with special processing (usually larch), a composite material or pure polymer. A special feature of the board is its increased resistance to moisture and textured surface;
- Built-in lighting fixtures can be mounted flush with the sheathing in the decking.
It is also possible to install a deck below the edge of the pool, if this edge is properly designed.
For bowls of complex shape, the flooring is also usually made with a curved contour.
If the pool bowl is not completely buried in the ground, the terrace flooring is elevated, creating a kind of podium.