- August 30, 2020
- Repair Tips
- Daisy Angel
Wooden buildings like log cabins, which were erected several decades ago, today have a worn-out appearance and a foundation that requires replacement. A dilapidated and rotten foundation threatens to destroy the building. In such conditions, the owners of the building have a question about how to raise the old house.
If things go well, the life of the house will be extended by another decade. To perform such work, it is better to use the help of a team of specialists who have all the necessary equipment and skills. But if there is no desire or opportunity to use the services of professionals, you can carry out this work yourself, being careful, as this can be dangerous to health and life, as well as the integrity of the old house.
Fastening walls and preparing gaskets
The building should be inspected for weakened logs and rotten wall elements. If any can be found, the structure is enclosed in a wooden vice. The house is sheathed with boards diagonally and fastened with bolts. This will prevent the building from being destroyed when it is lifted. It is necessary to prepare a number of spacers that will be sufficient to use them as support pillars during the period of pouring the foundation. Supports can be cinder blocks, bricks, logs and wooden blocks.
How to choose a jack
Before lifting an old house, you will need to select a jack and also calculate the weight of the building. This will allow you to correctly calculate the lifting power of the equipment and the number of jacks to lift the building. First, you should calculate the volume of the walls in cubic meters, and then multiply this value by the density of the logs. The last value for average wear of a rounded log is approximately 700 kg/m3. To the resulting number should be added the mass of the floor, interior decoration, beams and everything that was not removed and dismantled.
Once the mass of the structure has been determined, it will be possible to understand how many jacks will be needed. Before raising the old house, it should be taken into account that this work will be carried out from all sides so that the new foundation can be poured. This suggests that the number of jacks can be from 4 to 6, everything will depend on the number of walls and the volume of the building.
Installation of a log house
Hello dear homemade people.
The log house has been purchased, now it needs to be properly assembled and installed. How can you do this if you have never done anything like this before?
If you add information from several posts with tips on assembling a log house to the saying “The eyes are afraid, but the hands do the work,” then you will be quite capable of completing this work.
The logs are collected not by gods, but by men like you, perhaps even more crooked. So why are you worse? Let's do it. And I will help.
I hope you listened to my previous advice, ordered a log house in the second half of winter, they cut it down for you at the same time, you checked the quality of the cutting of corners and grooves, assembled it into a pile, and it stood safely in it until June, or even July.
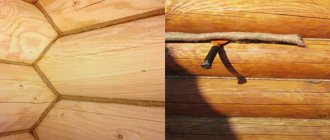
You shouldn’t wait any longer, because thanks to the rain and sun, the log begins to darken, and the more it darkens, the more you will have to plan away the oblon, the strongest outer part of the trunk.
Before loading it into the car and taking it to the site, carefully check the markings on the ends of the logs. It should be very visible and understandable.
God forbid you confuse the order of the crowns later
.
How to plan a log house
After the log house has been delivered and unloaded into the stack, you must immediately begin planing and impregnating the logs with an antiseptic.
Under no circumstances leave it in the stack for a long time. Weather, poor ventilation, and incorrect positioning can seriously damage the logs.
Planing is a rather laborious process, so it is better to build strong sawhorses for this, about 60 cm high, otherwise you may be left without a back.
The main goals that you need to strive for in the process are to cut as little as possible, and at the same time get as clean a log as possible.
The bulges around the knots, of course, need to be completely removed, but between the knots and even butt logs, it is better to plan with the release of the plane knives no more than 1.5 mm.
We remove the bark beetle
Another purpose of planing is to detect bark beetles hiding under the remains of bark, especially in the trench depressions.
Since my camera tragically died during assembly, I will show the results of the presence of this pest using the example of timber from another log house.
Here is a clean, naturally dried timber, without any traces of damage, but with a thin remaining strip of bark at the corner.
Let's remove this strip of bark, and underneath it the results of vigorous life activity are revealed.
And how deeply they penetrate into the wood! To destroy the pest, take a syringe and turpentine.
This is how all suspicious holes found in the log during the planing process are processed.
.
Impregnation of a log house
Immediately soak the planed, clean log with an antiseptic. Now the market offers a huge amount of such goods for all kinds of ailments. I will offer my time-tested impregnation recipe.
Recipe:
Mix 10 liters of natural drying oil with 3 liters of resin turpentine. If there are no natural ones (hard to find), you can use Oxol and simple turpentine.
This impregnation penetrates deeply into the wood and dries relatively quickly. It retains the smell of fresh wood for a very long time, and is guaranteed to keep the surface of the log from darkening until the next season, when the log house can be sanded and coated with decorative impregnation.
Why "Until next season"? Because the log house will continue to dry, that is, the log will decrease in diameter and shrink. Therefore, after a year it is advisable to caulk the log house, and then you can sand it for finishing.
Since the composition is relatively inexpensive, you should not skimp on it. Saturate thoroughly, especially those places where natural cracks have formed in the logs, so that it flows into them. It is better to soak the grooves too, so that no living creatures want to settle there.
Correcting chainsaw flaws
The next stage became necessary since log houses began to be made not with an ax, but with a chainsaw. My opinion: a chainsaw is a crazy machine for making a log house.
You can make end cuts with it, but you need to select the grooves and cut out the paw or cup with an ax or adze (there is such a tool).
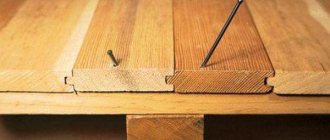
Since 99% of log houses are now done only with a chainsaw, let’s see what needs to be fixed after it. And it is advisable to correct the cuts that remain in the grooves, and some of which extend into the paw or cup.
Come in Santa Claus!
To prevent Kolotun Babai from actually entering, these cuts must be caulked with moss immediately after impregnation.
If the log house is cut down as it should be with an ax, and the groove is semicircular as it should be, then this problem disappears.
Installation of a log house on the foundation
Now you can begin assembling and installing the log house on the foundation. To be precise - on the base, which is made of red brick and is a necessary part between the foundation and the log house.
The base can be high, low, with or without ventilation and observation windows - it depends on the design features of the building.
In our case, one thing is certain - on a high base, the lower crowns of the frame are less susceptible to rotting.
We will install the log house using bog moss (sphagnum) as a cushioning material.
Lay 1-2 (depending on the type) layers of roofing material on the base and moss is evenly laid on it. The amount of moss for the first crown is determined as follows: the width of the moss ribbon should be 10 centimeters wider than the landing area - 5 on each side.
The thickness of the layer is determined by the clamp, i.e. if you press the moss roller with force with your hand, then its thickness should be about 2-3 cm. Later, after tamping, the log house will compress it to 0.5-1 cm.
The entire roller must be felt with your hand using pressure, while removing possibly remaining bumps and compactions formed by possibly remaining earthen lumps.
Yes, if the first logs do not have a landing pad when cutting, then one must be made during installation.
When the moss is spread out, a log is rolled towards it so that to install it in place, one roll is enough, without moving back and forth.
The second log of the first crown is installed in exactly the same way.
The third and fourth (transverse) logs of the first crown are placed on the first ones and brought to the paws so that to install them in place, one roll is also sufficient, and the edge of the upper paw should hang over the edge of the lower one, so that during installation the moss does not fall off the vertical plane, after which moss is placed on the paw.
The log is then rolled into place. Despite all efforts, moss is often partially removed from the vertical plane, so be sure to check the vertical seams and add moss to them, since it will be difficult to do this after installing the next crown.
While it is still possible to add moss on inclined planes using a wedge, it is not possible to add moss on vertical planes, so take your time and especially carefully and evenly place the moss on the paws, so as not to drive it there later with wedges or thin punches.
After installing the first crown, you need to check its geometry along the diagonals and make the necessary adjustments.
If the amendments are significant, and as a result moss is removed from under the logs, then you need to correct it too by lifting the crown using a jack or wedges.
During further assembly of the log house, the moss is placed on the previous crowns, and the following nuances may arise:
a) decomposed moss is blown away from the log by the wind;
b) the decomposed moss is collected when installing the log;
In the first case, you need to use moss of normal humidity. If it is too dry, it is of course blown away by a light breeze, but with normal humidity it lies normally even in medium winds.
For information on how to prepare moss if necessary, read the article Moss for a log house.
In the second, there is no need to try to put the log straight into place on the spread moss (when working with a crane).
Place the log as I recommended when installing the 3rd and 4th logs of the first crown, i.e. one roll and just slowly roll it into place without pushing it onto the spread moss.
Two crowns are installed.
The following crowns are installed similarly, but there is one caveat. After the third crown, the moss remaining outside between the foundation and the first crown and the first and second crowns is tucked in.
And so on. After installing the next crown, moss is tucked through the crown below.
At the same time, in a normally felled log house, you need to ensure that the gaps between the logs on both the outside and the inside are the same, and amount to approximately 1.5-2.5 cm.
If the gap is larger on one side and smaller on the other, this indicates that the log has rotated around its longitudinal axis and is not lying correctly.
The reason for this may be the uneven layout of the moss.
This situation can be corrected as follows: a wedge is driven into the paw, from the side of the thinned gap, until the log is leveled, and the resulting voids between the logs are tightly filled with moss.
The moss is tucked with the same wedge made of hard wood (birch, oak, maple).
After lifting all the crowns and tucking in the moss, the gap between the logs and in the feet should be approximately 1 cm at the bottom to 2 cm at the top.
Subsequently, under the weight of the roof, all the moss will be compressed, and all gaps should remain no more than 0.5 cm or close altogether. Well, this is from a properly cut log house.
And the last thing that is included in the installation of a log house is the manufacture of the uterus and the filling of grooves in the skull logs.
For reference: the very last logs in the log house are called flap logs, there are only two of them, and the last crown turns out to be unfinished, as it does not have transverse logs, and the last complete crown is called the skull crown and the ceiling runs along it.
The uterus is a beam or log with grooves for inserting ceiling boards.
It is better to make it from 200 x 200 timber. If the log house is large and requires several queens, then the span between them should not exceed 2 meters. Better than 1.5 meters.
The front part of the future uterus is processed with a plane and finished with a grinder, and the grooves are cut out with a hand-held circular saw and selected with a chisel.
The queen is embedded between the skull and slam logs.
First, grooves are made in the skull logs and the queen is installed in them on a moss cushion.
It is advisable to make the depth of the grooves such that the groove for the ceiling boards in the uterus is at the level of the junction of the skull and flap logs. In this case, it will be enough to trim the ceiling boards along the bottom edge (there will be a separate article on ceilings), and they will fit tightly to the log, as a result of which you will not have to select a groove in the skull log on which the uterus lies.
Then a groove is made for the queen in the flap log and it is installed on top, also on the moss.
But you will have to make grooves in the logs opposite the uterus. They are made level with the grooves of the uterus, otherwise the ceilings will not be even.
The installation of the log house could have been completed at this point, but I would like to bring to your attention one more nuance, which is very suitable when installing the log house on a low foundation with a low base and well protects the first crowns from rotting.
I found out about him by accident. God sent a centuries-old grandfather, who stated that his log house stood for fifty years, and he never changed the first crown, because he put it on a horse.
The hinny itself was changed twice, but the crown remained like new.
What a hinny is, I never got it out of him. The board says, but which one, he can’t explain. I even started to drive about this: on top, that means the horse, and on the bottom, the horse.
In the end, during the next disassembly, I came across this little horse. The fact that this is not a hinny, but a lounger, I already figured out myself, but what’s most offensive is that it really turned out to be a simple board, about 50 x 150 mm.
The first crown on it really looked great, although the lounger itself was a little rotten.
As usual, two layers of roofing material are placed on the foundation, then a 10 cm layer of moss, a planed and impregnated board 50 x 150 on top of it, another layer of moss on it, and then the first crown on it.
After the entire frame has been assembled, a cap board is nailed to the outside of the deck chair, and on the inside, the deck itself is additionally caulked with moss.
You have to work with an ax with a blank board to fit its upper end to the log. And so that rainwater does not flow under it, a tide is made above it in a special way, but this will be a separate article.
After installing the first two logs, the side logs are immediately placed on them, but the sunbed under them is placed after assembling the log house, and perhaps even after installing the roof, so that they are guaranteed to fit tightly on the first ones.
You can close the opening between the side logs of the first crown and the base with a brick, as if lifting the base in this place, or with a beam.
It is laid with a brick if half of the side log is left under the floor, and with timber if the floor is made along the first logs of the log house.
Well, be that as it may, you have a sunbed under a side log, or a beam, they are installed in the same way. First, wedges are driven in between the deck chair and the base, both outside and inside, with which the deck chair is pressed very tightly against the log.
The resulting gap is filled very tightly with moss.
Then the wedges are removed and driven in between the log and the deck chair
In this case, you need to use a heavy sledgehammer so that the lounger presses the moss laid between it and the base as tightly as possible, and then again very tightly fill the resulting gap with moss.
Then the outer wedges are removed, and a blank board is nailed to the bed, after which the moss is heartily forced out from the inside.
After this, the internal wedges can be removed
.
How to lift logs onto a log house
So, the first crown has been installed, now you need to lift the rest, which means you need a special device to do this job.
Very often this site receives a request: “How to make a beam crane for lifting beams or logs.” So, don’t bother yourself, all you need is two six-meter boards 50 x 150 mm, and thirty meters of jute rope.
The simplest and most effective device for lifting logs and timber onto walls is made from these materials.
For example: we raised a log house 6 x 7 x 3.2 m together with our 16-year-old son. I’m far from Hercules, boy, even more so, but they easily lifted all the logs.
Although I have a crane, and at first we tried to lift logs with it, but after the first log we realized that ramps are better.
Unfortunately, I crushed the camera during this work, so I’ll try to make a drawing.
That's all. We pull on the free ends, and the log calmly rolls up the slopes to the top. The timber is rolled in exactly the same way. Jute rope clings well to corners and turns it over. The beam moves even easier than a log, since it weighs less.
The slopes on top need to be attached to the log with self-tapping screws so that they do not come off, so you should have a screwdriver at hand. And inside the log house, along the perimeter, scaffolding is made on two boards, which rise as the walls rise.
The first time the scaffolding is made at a height of about 1.2 meters, then it is raised to a height of about 2.2 meters, and that’s it.
If the beam under the slopes is still damp, then it noticeably bends under the weight of the log. In this case, somewhere in the middle part, supports are placed under it, which are fastened on the sides with self-tapping screws, and the supports are first placed closer to the foundation, and then, as the log house rises, they move closer to the beginning of the slope.
After lifting, the log rests well with its ends on the opposite walls, we simply move it to the installation site and place it on the previous crown on which moss is previously laid.
I explained and showed in detail how to lay moss on a crown in the article Moss for a log house
The side logs, after lifting, are not particularly difficult for two people to deploy around the perimeter, using the corners, and bring them to their walls.
Follow the log markings
Tapping the log house in the corners
After all the crowns are installed, you need to pad the frame in the corners. This operation solves two problems:
1. The frame settles more tightly.
2. The geometry of the log house assembly is checked and, if necessary, corrected.
Punching is done from the outside using a heavy sledgehammer. At the end of each log, two or three good blows are applied, after each of which the frame sags noticeably.
If the cut is into a paw, then you need to hit at the protruding ends of the paw, directing the blow as if into the log house; if into a cup, then just at the ends of the logs, and not so hard.
When all the logs are pierced, a plumb line is taken and the corners of the log house are checked. The plumb line should fall from the center of the upper log to the center of the lower one. If a deviation from this vertical is detected, then the upper logs, most likely from several crowns, are knocked into place with the same sledgehammer.
This goes through all the corners until the log house takes its normal shape. Of course, you don’t need to catch the center of the log in millimeters. Care of 2-3 centimeters does not play a special role.
After punching, you can move on to the roof, but since the classic roof is now only done on some bathhouses, I don’t see the point in showing it.
In a separate article I will show one original version of the roof, under which there is both a log house and the stone part of the house; maybe someone will find the solution itself useful, although now, no matter the roof, it is a separate work of art, simply pleasing to the eye.
I wish you success in your work.
Section Construction >>>Subsection Loghouse>>>
Come on, what else is interesting?
How to choose a log house Moss for a log house Finishing a log house How to cut a log house
Lifting methods
Preparatory work involves choosing a method of carrying out the work. You can use more than just jacks to pour a new foundation. This method is effective and takes more time, but unlike lifting with a crane it causes less damage to the building. The building can be lifted in stages from each side or from all sides simultaneously. If there is only one jack, and its lifting power corresponds to the weight of the building, then the building can be lifted a little from each side.
To do this, the device is located at a certain point in the house, and the building is raised by 3 cm. It is necessary to place a support under the resulting space and move it to another place. This will allow the building to be raised to the required height. This method is dangerous, since if the height changes, the walls may not bear the load and collapse. A height difference of 2 cm in the crown area will be equal to 6 cm at the level of the ridge.
Stopping the subsidence process
Shrinkage is a natural process. However, when the work is carried out correctly, it occurs unnoticed and does not lead to consequences in the form of distortion of the structure and the appearance of cracks. When the foundation sank, negative manifestations of the shrinkage process appeared, so it is necessary to raise and strengthen the supporting structure of the house, then the initial action should be to stop the subsidence process.
To establish the shrinkage rate, beacons (plaster or paper) are glued to the crack that appears. If the settled foundation continues to rapidly deform, then the beacons will also quickly collapse.
When it is determined that the foundation has subsided very quickly, then actions to restore it should begin promptly. To prevent the process, the following steps should be taken:
- Dig a hole with a 35˚ slope directly next to the base of the house.
- Place an asbestos-cement or metal pipe (diameter 15-20 cm) into the hole.
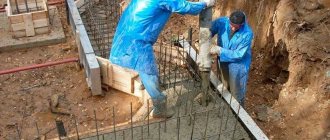
- Pour concrete or cement mortar over it, pouring it until the ground can absorb it.
- Take a break for a couple of hours, monitoring the condition of the remaining solution - whether they are absorbed by the earth or not.
- If the concrete is completely absorbed by the soil, then the next pour can be done in a day.
- To ensure good saturation of the soil under the foundation of the house, the actions are performed several times. Finally, a few days after the last filling, the beacons are installed again and checked for destruction. If they tear, then you need to continue pouring the solution.
This approach allows you to effectively strengthen the existing support of housing construction. Next comes the process of strengthening the structure:
- the old foundation is surrounded by a dug ditch (trench) 20-35 cm wide;
- formwork boards are laid along the bottom of the ditch from the edge of the outer side;
- between the elements, strong metal pins are driven into the support, onto which the mesh is attached;
- the design resembles reinforcement poured with concrete.
The use of such reinforcement of foundations allows you to correct the bearing capacity of the foundation of the house, distributing the load horizontally. This will prevent further subsidence. However, if the corner of the building has sagged, it may be impossible to lift it yourself. It is better to seek help from specialists.
Second lifting technique
Preparatory work involves choosing a method of carrying out the work. There is another technique that involves simultaneous synchronous work from all sides. Jacks are installed along long walls; about 60 cm should be moved inward from the corners.
If the crown logs are worn out and the wall length is more than 4 m, additional jacks can be placed in the middle of the walls. The work is carried out synchronously, and the log house is raised by 3 cm in one go. Each stage of lifting must be supported by support beams or pillars. This method is effective and not so traumatic for the craftsmen and the log house.
How to position the jack
When lifting a house, it is important to position the jacks correctly. These works will depend on the condition of the crown. If the lower logs are rotten, use a circular saw to use a jack to drill holes up to the white log. The head of the mechanism will rest against it, and rotten logs should be replaced.
A metal plate is installed under the jack, which will prevent the device from sagging. If you are wondering how to raise an old wooden house, then you need to inspect the crown. When it is undamaged, you need to make a hole in the old foundation to install the jack. A channel or metal plate is installed on the concrete base. In each of these cases, a square steel plate with a side of 10 cm is installed under the head of the jack. It will distribute the pressure of the device on the log. The place where the head rests should be sharpened, which will ensure the evenness of the crossbar.
Reasons for replacing the foundation
Beds lying in the ground deteriorate over time under the influence of dampness. Freezing in winter, in spring they thaw, swell and begin to crack and rot. After several decades, in such conditions, the logs become completely unusable. There are several reasons for the destruction of the old foundation under the house:
- too much load;
- errors in calculations for bed depth;
- the foundation under the building has rotted from age.
- unsuccessful reconstruction, which led to an increase in the weight of the structure;
- improper foundation laying;
- freezing of the soil, which caused cracking of logs.
Restoration of the foundation under a wooden house must be carried out immediately after defects have been discovered. Rotting of the beds leads to destruction of the base. After this, the structure begins to settle to one side. Failure to distribute the weight of a building causes it to collapse. Living in a dilapidated house is unsafe.
Height control
When restoring the foundation, you will need to control the lifting height. To do this, it is forbidden to use the tracking method above the lifting level due to the magnitude of the rod shift, since the device will sag when lowered. To control the height, marked slats are used, which are located in the corners of the house.
When performing this work, you need to ensure that the lifting mechanism is vertical. If you notice that the jack is misaligned, work is stopped immediately to align the mechanism. Otherwise, the house will fall from its existing height. The house can be raised to a height of up to 50 cm. This is enough to pour a new foundation. However, a height of 10 cm will also be enough to carry out the work.
Preparation of materials and tools
In order to raise the house and pour a new foundation, you will need to prepare:
- mechanical or hydraulic jacks;
- cement;
- granite gravel;
- boards;
- fittings;
- sand.
For a small wooden house you will need jacks with a lifting capacity of 5 tons and a minimum of 4 pieces. To prepare concrete, high-strength cement should be prepared. For the same purpose, you will need crushed stone or granite gravel of the middle fraction. Before raising the old house and pouring the foundation, it is necessary to prepare all the materials. To fill a new base, you will need reinforcement, the thickness of which is from 10 to 12 mm. The best option would be a 14mm rod. To install the formwork you will need plywood or boards.