Creaking floorboards are the most common problem in homes with wood floors. Its appearance can be caused by various reasons, and it occurs not only in old houses, but also in new buildings. To get rid of an annoying sound, it is not at all necessary to undertake large-scale repairs: there are several simple methods that will help quickly and at minimal cost eliminate any squeaks. First, you need to establish exactly why the boards are fastened together, and only then choose a way to strengthen the wooden floor.
How to strengthen a wooden floor so it doesn't creak
What should a wooden house be like?
The floor in a wooden house should be strong, durable, warm and smooth, with an aesthetic appearance.
When performing work on installing a floor in a wooden house independently, they take into account the above requirements, and also determine the procedure for performing the upcoming work, take into account the characteristics of the structure of the building and the individual characteristics of the operation of the house. First, you need to consider the different flooring options that can be installed in a wooden house, study their pros and cons and, taking into account the operating conditions, choose the appropriate option.
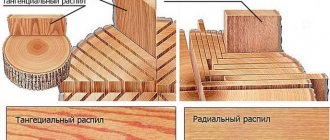
Natural wood in the interior of a country house
Ways to strengthen wooden floor beams
The main types and methods of strengthening wooden floors are given in order of increasing labor costs and duration of work.
Type of amplification without changing operating conditions
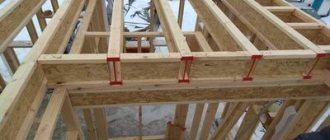
Reinforcement with wooden overlays
The method is used when the tree is damaged. The pads are installed on both sides of the timber beam (on the sides or top and bottom), as tightly as possible to it and fastened (tightened) through with a bolt
It is important to treat the damaged area and pads with an antifungal solution. In critical cases, if the area is severely damaged, it is better to remove it
To strengthen the beam, you need to attach an overlay along its entire length.
Reinforcement of spans with metal plates (plates) or rod prostheses
Steel plates are used instead of the wooden ones described above. The metal also needs to be treated with an anti-corrosion solution. The device diagram is shown in the figure.
Reinforcement of flooring with carbon fiber (carbon fiber reinforced plastic)
Modern reinforcement technology (carbon fiber reinforcement). Carbon fiber (strips, sheets, plates, threads, fabric) is glued in several layers until the required beam stiffness is achieved. The ease of use and lightness of the material lead to the fact that carbon fiber is gaining popularity as an effective means for restoring beams and building structures.
Below is a diagram of reinforcement (strengthening) of floor beams with carbon fiber.
Reinforcement at the ends with wooden or metal prostheses
The technology allows you to strengthen the beam at the junction with the load-bearing wall. This is exactly the place where, due to temperature changes, wood damage occurs faster.
The diagram below shows the technology of reinforcement with prostheses made of channel, rolled profile
Installation of a rod prosthesis
The bar prosthesis of the Deidbekov system is made of two paired trusses, which are made from scraps of reinforcing steel with a cross-section (diameter) of 10-25 mm. The length of the prosthesis should be 10% greater than twice the length of the rotted end of the beam, but not more than 1.2 m.
- Install temporary supports under the ceiling at a distance of 1-1.5 m from the load-bearing wall, consisting of racks and purlins.
- Disassemble the ceiling from below to a width of 75 cm and from above - 1.5 m from the wall.
- Cut off the damaged section of the beam (0.5 m)
- Insert the prosthesis blank vertically into the interfloor ceiling and turn it to a horizontal position, first pushing it onto the beam, then pushing it into the wall niche in the opposite direction.
- Move and nail the sliding strip.
Reinforcing beams with truss ties
Type of amplification with changing operating conditions
Strengthening wooden floors using these methods requires a significant restructuring of the supporting structure of the beam spans.
Changing the work pattern
If it is not possible to strengthen the wooden floor beams, you can try to unload them, i.e., distribute the load from the existing beams to additionally installed elements.
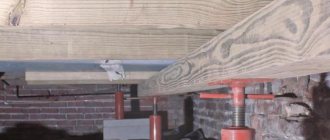
Supports supporting beams from below are a good way to redistribute the load from the beam to the support.
Strengthening floors by installing additional beams
If the existing logs are intact and intact, their load-bearing capacity can be increased by increasing their number. Installing additional wooden beams will increase the load on the structure. When installing new logs, it is imperative to protect their ends with roofing felt to avoid damage.
We hope that from the above methods of strengthening wooden floor beams, you will choose the one that will solve your problem in the best way and at minimal cost.
Advantages and disadvantages
In a building, the beam is positioned horizontally (sometimes at an angle) and distributes pressure onto the supports, which are walls, columns, pillars and other load-bearing components of the structure. Accurate calculation of wooden floor beams guarantees the strength and stability of the entire structure. What is important here is the correct selection of certain indicators - length, thickness, spacing.
Wooden floors are used in the construction of cottage-type frame structures, private wooden houses, dachas and outbuildings, combined buildings (brick or block) - in this case, the choice is determined by reducing the load on the load-bearing structures.
Wooden beams are especially in demand in low-rise construction. They have a number of advantages:
- strength and durability - wood is resistant to shock loads, mechanical stress and, with professional processing, will last 100 years or more;
- relatively light weight, which reduces the load on walls, supports and foundations;
- simple installation compared to metal or reinforced concrete floors;
- installation does not require special equipment and mechanisms;
- aesthetics - the tree looks representative even without decoration;
- environmental friendliness - natural material does not harm health, but on the contrary, creates a healthy microclimate in the house;
- maintainability - if required, it is easy to strengthen wood in various ways.
- without special impregnation they are fire hazardous;
- less durable in comparison with metal and reinforced concrete floors;
- susceptible to moisture, fungus and insects (with low quality wood);
- may become deformed due to temperature changes.
Well-dried wood, treated with fire-resistant compounds and antiseptics, has almost no disadvantages and will be the preferred option for constructing floors in a private house.
Experts recommend choosing coniferous wood - it contains resins (a natural antiseptic) and is denser than deciduous wood. The ideal building material is made from pine or spruce, which grew in harsh conditions.
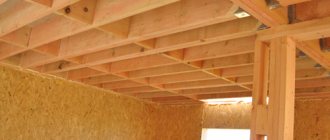
Design
Wooden flooring is the oldest and at the same time reliable method of covering. First of all, it is worth understanding the design of the wood covering and how it is constructed. Traditional construction consists of: wooden floor beams, joists, floorboards and baseboards.
The main element is logs. They are a kind of lathing, a frame on which the floorboards are laid. They are needed to ensure that the final structure is strong and even. Any violation in the joist design will affect the quality of the floor as a whole.
The bottom line is that the main function of the joist is to provide the floor with a flat surface. They also facilitate the passage of air within the deck structure. This prevents wood elements from rotting.
Danger Rot detected
If, when examining the floor and joists, you find areas of rot, they must be urgently replaced. In cases where only small areas of the joists are affected, you can do without completely replacing the floor. It is enough to remove the boards (this will give an additional opportunity to carefully inspect them and replace damaged ones), cut out the damaged piece of timber and replace it with a new one.
As you can see, most problems with uneven floors can be solved with little effort. And only in cases where the wood is severely damaged by moisture or dry rot will the floor have to be completely replaced. In any case, you should not lay the finishing coating on a shaky, uneven floor. This will inevitably lead to damage.
Natural wood floors are in no way inferior to their position in the building materials market, even taking into account the rapid development of more and more new floor finishing technologies. At the same time, this environmentally friendly material is not absolutely eternal, so wooden floors require periodic repairs. During use, a wooden floor inevitably acquires some disadvantages over time. However, by carrying out simple measures you can get rid of unpleasant squeaks, cracks, and unevenness for a long time.
Strengthening wooden beams using prosthetics
If the timber is damaged by fungus or insects, then the floors can be repaired by strengthening the structure with the help of prosthetics. The prosthesis is a special small metal truss that is installed in place of the damaged area.
Prostheses are made from channel bars or welded using metal rods. To repair on your own, in this case, it is better to use a channel, since it is produced in standard sizes, and you only need to select a suitable prosthesis. Thanks to its shape, the channel perfectly withstands existing floor loads.
To strengthen the floors, prosthetics made from channel or metal rods are used
Damage often occurs in the part of the beam that rests on the wall, since it is in this place that the logs are exposed to sudden temperature fluctuations and high humidity. If this part of the structure is damaged, then a system of wooden and metal prostheses is used to strengthen the floors.
Before starting work to strengthen the structure, the damaged element is supported with supports. The damaged area is cut out. The cut is treated with antibacterial compounds.
Next, wooden overlays are selected so that the total thickness of the structure is slightly greater than the thickness of the original structure. An insert is inserted between the pads. The liner is fixed to the linings using nails.
Strengthening the structure with a wooden prosthesis
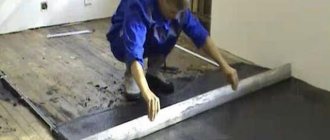
Elimination of minor defects
Restoring a screed with your own hands if there are small cracks is quite easy; for this you need:
- Using an angle grinder with a diamond disc, slightly widen the crevice;
- Remove loose pieces of concrete along the edge of the crack;
- Prime the resulting cracks;
- Fill the cracks with tile adhesive.
Renovating an apartment involves some difficulties that are worth mentioning. If the concrete surface is cracked in the bathroom, it is impossible to repair the defects with ordinary tile adhesive. In just a couple of months it will peel off due to high humidity in the room. If the microclimate in the room is specific, a mixture with water-repellent properties should be used to fill the defects. You can see how to repair a screed in a bathroom in the video below.
When reinforcement is needed
It should be noted that it is necessary to strengthen beam structures not only when constructing an attic, but also for other compelling reasons. Namely, when the load-bearing characteristics of wooden beams decrease due to the poor condition of the wood resulting from:
- incorrect calculations;
- high humidity;
- accidental damage;
- vital activity of insect pests or rodents;
- the appearance of unacceptable deflections;
- cracking;
- periodic exposure to temporary loads unforeseen by the design.
Professionals do not recommend postponing restoration work for a long time. Failure to resolve the problem in a timely manner can lead to dire consequences and even tragedy. To competently assess upcoming events, it would be wiser to invite a specialist.
Features of processes associated with reinforcement of floors
- Insufficient level of mechanization of work;
- Carrying out installation activities in conditions of a obviously limited front (while performing work, the master is in a cramped environment due to the limited space of wall structures);
- The need to carry out a complex of large-scale preparatory work, characterized by high labor intensity (punching nests, grooves and grooves in preserved structures);
- The inability to eliminate errors made during the implementation of the project, which leads to the need to cut off individual structural elements.
Necessary clarifications
For all its positive qualities, wood still has a number of negative parameters. Of the most basic:
- relatively low endurance of both the floor beams and the entire structure as a whole. The maximum load is 500 kg/m2, and in most cases it does not exceed 200-300 kg/m2. Therefore, deflection is very likely;
- low sound insulation performance, which is typical for all wooden floors. They transmit the entire range of sounds, from airborne noise (conversation, music, murmur of water) to percussion, which occurs during repairs, moving furniture and even steps;
- fire hazard, to combat which it becomes necessary to treat wooden beams with special compounds;
- defenselessness against bioattacks. Wood is susceptible to rotting and woodworm damage, so wooden beams need additional impregnation not only from fire, but also from natural enemies.
Despite all the shortcomings, wooden structures do not lose their position. Even when strengthening the floors is considered vital. And this need may arise for various reasons. Watch the video:
Laying logs on the ground
The method is used for outbuildings, bathhouses, gazebos, verandas, etc. The wood must be treated with antiseptics. It is better to have a columnar foundation; if you want to make a more durable strip foundation, then it is necessary to provide vents for natural ventilation in advance.
How is this floor made?
Step 1.
Remove the topsoil. You can use it to fill the beds or level the area in front of the house.
Step 2
. Mark the columns. The distance between them is selected taking into account the load and size of the logs. The posts can be made of concrete, block or prefabricated. The dimensions of the supports are approximately 40x40 cm, the burial depth is within 30 cm. A layer of sand ≈ 10 cm thick should be poured onto the bottom and compacted.
Step 3.
Fill the supports with concrete. To prepare concrete, you should use two parts crushed stone and three parts sand for one part of cement. Water is added as needed. There is no need to make formwork in the ground; formwork from boards or OSB scraps is installed above the ground level. During the manufacture of formwork, you need to use a level; all edges must be strictly vertical.
Step 4.
Proceed to fixing the lags; you also need to start work from the outermost ones. For precise horizontal alignment, you can use shims. It is not advisable to take wedges made of wood; over time, they will dry out and wobble will appear: the floor will begin to creak unpleasantly when walking. Between wooden structures and concrete surfaces, it is imperative to place two layers of roofing material for reliable waterproofing.
Step 5.
After the outermost logs are laid, a rope is stretched between them and all the remaining ones are laid under it. The logs are fixed with metal squares on dowels and screws. To increase stability, it is recommended to install them on both sides. Floor boards can be laid directly on the joists or a subfloor can be laid first. The final choice depends on the characteristics of the operation and purpose of the room.
Always select joists with a safety margin, especially in cases where the installation method involves bending loads. It must be remembered that correcting mistakes made during the construction of flooring always costs much more than carrying out the work with high-quality materials and in compliance with recommended technologies.
Choose your joist boards carefully. They must be absolutely healthy without signs of rot. The presence of through cracks and rotten knots is completely prohibited. If there are large healthy through knots, then you need to install the joists in such a way that there is a stop under them.
When attaching the logs, do not allow the possibility of wobbling.
Most loose joists cause very unpleasant squeaks in the flooring while walking. To eliminate such phenomena, you will have to remove floor coverings; this is time-consuming and expensive; it is not always possible to keep the dismantled materials in a condition suitable for reuse.
Modern topping technology
If the use of impregnations often refers specifically to, then strengthening the floor even at the pouring stage is possible using reinforcement and other means. Reinforcement has already been discussed above. But another option is to use a topping technique, which makes it possible to provide the concrete structure with greater resistance to various adverse factors.
The topping is represented by dry mixtures, including cement, polymer additives and fillers of various natures (for example, quartz).
Research conducted on the use of topping has shown that those reinforced using this method are able to withstand significant loads and become resistant to impacts.
It is noted that the level of wear resistance of concrete reinforced using topping technology is 8 times higher than M350 concrete, approaching its characteristics to M800 concrete.
Concrete reinforced using this method is able to withstand the influence of diesel fuel and gasoline, but is slightly less resistant to aggressive chemicals (for example, acids).
Using this amplification technology, the process is also divided into preparation of the base and main work. First, prepare a concrete cushion from high-quality compacted crushed stone and sand. After this, a concrete screed is performed. In accordance with the project, reinforcement is carried out or formwork is installed, and a vapor barrier layer is laid.
The concrete laid on the surface of the cushion is leveled using special devices. Today, beacons or vibrating screeds are often used.
After laying the screed and drying it, wait a while to allow the concrete to acquire the necessary strength. Next, the concrete is rubbed with specialized mechanisms, achieving its ideal smoothness.
Concrete grouting is done twice. First, a rough grout is performed to eliminate significant surface errors. For the second time, finishing grouting is already carried out using the blades of troweling mechanisms, also called “helicopters”. It is at this moment that topping technology is introduced: the topping mixture is scattered on the concrete layer and then it is rubbed into the concrete thickness using the same mechanisms.
As a result of applying the topping, the floor surface becomes smooth and resistant to abrasion.
The wooden floor is walking. Why does a wooden floor begin to spring over time?
Wood floors used to be widely used in housing construction. Now new technologies have replaced outdated materials. The main reason for refusing to use wooden floors is their ability to spring and creak. This is a natural process that cannot be prevented. However, living in an apartment or private house where the floors make unpleasant sounds is very unpleasant.
The formation of creaks and the springy effect of a wooden floor is quite understandable. Even the driest boards dry out even more over time, decreasing in size. The logs on which the boards are laid also dry out. Their cross section becomes smaller. All this leads to the sagging of the boards, the formation of cracks between them, creaks and a springy effect when walking on them.
The springing effect is aggravated by the fact that when the size of the boards decreases, the tongues at their ends become loose and break out. In addition, due to the loosening of nail joints, the fastening of the boards to the joists is disrupted.
Another reason for the springy effect of the floor may be violations of its laying technology. For example, when they use too thin joists, or make too much distance between them. There are cases when the floor is lined with boards that are too thin and cannot support the weight of furniture and people.
You can eliminate problems with a wooden floor with the help of repairs. However, first you need to find out the cause of the problem. This will help determine the scale of repair work and the need to prepare certain materials.
If the springing effect appears due to the appearance of gaps between the boards and their exit from the end grooves, the problem can be solved simply. The boards are simply pushed together. The resulting space is covered with the same board. If during the repair process boards with wide cracks or a broken end groove are identified, they should be replaced. Otherwise, it will not be possible to completely get rid of the springing effect and squeaks.
It happens that one or both ends of boards rot, but the middle remains intact. In this case, the entire board does not need to be changed. It is enough to remove the damaged ends and cover them with fresh pieces of board.
Small cracks in the boards are filled with putty and sanded. If the cracks are too wide, putty will not work. The boards will have to be replaced.
The biggest problem with the appearance of a springy effect on a wooden floor is caused by incorrectly laid, sagging or thin logs. To fix this problem, you will need to disassemble the entire floor covering and replace or re-install the joists.
Methods for eliminating squeaks
So, when the reason is determined, you can choose the optimal method of strengthening the floor. There are several effective methods that have long been tested in practice by home craftsmen.
| Ways to strengthen the structure | Causes of squeaking | Peculiarities |
| Using dowels | Small gaps in the flooring, loose end connections | Minimum labor costs and financial investments with high efficiency |
| Strengthening with anchors | Gaps between the subfloor and joists | The method is expensive, but very reliable |
Pulling with self-tapping screws | Loose connection of floorboards to joists | Economical and fast method, no need to spend a lot of effort |
| Floor bulkhead | Worn material, drying of floorboards, presence of large cracks and other damage | The method is time-consuming and labor-intensive, but it allows you to effectively eliminate squeaks and other defects |
| Bonding floorboards | The presence of wide cracks in the flooring as a result of drying out | The method is effective and durable, but requires some experience and physical effort |
| Foam blowing | Small gaps in the floor, loose fit of elements | Expensive, but quick and easy. The method allows you to remove squeaking for a maximum of 3 years |
Using self-tapping screws as supports | Deflections of boards due to large distances between joists | Easy to implement, but not suitable for high traffic areas |
Requirements for the floors of rooms in a multi-level house
- Have maximum rigidity and minimum deflection. The ceiling must withstand its own weight and the load from furniture, household appliances, people, etc.
- The design is simple and corresponds to construction technologies.
- The materials used are not afraid of moisture, have a long service life, and are resistant to abrasion.
- The flooring is made in a fireproof design, and its fire resistance limit corresponds to the permissible values for this material. For wooden floors without a protective coating, this value is less than 15 minutes.
- The ceiling has good sound insulation and complies with special standards for residential premises.
- If the temperature difference on different floors is greater than 10 degrees, the floor must be insulated.
- The load-bearing capacity of the deck corresponds to the operational load of the entire building.
- The appearance of the floor should be attractive and not differ from the style of the room.
Permissible load
The most important indicator when choosing building materials for load-bearing structures is the permissible load on the wooden floor beam. This parameter shows what operational load the elements can withstand without losing their functional properties.
Permissible load ratings vary depending on the location of the beams. If they are used as an attic floor, then the constant load on the elements will be small - within 50 kg/m2. In this case, the operating load will be 90 kg/m2. For buildings where beams serve as the floor for the second floor, the load is 150 - 250 kg/m2.
However, these are only average indicators that cannot be used as objective data. Each structure requires a professional calculation that takes into account all load parameters and other influencing factors.
Reasons for weakening the load-bearing capacity of the floor
Not only the passage of time can be to blame for the fact that the ceiling sags, creaks and vibration appear. There are a number of possible reasons for this phenomenon:
- the use of insufficiently strong materials in construction - the size of the board or timber is less than recommended, substandard wood, lumber from “dead forest”, etc.;
- an increase in the load on the floor in relation to the design load due to a change in the purpose of the premises, the attic has turned into an attic - it is necessary to strengthen the beams;
- the use of natural moisture materials when laying the floor - in this case, as the timber or board dries, it deforms and cracks;
- leaks on the roof - moisture entering the surface of the ceiling gradually destroys the wood, and even “opens the gate” to bacterial flora, mold, and fungus;
- damage to the beam mass during installation or storage;
- incompetence of builders.
Also, wood is adversely affected by any changes in humidity and temperature, lack of special antiseptic treatment, exposure to aggressive chemical environments and insect damage. Sometimes a colony of ants can destroy the load-bearing elements of a floor in less than one summer season.
To determine the condition of the load-bearing beams, it is necessary to calculate the maximum permissible deflection of the element. The norm is 1/300 of the length of the beam. That is, with a length of 3 meters, the deflection in the central part should not exceed 10-12 mm. If the value is greater, repairs are required - strengthening and strengthening the load-bearing component of the floor.
Reinforcing joists using plywood or OSB boards
For logs made of glued material or structural wooden I-beams, overlays made of plywood or OSB boards are most often used. Such overlays are also installed in the form of double-sided overlays or one-sided lag reinforcement. This connection is fixed using self-tapping screws. The thickness of the plywood element or OSB board element should be no less than 10-12 mm. The size of the overlay for a structural I-beam must correspond to the height of the central part.
Reinforcing joists with plywood
Fixation with self-tapping screws is done on both sides of the linings. It is important that the screws pass through the thickness of all elements being fastened.
What to do if strengthening beams is impossible
If the floor beams are not damaged, but have difficulty withstanding the load and bend, and their strengthening is problematic or impractical, you need to consider the option of installing additional beams or placing supports under existing ones. In this case, the load-bearing capacity of the structures will be strengthened by redistributing the load onto additional beams or racks. The latter, naturally, will transfer the load to the floors of the lower room.
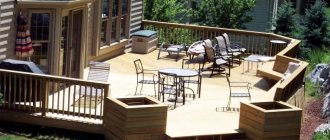
Installing racks, although a simpler task, is often associated with an additional undesirable effect - such supports can clutter up the space and interfere with unhindered passage through the room. The visual component is also important - it is advisable to decorate the supports so that they fit harmoniously into the design of the room.
Additional supports
If the floor beams are in generally good condition but have cracked - for example, due to heavy snowfall - the best option to strengthen them and restore their functionality is to install supports on either side of the fracture. Of course, if we are talking about the attic and other utility rooms. However, a beam equipped with additional support may well fit into a living space if it is designed in a designer manner. The support can be installed either wooden or metal.
The procedure for strengthening work can be reduced to the following points.
- Bringing together the ends of the damaged beam. You will need an analogue of a jack, which will allow you to connect the fragments. Or the coordinated and leisurely work of a team of three or four people.
- Fault fastening. You can use any option of prostheses and onlays: until the supports are installed, they will hold the split part.
- Calculation of the location of the support. It is likely that they will become places of schism. But it may happen that two supports are needed, in those places where the maximum load falls on the wooden beam. This is especially likely if the beam has a large cross-section.
The rest is a matter of technique. The only thing that is required from the repairman is to clearly check the perpendicularity of the support, otherwise strengthening the ceiling will definitely not be possible.
Disadvantages of wooden floors on joists
- Fire hazard. These disadvantages are inherent in all wooden structures and require strict adherence to fire safety rules. Particular care must be taken to protect the floor in hot spots of the house, such as the kitchen and places near the stove, if there is one in the house.
- Weak moisture resistance. Wood absorbs moisture well, which is especially reflected on wooden floors. Excessive flooding of floors on joists should be avoided, since moisture will escape from such a floor cake for a very long time and with negative consequences in the form of swelling, changes in the geometry of the floor, and the possible appearance of fungus and mold.
Excessive wetness of wood floors can cause mold
- Raising the floor level. Logs reduce the height of the room by 15-20 cm, which in some houses can be critical due to initially low ceilings.
- It is dangerous and not recommended to install underfloor heating systems. Warm floors installed inside frame floors will require large costs to protect the wood from high temperatures and create an unreasonable risk of floor fires. Therefore, according to fire safety rules and taking into account common sense, it is not recommended to install underfloor heating systems at the base of a house on joists.
It is not recommended to install heated floors in floors on joists
Manufacturing for a steel podium bathtub
To more reliably strengthen a steel bathtub, you can use a specially constructed podium. For its manufacture, you can use a variety of materials: brick, foam blocks, wooden beams, metal corner, profile pipe and other similar materials.
The most durable material for a podium is brick, but in houses with unreliable floors it is not always possible to use it. For the same reason, concrete is not suitable for the podium. Although wood or foam blocks are lighter than brick, these materials are easily destroyed when interacting with moisture. If you follow some recommendations, you can safely use the above materials in the manufacture of the podium.
Making a podium from foam blocks
The podium made of foam blocks must be made in such a way that the edges of the bathtub rest on the walls. The height of the podium is selected so that it is convenient to use the installed bathtub. Before use, foam blocks must be treated with special moisture-resistant impregnations, which will protect the material from destruction and protect against the appearance of fungus and mold.
Making a podium from wooden beams
Before use, the timber will need to be treated several times with a special protective impregnation. Additionally, it will be necessary to treat the places where the timber was cut. If the structure protrudes beyond the edges of the bowl, then a moisture-resistant sheet of plywood can be laid on the wooden beam.
To fasten the frame, you need to use only special stainless steel screws. Although the timber structure is quite strong, additional insurance will not be superfluous. The bathtub can be installed on additionally laid out stands or used for this purpose are the legs on which the bathtub bowl will rest.
Making a metal frame
The frame for the podium can be made from a metal corner or from a profile pipe. This frame is durable and lightweight. The main disadvantage of this design is the need to weld individual parts during assembly, since it is not always possible to use a welding machine in an apartment. And a frame welded outside the apartment, due to its size, may not fit through the doorway.
If there are no problems with such a frame, then the completely finished product should be pre-treated with anti-corrosion impregnation, primed and painted.
To prevent the structure from moving, it can be additionally secured to the wall or floor. After installing the steel bowl, you can begin covering the podium with plywood or other material.
If your podium is two-level or occupies a significant area, you can provide drawers or niches for storing toiletries.
Other solutions
Before strengthening the logs of the second floor, you can check whether it is possible to unload them, that is, distribute the load to other elements.
For example, you can use supports or install additional logs. The first option, however, is not always possible to implement. The fact is that the supports will take up space and can create inconvenience when moving around the room. But some craftsmen turn them into a decorative element of the interior.
As for the installation of additional logs, as mentioned above, this is not always possible due to the design features of the building. If conditions allow, then it is better to add several elements to the ceiling. This is especially true when the existing joists are not damaged. In this case, the ends of the new elements must be protected with roofing felt before installation.
Is the crack expanding?
How to install heated floors Review of methods for installing heated floors
The cement mixture itself is very susceptible to defects.
In this case, it is very important to find out not only the reason for their formation, but also the dynamics of the increase in cracks in the screed. This practice especially applies to apartments in which the interfloor ceilings are not particularly rigid.
How can you tell if there is a tendency for a crack in the foundation to grow larger?
When checking the coating for the possibility of further deformation, you need to do the following:
- Stick a strip of paper over the crack;
- Do not touch the pasted area for a month;
- If the paper breaks after a specified period of time, we can talk about a tendency for the size of the crack to increase.
What to do in this case? Often, such problems arise when renovating an apartment yourself. Why? Failure to follow the rules for mixing and laying concrete mortar inevitably leads to damage to the material. To correct the situation, it is advisable to seek help from specialists. Of course, the price for restoring a subfloor can be quite high. But in this case you can be sure of the quality of the work done.
Floor insulation
Any type of flooring in a private house along joists requires the installation of insulation. When installing the logs, it is necessary to maintain a distance of 50 cm between them, where the heat-insulating material will be laid.
How to insulate a floor:
It is necessary to lay a waterproofing material on the concrete screed, which will protect the insulation from moisture; When choosing insulation, pay attention to its thickness: it should be 10-15 mm less than the height of the logs. This will create an air gap that will ensure natural ventilation of the floor; Next, you just have to cut the material so that its width is slightly larger than the pitch between the joists, so that the insulation fits in, imperceptibly pushing the joists apart.
Having installed the logs and insulation, you come to the final stage - installation of floorboards. It is important to learn about installing floorboards, because this is an important part of the question of how to make wooden floors in a private house
Having installed the logs and insulation, you come to the final stage - installation of floorboards
It is important to learn about installing floorboards, because this is an important part of the question of how to make wooden floors in a private home
You can fasten the boards to the floor with screws and nails, but you also have a choice:
- You can attach floorboards over the edge by screwing them to the joists;
- You can also attach them through the groove by screwing the self-tapping screw into the connecting groove at a slight angle. You just need to know which screws to attach the boards to the joists is best in your case.
To adjust the boards, it is worth using a piece of board that can be hit with a hammer. The joints must be strong, without cracks. The tightness of the connection will be maintained if you use a tongue and groove board. “Installing a floor in a frame house with your own hands – what and how.”
If there is no tongue on your boards, then you should fasten the boards in a slightly different way:
- Secure the first board with a self-tapping screw;
- Lay two boards in a small “house”;
- Secure the fourth board, which will preserve the “house”;
- Straighten boards installed at an angle using your own weight;
- Secure the middle boards and repeat the operation over the entire floor area.
Thanks to this spacer, you can create a tight connection between the boards.
Conclusion
In this article, we told you which floors are best made in a private home, because the options given have high technical characteristics, in addition, even a beginner can cope with such installation methods.
In conclusion, it is also necessary to give some general advice:
- It is advisable to use self-tapping screws for fastening, because the nails can gradually be pushed out of the floorboards;
- When laying boards, maintain a damper gap (the distance between the wall and the floor is 5 mm);
- It is advisable to varnish the floor to extend its service life.
About laying the finished floor
To install finished flooring options, tongue and groove or parquet boards, as well as plywood panels, are best suited. The latter, as a rule, are laid on top of the insulation and secured with self-tapping screws diagonally and along the entire perimeter. Then the actual installation of the flooring begins.
If the boards are damaged, but the floor is not damaged
Let's start with the simplest option, when the floor is strong enough, not damaged by insects or rot, but over time the boards have become damaged, causing unevenness to appear on the surface of the floor. How can I level a wooden floor in this case?
Option #1 - floor scraping
The easiest way is to try using a sanding machine or a plane. But it should be remembered that this is possible in the case when the floor is located strictly horizontally.
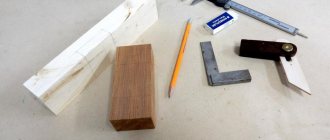
If you manage to get a sanding machine (sometimes you can rent one from hardware stores) or hire a sander, you can simply varnish the finished floor and not spend money on floor coverings. Sanding will not only level the floor, but will also emphasize the structure of the wood.
Before starting work, you need to take some safety precautions:
- Purchase protective equipment (headphones or earplugs, respirators);
- Cover upholstered furniture with plastic;
- Using a hammer, drive the nail heads into the boards, a few millimeters below floor level. If you encounter such an obstacle, the blades of the sanding machine may break;
- Having taken all measures to protect the car, furniture and your own health, you can start working. You need to start from the far corner of the room and move towards the door in a “snake”. That is, when you reach the wall, turn 180 degrees and continue working;
- After removing the top layer of wood, it is necessary to fill large cracks. Use acrylic putty of the desired shade for this.
- After the putty has completely dried, sand the floor again.
That's all. If you decide to varnish the floor, wait until the dust has completely settled, vacuum it up, treat the floor with white spirit or another solvent and begin applying varnish.
Option #2 - using plywood
This method can be used both to correct small defects on the floor surface, and in cases where the floor level is significantly deviated from the horizontal. In the first case, it is enough to simply stuff the plywood onto the floor surface. This must be done in two layers so that the joints of the sheets do not coincide.
When leveling using this method, you will have to tinker a little longer:
- First you need to make markings on the walls. The easiest way to do this is with a laser level;
- Now we set up beacons from self-tapping screws. At a distance of 250-300 mm from each other, screw them into the floor so that the caps form a horizontal surface. Check the level;
- As logs, you can use timber or strips of plywood, 3-4 cm wide. We attach them to the floor with glue.
- Now it's time to lay the plywood sheets. The easiest way to do this is by first sawing the plywood into equal squares with a side of 60 cm. You can easily get these by simply cutting a standard 125X125 sheet into 4 parts.
In order to raise the beacon to the required height, use scraps of the same material coated with glue. Simply place them under the guides
It is necessary to lay plywood squares on the guides with an offset, as when laying bricks. Before final installation, we cut the plywood to size and fasten it to the joists with countersunk self-tapping screws.
Ways to strengthen floors
There are two ways to increase the load-bearing capacity of interfloor beams: by strengthening them or by unloading them.
Beam reinforcement
There are several ways to strengthen the floor beams of the second floor.
Increasing the cross-section with wooden overlays.
The most effective solution would be to increase the cross-section of the beams along the lower horizontal plane with the obligatory condition of creating support for the linings. To do this, you need to either deepen the support sockets in the load-bearing walls, or use special steel fasteners or corners. Boards of the calculated thickness are nailed to the bottom edge of the beam along its entire length.
Galvanized steel support angleSource i.ytimg.com
With a slight deflection, it is possible to increase the section by installing 50 mm thick side plates on the beam. Before this, a support is installed under the point of its maximum deflection and raised with a jack until the beam is level. Then fix it in this position by installing boards on both sides and tightening them with pins.
Side reinforcementSource i.ibb.co
How to calculate permissible load
Competent and accurate calculation of the load on wooden floor beams guarantees the reliability of the structure and allows you to select a material that most accurately meets the specified parameters.
To calculate the permissible load on a beam, you will need the following parameters:
- material (type of wood);
- the length of the wooden beam (or the distance between the walls);
- pitch - the distance between the beams themselves;
- load on the structure.
The latter consists of two quantities - a constant load (the weight of the beams themselves + insulating materials) and a temporary load (the weight of furniture, people and everything that will be in the room).
The permissible load on a wooden floor beam is the most important indicator in the construction of low-rise buildings. If you doubt your ability to perform an accurate calculation, we recommend delegating this task to professionals.
Video description
How reinforcement is performed with a steel channel is shown in the video:
Carbon fiber reinforcement.
A canvas made of this modern composite material, glued in several layers, allows you to very efficiently solve the problem of how to strengthen a wooden floor beam. The carbon fiber is glued with epoxy glue, covering the joints of the strips with transverse layers. After the glue hardens, it turns into a strong and rigid frame, almost as good as metal and perfectly resistant to loads.
The advantage of this method is its ease of installation and the absence of the need for installation tools.
Carbon fiber is used to strengthen a wide variety of structuresSource u10.filesonload.ru
Prosthetics with steel reinforcement.
This method is more suitable for cases where the ends of the beams are damaged, which often occurs when they are poorly waterproofed in the support sockets. They are replaced with prostheses made from paired trusses made of steel reinforcement with a cross-section of at least 10 mm.
Before strengthening the ceiling in a house with wooden floors, a temporary support is installed under the damaged beam and the floors are dismantled from the bottom and top 1.5 meters from the wall.
The rotted end is cut off, and the prosthesis is inserted vertically into the opening. Then it is unfolded, placed in a horizontal position and pushed onto the beam, after which the free end is pushed into the support socket in the wall. The prosthesis is secured to the beam with nails.
Installation diagram of a steel prosthesisSource i.ibb.co