An extension made of rounded logs to a log house is the fastest and most practical way to increase the usable area of a wooden cottage. You can move all the engineering equipment into a specially attached room and make it a summer kitchen, terrace/veranda, bathhouse, storage room or guest room. At the same time, a uniform load on the foundation and load-bearing walls is maintained.
However, before starting construction work, you need to know a few nuances regarding the type of construction, materials, design and architecture of the house. It is these subtleties of construction that we will talk about further.
Is it worth making a wooden extension?
An extension made of logs may be required when expanding the living space or for utility rooms (shed, workshop, garage). The advantage of an extension made from such material is that it is very durable and does not require large costs for insulation from external influences (heat, dampness, wind).
Also, such a room is an excellent insulation for one of the walls , since due to the size of the extension, the ventilation of the house is reduced.
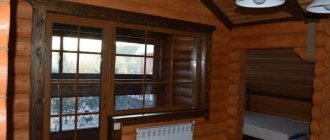
The extension made from logs has an attractive appearance and is environmentally friendly, which is well suited for building a recreation area, both for winter and summer. For example, a glazed or open veranda, a bathhouse with access to the house or a greenhouse.
The relevance of an extension made of logs for each case is individual, therefore, when choosing, you should take into account the purpose of such a room and climatic conditions , as well as the size of the free area, since an extension made of logs can take up more space than a similar one made of brick.
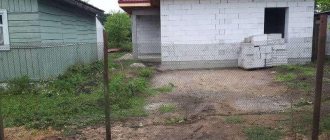
Extension made of logs on a brick base:
Foundation specifics
To build a veranda, terrace or bathhouse from a log, a solid foundation is required. So, when pouring a shallow foundation, work is performed in the following order:
- the abutment zone is excavated and the depth is determined;
- the outline of a new foundation is formed;
- holes are drilled in the existing foundation for mounting reinforcement;
- formwork is installed;
- connects with steel rods built into the old foundation;
- The concrete mixture is being poured.
Pile or screw foundations are tied at the level of the grillage. For extensions, it is advisable to equip the same foundation as the house. In this case, when the soil moves, both objects will behave the same, which will avoid deformations and subsequent major repairs.
Choosing the right log material
There are 2 main types of logs for the construction of residential premises:
- “Wild logs” are a tree trunk from which the bark has been removed down to the bast layer, which is the log’s natural protection from fungus and moisture.
The biggest disadvantage of this type of material is that the wood tapers towards the top even after turning. Because of this, difficulties arise during installation, since in order to make a house without distortions from such logs, the skill and experience of the builders is required, as well as careful calculation of the lumber. - The rounded material is turned on special machines so that the log is perfectly flat and does not narrow.
Also, grooves are machined into such lumber for easy fixation of logs. The disadvantage of this building material is its cost. After processing using sophisticated equipment, the natural protective layer is ground down to the central part and the log must be additionally impregnated with antiseptics and fire retardants.
When choosing material for an extension, the tree is divided into 3 parts:
- “butt” is a section of a log that starts from the root;
- “drugach” – the central part of the tree;
- “Tretyak” is the top of the tree.
For residential buildings, it is the “butt” that is most often used, since it has the greatest thickness, density and strength, and also knots are less common on it.
The “butt” changes least in diameter when compared with the other parts of the frame, which helps to more effectively level out distortions in the walls.
For residential buildings, spruce and pine are most often used , since they are the most common and cheapest. Also suitable for an extension made of logs are cedar, larch, and in the absence of coniferous trees, oak, ash, aspen or other deciduous trees can be used.
For residential premises, wood that was harvested in winter is best suited, as it is more moisture resistant.
You should also choose building material from the northern regions, as it has high moisture resistance and durability, for example, Canadian spruce or Baltic pine. But wood from the middle zone is also suitable for construction, if it was harvested correctly.
When choosing the diameter of the log, you should take into account the purpose of the extension, as well as the weather conditions in the region. If you require a room in which a certain high temperature must be maintained (more than 21 °C), then it is recommended to carefully consider the thickness of the material:
- If the outside temperature does not drop below -20 °C, then a log with a diameter of 200 mm is suitable.
- At temperatures down to -30 °C – 220 mm.
- In case of severe frosts, during which the temperature drops to -40 °C and below, you should choose logs with a diameter of 240 mm or more.
If the log is thicker than required, then this is not a problem, since the excess size will well compensate for temperature changes (more about all log sizes here). When choosing this building material, you should carefully inspect it before purchasing :
- The color of the lumber should be yellow or dark yellow (a darker color means that the wood has begun to age and dry out).
- If there are knots in the log, they must fit tightly, as when dry they can form cracks or reduce the strength of the material.
- It is best to choose lumber without cracks, but if there are cracks, their depth should not be more than 1/3 of the radius of the log.
- The tree trunk after processing should not be “twisted”, as this will make it difficult to level the structure, and it may also move during the drying process. Such logs are used for flooring. They are cut into boards and bars, which is why the “torsion” does not greatly affect the construction.
Some craftsmen believe that the log should “ring” correctly. If you hit the end with an ax, a ringing sound should be formed, which means that the log is of high quality.
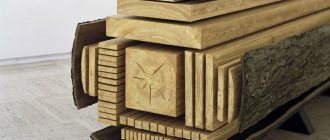
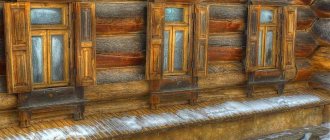
An example of a “butt” with the bark removed:
Tips for creating a project
Before building an extension from logs, you should make a project, as it makes it possible not to break the main structure, and also to avoid excessive waste of material. A quality project includes :
- area calculation;
- selection of building materials;
- calculation of climatic and geological conditions;
- purpose of the structure;
- location of networks (electrical, heat-conducting, sewer and ventilation);
- the presence of window and door openings, as well as the “connection” of the constructed premises to the house.
Also, before starting construction work, you should approve and approve the construction plan in government offices, since if this is not done, you may receive a fine and a decision to demolish the extension.
Stages of construction of the extension
Let us briefly list the main stages:
- Project development.
- Pouring the foundation, strengthening it.
- Construction of walls and ceilings.
- Construction of the roof.
- Laying utilities (if necessary).
- Facing, finishing.
The first step is to develop a project that includes justification for the choice of a separate foundation and accompanying building materials. During the design process, hired designers and planners (when ordering work from a construction company) or the owner of the house (in the case of DIY construction) must take into account that the extension will become a logical continuation of the house itself. Therefore, it is necessary to choose building materials identical to those of the main building.
Difficulties in the process of constructing an extension from rounded logs
The main difficulty in building an extension to a house assembled from rounded logs is that you will need to strictly control the quality of the lumber used. One of the main indicators of quality is the moderate moisture content of the wood. The humidity indicator directly affects the degree of shrinkage of the log house extension. It is also important to ensure that the wood of the logs is free of defects, the processing is smooth, without gaps, and without mechanical damage to the workpieces (chips, saw cuts). If you are not sure that you can choose really high-quality material, deliver and store it under appropriate conditions before construction begins, then make a purchase from a trusted company that sells its own lumber.
What additional requirements will be required?
A log extension will require various types of additional building materials, as they will help make the structure more durable and strong. For example, if you impregnate logs with additional layers of antiseptics, herbicides and insecticides, you can protect your home from fungi, bacteria and insects.
The building material should
also to increase fire resistance.
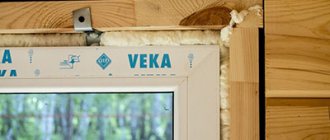
For insulation and sealing cracks, a jute or flax-jute gasket is used.
It is laid between logs during construction, and also plugged into cracks at joints and corners. You can find out more about how and with what to seal the gaps between logs in another article.
When laying the first crowns, waterproofing (boards soaked in mastic) is placed on the foundation so that the tree does not draw moisture through the base of the extension.
Also, when building a roof, various types of covering can be used , for example, slate, “Euro-slate”, roofing felt or tiles. This depends on the design decision as well as the covering of the main building.
Step-by-step instruction
So, the sequence of work:
- To begin construction work, you should choose the place where the extension will be and the type of foundation fastening: rigid coupling or expansion joint. The first option is used if the structure will have a large mass, for example, a building with several floors or a voluminous room made of thick logs, as well as on non-heaving soils.
- For a rigid coupling, a type of foundation similar to the main structure is used (strip or slab), and their depth must match. Therefore, soil excavation is done in the working area of the foundation of the house, so that later the two foundations can be connected using reinforcement.
To do this, holes are cut in the walls of the base in a checkerboard pattern. Their depth should be the diameter of the rod multiplied by 35, and the length of the reinforcement should be 2 times the depth of the hole. A combination of 2 plates is possible only if the main one has a thickness of 40 cm and a protrusion of 30 cm for welding the reinforcement between them.Such a foundation needs to settle for a year, so if there is no extra time, then it is better to use a different type for the base of the extension.
- An expansion joint is the most common method for constructing small extensions on heaving soils.
For this option, a separate independent foundation is made, and a connecting seam from 20 to 50 mm is made. For aesthetics, this space is filled with a board that has been previously wrapped in polyethylene or roofing felt. This filling of the connection will allow the building to “play” without damaging the house, since the load on the base and walls of the main building will be less. - Also, during construction, this seam is filled with insulation and sealed with elastic materials (for example, corrugated rubber and stainless steel linings). The type of connection in the form of an expansion joint is considered the safest, as well as universal, since any type of foundation (pile, strip, columnar) can be used for it.
If you are making an extension to a brick or block house, then connecting the walls should not be done at all, since this is not advisable and can also damage the entire structure. To do this, it is better to use a separate type of foundation and make an extension with 4 walls, one of which will be adjacent to the house. This method is safer and more practical. To insulate the joint between the walls, you can use insulation so that they do not freeze.
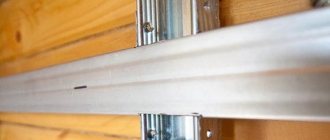
For an extension made of logs to a wooden house, you can use a tongue-and-groove connection. To do this, a groove is cut in the load-bearing walls of the house, and a tenon is turned into the logs of the extension. Logs can also be connected using metal brackets or galvanized corners.
The roof for the extension should be made so that water does not get into the joints between the walls (if any). To do this, you can cover the seam with a stainless steel trim or redo the roof so that the drain is sloping and there are no indentations at the joint.
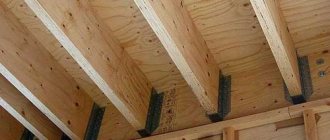
An example of a strip foundation for a log extension:
How to avoid exposure to heaving soil
Builders order geological exploration at the construction site. Conducted soil studies allow us to obtain figures indicating the properties of the soil: composition (clay, chernozem, sandstone, rocks); percentage of substances; moisture saturation of the earth; freezing depth, etc.
For the construction of a house, the service of geologists is justified, but when constructing a frame extension, it is a waste of money. Therefore, they focus on the freezing point of the soil in the region (1.2 - 1.4 m), protect the pile: with roofing felt; expand the base, making a “heel”; insulate the space around to reduce the impact of (ice) frozen ground.
Don't neglect these foundation insurance methods. Take an interest in how similar objects in your neighbors behave in order to intuitively understand what kind of protection is needed.
A common method of pouring a columnar foundation:
1. Remove the top layer of soil around the perimeter of the object being constructed by 10 - 15 cm; 2. Make accurate markings; mistakes are unacceptable; 3. At the location of the post, dig a hole (cube) 50x50x50; 4. Dig a round hole in the middle with a hand drill to hard rock or just below the freezing point of the soil; 5. Pour 15/20 cm of alluvial sand and 10 cm of crushed stone at the bottom of the “well”; 6. Compact the “cushion”, insert a pipe made of roofing felt, a frame made of reinforcement; 7. Pour the concrete mixture (cement, crushed stone); 8. Use a special tool to compact the solution, releasing air bubbles; 9. Make formwork in the upper part, fill the space with mortar; 10. Or lay it out with bricks, building even pillars to the required height;
Subsequently, it is advisable to insulate the perimeter of the foundation (penoplex) and cover it with panels. For a living space, this is done necessarily so that the floors are warmer. Holes are made in the insulating circuit for ventilation of the underground space. A blind area around the posts is desirable - this is protection against moisture penetration.
Conclusion: There are many ways to construct the foundation and roof of a frame extension to a log structure. We have presented the main construction technologies. Once you understand the principle, you can handle any option.
Remodeling an old house: extensions from different wall materials
Our website presents a number of log house projects, for example: Or you can see all prices for log houses. You can calculate the house or bathhouse you need with maximum accuracy using our log house cost calculator. To order and buy a log house, call:
- Vologda
- Moscow,
Comments
No comments yet.
Difficulties during construction
The biggest difficulties in constructing a building are its foundation and fastening to the walls . The first needs to be done so that when the extension shrinks or the soil swells, the foundation of the house is not damaged. And mounting to walls causes connection difficulties.
For example, for walls not made of wood, such a joint is practically impossible, since with subsequent shrinkage and drying out the extension will “lead”, and this can cause the wall to collapse.
To connect an extension made of logs to a wooden frame, you need to make grooves in the walls, and for this you will have to select the size of the lumber so that it matches the main structure.
Extension to a house made of rounded logs
An extension from rounded logs to a log house is the fastest and most practical way to increase the usable area of a wooden cottage.
You can move all the engineering equipment into a specially attached room and make it a summer kitchen, terrace/veranda, bathhouse, storage room or guest room. At the same time, a uniform load on the foundation and load-bearing walls is maintained. However, before starting construction work, you need to know a few nuances regarding the type of construction, materials, design and architecture of the house. It is these subtleties of construction that we will talk about further.
Advantages and disadvantages
The advantages include:
- environmental friendliness of the material;
- aesthetic appearance;
- lightness of construction (with small thickness of logs);
- good thermal insulation (for an extension made of thick logs);
- insulation of one of the walls of the house;
- great functionality.
The disadvantages include:
- attaching logs to the walls of a house can be very problematic;
- alignment of walls due to the narrowing of trees towards the top;
- selecting high-quality material may take time, since the correct thickness of the logs and their external condition greatly influence the durability of the structure;
- The duration of shrinkage of the extension can be 1 year or more.
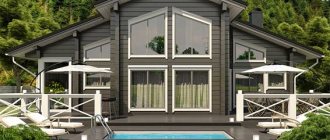
Example of an extension made from logs:
Expenses
When building an extension to a house, the cost is calculated based on the selected logs and the size of the room. For example, 1 m3 of the cheapest rounded log with a moon groove (pine of natural moisture) with a diameter of 200 mm ranges from 7 to 11 thousand rubles.
To build a 6x8 m room with a wall height of 2.5 m, you will need about 11 m3 of wood . An ordinary unprocessed log can cost from 5 thousand rubles. Also, drafting a project in specialized institutions and private offices costs about 25,000 rubles.