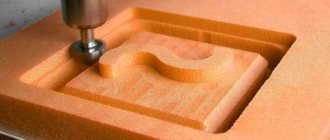
The article describes in detail how to make a wood milling machine with your own hands with all the details of the working platform - bed, tabletop, base plate, additional protective devices. Step-by-step technologies for converting a drill and washing machine engine into a milling machine are presented, as well as the main points of manufacturing a machine with numerical control.
Preparing to make a milling machine
When planning to make a wood router with your own hands, you should proceed from the basic principle. It is better to immediately install the cutting attachment of the machine so that it can process wooden workpieces not only along straight contours, but also along curves. This will be needed for shaped sharpening of edges and making complex grooves. The type of router depends on the tasks being solved.
- For figure cutting, a manual milling machine with a movable cutter, which is attached to a spindle fixed to the shaft, is suitable. The movement of the cutter is provided by a motor placed in the housing.
- Plunge-type milling machines are used to make holes of the required depth.
Plunge router
- A stationary milling machine will allow you to obtain a more complex recess and pattern on a wooden workpiece. In addition, work time is saved compared to hand tools.
Important! For periodic processing of workpieces in small quantities, a manual milling machine is sufficient, but it is better to entrust regular work with large batches of lumber to a stationary tool.
Making a copy router
Copying wood by milling a workpiece is a very delicate matter. The principle of 2- and 3-coordinate (2D and 3D) copying is the same: the copier probe traces the contour of a flat sample (template) or moves along the surface of a volumetric one. The cutter of the milling head accurately repeats the movements of the probe, removing excess wood from the workpiece. You need to move the probe carefully and slowly, sensitively feeling the resistance of the material: the workpiece is not made of thin air. It is better to start mastering wood copying with 2D. It is already possible to make good money in this way: flat decorative parts with molding made on a vertical router are in good demand, and are made quite quickly. But for both 2D and 3D copying you will need a special milling head.
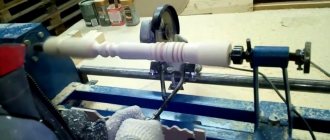
Head
Copy milling heads are available for sale separately, but are expensive. You can replace the branded head with a drill without an impact mechanism: “slotting” drills are unsuitable for copying due to the design features of the spindle assembly. To begin with, any drill or screwdriver will do, but it is better to purchase a tool with increased precision. Such a drill is more expensive than a regular one, but much cheaper than a milling head, and is not inferior in quality of work. You can recognize a precision drill simply by its appearance: on the neck of its body there is a metal collar for installation in the frame of a drilling machine for a drill.
2D
For 2D copying on wood, machines with a pantograph, tabletop and mounted, are used. It’s easier to make a desktop pantograph machine with your own hands, but copying accuracy better than 1 mm will be difficult to achieve. On a machine with a mounted pantograph, you can literally draw and leave autographs on the workpiece.
The structure of 2D copy-milling machines for wood is shown in Fig: on the left is a tabletop one; on the right with a mounted pantograph. The latter is essentially an engraving machine. The probe here and there is needle-shaped with a radius of curvature of the end of approx. 0.5 mm (in engraving up to 0.1 mm or less). Conical roller cutter; By installing it at different offsets in the head cartridge, the width and depth of the selected groove are adjusted.
device of 2D milling copying machines for wood
Do you need a scale?
Drawing and drafting pantographs are made scalable (see figure). Copying on wood is usually done on a scale of 1:1. The fact is that due to the resistance of the material, the error in copying on wood increases greatly due to play in the hinges; a professional engraving machine is a complex, precision, expensive unit. But if the copying pantograph is set to a 1:1 scale, an interesting phenomenon is observed: the beats in the hinges seem to compensate each other, and the overall error due to backlash increases slightly.
Drawing pantograph with scaling
3D
3-axis milling and copying machines (duplicarvers) are quite actively selling on the tool market despite high prices. Using a duplicate carver, you can make copies of it based on a three-dimensional sample (not necessarily wooden; for example, stucco), which, in the opinion of the average consumer, are not inferior to the original in artistic merit.
The device of a factory duplicate carver is shown on the left in Fig. Its copier (mill + probe) has 4 degrees of freedom: swings up and down, back and forth, rotates in a vertical plane, moves left and right. It would be possible to do without the “extra” degree of freedom compared to the number of geometric dimensions of the copied figure if the movements of the copier along all three axes were rectilinear (as in CNC machines), but this is technically difficult and expensive. The same degrees of freedom can be implemented in a different kinematic scheme, which is used in most homemade doublecarvers (center in the figure).
3D milling and copying machines under wood (duplicarvers) of industrial production and homemade
Experienced copiers work with a cylindrical probe and a cutter. In this case, the template is outlined with the very edge of the probe (the annular edge of its lower end); turns out to be working and accordingly. cutter edge. The sample and the workpiece are fixed in exactly the same position on exactly the same supports. During operation, they have to be laid on their sides and turned upside down, each time fixing the stands in a precisely defined position relative to each other. In this way it is indeed possible to accurately copy the complexity figure as on the left in Fig.
It is better for novice copiers to learn the craft on less complex samples, using a spherical probe and a cutter, on the right in Fig. The dipstick needs to be sharpened to order. Micron precision is not required; Instead of a sphere, a drop may hang at the end of the probe. But the tip of the probe needs to be sanded at home with fine sandpaper and polished with felt or leather with alcohol and GOI paste. The diameter of the cutter is taken equal to the diameter of the probe tip, otherwise the contours on the left and right (top and bottom) will not converge. The handle of the probe is also better turned from pear-shaped wood; using a probe from a screwdriver with a ribbed plastic handle, the “recoil” of the workpiece material is felt much worse.
General arrangement of a workplace for a milling machine
The working platform for milling typically consists of the following structural elements:
- bed;
- Workbench;
- table top;
- machine frame;
- drive support platform;
- directly milling machine;
- spindle for securing the cutter;
- spindle launch panel;
- slides that ensure the movement of the workpiece;
- management control system.
General arrangement of the workplace
How to make at home
A milling machine is a very useful device. However, its cost in factory version starts from 12,000 rubles, and increases depending on the power and functional content. Therefore, it is advisable to buy it only for constant use. For domestic use, the machine can be made independently.
Deciding what we will do
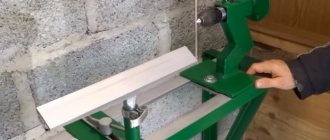
For household use, a machine driven by a manual router is suitable. It has good power, efficiency and is designed for long-term loads. In addition, it is the easiest to manufacture, and milling of workpieces will be very accurate. With its help, you can perform countersinking, cutting quarters, adjusting the ends of wooden and plastic parts, as well as other operations on processing workpieces.
What you will need
Manufacturing a stationary woodworking milling machine does not take much time and effort, as well as the use of special equipment. The required list of materials includes:
- manual frezer;
- old car shock absorbers;
- chipboard or OSB sheet;
- Metal sheet;
- fastening hardware.
For assembly you will need the following tools:
- a set of wrenches and screwdrivers;
- angle grinder with cutting disc;
- vice;
- jigsaw;
- drill;
- set of crowns and drills for wood and metal.
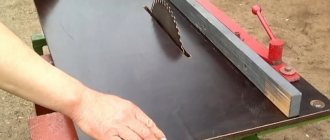
Step-by-step instructions for making a table
To make a working table for a milling machine, you must perform the following steps:
- From a sheet of metal, according to pre-marked dimensions, cut a workpiece of the required dimensions and clean it from traces of corrosion.
- On the reverse side, mark the cutter seats and the table base. Lubricate the places intended for through holes with oil.
- Drill through holes.
- Use a metal bit to cut a hole for installing a cutter.
- Cut a work surface from a sheet of chipboard and drill mounting holes for installing a cutter and base plate.
- From wooden blocks and a sheet of chipboard, assemble a table of the required height. Apply dimensions in the center and cut a hole to install the working surface of the machine.
- Place the work surface in the mounting hole and secure it with countersunk screws or fasteners.
Chipboard sheet is light, durable and inexpensive material. If desired, it can be replaced with a tabletop or made from boards.
Step-by-step instructions for making everything else
A milling unit with a microlift is the working part of the machine. Compared to a table, its manufacture will require more effort; for this it is necessary to perform the following algorithm of actions:
- Clamping the car shock absorbers in a vice, use an angle grinder to cut off the support cups and protruding fasteners.
- By installing a grinding or cleaning disc on the angle grinder, remove any remaining irregularities. In order not to overheat the housing, it is necessary to periodically water it with water during operation.
- Cut off the threads of the shock absorber rod and smooth out the resulting irregularities until a smooth surface is obtained.
- Cover the end of the rod, lubricate it with oil and drill a through hole in it.
- Using a saw, cut the thread in the rod.
- On pre-cut sheets of chipboard or plywood, use a compass to apply markings for making guides.
- Using an electric jigsaw, cut out the outline and guide. Remove any resulting irregularities using an angle grinder with a sharpening wheel or a router.
- Using the first guide as a template, make the remaining pieces. In total, six guides need to be made for the machine. Then, using wood crowns, make through holes in them according to predetermined dimensions.
- Glue three, and then two separately, guides. To do this, use PVA or other suitable glue. After application, tighten the parts with a clamp and leave until completely dry.
- Press a furniture nut into the hole.
- After this, apply a layer of glue, connect it to another guide and, tightening it with a clamp, leave it until it hardens completely.
- Use a wood bit to cut out mounting holes for installing shock absorbers.
- Press the shock absorbers into the guides. It is better to do this by hammering them with a mallet or hammer through a wooden block.
- Cut two supports from a wooden beam and install them between the guides. For fixation, wood screws with a countersunk head or confermats are used.
- After this, you can begin assembling the machine. First of all, you need to screw the previously made metal plate to the shock absorber rods.
- Install the guide pin, which will serve as a milling depth regulator. Screw the fixing nut on the reverse side.
- Place the previously made working surface of the desktop on the base plate and secure it with screws.
- Press the hand router into the seat and secure it. The top edge of the tool should be about an inch above the guide.
- After this, assemble the resulting structure together and secure it with bolts.
After this, you can put a support ring made of chipboard on the cutter, turn on the tool and start working. By watching the video below, you can familiarize yourself with the nuances of making a stationary milling machine from a manual router and watch it in action.
Engine requirements for a milling machine
The main parameter of the electric motor for the future router is power. It is recommended to install the motor at 1100-1200 W. For simple wood processing, 400 W is enough, but higher power will allow you to work with different types of cutting attachments, that is, expand the capabilities of the tool. A three-phase asynchronous motor from a drill, hammer drill, or grinder is suitable.
Three-phase asynchronous motor
Engine speed from 10 to 35 thousand rpm. Insufficient frequency will lead to poor sharpening; excessive frequency can lead to overheating and even fire of the wooden workpiece.
As for power supply, homemade home routers are connected via a standard 220 V network. It is worth equipping the machine with a power cable with a cross-section sufficient for the engine power.
Important! It is recommended to equip the milling machine with a switch for soft start and quick stop modes. The motor is designed so that the motor brushes can be changed without disassembling the housing.
Options for making a homemade router for a home workshop
Before starting production, you should decide on the frequency of use of the machine. Depending on this, the electric motor is selected. Household use involves the use of a 1.4 - 1.6 kW motor, for example from a washing machine. Professional work requires more frequent use, so more powerful and efficient single-phase asynchronous electric motors are used for this.
The optimal number of revolutions for any manufacturing option ranges from 10,000 to 35,000 rpm.
You can also make a machine from a hand router. True, in this case its functionality will be limited, since it will not be possible to produce artistic works with its help.
Step-by-step procedure for assembling a working platform for a wood milling machine
The standard sequence of stages for making a working platform for a wood router with your own hands:
- Construction of the bed.
- Installation of workbench and tabletop.
- Drilling a hole for the base plate to drive the router.
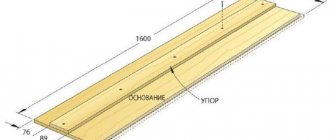
- Manufacturing of one side and two comb stops.
- Connecting the dust collector to the vacuum cleaner.
- Additional protective elements
- Installing the wood router into working position.
- Connecting to the network, checking operation.
Milling table bed
The first thing to construct is the frame - a frame for the milling table. It is made of metal or wood, depending on the material and dimensions of the future workpieces. Type of construction: prefabricated or cast. The primary requirement for the bed is high stability while working with a router.
The metal frame is designed as follows:
- Using a grinder, pieces of corner profiles or pipes of the required length are cut and welded together.
- At a height of 15-20 cm from the floor or other supporting surface, transverse jumpers are welded for greater stability.
- Support plates are welded to the upper ends of the vertical pipes.
- Threaded holes are made in the plates for bolts to fix the future table.
Idea! Instead of a profile, you can use adjustable supports. This will allow you to install a bed for a homemade router even on a not-so-even surface.
Stand with adjustable legs
Milling table
The entire milling process is carried out on a special table, better known as a workbench. Its dimensions depend, first of all, on the area of the workshop, and secondly, on the volume of work. There are three types of workbenches for a milling machine:
- Static – installed in one place as a full-fledged working platform;
- Portable - a table that is easy to assemble and disassemble, which can be taken for on-site milling operations;
- Aggregate – used in spacious rooms.
A portable milling workbench, despite being easy to transport, is only suitable for processing small parts. It is recommended to work with a static table.
Tabletop for router
To make a tabletop for a router, as a rule, dense laminated plywood with a thickness of at least 1 cm is used. Another option is a 2.5 cm sheet of chipboard with polymer protection on top and at the ends. The protective layer, in addition to its direct function, also reduces vibrations during operation. Recesses are drilled into the sheet into which metal profiles are placed.
A used countertop from a kitchen set will do, as long as it does not have the slightest irregularities, nicks, or distortions. This will not only create unnecessary vibrations, affecting the quality of the milling, but can also damage the cutting attachment of the router.
Drive base plate
A rectangular opening is drilled in the center of the tabletop into which the base plate for driving the router will be mounted. To make the machine vibrate less during operation, it is recommended to make the recess round. The main thing is to make sure that the stove and the motor do not come into contact with each other. There should be a gap of at least 1 mm.
Drive opening
The base plate is made from at least 5 glued plywood sheets, but more often from textolite with a density of at least 1.5 cm. The plywood should first be treated with a vibration-absorbing agent. The milling machine is attached to the base plate with long motor bolts, onto which washers with rubber gaskets are additionally placed. Thanks to this, the cutting attachment will move up and down.
Side stop
It is also necessary to make a static side stop with a dust collector socket. Material - a sheet of plywood with a thickness of at least 2 cm. 3-5 holes are drilled in the table for the comb and lifting stop. The first 2 holes should be made at a distance of 0.5 cm from the edges of the rectangular recess for the cutter, the next ones - 2.5-3 cm from the first. The position of the stops depends on the size and quality of the workpiece material. To regulate the slight lateral movement of the cutter, the stop is turned and secured with a clamp.
Table with side support
Dust collector
Milling always produces a lot of dust and chips, so it is important to ensure timely disposal of waste. For this, a regular household vacuum cleaner is used, but you cannot connect it directly to the dust collector pipe - there is a high risk of breakage. The connection is made through an additional device - a dust collector, consisting of the following parts:
- Capacity 15-20 l. A good option is a bucket with a tight lid and snap-on latches.
- The inlet pipe has an internal diameter of up to 2 cm. Its lower end should be beveled by 45° and turned upward by 25-30°. The pipe must be installed at a distance of 1.5-2 cm from the side of the bucket.
- The exhaust pipe has a larger internal diameter - at least 3 cm. The selected end is made in the form of a cone, narrowed to 1.5-2 cm.
The operating principle is as follows. Dust from the milling cutter enters the inlet pipe, through the beveled end of which it is directed into the selection cone of the exhaust pipe. From there, low-density dust comes out into the vacuum cleaner, which will not damage the household appliance.
Principle of operation
Comb stop
So that the workpiece can be fed to the workbench from any side, the working platform for a wood milling machine is equipped with two combs - on the left and right sides. It is important that the comb is made of fine-grained wood: walnut, oak, beech. There should not be the slightest defects, knots, or mold.
The first tooth of the comb is shortened by 3 mm. It will not come into contact with the workpiece, acting as a rebound spring. Without this shortened tooth, there is a risk that the comb will break on the workpiece.
The ridges are attached to the side stop through a longitudinal groove using a bolt with a wing nut. In the non-working position, the comb is fixed with a self-tapping screw also on the side stop through a 7 mm hole. To transfer to the working position, the comb is placed so that all teeth, except the shortened one, touch the workpiece, and is fixed with a wing nut.
Comb stop
Additional design elements
It is also worth paying attention to the auxiliary and protective elements of the working platform for a wood router. They are responsible for the following tasks:
- work area lighting;
- Possibility of emergency stop of the milling cutter;
- protection from heavy dust;
- quick access to the mechanism for cleaning the cutting area from chips and dust.
Even at the stage of designing a tabletop for a wood milling machine, it is worth designating places for future clamps and clamps. In addition, the milling table requires guides and enclosing screens made of plexiglass with a density of at least 4 mm, which increase safety during operation. Areas of equipment that extend beyond the frame are usually marked yellow.
Another additional part of the equipment is overload protection. In unexpected cases - a milling cutter stalls, for example - the system automatically turns off the power supply to prevent machine breakdown. The spindle slows down and the drive stops.
Rule! The on and off buttons on the wood router must be installed so that they do not interfere with normal operation. The handle of the machine should be comfortable and not cause the slightest discomfort.
Which one should I do?
Dozens of different milling operations and at least a dozen types of machines for them are used to process materials. At home, not all of their designs can be repeated by beginners and intermediate craftsmen. 2- and 3-axis CNC machines (2D and 3D wood milling machines) are not discussed in this article. It is possible to make a 2D or 3D milling machine yourself (item 1 in the figure below), but already having quite a lot of experience working on a simple machine, a significant volume of orders and an urgent need for a sharp increase in labor productivity. At the same time, you will have to master programming microcontrollers, because... finished samples are designed for a machine of a very specific design; There will also be significant costs for stepper motors and precision drive parts.
Types of homemade wood milling machines
To begin with, at home, you can make a homemade milling machine using any of the following. varieties:
- Horizontal (item 2 in the figure).
- Vertical (item 3).
- Flat copy machine with pantograph (2D duplicator, item 4).
- Machine for volumetric copying (3D duplicator, item 5).
Tool…
The choice of a machine of one type or another is determined, of course, by the work operations most used by the master. To specify their nomenclature, you must first decide which working parts (cutters) you will most need. Most of them are applicable in both horizontal and vertical machines.
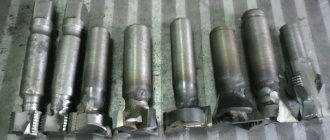
Types of wood cutters
Mounted cutters (item 1 in the figure) are processed primarily. straight edges of the boards: grooves and ridges (including shaped ones) are cut out to their full length, and a chamfer is applied. The spindle assembly of the machine for attachment cutters (see below) is structurally the simplest; its parts can be turned by a 3rd class turner. The required drive power for a processing depth of up to 60 mm is from 1.5 kW. The quality of the material is almost any, ranging from raw material straight from the sawmill. A vertical wood router is most suitable for attachment cutters, see for example. Below is a video in 4 parts:
Video: homemade wood milling machine with attachment cutters
There are many more varieties of milling cutters with a cylindrical shank (landing, seating), because their functionality is wider. But for such a cutter it will be necessary to machine a spindle attachment with a Morse taper for a clamping chuck; It is also possible to use ready-made spindle units from a drilling machine.
End mills, e.g. Forstner cutter (item 2 in the figure above) is a specialized tool; They choose round holes with a flat bottom in thin boards with a decorative coating that cannot be damaged. Have you ever hung doors on furniture? The holes for their loops were chosen using a Forstner cutter. The quality of the material is no worse than straight-layered wood of the 1st grade, chamber dried. Required drive power from 150 W. They work with end mills only on a vertical machine or, with a certain skill, manually.
Note: using a Forstner cutter in a 170 W screwdriver to select holes D32 for door hinges in furniture chipboard 16 mm thick is quite possible, I did it myself.
End (finger) milling cutter, pos. 3, can be threaded into both horizontal and vertical spindles. Using end mills, blind grooves are selected (not the entire length of the board) and tenons are cut for tongue-and-groove joinery joints. It is more convenient to work with an end mill on a horizontal machine. On a vertical surface, it can be used to select long grooves (grooves) of a rectangular profile on the surfaces of boards and beams. Tapered end mills (item 4) are also a specialized tool for preparing parts for dovetail joints. They work with conical end mills only on a vertical machine. For both of them, the required drive power for a processing depth of up to 80-100 mm is from 1 kW. The quality of the material is from commercial wood of the 2nd grade, air dried (from a timber exchange).
End shaped (curly) cutters, pos. 5, also a specialized, but highly sought after tool. They apply molding (including on curved edges) and select shaped grooves (decorative grooves) of any configuration in the faces of the boards. Drive power from 1.2-1.5 kW; The quality requirements for the material are the same as for end mills. To process edges, the shaped cutter can be threaded into either a horizontal or vertical spindle; for working on layers only in a vertical position.
Roller-cone cutters (burrs, item 6) can also be used to select shaped grooves and create a groove on both a horizontal and vertical machine, but in general they are a special tool for copy milling machines. The requirements for the quality of the material are high, as for end mills, but the drive power in the copier can be from 250-300 W.
And, finally, using a circular cutter (item 7) in a vertical milling or drilling machine, round holes of large diameter are cut out in almost any material that is not overly thick (including sheet metal). Required drive power per hole D200 in 60 mm thick oak board approx. 2-2.5 kW.
...and his presentation
Milling can be done in two ways: up and down, see fig. below. As for wood, ordinary straight-layered wood (especially one that is not of very high quality air-dried) is milled only along the way, otherwise the milling cutter can even split and/or fray the workpiece. But in this case, with an excessive feed rate, there is a considerable probability of the workpiece being pulled away by the cutter and damage to the processing profile. Removing dust, sawdust and shavings from the working area (and this is a serious problem) on a vertical milling machine during down milling is difficult, because The dust collector (see below) has to be placed in the field of view in front of the cutter and it obscures the working area.
Up and down milling methods
Note: on a horizontal milling machine there are no problems with removing processing waste during down milling, because dust (sawdust) then flies down, and the dust collector socket can be placed directly on the machine plate (see item 2 in the figure at the beginning and below).
Up milling gives better precision and cleanliness of processing, but only on sufficiently high-quality and homogeneous materials. From wood - on solid, fine-grained wood, chamber dried. Removing processing waste on a vertical milling machine is easier, but on a horizontal one it is difficult - dust and sawdust fly upward. The removal of the workpiece is almost impossible, but there is a danger of it being bitten by the cutter. A well-behaved profile can often be modified; a bitten and broken piece is an unconditional defect.
Motor
Based on the above, it is optimal to make a do-it-yourself milling machine with a drive with a power of 1.5-2 kW. The reason is that motors up to this power are produced, incl. asynchronous with capacitor starting for voltage 220 V 50 Hz. They can be plugged into a regular household outlet, and switching the direction of rotation is a child's task for an amateur electrician; rotation speed is 700-2850 rpm, which is suitable for milling. It is also possible to use an electric motor of the same type from a washing machine; in this case, it becomes possible to switch the rotation speed (in asynchronous washing machine motors there are different windings for this). A 2 kW motor will provide a processing depth of up to 80-100 mm; if a larger one is required, you will have to install a three-phase motor at 380 V 50 Hz from 3 kW into the machine, see for example. video clip:
Video: homemade vertical milling machine for wood
Note: commutator electric motors of 1.5-2 kW 220 V 50/60 Hz (for example, from another washing machine or vacuum cleaner) are of little use for driving a milling machine - due to their excessively soft external characteristics, the cutter may get stuck in the wood if the workpiece is not manually fed, tear and rag it (if it’s damp).
Purpose of woodworking machines
Wood processing units used today can have different purposes. This can be either highly specialized equipment that performs one or several operations, or universal machines that, by changing the working head and attachment, can perform many different jobs on processing, drilling and sanding wood.
Most wood milling machines used today are multifunctional, which makes working with such equipment easier and saves space in the workshop. Literally a few manipulations with the unit frame allows you to easily repurpose such a machine to perform various operations on it and work with different materials.
Milling machines have a corresponding cutting working tool and a head, which is responsible for moving the tool used. This head is driven by an electric motor, and it is possible to adjust the spindle speed, which in turn allows you to work with various materials and process wood that differs in its density and strength.
Application of milling machines
Modern milling units are distinguished by their versatility of use, which allows them to carry out a variety of wood processing, including the production of parts with a simple round shape. Such equipment is widely used in woodworking for the manufacture of furniture and the following operations:
- Creation of recesses and depth of a given shape.
- Cutting out grooves.
- Drilling.
- Removing a quarter.
The design features of such units make it possible to significantly simplify working with wood, so even on a machine made by yourself, you can easily perform high-quality milling. Today, there are numerous varieties of such milling machines, the most widespread of which are surface grinding equipment. You can easily make a surface grinder with your own hands; such installations are distinguished by their power, functionality, and, if necessary, they can be easily upgraded, expanding the possibilities for their use.
How to make a homemade elevator for a router
In addition to the above option, the guide can be made in other ways. The most common ones are:
- using a jack. Despite its cumbersomeness, this method ensures accurate adjustment of the milling depth. In addition, the jack can be equipped with an electric drive;
- driven by threaded rod. It is the simplest and least labor-intensive option. However, to set up, you must always keep a hexagon or screwdriver on hand to adjust the milling level;
- with chain drive. A complex but very effective lift for a router. In addition to the chain and drive sprockets, the assembly diagram contains guide pins, an electric motor and a lift position switch. Despite the very complex manufacturing process, such a lift provides the most accurate setting process.
Some models of manual milling cutters are equipped with a microlift, which ensures precise adjustment; its use increases the accuracy of the work.