Carpenters, joiners, fashion designers, carvers, turners and other manufacturers of wood products sometimes have to make cutters for processing wooden blanks with their own hands. This is not so much an opportunity to save money as it is the need to obtain a cutting tool with a given geometry. A homemade milling cutter for rough processing of any type of wood can be made in tens of minutes or several hours.
Homemade wood cutter with your own hands
Working with various materials requires the use of high-quality cutting tools.
Most of the required types have standard parameters and are freely sold in stores, but some samples have specific sizes or shapes. They are not produced or are extremely rare. To a greater extent, the question concerns cutters that have many profile options, varieties or types of design. Finding the right type can take too much time, so sometimes there are no other options other than making a cutter at home.
Classification of units
There are three categories of milling cutters:
- Professional. Workpieces of different sizes and in large quantities are processed. For this, a serious range of cutting tools is used.
- Household. In terms of functionality, they are suitable only for home workshops.
- Manual.
Each classification has its own subtypes. So professional machines have the following varieties:
- Standard. Used to implement template operations. Their equipment allows you to perform many jobs and give the workpieces the required configuration. The cutting arsenal includes: cutters, drills of different diameters, and special knives.
- Copying. They perform artistic operations: applying complex images, placing samples on different surfaces, and designing ornaments. In this work, accuracy is guaranteed since the workpiece is fixed using the vacuum method.
- For vertical processing of parts (from top to bottom). Here grooves with the required width and depth are cut, and fastening components are prepared. The parts are cut to the required length.
- For horizontal work with workpieces. Here the spindle axis is horizontal in relation to the floor. There are cylindrical and end mills.
- Performing simultaneous processing on both sides. They are universal. Various profiles are processed here. Not a single production of furniture components is complete without these machines: stands, legs, support elements, etc.
- Equipped with CNC devices. An electronic complex based on a special microprocessor is integrated here. It contains a program that determines the algorithm of operations. Due to this, the accuracy, quality and dynamics of work, and the labor productivity of a CNC milling machine are significantly improved.
Household models are small in size and weight. They implement basic functions (planing, drilling, grinding, sawing). Their types:
- Desktop. Characterized by ease of operation and service.
- Manual. Used for working with small-sized parts. Small grooves are prepared on it, which are required for the articulation of separate components.
How to make a cutter
Milling cutter is a general name for a wide group of cutting tools. There are two main types:
There are many types of cutter designs used to perform different technological operations:
- Whole.
- Composite (prefabricated).
- End.
- End face.
- Shaped.
- With replaceable plates and others.
The production of cutting tools is a high-tech process that is demanding on the quality of the material. For example, the production of end mills consists of several stages:
- Turning of a workpiece (shaping).
- Milling teeth.
- Processing of cutting edges (sharpening and backfilling).
- Heat treatment of the material (hardening, tempering, other operations resulting in a high-quality metal structure).
To manufacture other varieties, similar or other operations are performed, determined by the type and design of the tool. Homemade cutters are only modifications of ready-made samples.
The need to use one type or another, to obtain a certain profile or size of the cutting organ, forces you to decide the issue yourself. Let's look at how to make a cutter with your own hands at home.
Homemade wood cutters
Making a wood cutter with your own hands is possible if you have the appropriate workpiece and a machine where it will be installed. At home, an electric drill or a hand-held milling machine is usually used. The most affordable option is to change the shape of a regular metal drill, but other methods can also be used.
Let's look at how to make a wood cutter from a drill. Depending on the purpose of the tool, you will need a workpiece (metal drill) of a certain size. If you plan to manufacture a shaped cutter, then the diameter of the workpiece must be equal to the maximum diameter of the final product. Manufacturing consists of two stages:
- Giving a profile.
- Creating a shank.
Both operations require the use of industrial equipment. In any case, a lathe will be required to make the shank. The hand router collet is designed for a diameter of 8 mm (there are options for 6 and 7 mm). Therefore, for large drill diameters, the shank should be prepared before creating the profile. This will eliminate beating, which is dangerous when processing wood. The easiest way to create a profile is by grinding. First you need to make a template, according to which you need to constantly check the status of the profile. To work, you will need a grinding machine (emery), a grinder or a cutting wheel mounted in the chuck of an electric drill.
To create replacement plates for the milling head, either ready-made samples are used, which are given the desired shape, or blanks made of high-quality metal. The profile is created by grinding on a machine at hand.
The final operation is backing. This is the process of setting a specific cutting edge angle to ensure that the back of the edge does not contact the workpiece.
Important! Backing is a rather labor-intensive process, but necessary; it is the only thing that gives the cutter the ability to work normally.
DIY metal cutter
Making cutters for metal at home is limited to regrinding existing tools, changing the profile or diameter of the cutting part. More active intervention will require the use of industrial equipment, as it will be necessary to perform complex procedures:
- Tempering of metal (a procedure reverse to hardening).
- Machining, including shaping, sharpening, backing).
- Hardening the cutter.
It is almost impossible to carry out these actions efficiently at home. In addition, work of this kind requires considerable professional training and experience, which not everyone has. Therefore, they are limited to only available procedures that involve minor intervention in the original state of the workpiece.
Making cutting tools at home requires the necessary equipment and suitable workpieces. In addition, you must have skills and experience, otherwise you can end up with a very dangerous product that can ruin the surface being processed and harm the craftsman himself. It is not recommended for an untrained person to carry out such work; it is better to seek help from a specialist.
Step-by-step instruction
So, let's move on directly to considering the instructions for making the above-mentioned device.
- First, use a caliper to measure the residual distance on the bolt head relative to the bearing being installed. If we are talking about an M8 type bolt, then the size of the hat circle in this case will be 1.27-1.3 cm. The diameter of the handle is about 1.16 cm, which makes it possible to easily clamp it in the vast majority of modern drill chucks.
- The cap should be adjusted to the bearing diameter. It is this area of the bolt that will represent the working part of the cutter.
- For marking, it is better to use a thinner contrast marker; the main thing is that the marks that will be applied with it are easily distinguishable on the metal. Now we apply the markings of the cutter's burrs. This solution will allow her to get rid of shavings without much effort.
- After this, we clamp the bolt in a vice. Using a cutting wheel, we use a grinder to create slits on the cap.
- We measure the bearing diameter. To work the head of a bolt with a faceted surface to a circle, you should transform the drill into a lathe. To do this, you need to clamp it in a vice, and then firmly attach the bolt in the chuck precisely in the center.
- Now you should fix the drill key at a constant operating mode, after which you can begin processing the bolt head. This process must be controlled at all stages of its implementation in order to prevent the center of the bolt from moving, which can cause a violation of the uniformity of the operated teeth.
- After this, you should install an abrasive disc on the grinder for grinding and process the edges around the circumference. The end area of the cutter should also be removed a little, leaving only a slight sharpness in the center. This element is of great importance, because this type of cutter will first find the center when working, and only then will the material be triggered by the rims and edges of the cutting type. Here you can carefully refine everything using a file, so as not to accidentally cut off more than is necessary during the grinding process.
- The cutter itself will be almost ready. All that remains is to give the cutting edges the required shape, and then sharpen them a little.
For greater efficiency, it would be useful to make the simplest clamp for pressing. Therefore, the instructions for creating it also need to be considered.
- This device is also made from an M8 bolt and a washer of suitable diameter. The bolt should be placed vertically on a surface made of metal so that the required contact for electric welding is ensured. The washer must be installed in the center of the bolt head. To make this job easier, you can use pliers. After this, the central part will need to be treated with an electrode to fill the area of the inner hole of the washer.
- Now you need to clamp the clamp, which was obtained as a result of the above actions in a vice, and then clean it using a grinder. You can walk along its back using a special brush attachment for a drill.
- At the final stage, all that remains is to install the finished device into the chuck of a vertical drilling machine, after which you will need to press the bearing into the wood. Such a simple “gadget” will eliminate a number of inconveniences when using a homemade cutter.
By the way, an end mill for wood can be made not only from a drill, but also from a tube with thin walls.
In this case, the algorithm for creating it will be as follows:
- in this case, the workpiece will be a piece of pipe with a length of about 20 centimeters;
- on the side where the cutting edge will be located in the future (somewhere at a distance of 2 cm from its intended location), oval-shaped grooves should be made on both sides of the pipe;
- the future cutting part of the cutter itself will need to be shaped into a cone - it is ground at an angle of about 2-3 degrees;
- when clamping the workpiece in a vice, a cross-shaped cut should be made at its end area - this can be done using an angle grinder;
- From the side of the cutting part, you need to make grooves on the workpiece - right up to the oval holes made earlier.
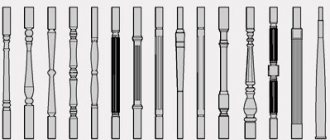
DIY cutter: making homemade wood cutters
The question of how a wood cutter can be made with your own hands worries not only home craftsmen who do their own carpentry and modeling, but also professional finishers. And the main thing here is not only the desire to save money, but the fact that serial tools for woodworking, which today are easy to purchase in specialized stores or on construction markets, often do not have the required configuration of the working part. That is why specialists and home craftsmen who use such a tool have to modify its serial models or make it from scratch, using cylindrical steel blanks.
Homemade wood cutters
Cone cutters
Wood cutters, the working part of which has a conical configuration, are used for processing surfaces of complex terrain. In particular, with the help of such cutters, finishing of grooves in elements of furniture structures is performed. To manufacture such wood cutters in production conditions, complex-shaped workpieces are used, which are problematic to process at home. Such a cutter can be made with your own hands from a drill, the working part of which is given the required configuration.
Due to the fact that a homemade wood cutter is used to process fairly soft material in several passes, there is no need to further strengthen the structure of the material from which such a tool is made.
Manufacturing options for cone cutters
Types of homemade cutters for wood processing
Cone cutters, processed at medium and high speeds, are used to remove excess wood from the end elements of the workpiece. The best option for making a tool of this type on your own is a cutter from a drill. This cutter from a drill is made at home as follows: the tool is cut closer to its shank (from half to a quarter of its length), then each cutting edge of the cut drill is ground down by 1/2 – 1/3 of its diameter. If the cutting edges are ground down to a large amount, then not only will its body be exposed, but it will also lose its cutting properties. It is difficult to restore the cutting edges of homemade wood cutters, which have a spiral shape, with your own hands.
From a drill you can make cutters with different working heads
An end-type wood cutter can also be made from a thin-walled tube. How to make a cutter from such a blank? The following recommendations should be followed.
- A piece of pipe is taken as a workpiece, the length of which is 15–20 cm.
- From the side of the future cutting edge (at a distance of 2–3 cm from it), oval-shaped grooves are made on both sides of the pipe.
- The future cutting part of the wood cutter is given a conical shape, and it is ground at an angle of 2–3°.
- Having clamped the workpiece in a vice, a cross-shaped cut is made on its end part, for which an angle grinder is used.
- From the side of the cutting part, grooves are cut on the workpiece - up to oval holes.
Homemade tubular cutters
Using a homemade end mill made from a thin-walled tube, you can create blind or through holes in wood products. In this case, the inner surface of the blind holes must be refined using a chisel.
Many home craftsmen are interested in the question of how to make a large-diameter cone cutter with their own hands. It should be borne in mind that it is not easy to make such a tool for woodworking; for this you need to use special blanks and complex metal-cutting equipment.
Milling machines and their varieties
Different types of milling machines differ significantly from each other both in design and purpose, some are intended only for wood processing, others for metal, there are also universal models. A number of designs have manual control, while others operate automatically; the simplest options can be made with your own hands, and there are complex factory-made designs.
Let's look at several types of machines below, and if you wish, you can also find drawings that relate to their independent manufacture and design.
The vertical type of milling machine is very common. The following cutters serve as working tools:
- cylindrical;
- end;
- shaped.
You can also perform drilling work. Using this machine you can process:
- grooves;
- gears;
- corners;
- vertical and horizontal metal surfaces;
- frame elements.
A feature of another type of machine, horizontal, is that the spindle is located horizontally. Thanks to this type of design, you will be able to process small parts. The versatility of using such a machine is due to the use of shaped, angular, end, end and cylindrical cutters. The standard factory equipment does not make it possible to process parts along a screw surface; in this case, you can modify the design with your own hands using drawings.
Drilling and milling machines help process horizontal, vertical and inclined surfaces, as well as grooves of dimensional parts. They are designed for manual metal work.
The machine has a milling and drilling head, which can perform drilling work at an angle and process surfaces that are located at an angle to the horizontal axis. The working head can also operate in reverse mode.
Preparing the template
Stage 1. Sketching.
The materials that may be needed at this stage look like this. Using a ruler and pencil, it is worth sketching the knives, since they are a direct reflection of the future cutter. If they are not available, it is not a problem to find an example on the Internet, and then redraw its profile and follow further instructions.
Stage 2. Cut out the shape.
Depending on how many knives we ultimately need, we count out the required number with a leaf and, grabbing them, carefully cut out the shape of the future product, without catching either the “edge” or the two load-bearing sides of the knife.
Stage 3. Making the mold.
Using glue, glue the template to the workpiece and carefully saw off the excess length with a grinder. Remember: it is important to preserve not only the edge, but also the sides! So, when working with an angle grinder, you should be somewhat careful and take into account the dimensions of the product.
Manufacturing of the product
Stage 1. Preparation for sharpening.
For this process we need a stone disk like the one in the photo. Who would be sorry to use new ones for this task - you can get them already, so to speak, used ones. After all, in the process you will have to slightly change the radius of the wheel so that when working on a stand, the product will end up with the desired shape. To do this, you should use “balls”, which will help you quickly bring the stone wheel into the desired shape.
Stage 2. Making knives.
Using the same stand, we cut out the shape we need according to the template. After the wheel became the desired shape (previous stage), this became much easier to do. Total: the product has become the shape we need. What's next? Next, we sharpen it to such an extent that the metal begins to bend slightly inward - this is what should serve as a signal that it is necessary to stop the process.
Stage 3. Formation of the finished product.
So, the final stage is formation. The knives that we obtained in the previous stages need to be inserted into the empty recesses on the cutter. At this stage, it becomes clear why it was necessary to observe the proportions of the sides at the previous stages. Carefully insert the knives all the way into the cutter and voila! – the product is completely ready for use, and the funds spent are minimal.
The period of operation of these homemade knives may vary, but according to statistics, it significantly exceeds the accessory knives included with the product, which require constant sharpening and attention during operation.
Observe the boundaries of the product according to the template, strictly follow the above instructions, and lo and behold - in no more than half an hour you will have at your disposal a high-quality product for a minimal amount.
Video: DIY woodworking cutters.
Do-it-yourself router from a drill: a detailed guide
Situations often arise when you need to make a groove, carefully trim the edge of a board, or make a part of a complex shape. Typically this work is done using a router. In a well-equipped workshop, any tool and all the necessary machines are at hand.
But what if, for example, instead of a workshop there is a garage, and only a drill is available. You can resolve the issue at your nearest power tool store. But, as usual, it all comes down to either finances or the fact that the milling tool is needed only for a while, and then it will simply gather dust on the shelf. As you know, there is a way out of any situation, and specifically from this one - a do-it-yourself router from a drill.
What is needed for making
You can make a router with your own hands from a drill using any available materials. The main requirement: the structure must be durable, the presence of backlashes and distortions is not allowed, the electric drill must be securely fastened.
To make parts you can use:
- Chipboard or multilayer plywood with a thickness of 12 mm or more;
- cutting boards of suitable thickness;
- wooden bars.
It is also possible to use other materials. For example, you can use metal. A base made of thick plexiglass or acrylic is a good idea. The surface being treated will be visible through such material.
The parts are connected using self-tapping screws. For reliability, all fixed joints can be glued with any suitable glue (carpentry glue, PVA, etc.).
To fasten moving parts, you may need bolts or studs with a diameter of 6 - 8 mm . They will need nuts, both regular and wing nuts. Some connections may require washers. It is possible to use furniture fittings: guide mechanisms, various fasteners, and so on.
Device Add-ons
There are several devices that can be added to make this device more convenient to use, as well as slightly expand its functionality. For example, you can add a device such as a microlift, which will move the drill in the vertical direction. If everything has become clear on how to make a wood router from a drill, then few people know how to make a microlift, and therefore here are brief instructions:
- Guides are required. You can use two metal rods as them.
- To fix the electric drill, you need to use a platform that will be made of the same plywood or chipboard.
- An element such as a threaded axle and a nut will be responsible for moving the electrical device in the vertical direction.
- It is necessary to use suitable devices that can hold the drill in the selected position.
Manufacturing process
In everyday life, a vertical manual router is often used. It has the easiest design to repeat. It is enough to make a stand with a mount for an electric drill, and the device is ready to perform simple operations. An example of such a homemade unit is in the photo below.
The process of making such a base is quite simple:
- The first part that is best to start with is the base (sole). It is necessary to cut the workpiece into a round or oval shape.
- Next, make a hole for the cutter. It should be offset relative to the center of the part, taking into account the thickness of the side post.
- Depending on the dimensions of the electric drill, a stand of the required size is made and secured to the base with self-tapping screws or furniture fittings.
- The rigidity of the fastening is ensured by a spacer (kerchief). The inner sides of this part must have an angle of strictly 90°.
- The next element is the drill mount. You can use a pipe clamp, as in the photo, or make a clamp from wood or plywood and secure it with self-tapping screws.
- As an additional fixation, a stop is installed above the drill.
This option is suitable for doing rough work or will serve as a temporary alternative to a full-fledged tool. To perform more precise operations, you will have to develop a more complex design.
There is nothing stopping you from equipping your “homemade product” with adjustable cutter reach or the ability to change the angle of inclination. It is possible to use a drill in a tabletop milling machine. To do this, the electric drill is installed vertically under the working surface.
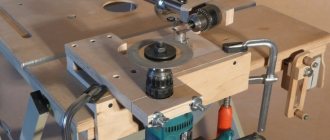
Design and principle of operation of the equipment
If you look at a professional drawing, you will notice that its design includes many different mechanisms and components. A desktop home machine, unlike a serial one, has a simpler design, consisting of a limited set of required elements. Despite the simplicity of the system, a homemade milling group machine is a fairly functional device and allows you to successfully solve many problems related to the processing of metal and wood workpieces.
One of the options for a homemade milling machine. The disadvantage is the insufficiently developed drill mount, but the design of the bed can be borrowed from here
The basis of any such machine is the bed, which must be rigid and reliable in order to be able to withstand the necessary loads. The next important element of a homemade milling group machine is the drive, the rotation from which will be transmitted to the working tool. As such a drive, you can use a hand drill or a separate electric motor with sufficiently high power.
To place and fix workpieces that will be processed on such equipment, its design must necessarily include a work table with fastening elements for the parts being processed. Processing on both professional and home milling equipment is carried out using a special tool - a milling cutter with a sharply sharpened working part.
Large machine with a powerful electric motor
When making a mini-machine for home, you should not skimp on components. They should only be of high quality, as this directly affects the reliability and performance of your equipment.
The technical characteristics that your home benchtop machine will acquire will depend on a number of parameters. These include the dimensions of the work table, as well as the permissible weight and dimensions of the workpieces that will be placed on it. An important factor influencing the performance and power of equipment is the power of the drive installed on it and the maximum number of revolutions that it can provide.
Another option for a homemade milling machine