Manufacturing Features
A homemade part of this type has certain restrictions on the materials that can be worked with when using it. Creating cutters for a hand router usually involves working with steel, which belongs to the soft category.
For this reason, such a device allows you to work perfectly with wood, but if the material is very hard, then the effectiveness of the device is significantly reduced.
To create a homemade cutter, scraps of reinforcement or steel rods are usually used. Sometimes it is made from a drill. If the reinforcement is the base, then its ribbed coating will need to be leveled using a lathe.
First we need to make the shape of our future cutter.
- Using a pencil and ruler we draw knives. If the diagram is not at hand, then you can find examples on the Internet or in the relevant literature, then simply redraw the required profile and follow the further algorithm.
- Now you need to directly cut out the shape. Depending on how many knives we need as a result, it is necessary to count out the required number of sheets and, having grabbed them, carefully cut out the shape of the future product, without catching the pair of load-bearing sides of the knife, as well as the tip.
- After this you can start making the form. Using an adhesive composition, you will need to glue the template to the workpiece and carefully saw it off using a grinder. It is important to remember that not only the tip should be preserved, but also the side parts. So when working with an angle grinder you will need to be as careful as possible and take into account the dimensions of the product.
Features of working with the tool
The principle of working with a circular drill is simple. A hole is drilled using a centering drill, and then the cutters are put to work. They gradually make a narrow groove, gradually cutting through the material in a circle to the full depth.
The materials used in working with the ballerina are varied: wood, fiberboard, chipboard, MDF, plasterboard, plastic. One common point is that the thickness of the part should be no more than 15-20 millimeters. This parameter is limited by the length of the incisors. Usually the manufacturer indicates the maximum drilling depth on the packaging. If you try to drill into thicker material, you may experience problems with ragged edges.
The use of a tool with one cutter is characterized by runout. This is caused by a lack of balancing relative to the longitudinal axis of the drill. The beating will be especially noticeable when cutting large diameter holes. Cut holes using a drill at low or medium speed. When working on a drilling machine, such problems do not arise.
Also, a laminated or veneered surface can cause inconvenience when working. After passing through the decorative layer, drilling proceeds without problems.
A feature of the circular drill can be considered the ability to adjust the diameter. The distance between the cutters can be set using a scale on a rod or more accurately using a caliper. This is convenient if you need to make a hole without gaps for a pipe or round part.
The spacing of the cutters relative to the center is adjusted individually. It is necessary to align the cutting parts as accurately as possible. This will eliminate unnecessary effort during operation and extend the life of the tool.
Manufacturing technology and recommendations
A homemade cutter has limitations on the materials that can be processed with its help. Making cutters for your own needs, as a rule, involves working with soft grade steel. That is why such a homemade tool is capable of cutting wood quite effectively, but when processing harder materials it quickly becomes dull.
In order to make their own milling tools, craftsmen use scraps of steel rods or reinforcement. If reinforcement is used as a workpiece, its ribbed surface is leveled using a lathe.
The technology for making a homemade wood cutter from such a blank is as follows:
- On the part of the cylindrical workpiece where the cutting part of the homemade tool will be formed, half the diameter is cut off.
- A smooth transition is formed between parts of the workpiece with different diameters.
- Another quarter of the diameter is removed from the treated section of the workpiece; such a section of the workpiece is also connected with a smooth transition to the untreated part of the rod.
- The processed part of the workpiece is given a rectangular shape, for which its lower part is cut off. The thickness of the part of the workpiece on which the working part of the woodworking tool will be formed should be 2–5 mm.
- To trim the rod, you can use a grinder and a drill, and the formation of the working part can be done on a sharpening machine
- A homemade cutter can be used to process wood, but its internal angle must coincide with the center of rotation.
- In order for a home-made wood cutter to be used for effective processing, the following recommendations must be followed when making it.
- The cutting edge must be sharpened at an angle of 7–10°. If you make it sharper, it will hold an edge poorly and have low cutting properties.
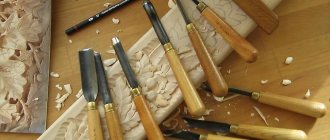
- To give the cutting part of the tool the required configuration, diamond-coated needle files or angle grinders with discs specially designed for metal work are used.
- If a homemade wood cutter must have a complex configuration, then it can be bent or flattened.
- The cutting edge is polished with a diamond disc, then the surface is polished with sandpaper
- With a small thickness of the cutting part, a hand-made milling tool has a fairly short working life. To slightly increase the service life of such a wood cutter, the corner on the bottom of the tool, located opposite its cutting edge, can be slightly rounded.
- A homemade cutter cannot immediately cope with a large volume of wood removed from the surface of the workpiece, so processing is carried out in several passes.
Cone cutters
Wood cutters, the working part of which has a conical configuration, are used for processing surfaces of complex terrain. In particular, with the help of such cutters, finishing of grooves in elements of furniture structures is performed. To manufacture such wood cutters in production conditions, complex-shaped workpieces are used, which are problematic to process at home.
Such a cutter can be made with your own hands from a drill, the working part of which is given the required configuration.
Due to the fact that a homemade wood cutter is used to process fairly soft material in several passes, there is no need to further strengthen the structure of the material from which such a tool is made.
Homemade wood cutter (Forstner drill)
- First, use a caliper to measure the remaining distance on the bolt head relative to the bearing being mounted. The head size in circumference of the M8 bolt is 12.73-13mm. The diameter of the handle is 11.60 mm, which allows it to be clamped in most modern drill chucks.
- The cap will need to be adjusted to the diameter of the bearing. It is this part of the bolt that will be the working element of our cutter. For marking, it is best to use a thin, contrasting marker, the marks of which will be easily visible on the metal.
- We mark the cutter's burrs. This will allow her to easily get rid of the shavings. We clamp the bolt in a vice, and using a cutting wheel we make these slits on the head with a grinder.
- We measure the diameter of the bearing.
- To work the faceted head of a bolt to a circle, we need to turn our drill into a lathe. We clamp it in a vice, and firmly fasten the bolt in the cartridge strictly in the center.
- We fix the drill button at a constant operating mode, and proceed to processing the bolt head. This process should be constantly monitored so that the center of the bolt does not shift and disrupt the uniformity of the actuated teeth. We place an abrasive grinding disc on the grinder and grind the edges to a circle.
- We also slightly remove the end part of the cutter, leaving only a small tip in the center. This detail is extremely important, since this type of cutter first finds the center when working, and only then begins to work the material with the cutting edges and rims. It can be carefully finished with a file so as not to be accidentally cut off during the grinding process.
- The cutter is almost ready. All that remains is to shape the cutting edges and sharpen them.
- This is what happened in the end.
Now you can try the resulting tool on an unnecessary piece of wood. It works, and quite well!
Blind hole:
Types
Currently, there are many manufacturers that produce sets of hex drills of various lengths and diameters.
The modern range of such products consists of a number of models for processing various materials - ceramic surfaces, concrete walls, products and structures made of metals and their alloys, wood, plastic products, tile surfaces and others.
Drills with a hex holder are also classified according to their design - they can be produced with different groove structures and sharpening angles. There are several types.
- Twist drills. The simplest and most popular models. They are drills with two cutting edges and two flutes for chip removal.
- Cone models. The tip of this product has the shape of a cone. Such models are rarely used and only for special machines.
- There are also screw, feather, milling models, as well as products with Lewis and Forstner spirals.
Conventionally, drills can be divided depending on the country of origin (China, Europe, and so on). Information about this is contained in the markings on the shank. Quite often, brands produce sets of drills of the same diameter, but of different lengths, as well as sets of drills of the same length, but with different diameters.
All drills are distinguished by color. The color of the product indicates the processing method and material used to make the product.
- Gray. The cheapest and most popular. They are not durable.
- Black. Treated with superheated steam. Suitable for drilling carbon steels and non-ferrous metals.
- Slightly golden. They are hardened and will last a long time.
- Golden. They are coated with titanium nitride and are the highest quality, durable and reliable.
Moving away from the topic, it is worth noting separately that similar drills are produced for screwdrivers. Screwdrivers are most often not designed for a hexagon and require a certain type of shank. In addition to hexagonal, there are triangular, cylindrical, conical, hexagonal (hexagonal) and other types of shanks.
Adviсe
Let's talk a little about tips that should be taken into account when creating homemade cutter models.
- To give the cutting area the correct configuration, you will need to use diamond-coated needle files or angle grinders with discs that are used specifically for working with metal.
- The edge for cutting should be sharpened at a 7-10 degree angle. If you make it sharper, then it will hold an edge poorly, which is why its cutting properties will significantly decrease.
- If a wood cutter made by yourself must have some kind of complex device, you can flatten it or bend it.
- When using an edge router, take into account that the guide ring or bearing is already installed.
- The cutter must be secured in the collet before starting work.
- The presence of additional accessories will help increase the power of the electric tool.
- The part to be processed must have some kind of support.
- When carrying out work, the correct insertion depth level should be set.
- To prevent too much dust from being generated when working, you can use a vacuum cleaner.
In general, it should be said that creating a wood cutter yourself is not difficult. True, it should be understood that in this way you can quickly solve some simple problem, because for hardware such as bolts, ordinary steel is used, not tool steel. This means that such a homemade cutter will quickly wear out. But its life can be significantly extended in a number of ways.
Therefore, this solution has a place and should be used in cases where you really need to quickly acquire a pretty good wood cutter in order to get the desired result.
Types of homemade cutters for wood processing
- Cone cutters, processed at medium and high speeds, are used to remove excess wood from the end elements of the workpiece. The best option for making this type of tool yourself is a milling cutter from a drill.
Such a cutter from a drill is made at home as follows: the tool is cut closer to its shank (from half to a quarter of its length), then each cutting edge of the cut drill is ground down to 1/2 - 1/3 of its diameter. If the cutting edges are ground down to a large amount, then not only will its body be exposed, but it will also lose its cutting properties. It is difficult to restore the cutting edges of homemade wood cutters, which have a spiral shape, with your own hands.
From a drill you can make cutters with different working heads
An end-type wood cutter can also be made from a thin-walled tube. How to make a cutter from such a blank? The following recommendations should be followed.
- A piece of pipe is taken as a workpiece, the length of which is 15–20 cm.
- From the side of the future cutting edge (at a distance of 2–3 cm from it), oval-shaped grooves are made on both sides of the pipe.
- The future cutting part of the wood cutter is given a conical shape, and it is ground at an angle of 2–3°.
- Having clamped the workpiece in a vice, a cross-shaped cut is made on its end part, for which an angle grinder is used.
- From the side of the cutting part, grooves are cut on the workpiece - up to oval holes.
- Using a homemade end mill made from a thin-walled tube, you can create blind or through holes in wood products. In this case, the inner surface of the blind holes must be refined using a chisel.
Many home craftsmen are interested in the question of how to make a large-diameter cone cutter with their own hands. It should be borne in mind that it is not easy to make such a tool for woodworking; for this you need to use special blanks and complex metal-cutting equipment.
I MAKE DRILLS MYSELF
Many fans of amateur technical creativity often have the need to drill a hole of large diameter. Of course, special drills for this are now sold, but sometimes it happens that a suitable factory-made drill is not at hand at the right time. For example, I have been working with metal for several years now, building various homemade products, and when the need arose to drill a hole with a diameter of about 70 mm in channel No. 30 with a wall thickness of 6 mm, there was no equipment for this in my workshop. So I decided to make the tool I needed myself from available materials. I hope my experience will be useful to other DIYers. I offer several options for devices suitable for solving the designated problem.
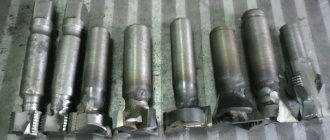
DRILL FROM… BEARING
I took a used double-row automobile wheel bearing. These cages are made of high-strength steel ШХ15 or ШХ20 with a hardness of 65 HRC units. I reasoned this way: if you make a gear crown from the outer casing, then it should “take” a metal of lower hardness - the same construction channel, for example, made of structural steel. Of course, such a “homemade” won’t last long, you can’t make many holes, but I don’t need many. And wood or drywall can be easily treated with it.
Having shaken out all the contents from the outer race of the bearing, I marked the teeth at one end. To do this, I pasted a template on the clip, which was a strip cut from a school lined notebook. Using a marker, controlling it with a ruler, I marked the teeth evenly around the entire circumference, taking into account the direction of rotation of the future drill.
Sketch of a drill made from a wheel ball bearing with an outer diameter of 72 mm.
The leading edge of the tooth is made perpendicular to the line of the end of the cage or with a slight slope. The inclination depends on the hardness of the material being processed: the softer the material, the sharper the tooth profile should be. The trailing edge is a diagonal line connecting the top of one tooth to the base of the adjacent one. Then, taking a grinder, I cut out the teeth according to the markings. Their height is 10 mm.
Now you need to somehow secure the clip with the cutting edge in the chuck of a drill press or drill (as in my case).
To do this, I used the convex cups for fastening the rod of a car shock absorber - they fit inside the homemade “crown” almost without a gap. If they do not fit, then you need to adjust their diameter to the inner diameter of the holder. Using an M12 pin, tighten the cups installed with their convex part to the drill, and clamp the bearing race between them. On the tooth side, the cup is clamped on both sides with nuts. The pin rises 10 - 15 mm above the cutting edge, and at this length it is ground down to a diameter of 10 mm - this is necessary for centering the drill in the workpiece. That is, in the center of the future large-diameter hole, you must first make a “guide” hole with a diameter of 10 mm. In this case, it is important to center the drill relative to the axis of rotation - the M12 pin, if the diameter of the hole in the cup is larger. A 12 mm washer under the nut will help here, selected according to the outer diameter so that its outer edge comes into contact with the concave surface of the cup. The inclination of the leading edge of the tooth depends on the hardness of the material being processed
The teeth should be cut at even intervals using a paper template.
Car shock absorber rod cups perfectly fix the clip on the axle
The range of wheel bearings allows you to make drills of different diameters.
So, the homemade drill is ready. They should work at low speed, pouring cutting fluid over the cut area, for which I usually use soapy water. The power of the drilling equipment must be sufficient so that the drill does not stop.
The range of wheel bearings of this type is quite large, so you can choose the diameter of the drill in accordance with almost any task. Just go to auto repair shops - old unnecessary bearings and shock absorbers there, as a rule, are simply thrown into scrap metal.
However, I couldn’t “take” high-carbon or stainless steel AiSi304 1.5 mm thick with such a drill... Well, that means we’ll do something else!
THERE WAS A SAW - THERE WAS A DRILL
At the core is the same drill made from a bearing. Moreover, you can even use something that has become completely dull, since now it will only perform auxiliary functions. The cutting part of this tool uses a 30mm wide band saw blade made from high carbon steel.
It is worth noting that there are saw blades made from a variety of steel grades, so before proceeding directly to the manufacture of the device, I recommend conducting a little testing. Press firmly on the blade and try to leave a scratch on the material you plan to drill. If the mark is clear and chips form, then everything is in order - such a saw is suitable. If there is no obvious scuffing or chips, then this blade is not suitable for this task - you need to look for another, harder one.
Fragment of a sketch of a drill with a cutting edge from a band saw.
It is not difficult to estimate the length of the cutting part of the future drill: it is equal to the inner diameter of the bearing race multiplied by the number π. Then we glue a paper template onto the saw on the side opposite the teeth, and using a grinder we make cuts evenly along the entire length to a depth of about 7 mm; they should be perpendicular to the edge.
Next, take a piece of pipe with an outer diameter slightly smaller than the inner diameter of the bearing race and cut it lengthwise on one side. We insert the edge of the saw into the resulting slot and wrap it around the pipe. At this stage, be sure to use safety glasses and gloves, since the elastic, hard saw may burst. By the way, don’t forget about personal protective equipment and when picking up a grinder, remember safety precautions! In the resulting cylindrical segment, slightly bend (without taking off your glasses!) the previously cut comb teeth inward.
A drill made from a bearing here serves as equipment for securing the saw. The brand of band saw is selected depending on the hardness of the material being processed
Using personal protective equipment (glasses, gloves), according to a template, we make a notch on the smooth side of the band saw section and bend the teeth of the resulting comb slightly inward.
The cup on the side of the cutting edge of the bearing drill needs to be modified in diameter so that the rolled saw section passes between it and the holder as much as possible tight. We insert the saw into the holder until it stops, so that it protrudes above the holder by 10-15 mm. By tightly tightening the nuts on the central stud, we clamp the saw in the cage. We center the drill similarly to the option described above.
Tested: this drill can (literally) even work with “stainless steel”! But what if you need to make holes of a smaller diameter, but still significantly larger than the diameters of drills usually used in everyday life? Let's say from 20 to 30 mm. I also made equipment for this case.
SECOND LIFE OF THE SQUAD HEAD
The hardness of this tool is about 40 HRC units, which means it is suitable for working with softer materials. A socket tool head is used as a workpiece. If you don’t mind, you can take a normal one, suitable for unscrewing and tightening nuts, but I got my hands on one that was already cracked in several places and practically useless for its intended purpose. Although, I’ll say right away that it’s definitely not worth taking a cheap Chinese head - it’s most likely “plasticine”, and it won’t be able to drill anything. And it is preferable that the head has 12 sides.
Sketch of a drill from a socket tool head
It is better to use a 12-sided tool head as a drill blank
This homemade drill can handle wood, slate, drywall and other less-than-hard materials.
The pitch and size of the teeth can be very different - there is room for experimentation! A drill from a sister-in-law can be used both as an independent tool and as an accessory for a drill from a bearing.
In my case, the head was very used, but of fairly high quality, impact, with a socket “22”. Its outer diameter is 30 mm. Using the method described above, I marked and cut the teeth - there were only six of them, about 5 mm high. I inserted an M12 pin into the central hole of the head and assembled the drill - I think the reader has already clearly understood the idea. The centering of the stud was carried out by selecting a washer, put on it and in close contact with the inner edges of the head. The shank, which rises 10 - 15 mm above the cutting edge, ensures alignment when drilling.
The wall thickness of this profile is 2 mm, holes with a diameter of 70 mm are made in it with a homemade drill - good job!
Let me summarize. All three drills I made from ferrous metal work. They perfectly drill plastic, drywall, rubber, slate, wood, cellular blocks, aluminum, copper, low-carbon steel (type St.3). Stainless steel can only be drilled using a band saw. It is clear that the resistance and durability of a homemade tool depend both on the hardness of the material being processed and on the quality of the workpieces used for manufacturing. For woodworking, for example, it will last a long time, but when drilling medium-carbon steel, the drill will most likely need to be sharpened frequently. The main advantage of such equipment is its accessibility. To make it, you need worthless waste materials that can be found in the household of any homemade worker, but the result is very useful things.
Rustam SHEIKO, Zaslavl (Belarus)
We recommend reading
- CHARGING WITH PREVENTION During operation of acid batteries, sulfation of the plates gradually occurs, leading to a decrease in capacity and a shortening of the service life of the device. Eliminate this...
- FAIL-FREE LIGHTER “Electronic match” - this was the name of the material about the electric lighter, published in No. 3 of the “Modelist-Constructor” magazine for 1999. The development will be able to find its rightful place on…
Homemade spherical cutter
So making a milling cutter (as the author did) is not so easy; you need a lathe, a drilling machine, etc. But you can come up with something of your own, look for other ways, because making all kinds of homemade products is a great way to train your brain, but you just have to do it like the author, look for other ways.
Let's get started, the necessary tools/materials.
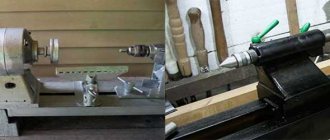
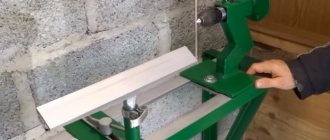
1. Tokarka
2. Drilling machine, drill (it won't be easy)
3. Hacksaw, grinder
4. Material for making a cutter (the author uses a piece from a saw)
5. Tap, bolt, etc.
6. Round timber 30 mm (the cutter is made from it)
Step 1. Manufacturing
The round timber is processed on a lathe and given a spherical shape with a rod. If you don’t have a lathe, you can order this workpiece from a turner or take a file and earn yourself one. Next, the spherical shape of the workpiece is brought to an ideal state using a homemade pattern. The author made a pattern from cir. disk and block of wood. A circular mark is made on the sphere at 40 degrees; the author makes it using a saw blade. The author marks the center of the mark and drills a hole through. Then, using a hacksaw, using this mark, the sphere is divided into two parts, and on one part a recess is made for the bolt head. A piece is cut from a saw blade, it is given a round shape on a lathe and sharpened in one direction, this is a cutter.
Step 2.Testing
A cutter is tightened between the two parts of the ball with a bolt. At this point the cutter can be considered complete; now all that remains is to test it. Words cannot express how the homemade product manifests itself in operation, so watch the video. We can end here, thanks for watching. If the article is good, then don’t forget to like it.
Expanding the functionality of the router
Additions for a router should solve one problem - to hold the tool in the desired position when processing material. When purchasing an expensive machine, frequently used milling accessories are included in the kit. But for cheaper or highly specialized options, you have to buy them separately.
The design of such additions is quite simple and does not require a drawing for self-production.
Rip fence
This addition allows for straight cuts and is often used when working with wood. It allows you to work on any surface, not just your desktop. The grooves are cut with its help.
The design of the add-on consists of:
- Rods that are attached to the body of the instrument.
- A fine adjustment screw is used to adjust the gap between the cutter and the surface.
- A locking screw, with its help, the rods are secured in the desired position.
- Overlays, on which the tool is placed.
The design of the base is quite simple and you can make it yourself.
To prepare an addition to the work you need:
- Install the rods into the holes of the tool body and secure them with a screw.
- Set the required distance between the surface and the cutter.
Additionally, by placing a specially treated block (with one rounded edge), you can significantly increase functionality and make cuts along a curve. This part is installed between the tool and the surface. Due to its unstable position, it must be handled very carefully.
Guide rail
The addition is used to move the tool over the working surface at any angle, which is different from the rip fence. The design makes it easier to mill holes located at a distance from each other. Special clamps hold the device on the surface being treated.
If they were not included in the delivery set, then clamps are used. Some options are equipped with an adapter to adjust the direction of movement of the tool.
The design is best used together with a power tool whose support platform is adjustable. This will help eliminate the problem when the tire and the cutter are located in different planes, which happens when the tool and the workpiece are close.
The design is quite simple, but very effective. If you have minimal skills in working with the tool, it can be easily done at home. To do this, just take a block, which is attached to the surface to be treated using a clamp. If you fix the structure on two or more bars at the same time, you can make a groove in one go.
The main disadvantage is the difficulty of accurately fixing the structure in relation to the future cut. But the following additions lack this.
The first fixture consists of a sheet of plywood and a guide connected together. It is used to work with blades of the same size.
When you need to use cutters of different diameters, a different device is suitable. Its main advantage is that the tool is in contact with the entire lower part of the material. The guide has a board (folding) that holds the power tool in the desired position to the material.
Very often, when working with wood, the material is milled against the grain, resulting in chips.
To reduce this phenomenon, an addition is used that presses the wood at the entry point of the cutter, which prevents it from splitting off. The device consists of two guides connected at an angle of 90°. And another type is assembled from two parts in the shape of the letter L, which are attached to the material using clamps. It is often used for cutting grooves.
Extension cord for feather drill.
There's a problem.
It is necessary to drill timber walls at the dacha with a 22mm tip drill (for electrics). The thickness of the wall including the cladding is 17-19cm. A regular feather drill allows you to drill to a depth of approximately 13cm. An extension cord is required. Couldn't find it for sale anywhere in Moscow. Many sellers don’t even know that such things exist. Question: Is it possible to use a bit extension as a drill bit extension? Do they have the same mounting dimensions? There are different feather drills. Others fit perfectly into adapters. Only an adapter like the one in the picture will be inconvenient - it will not hold the drill when removed, the drill will remain in the wall. Needed with fixation. There are other feather drills, they will generally hang too loosely in the 1/4″ adapter.
Leroy-Merlin sells extension adapters for Anchor drill bits. 59 rubles, length - about 20 cm.
.. can’t you just use a spiral one?? without any adapters.. Length up to 450.. yes, there are also short ones like 20 cm. They pass the tree perfectly..
2Dmitriy65 You need to look at the markets. There are 30cm extensions. True, they are from a series of one-offs and mostly in sets. Personally, I welded a piece of a pin. But there f35 had to be chewed 40cm.
Where, to the tail of the drill?
I also didn’t want to go to the store 20 km away. and here the welding is at hand (I assembled the heating), the drill costs a penny, grab it and go for it.
Not convenient. You will have to buy too many different sizes. And I don’t know if a screwdriver will pull it. I used Makita to drill with a diameter of 35 in 150 timber. It goes without problems, but the length is not enough.
Similarly, I bought a twist drill of the required size, the smallest 200 mm and welded it to the 10 mm fittings and got a twist drill 1 meter long. even if you want to find it, you won’t find it.
drilled ties for the formwork. There is 800 mm minimum size
I guess sometimes you have to get out of it.
I also drilled, but made do with a short (regular) metal drill.
So what's the point? Are the shanks of the drill bit and the bits different or the same?
Ruslan1111 wrote: you need to look at the markets. There are 30cm extension cords. True, they are from a series of one-time ones and mostly in sets.
I used this Enkor: the drill and extension are misaligned - the beating is crazy! Summary: cal.
Dmitriy65 wrote: So what's the point?
Anchor extension + Encor drill (as the most budget option). Or another drill that (the tail) will fit into the Anchor extension.
Give it up, for occasional one-time work, no problem. There are options for welding the reinforcement to the tail, and no one complains about the beating. And this is all done in a machine, in the centers.
Copy templates and rings
The copying sleeve runs along the edge of the template and thereby sets the blade in the desired direction. The addition is attached to the bottom of the instrument using screws or special antennae. Using a copy sleeve for a router is quite simple, but you need to ensure that the size of the cutting blade and the ring are the same, and they should not touch during operation.
The template is fixed to the material using tape or clamps. The rings should lie tightly on the workpiece.
Using this device, the corners of the parts are rounded and the edges are cut out. To improve convenience, bearings or rings are installed on the templates. But there are several conditions: their diameter must match or an additional limiter must be installed that will keep the template at a distance from the workpiece. And for figure milling, flexible templates are used.
Before you make a template for the router, you need to decide on the grooves that it will cut. For its manufacture, it is best to use hardboard with a thickness of at least 6 mm. And to increase durability, they use birch: it has the best characteristics.
Jig routing is often used by furniture installers when large numbers of holes and grooves need to be cut. This allows you to significantly reduce installation time and also increase the quality of work.
To get a good result from using the template, you need to consider several points:
- Before work, the router is set to full depth.
- The most precise displacement of parts can be achieved using two additional rods.
- Tenon parts made using a template do not require additional fixation with glue.
Design and operating principle
Since the Forstner cylindrical cutter was invented, many other similar tools have appeared due to its great demand. Some of them only slightly resemble the original model, but work on the same principle. They make blind round holes with a smooth flat bottom.
Types of incisors
- Sharp central, defining direction;
- A rim that trims the hole along the contour. By cutting the wood grain along the edges of the hole, it ensures a perfectly straight cut.
- Internal pairs of edges, similar to rotating planes, select material inside the hole being machined and bring the resulting chips upward.
For work, a drill with a standard type chuck is used. For example, a Forstner drill with a diameter of 15 mm has a shank size of 8 mm, and with a drill diameter of 28-60 mm, the shank size is 10 mm. To make furniture hinges or other fittings, cutters of different sizes are required and therefore you need to have a set of such tools in your workshop.
To accurately position the drill, at the beginning of work, its centering tip is placed at the marking point and pressed into the material being processed until it completely touches the plane of the drill. Drilling begins at low speeds, then increases to 800-1800 per minute, depending on the diameter of the hole. The larger it is, the lower the speed to avoid overheating of the cutters.
At high speeds, the drill may break off. To ensure safe working conditions, ease of execution, and in cases where special precision in making a hole is required, a 35 mm Forstner drill with a limiter is used. It ensures the required hole depth by stopping the tool in time. Furniture hinges or other fittings should be installed only in high-quality sections.
Most likely, you will need information on how to use a feather drill for wood.
Elliptical and round grooves
To cut grooves in the shape of an ellipse or circle with a hand router, circular devices are used. A simple compass for a router can be made from a rod, the end of which is connected to the base of the tool, and the second is equipped with a pin or screw. To obtain a circle, the rod is inserted into the hole, which serves as the center, and then a groove is formed along the contour.
To change the diameter of the circle, you need to move the tool closer to the other end. A more convenient version of this compass uses two rods instead of one.
Such equipment is quite common and often comes complete with a router. With its help it is convenient to cut shaped grooves with different radii. And when it is necessary to obtain holes of small diameter, other equipment is used. Its peculiarity is that the pin, which is installed in the center of the workpiece, is located under the tool.
- The design of such a compass includes:
- A base that is fixed to the material being processed using screws or vacuum suction cups.
- Two rods.
- Two shoes that fit onto the guides.
- Bracket connecting the router and fixture.
Using the holes in the bracket, the support plate of the equipment is easily aligned with the tool. If a circle is being milled, then only one shoe is used, but for an oval, both are used. Cuts made with this addition are of a higher quality than those made with a band saw or jigsaw.
This occurs due to the characteristics of the tool, which rotates at a very high speed.
Cutting grooves on narrow surfaces
The home handyman is often faced with the need to cut grooves for a door lock or hinges. As a rule, a chisel and a drill were used for this. But this procedure can be carried out much faster and easier if you use a milling cutter with special equipment. This design allows you to easily create grooves on narrow surfaces and is a flat base that is mounted on the tool.
And also two pins are additionally installed, which ensure the movement of the cutter in a straight line.
The main requirement for this design: the pins must be located in the center of the material being processed. If this condition has been met, then the groove will be located strictly in the middle. To shift the direction of processing, it is enough to put a sleeve of the required size on one of the pins. When using such an attachment, you must ensure that its edges are pressed tightly to the sides during processing.
If you need to cut a groove on a narrow surface, but there is no necessary equipment, then this problem is solved with the help of two boards. They are attached on both sides of the product in one plane. And the power tool itself is fixed with a parallel stop.
The use of such an attachment for a door hinge router allows you to:
- Make the most accurate notch without spending a lot of effort.
- Minimize the possibility of an error, the probability of which is very high without using a template.
How to lengthen a metal drill with your own hands
To lengthen a metal drill yourself, use one of three methods.
Simple welding
For this drill extension method you will need:
a steel cylindrical rod of the same diameter of the required length;
a piece of metal corner;
Make chamfers at the end of the drill and one of the ends of the rod.
Place the tool and rod in the metal corner and align them with each other.
Gradually turning the workpieces, weld the drill to the metal rod.
Process the seam until all irregularities are removed.
Shank extension. Method 1
For this drill extension technology, you will need a rod whose diameter is 2–3 mm less than the diameter of the shank. The general principle is this.
A hole is made in the shank of the drill for an internal thread.
Cut it with a tap.
An external thread is cut on the metal rod.
The parts are twisted together.
For greater reliability, the joint can be welded and cleaned.
Shank extension. Method 2
This method of extending the drill will require a rod whose diameter is larger than the diameter of the shank. To work you will need a lathe. The technology looks like this.
On a lathe, the diameter of the shank part is slightly reduced.
A hole is drilled in the rod to insert the tool.
The shank is fixed in the rod and the joint is welded.
On a lathe, the diameters of the old drill and the extended shank are equalized.
In this article we will talk about the features of using machines and the above-mentioned devices.
Greetings, dear readers! In this article we will talk in detail about thread rolling rollers.
In this article we will talk in detail about technologies for processing blanks and products made of hardened metals
We will pay special attention to the following main issues
In this article we will tell you what standard diameters and sizes the most common spiral and core drills for metal have.
The rotation speed of the metal cutter and other cutting parameters are set individually for each operation.
Mechanics and other craftsmen are often faced with the need to cut a circle in metal. This can be done in various ways. We will talk about them in this article.
In this article we will talk about all the features of metal turning.
In this article we will tell you everything about metal burrs.
In this article we will talk about the types of boring cutters, their purpose and design features.
A turning cutter is the main tool that is used for processing workpieces on lathes. It is he who contacts the part and gives it the required shape. In this article we will talk in as much detail as possible about the design features and classification of cutters. After studying the information, you will be able to choose a tool for a particular operation without any problems.