How to saw a board lengthwise on the thin side? (Newbie question)
37 cm - that is, just in two halves.
But the question arises: how to cut a board on the thin side? I saw a photo where a friend was sawing with a regular saw - but this is inaccessible to me - after 5 cm of cutting I will definitely go at random. The idea arose to take a circular saw blade with a diameter of 40-45 cm and a thickness of 2.5 mm (with a larger number of teeth - 100) - these are on sale, attach it to a milling machine (fortunately there is access) and make a cut to a depth of 20 cm at once - leisurely. The second option is to take a disk half the size, saw through half and then turn the workpiece over - the gain is in the thickness of the cut. You can use a thinner disk. On the other hand, I don’t need a carload of guitars - there’s no point in saving a lot of material - so the first option is probably easier. The question of possible vibrations confuses me - although there seem to be discs with stabilizers. One of these days I’ll try it with a smaller disk - I don’t have such large disks in my arsenal. Criticize the idea, please! What if I suddenly reinvent the wheel - the whole world somehow makes soundboards? Best regards, Harry Let me warn you right away that using a circular saw is always a risk of damaging your fingers. A message just flashed by. that the manager of a timber office in Ivano-Frankivsk injured his fingers. There is hardly any doubt that he did not know how to approach the machine. Especially if some homemade products are on circular paper. It's too dangerous.
There is such a technique where a cutter is installed horizontally above the table. This circular is rotated 90 degrees. The height above the table is set, this is the thickness of the future workpiece. To drive the workpiece to its full depth, you need to drive the saw half its width and drive it from both sides towards each other. Moreover, a fairly deep blind cut like 5cm already guides a hand saw very well. Those. saw 5 cm in a circle and the remaining 10 cm is already manual, as you saw. Recently I posted a link on how to cut logs. The mechanic suggested reducing this to the level of a hand saw. The idea is interesting. In markets and shops there is a frame that guides a large hand saw, also on the frame. Theoretically, somehow this design can be adapted.
Gentlemen, how to cut boards with a jigsaw so that the cut is good,
subzh, plus what you can cover the end with, if you have to.
saw along the guide! The file must be sharp and of high quality. It is not usually necessary to cover the end, it is not some kind of disgrace.
In general, I am engaged in the construction of websites and online stores.
Use a hand jigsaw to cut out. If your hands don’t hold well, then edge with a chipboard edge
Pekkonen wrote: saw along the guide! The file must be sharp and of high quality. It is not usually necessary to cover the end, it is not some kind of disgrace.
It is necessary to make a curly curved rounding (shelves), the radius of the circle is 100 mm. There is no crooked exact template. How to get out of this situation? The file must be sharp and of high quality - how do you understand this? Which file should I take? large, small tooth? Diluted or not (for metal)? What does quality mean? Which one produces less surface chipping?
If you are sawing the ends, it is better to use a metal file; it has a small tooth, so it does not tear.
T-34 wrote: The file must be sharp and of high quality - how is this to be understood?
Literally.
T-34 wrote: Which file should I take? large, small tooth?
The tooth size depends on the thickness of the board. And her hardness.
T-34 wrote: Divorced or not
T-34 wrote: Which one produces smaller surface chips?
Pekkonen wrote: The file must be sharp and of high quality
I didn’t like Boshevsky Extra Clean. How I sawed curves on window sills (oak, 40 mm thick):
- First about the straight cut. Not a single file cuts straight, they all go slightly to the side. You need to move the jigsaw “diagonally” to where the file goes, and not forward.
- The guides don't work. Because of point 1 - the jigsaw does not cut straight forward, along the edge of the sole. If at the level of the sole the file can be forced to go straight, then from below it will go where it wants, the cut will not be vertical.
- We mark the line for sawing with a sharp knife. Roundings - according to a pattern, such as a pan, plate, flower pot, etc.
- When sawing, keep, say, the left part of the cut from 0 to 0.2 mm to the right of the marking line. Even if the file wants to tear out a sliver, it will break off along the marking line and everything will be beautiful. Remember to rotate the jigsaw when turning (around the file, not around some other point), and never push it sideways. The file is by no means a support for the jigsaw when turning.
- If you actively push the jigsaw forward, the file will “stick” and go sideways at the bottom of the cut. Therefore, we make almost no effort forward at all. We're pressing a little, there's no hurry - we have to be careful. Even a slight decrease in the speed of the jigsaw means that you have pinched something somewhere.
- Try sawing with different settings for the saw moving back and forth, choosing an effective and clean mode.
- A file of normal quality was enough for me to make 20 centimeters of cutting, after which I had to push it forward by force, and it no longer worked smoothly. But it was a thick oak.
- Take files that are very narrowed at the back, otherwise when turning the file will rub against the rear edge and go in the wrong place. The teeth are as fine as possible. The sharper the tooth, the faster the file will wear out, but the cut will be cleaner. I often used very narrow "circular" files.
plm wrote: I didn’t like Boshevsky Extra Clean. How I sawed curves on window sills (oak, 40 mm thick):
- First about the straight cut. Not a single file cuts straight, they all go slightly to the side. You need to move the jigsaw “diagonally” to where the file goes, and not forward.
- The guides don't work. Because of point 1 - the jigsaw does not cut straight forward, along the edge of the sole. If at the level of the sole the file can be forced to go straight, then from below it will go where it wants, the cut will not be vertical.
- We mark the line for sawing with a sharp knife. Roundings - according to a pattern, such as a pan, plate, flower pot, etc.
- When sawing, keep, say, the left part of the cut from 0 to 0.2 mm to the right of the marking line. Even if the file wants to tear out a sliver, it will break off along the marking line and everything will be beautiful. Remember to rotate the jigsaw when turning (around the file, not around some other point), and never push it sideways. The file is by no means a support for the jigsaw when turning.
- If you actively push the jigsaw forward, the file will “stick” and go sideways at the bottom of the cut. Therefore, we make almost no effort forward at all. We're pressing a little, there's no hurry - we have to be careful. Even a slight decrease in the speed of the jigsaw means that you have pinched something somewhere.
- Try sawing with different settings for the saw moving back and forth, choosing an effective and clean mode.
- A file of normal quality was enough for me to make 20 centimeters of cutting, after which I had to push it forward by force, and it no longer worked smoothly. But it was a thick oak.
- Take files that are very narrowed at the back, otherwise when turning the file will rub against the rear edge and go in the wrong place. The teeth are as fine as possible. The sharper the tooth, the faster the file will wear out, but the cut will be cleaner. I often used very narrow "circular" files.
Cutting boards: choosing a cutting method and types of equipment used
Very often, when carrying out various works in construction, the need arises to carry out such an operation as cutting wood into boards. In this review, we will tell you how you can organize the work process depending on the conditions and specifics of a particular operation, since sometimes you need to cut only one element along the length, and sometimes you need to cut a whole log or timber.
In the photo: special equipment allows you to open the board at different angles, but only those who do professional woodworking have such installations, since their price is very high
Why does a jigsaw cut crookedly?
The saw blade leaving the pre-planned line may be due to several reasons. The operator may not have enough experience in handling the tool, the file may be defective, and the rod and guide roller for the jigsaw may have serious play. In order not to guess from the coffee grounds, it is worth starting to sift out the factors that determine the accuracy and evenness of the cut line in your individual case.
As usual, it’s better to start with yourself and your approach to sawing. Often, novice craftsmen rush things and, wanting to speed up the cutting, apply a lot of pressure to the jigsaw. The tool does not have time to bite evenly into the material and create a clear groove for the file, which begins to follow the path of least resistance and makes unpredictable movements. This problem is especially common when working with thick timber (from 40 mm) and varnished plywood from Soviet times.
This is one of the reasons why the jigsaw moves to the side. What to do about this? The answer is obvious. Apply the minimum pressure sufficient to guide the tool along the line and set the maximum number of revolutions (when working with wood). The pendulum mode usually does not affect the evenness of the cut if its design is in good order.
The quality of assembly and wear of tool parts can be a good reason for the formation of beveled lines when sawing. There are basically no complaints about devices from the budget segment (up to 2,500 rubles), as well as hopes for their conscientious assembly. It’s another matter when original, branded instruments begin to perform such tricks. Often, the cause of a crooked cut is the guide roller, the jigsaw rod or its sole.
You can check the reliability of the element’s fixation by simply tugging it with your hand. Loosening of the rod or roller by more than 1 mm determines that this device is not capable of producing a perfectly even cut. The more play there is in the parts, the less accurate the cutting line they form. This problem should be corrected based on the circumstances. If the part itself is worn out, it can be replaced with a similar one. It is difficult to fix a breakdown if the attachment point to the mechanism is worn out. Not every modern Kulibin undertakes such repairs, and this problem is usually solved by purchasing a new tool.
Unfortunately, the products of many trusted brands are often counterfeited, and jigsaw files are very popular in this regard. It so happens that low-quality and counterfeit products have a rather short service life, which brings many problems to the owner. One of these problems is a crooked cut. An initially smooth blade can bend due to poor-quality metal, which can cause deformation of the tooth set, if it was present at all. In this regard, if your jigsaw cuts crookedly, replacing the saw blade can correct the situation. The process of choosing a high-quality jigsaw file was discussed in detail in a separate topic.
What criteria should be taken into account when choosing a cutting method?
All of the options we'll discuss below will get the job done, but each of them is suitable for certain conditions, so you need to decide on several factors in advance:
Important! Sometimes the best solution may be to purchase a ready-made board, especially if the amount of work is large.
A special machine for sawing boards lengthwise is an ideal solution for those who carry out longitudinal cutting constantly and in large volumes
Mistakes when working with a jigsaw
If the technological subtleties are taken into account, but the cut line turns out to be crooked and with many chips, there may be several reasons.
The master has little experience working with a jigsaw. You need to practice more and as a result you will be able to cut as it should.
The material is not secured securely enough and moves out of place when cutting, or is fixed inconveniently for the person doing the work.
If the process is performed by a worker without experience, it is necessary to use guides, and when making complex shapes, a special pattern. If this is not possible, the quality of the cut can be improved by reducing the speed.
The main reason why a crooked cut is obtained is a malfunction of the tool or blade. In this case, there is a high probability of chipping, the file moving to the side and becoming dull. An incorrectly selected blade for a specific material will lead to it breaking repeatedly during work and the result will be of poor quality. It is worth carefully inspecting the jigsaw and eliminating the damage.
Too much emphasis on the jigsaw leads to excess pressure, which also negatively affects the final cut.
To cut material with a jigsaw, it is not necessary to have many years of carpentry experience; it is important to listen to the advice of professionals and follow the technology for working with the tool.
Types of equipment used
We will look at some options for doing the work yourself and tell you about the devices used; you will have to choose the solution that will be best for you in a given situation.
Sawing boards
This type of work, such as longitudinal cutting of boards to size, can be done in several ways:
- If the amount of work is small, then you can use a hand saw, although you will need a special version for longitudinal sawing, which differs in the shape of the tooth. The instructions for carrying out the work are as follows: it is necessary to carefully mark using a square and a tape measure, then draw a clear line, then the element is carefully secured so that the board does not move during the work;
The longer the board is, the more difficult it is to carry out the process efficiently
Important! When processing manually, pay special attention to the vertical position of the cutting blade, otherwise the edges will turn out to be nervous.
- The second option is to use a jigsaw for wood, but it is also suitable for small amounts of work, and the thickness of the board is limited; the marking process is similar to that described above. The work is easier to carry out, since there is no need to apply physical force and monitor the verticality of the cutting - the sole in the equipment ensures that the right angle is maintained;
- Now let’s look at how to evenly cut a board lengthwise using a circular saw. There are two options for carrying out the work: if the edges of the element are uneven, then a line is first drawn along which the cutting is made (most often this is done with unedged lumber), but if one edge is smooth, then the stop is pre-set to a certain distance, and you simply guide the tool, pressing the stop part against the end;
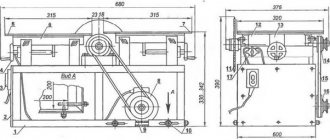
Design of various attachments for longitudinal sawing of logs
Let's start with something simple, with the design of a gas cutter. Visually, it resembles a bearing assembly, complemented by a pulley and a movable shaft (performs rotational movements). This device is driven by a belt drive. The unit is equipped with a special mechanism designed to fix the disks. The latter must be selected from an assortment designed for cutting metal, wood, and stones. With the help of such discs and attachments, transforming a gasoline saw into a multi-tool is not difficult.
An alternative version of the device for longitudinal cutting is a debarker. This is popular not only because of its ability to increase the efficiency of making boards, but also due to its ability to remove bark from logs. In addition, it can be used to cut grooves in the material being processed. These are just a few examples of the purpose for which a debarker is used. Such nozzles are found in two varieties:
They differ from each other mainly in functionality.
There are other devices for longitudinal cutting of logs. Most of them are developed by large companies, but you can also see homemade devices on the Internet. They differ from those manufactured at factories of famous brands mainly in their design features.
In this regard, homemade nozzles are much simpler. The most common version of these is a manual sawmill. The basis of such a small sawmill is a gasoline chain saw, supplemented not only with guide elements, but also with wheels designed for moving along the log (in order to reduce the resistance indicator). This device has no more than 2 wheels, one on each side of the workpiece.
A manual sawmill is a simple and convenient device. With its help, you can produce a large number of smooth and neat boards without much effort. The only essential condition is the correct installation of the chainsaw. It should be positioned horizontally (unless the operator requires an oblique cut).
Introduction
Wood has found application in a wide variety of industries. This raw material has always been popular due to its versatility, ease of extraction and processing. Furniture, interior items and even entire houses are made from wood.
Any craftsman encounters this material, but, as practice shows, not everyone is able to accurately cut a board. Tools often leave chips or nicks on the cut, which does not add beauty to your product. So what’s better, cut it yourself or order it?
Many companies offer to cut your boards when purchasing, and the price for this service is not too high. In production, boards are cut by a qualified craftsman using precision equipment, which allows you to obtain high-quality workpieces of the desired size and shape.
You, of course, can acquire expensive equipment yourself, but is there any point in this if you need to cut several boards? It’s up to you to choose, but if you still decide to cut boards at home, then I’ll tell you how and why it’s more convenient to do it.
WHY DISMISS THE WOOD?
The simplest answer is to get the most out of your workpiece. For example, instead of planing a 25 mm thick board to 10 mm, cutting it apart will allow you to get two boards of the same size from one board. As an added benefit, each of these boards will have nearly the same grain pattern, allowing them to be used on furniture (photo at right). And if you cut a 2-5 mm board of expensive wood into 3 mm thick veneer sheets, this will allow you to profit even more.
How to easily open a wide board along the width
It is not always possible to predict how symmetrical the sawn panels will be in pattern. Basically, any wood grain pattern has the potential to create a beautiful pattern, but choosing a piece with a particularly interesting pattern often produces the best results. Look what was hidden inside the nondescript board I used to test the adjustment of the bandsaw.
Note. Dissolution is the cutting of wood along the grain, parallel to the face.
The first time I saw a cabinet with a symmetrical design on the doors was in a museum, at an exhibition of furniture from the 17th-18th centuries. When I looked at these almost identical panels with a mirror grain pattern, I was blown away by them. Back in the day, I had an old Craftsman bandsaw in my small basement workshop. Its one-size-fits-all blade made acceptable curved cuts, but was not at all suitable for accurately cutting lumber along the grain, which is what I now planned to do. And, frankly, for accurate and stable operation, that saw needed more than just a new blade. I subsequently learned many lessons about how to handle any band saw. To set it up correctly, first of all, you need to set the table strictly perpendicular to the saw blade, get the maximum benefit from the guides and make sure that the cut is in the correct direction.
What is the best way to make a cut?
Circular saw
This is the most convenient tool for sawing boards. Compared to some other power tools, it has better performance. But it is worth remembering that circular saws differ in characteristics and scope of application.
Before buying a saw, decide for what purpose you will use it. The main use of circular saws is cutting or cutting boards.
When choosing a saw, you need to consider the depth of the saw. There are circular saws on sale with cutting depths from 30 to 130 mm. You need to find out what thickness of boards you will be sawing and, based on this, give preference to one saw or another.
It is also worth taking a responsible approach to choosing a blade for your circular saw. If you need to make a neat cut, you should choose a saw blade with a higher tooth frequency. If the teeth on the disk are sparsely spaced, the work will be faster, but much rougher. It is important that when working with a circular saw, the cuts are smooth and practically without chips. This is discussed in more detail in my book. More details about it in the “BOOKS” section.
To start working with a circular saw, set the depth of cut equal to the thickness of your board. Thanks to this, you can make the most beautiful cut on almost any surface without leaving marks.
But it is worth remembering that if you make a cut at 90 degrees, the cutting depth will be the same, but for a 45-degree cut the cutting depth will be much greater. Then check that nothing interferes with the protective casing, otherwise it simply will not open.
Fix the board so that it does not slide on the table during work; this requires a stop along and at the end of the workpiece. By the way, some saws are equipped with a thumbscrew that allows you to set the cutting angle. Typically, circular saws have a range from 90 to just under 45 degrees, allowing you to make neat, angled cuts.
Hand circular saw
Typically, gardeners think about buying a hand-held circular saw after they had to manually saw a couple of boards along their two-meter length or so. In other words, dissolve the boards.
For these purposes, there is a hand-held circular saw. Once you get used to working with it, you can no longer avoid the temptation to use a circular saw wherever it can replace a regular handsaw.
A couple of months after purchasing the saw, I realized that for any household needs it is enough to buy only wide boards of the required thickness. And from them you can “cut” any blanks. For benches, stools, various country furniture, garden trellises and a host of other things useful in the country.
For the frame of a small lightweight woodshed, it is quite enough to make 75x50 posts, which can be easily obtained from a standard 150x50 board. It’s easy to cut slats from it for decorative “chlamys” in the garden for climbing plants. Believe me, the savings are very significant.
Further more. Having learned how to select a quarter using a circular saw, you can quickly and efficiently make profiles for finishing door and window openings and lining external corners.
The blanks will look good, not like store-bought items that can be broken with just your fingers. At the same time, costs will be reduced threefold, or even more, taking into account the “exclusivity” of the product.
So, I won’t try to persuade you – a circular saw is an extremely useful household item!
Operating a circular saw is quite simple, but requires skill and care. I tried to demonstrate the general principles of adjustments in two interactive flash drives:
I would like to dwell in more detail on some of the features of working with a circular saw. I think that these points will help with choosing a tool.
Depth of cut. Always set the depth of cut equal to the thickness of the board you are cutting. Make this a rule for yourself. You can do less if you need to make a groove, but you shouldn't do more. Not only for security reasons. For example, you can saw by placing the board directly on the workbench. Barely noticeable grooves on the surface of your workbench after such cuts will not interfere with your work for many years.
The nominal cutting depth of the saw is selected based on your individual needs. In practice, to cut a 50 mm board at an angle of 90 0, you need a cutting depth of 50 mm. Anything larger than this size will only work for miter cuts. So, to make a cut at an angle of 45 0, you will need a saw that has the characteristic we are interested in at the level of 71 mm. Based on this, draw conclusions. How often will you have to cut at an angle?
Other structural elements. Lower saw blade guard (openable). Keep in mind that the guard will open the saw blade on its own only if nothing interferes with it. For example, as in option A, when the end of the board is like a canopy.
If the board is lying on a workbench, then an attempt to “automatically” open the casing can end disastrously: realizing that the casing is “in the way,” you will try to pry it off by lifting the back of the saw; the disc will enter the material when the saw is “in the air” , without emphasis. It can easily be thrown away, which in itself is unsafe. And you'll ruin the board.
In this case, you need to carefully manually move the protective cover aside. It’s good to get used to doing this in such a way that your left hand and saw firmly hold the tip of the latch of the retracted protective casing. Safety first!
First, think about how all the elements involved in the sawing process will behave, taking into account the specific situation - then act!
How to cut a board into thin bars
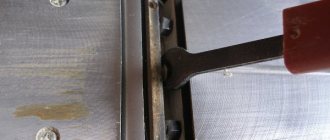
Align the front end of the striker plate with the marks where to start sawing, and press it firmly against the board. Please note that the disk does not touch (!) the workbench when turned on; for this purpose, the rear part of the support plate can be slightly raised. Turn on the saw, pick up the speed and feel free to start making cuts.
The ideal option with a board on a workbench: when the edge of the board, from which the cut begins, protrudes a few centimeters beyond the edge of the workbench.
along a board that is in a very “suspended” state (it even bends!) .
The “riving knife” is used to prevent the disk from getting pinched and to prevent you from “crashing” the disk into the board while moving it in the opposite direction. And you are almost guaranteed to receive a noticeable backlash, similar to what happens in similar situations with an angle grinder, a chain saw, and other “rotational-cutting” tools.
Parallel fence, or guide. If you have markings and the appropriate skill, you can make an even cut without a parallel stop, but I see the point in this only in those rare cases when you need a board of this shape:
In all other cases, the rip fence is indispensable:
Fixing the workpiece. In all cases, the workpiece must be securely fixed. It is unacceptable when the workpiece begins to move with the saw or deviate somewhere to the side. Having secured the workpiece, before you start sawing, you must mentally go through it with a saw. It is important that there are no obstacles along the entire path of the saw’s future movement! The stops you use and other possible fasteners should not be anywhere in the path of the tool or its element.
In the photo above, I give only an example from my practice, although there are a lot of possible options. I think in this regard you should not blindly use other people’s recommendations. Take them as a basis (from various sources) and adapt them for yourself as a belt, tightened to your individual size.
On one side (blue color) I have a rail attached to the workbench, which serves as a counter so that the board does not move sideways. It protrudes slightly below 2 cm, that is, less than the thickness of the boards that I usually process on this workbench. To prevent the sawn board from sliding forward, it is pressed against the second stop (green). This stop is tapped from below to the required height, so that in turn it also does not interfere with the saw when completing the wiring. I have developed this work scheme over several years, and it is convenient for me. In this configuration, you can use a plane and a router (for rough work). I don't pay attention to the grooves from old cuts. The workbench is already 7 years old and it always winters in the open air. I fastened the upper boards from below, so that the blade of the saw blade could never run into the screw.
READ Proportion of oil and gasoline for a chainsaw
board follows closely behind the solid wood being cut , without reliable fixation:
In the border zone, the board can be twisted or dangerous chips can be torn out of it, and the saw can be thrown back. This, for example, can happen when, as in the case of my “green” stop A, if the saw blade runs into it.
How to cut a board into thin bars
In some difficult situations, when it is necessary to select a quarter for the profile, I additionally secure the workpiece with screws, which I tighten in places where the disk will not run into them, and which will then be cut off during the final trimming of the workpiece. A little advice: during “in-line” production, change the screws more often. Their quality is poor, the head wears out quickly, you can easily screw it in and not unscrew it.
When preparing the board for cutting, make sure that there are no internal stresses in it that could jam the disk.
Wiring. The saw should be driven gently, without overloading the motor. Try to rest the saw when making many long rip cuts. a manual for several hours , it is easy to “burn out” the motor even in a reliable professional-grade saw.
After finishing the cut and lifting the saw up, hold it with the blade away from you, even if it is already covered with a protective cover. Place the saw on the floor or workbench only when you are sure that the blade has completely stopped and is “covered.” Cultivate a similar “habit” in yourself to the level of a reflex.
Despite the huge selection, almost 90% of commercially available circular saws represent one “medium” weight category. These are the most popular saws, capable of cutting the most popular boards in construction, up to 50 mm thick. The diameter of the discs used is from 180 to 200 mm. This saw is universal. The typical power range for such saws is 1100-1800 watts.
The simplest way to cut lumber with a hand-held circular saw in the country
It makes sense to take smaller saws for regularly performing specific work. When you don't need to make deep cuts. Then you will be able to realize the absolute advantage of such a saw - its lighter weight.
Among the very “small” saws – “SUVs” – that have proven their reliability, we should especially highlight the Skilsaw with a power of 500W, although it is now already available in an 800W version. This model is, in fact, very convenient for working with lining, picket fences, OSB boards, and laminate. This is a super lightweight circular saw. So light that you quickly start using it with one hand, firmly “turning off” the lower protective casing, losing your vigilance in front of its insidious charms. Which is unacceptable! But perhaps this is its only drawback.
Therefore, let's return to middle-class saws.
External inspection - take the saw in your hands and feel how convenient it is for you. A saw is a dangerous tool. Prolonged work with a tool that is not comfortable in your hands is very tiring. When moving a circular saw, a person is always very focused on a subconscious level, and experiences incomparably more tension than running an “iron” along the same board, which can be much harder. Therefore, I put the ergonomic factor of a circular saw tool first.
This should also include an inspection of the quality of the instrument itself and the materials from which it is made. For example, a plastic top guard is not a good sign, but that's in my opinion. The lower protective cover should open and close smoothly and without play. At the same time, it should not look so that it can be easily bent if you do not “throw” (accidentally, of course) the saw on the floor too carefully.
Brand. A high-quality circular will cost from 4 to 6 thousand rubles. In this range, you can choose a worthy copy of a well-known brand with a reputation, and tailored exactly for you.
For some it will be Metabo, for others BlackDecker, for others Makita, but, in fact, a specific brand among “equals” as a decision-making factor will be less significant compared to ergonomics.
Other adjustments and features.
Please make sure that all settings are easy for the saw you like. For example, loosen the cutting depth locking lever, change the cutting depth and try to lock the lever in different positions. I won’t point fingers, but there are popular saws that have problems with this lever. In the minimum cut position, it is easily tightened firmly, but in the maximum position, it begins to rest against the sole, and it will not be easy to tighten it. If you try to correct this by changing the position of the lever on the slots, you will experience inconvenience when locking in a different position.
The lower protective casing can cause significant inconvenience when cutting at the maximum possible angle (45 0), or even simply prevent such a cut from being made due to the fact that it will simply protrude outward from the bottom of the sole, along with the saw blade.
In fact, the design of the saw is not simple. There are many elements that rotate in different planes - so carefully evaluate for yourself the convenience of each of these elements.
The most important thing is that after you have installed and fixed the saw in the desired position, the resulting structure does not “creep” in different directions due to work loads.
Convenient and easy access to brushes for independent replacement is important, which is especially important for powerful saws.
Possibility of permanent installation - for some this may be a useful option.
Electronics. Nowadays such modules are fashionable. In addition, for certain purposes they can be very useful. For example, an electric brake on the saw blade in case of jamming. It will not prevent a kickback, but will reduce its consequences (in this regard, a slip clutch works more effectively, ensuring free rotation when the saw blade is stationary). Otherwise, the same electronic bells and whistles are typical for circular saws as for all power tools.
This is a soft start system (solves the problem of “starting current”), a system for maintaining a constant speed under load, a speed control system (for example, to reduce speed and cut plastic without it melting), and an engine overload protection system.
There are many saw blades. I will limit myself to those designed for sawing wood. Often, the best saw blade is the original one. As a rule, this is a strong, durable and versatile disc (of course, this only applies to brands with a well-deserved reputation). But sooner or later it wears out and requires replacement or sharpening. Sawing with a dull disk is extremely undesirable for many reasons. This puts excessive strain on the engine. This “rips” the wood instead of making a straight cut. And this is dangerous due to the higher probability of a kickback when blunt teeth become jammed in the array.
READ Husqvarna Chainsaw Starts and Stalls Cause
Almost all modern saw blades have carbide-tipped teeth, which provides them with a long service life.
The fewer the teeth (and they are, accordingly, relatively larger), the faster such a disk cuts, but the cut is rougher. Such discs are better suited for longitudinal sawing of wood.
Discs with more teeth are used for clean finishing cuts. These discs best reveal their advantages when cutting wood crosswise, although longitudinal cuts made by such discs also do not cause any complaints.
The inclination of the teeth can be positive or negative.
To better understand how this works, imagine peeling a potato or sharpening a peg by changing the angle of the knife. Obviously, the blade works differently, and the chips produced are not the same. Most wood blades have a positive tooth angle. A negative angle is useful for finishing cuts in plastic, laminate, and aluminum. Also, a slight negative tooth angle may be required for those discs that are installed on miter and plunge-cut saws. There, the trajectory of the “introduction” of the saw into the wood differs from the classical one. Accordingly, there is a different distribution of loads.
Compensation slots on the disks serve to prevent thermal deformation of the disk in case of overheating. This reduces noise and vibration, as well as the load on the engine when the saw is running. The friction and beating of a disk, even slightly bent by a propeller, is very unpleasant.
Not only the number of teeth and their inclination, but also their shape and sharpening geometry have a great influence on the speed and quality of sawing. In most cases, the subtleties of sharpening come down to the principles of setting a regular hand saw. But there is a peculiarity, rather a marketing subtlety. If the disk has become dull and you decide to try to sharpen it yourself, or take it to a workshop, then not all sharpening methods can be reproduced “makeshift” without special equipment. These are little tricks of saw blade manufacturers who benefit from you buying their blade again rather than sharpening it all your life.
When choosing a disk, you should also pay attention to such points.
The topic of saw blades is well discussed on the Internet, not only in an advertising sense, but also in an informational and educational way.
The simplest way to cut lumber with a hand-held circular saw in the country
And one more thing: as a rule, manufacturers that respect themselves and the buyer place all the information about the disc on its packaging and directly on its surface.
Speaking about hand-held circular saws, one cannot fail to mention one rather interesting variety of them - plunge-cut circular saws.
Not all manufacturers have them in stock. Less common than miter saws. With the help of such saws it is much more convenient to cut rectangular holes in solid wood or plywood without touching the edges. I suggest looking at the operating principle and features of using such saws on the catalog page of the manufacturer of the same name. Grizzly. Those who are interested in this can go to the corresponding website using the link at the bottom of the picture.
And now the most important thing! A hand-held circular saw is an extremely dangerous tool. This needs to be repeated constantly. I suggest watching videos that clearly demonstrate the possible consequences of disrespectful handling of circular paper, everything is more than clear:
I think what you see will force you to once again carefully study the instructions and safety recommendations from the manufacturer of your tool. And I wish no one to see this in reality!
How to cut a board smoothly with a simple hacksaw
A hacksaw is a simple tool needed for cutting various materials. The process is energy-consuming and progresses at low speed. Despite this, a hacksaw is the most popular tool needed for cutting boards, timber and other materials at home.
Main settings
The effectiveness of using a hacksaw for wood largely depends on its technical characteristics. The main ones are:
- the material from which the saw blade is made;
- length of the canvas and its shape;
- tooth size and shape;
- type of handle.
READ Replacing a Black and Decker Circular Saw Blade
When choosing a tool, you need to pay attention to each element of the characteristics. Only in this case you won’t have to regret the purchase.
Handle type
The type of handle and the material from which it is made largely determine the ease of working with a hacksaw on wood. It is best to work with a saw equipped with a solid plastic handle with rubberized finger inserts. The handle, made of two parts, is less comfortable, as it does not have sufficient rigidity.
There are also hacksaws with reversible handles. They are usually equipped with universal and bow saws, in which blades can be changed during operation.
Varieties
Modern experts distinguish the following types of hacksaws:
- necessary for cutting wood. With its help you can work with logs, boards, chipboard leaves. The process is simple, a person with minimal knowledge in this area can handle it;
- capable of sawing metal products. A narrow and thin file with fine teeth is attached to the C-shaped frame. To make it convenient to work with the tool, there is a special handle made of rubberized or plastic material;
- working with concrete. The teeth, unlike other types, are larger.
The wood saw is easy to use and lasts a long time. The choice of tool must be made depending on the size of the board. You need to pay close attention to the length of the teeth. A saw with teeth equal to 3.5 mm can cut soft wood perfectly. To cut hard wood products, you should take a hacksaw with a tooth size of 5 mm. Be sure to sharpen the tool before cutting.
DIY jigsaw guide
If a jigsaw cuts crookedly, and it is not advisable to buy an expensive guide, you can completely get by with improvised means. Any smooth edge with a thickness of 5 mm or more can become an impromptu stop: a straight strip, usually a piece of plywood and other straight surfaces of suitable sizes. A pair of ordinary clamps can serve as clamps for the guide to the material. If the condition of the surface of the opposite part of the material being sawn is not of great importance, the guide can be screwed onto a pair of self-tapping screws.
To make the line as neat and even as possible, use the optimal file suitable for the material being processed. More visual processes for making and using a homemade guide are demonstrated in the following videos.
Stages of work
To cut a workpiece quickly, you need to proceed in stages:
- Take a board of the required size and decide on the tool. If the workpiece is large, you should use a hacksaw with large teeth. For smaller wood materials, use a saw with smaller teeth.
- The necessary markings are applied with a pencil and ruler. Draw lines that are barely visible to the naked eye. You need to follow the well-known proverb: “Measure twice, cut once.”
- First make a drink. To prevent the canvas from wobbling, experts advise holding it with your thumb or a special device called a miter box. This makes the procedure much easier.
- Cut the wood straight, do not sway the body of the tool from side to side. If the hacksaw gets stuck in the material, carefully release it and try cutting again.
HOW TO MAKE A PERFECT STRAIGHT CUT WHEN ASSEMBLYING A FRAME
If you are not a tough frame construction professional, then you most likely have problems with straight cutting with a manual circular saw.
A good, even cut is very desirable when assembling a frame. Even if you have a laser-guided saw, it still takes skill and a steady hand.
Usually, for a straight long cut, they use a cord rubbed with chalk: they beat off a straight line with it and saw along it. But if you don’t have the skill, this doesn’t really help. It is good to have a rigid guide against which the edge of the saw rests - then the cut should be straight. To do this, I had to come up with equipment from what was at hand.
Cutting boards: choosing a cutting method and types of equipment used
Very often, when carrying out various works in construction, the need arises to carry out such an operation as cutting wood into boards. In this review, we will tell you how you can organize the work process depending on the conditions and specifics of a particular operation, since sometimes you need to cut only one element along the length, and sometimes you need to cut a whole log or timber.
In the photo: special equipment allows you to open the board at different angles, but only those who do professional woodworking have such installations, since their price is very high
The advantage of sawing logs with a chainsaw
The method of cutting logs using a chainsaw has several advantages.
The ability to work under any conditions - the chainsaw is not afraid of humidity, so specialists can cut logs during the rain; in this case, the equipment will not deteriorate.
High productivity - it is allowed to carry out woodworking throughout the day, but it must be taken into account that the power of the device must be at least 7 horsepower.
Autonomous device - the equipment runs on gasoline and does not depend on electricity; the workplace can be mounted in any area where it will be more convenient to carry out the process.
Ease of use - the chainsaw is equipped with a soft start and adjustable chain rotation speed; these conditions ensure that beginners in this business obtain high-quality results.
What criteria should be taken into account when choosing a cutting method?
All of the options we'll discuss below will get the job done, but each of them is suitable for certain conditions, so you need to decide on several factors in advance:
Important! Sometimes the best solution may be to purchase a ready-made board, especially if the amount of work is large.
A special machine for sawing boards lengthwise is an ideal solution for those who carry out longitudinal cutting constantly and in large volumes
Smooth cutting of material with a jigsaw
How to cut smoothly with a jigsaw? This tool is a saw equipped with an electric drive. It can cut various materials:
- tree;
- metal;
- plastic;
- tiles
Working with a jigsaw is simple if you follow the rules: the table must be stable, the material must be firmly fixed, and the correct saw has been selected.
The tool can cut parts, cut workpieces along a straight or circular line. How to cut with a jigsaw?
Principle of operation
Materials and tools:
- wood;
- jigsaw;
- protective glasses;
- protective gloves;
- machine oil.
First of all, it is necessary to firmly secure the material being cut.
If the jigsaw cuts crookedly, you need to check the stability of the worktable and the strength of the workpiece. Using a jigsaw, it is not advisable to cut wood along the grain, since it will be quite difficult to make an even cut.
If you still need to do just such work, then you need to use a parallel stop. It is attached to the jigsaw with one side, and the other side should rest against the edge of the wood. This will ensure an even cut.
The right process
Jigsaw device.
If during work it becomes necessary to cut a circle inside the wood, then you need to drill a small hole in the center of the future circle. Then they put a jigsaw in it and move towards the circle marked on the material.
If you need to cut a hole in the shape of a rectangle, you need to move the saw along the side of the rectangle, then smoothly bending around the corner and cutting out the next side. When the required hole is ready, you need to make the corners.
When performing work, do not put too much pressure on the tool, as this can cause the device to overheat and fail. You don't want to use the saw for too long, as it will become dull and start to catch on the edges of the wood.
When sawing durable materials, you need to lubricate the saw with machine oil. This will make cutting easier.
If work is performed at low speed, then you need to take breaks, as this will cause the device to overheat.
When working, you must follow safety precautions and perform cuts wearing safety glasses and gloves.
After finishing work, the jigsaw must be cleaned and lubricated with machine oil.
The device can have a regular or pendulum stroke. In the first case, the jigsaw moves vertically. At the same time, it cuts the wood as it moves upward. The device, which uses a pendulum stroke, additionally feeds the jigsaw forward when moving upward. With this method, the speed of work increases and the tool blade wears less.
Sawing technique
During construction work, sometimes it becomes necessary to saw off the material evenly, with extreme precision.
Materials and tools:
- wood;
- jigsaw;
- guides;
- clamps;
- pencil;
- roulette.
Types of saws for jigsaws.
For an even cut with greater accuracy, you need to use a tool with a high frequency of blade movements.
The file should be wide, designed for working with wood.
The work will be done using a guide. To do this, you can use a flat board or batten.
You need to prepare 2 clamps. They should fit the workpiece and guide.
The workpiece must be placed on a raised surface so that the jigsaw does not rest against the saw when cutting.
Then you need to measure on both sides with a tape measure the required width of the area that needs to be sawed off. They make notes. Then they are connected along a ruler, obtaining a cutting line.
Then lay the guide at the required distance from the cutting line and secure it with clamps. After this, the jigsaw is placed with a file to the cutting line. Then press the guide against it and secure it with a clamp. You need to secure it so that it does not move, but not too much.
Then the same actions are performed on the other side. Here you need to clamp firmly, but so that there are no indentations on the wood.
After this, move on to the first clamp. Check its installation and tighten it.
The necessary measures have been taken to ensure an even cut.
Now turn on the jigsaw. Set the maximum speed. The pendulum stroke regulator is set to number 1. Set the tool with a file to the cutting line. They press the side of its platform against the guide and begin cutting.
When working, do not press too hard on the device. Slightly move the tool forward, while controlling its platform. It should press against the guide so that it does not move. When a few centimeters remain until the end of the cut, you need to hold the sawn part so that it does not break off.
This is where the work ends. The cutting line turned out perfectly smooth.
Additional accessories
To make the cut more accurate, for example, when cutting out small parts, use a special sawing table. It is secured to the desktop using a clamp. Cutting on such a table occurs in reverse. In this case, it is not the saw that moves, but the part itself. This way you get more precise lines.
To ensure that the saw moves well along the workpiece, an additional device is used - a replaceable plate. It can be made of various materials. It is attached to the support sole of the instrument. Thanks to the guide bar and adapter, more precise cutting lines are achieved.
When sawing some materials, they need to be cooled. For this purpose, there is a container with cold liquid, which is installed on the support sole.
Plastic and wood are sawed from the back using a thin file. Thanks to this, no deformations will form on the cut line. When cutting metal, the cutting blade is lubricated with machine oil, and the metal cutting line is cooled. Curvilinear cuts are made with narrower files. To cut a circle, use a special circle cutter. It needs to be installed in the center of the future circle.
A jigsaw is an indispensable tool in any home carpentry workshop. With its help, you can saw any materials, perform smooth and precise cuts, and cut out parts of any shape and size.
Source: https://masterpomebeli.ru/instrumenty/kak-rovno-pilit-elektrolobzikom.html
Types of equipment used
We will look at some options for doing the work yourself and tell you about the devices used; you will have to choose the solution that will be best for you in a given situation.
Sawing boards
This type of work, such as longitudinal cutting of boards to size, can be done in several ways:
- If the amount of work is small, then you can use a hand saw, although you will need a special version for longitudinal sawing, which differs in the shape of the tooth. The instructions for carrying out the work are as follows: it is necessary to carefully mark using a square and a tape measure, then draw a clear line, then the element is carefully secured so that the board does not move during the work;
The longer the board is, the more difficult it is to carry out the process efficiently
Important! When processing manually, pay special attention to the vertical position of the cutting blade, otherwise the edges will turn out to be nervous.
- The second option is to use a jigsaw for wood, but it is also suitable for small amounts of work, and the thickness of the board is limited; the marking process is similar to that described above. The work is easier to carry out, since there is no need to apply physical force and monitor the verticality of the cutting - the sole in the equipment ensures that the right angle is maintained;
- Now let’s look at how to evenly cut a board lengthwise using a circular saw. There are two options for carrying out the work: if the edges of the element are uneven, then a line is first drawn along which the cutting is made (most often this is done with unedged lumber), but if one edge is smooth, then the stop is pre-set to a certain distance, and you simply guide the tool, pressing the stop part against the end;
When working, do everything in accordance with the operating instructions for the power tool.
- Of course, the simplest solution to the question of how to cut a board lengthwise is a circular saw, and both full-fledged installations and compact options can be used. This option is very suitable for cutting a large number of elements to one size; you can set a stop or attach it and not waste time on marking and fixing; in addition, this type of equipment has the highest productivity;
Having secured the stop, you don’t have to worry about compliance with the parameters
Log sawing
A more complex option for carrying out work, which requires more powerful equipment. Of course, purchasing a full-fledged sawmill is not the best option, so sawing logs into boards in the field is done using a chainsaw and a special Timberjig kit.
Let's talk about this system in more detail:
- You will need a standard chainsaw, preferably one with fairly high power;
- It is also necessary to purchase a set consisting of a guide and a stop; it is sold with a set of the required fasteners, so no additional elements are required;
Design fits all standard chainsaws
- Next, a device for sawing logs into boards is assembled; for this, first of all, a support is made of two boards, one of which is attached at the end to the middle of the other, a very strong T-shaped element is obtained, which will serve as a guide during the work process;
- The log is placed on a flat base, after which stops are screwed to its ends, which are made from a board connected by a corner; it is important to control their level and position them evenly, the quality of the work depends on this;
- Now you need to attach the guide to the stops; it is aligned along the line of the future cut, taking into account the fact that the chainsaw bar will run 10 mm above the top edge of the guide. Fixation is done using clamps, which are also included in the kit;
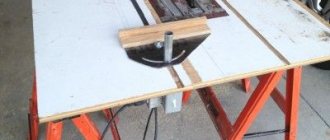
- The saw is located on the frame; the frame allows it to occupy the same position throughout the entire work. To ensure convenience, we recommend that after fastening, lift the log so that the chainsaw is positioned at an angle, this will make it much more convenient for you to work. The photo shows the structure in operation.
This is what the assembled system looks like
You might prefer working with a rod stop
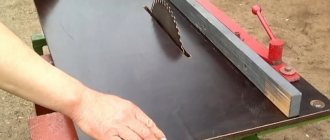
Instead of fiddling with adjusting the rip fence to compensate for drift, some craftsmen prefer to manually guide the boards using a rip fence (top photo). This method saves time by avoiding long setup times, especially when you only need to make one or two cuts. In this case, the surfaces of the boards usually turn out to be rougher, which will require additional work to level them on planing and thicknessing machines.
Some rip fences come with a removable rod attached to the side (bottom photo) or a semicircular trim, but they are not difficult to make yourself. To use the rod stop, install it at a distance from the saw blade equal to the thickness of the future plates and adding another 1.2 mm.
Place a longitudinal line on the workpiece. Pressing the workpiece against the fence, feed it forward, making sure that the cut follows the cutting line, and manually correct the deviations.