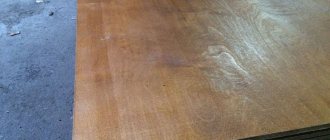
People just starting to burn portraits have a question: “How to cut plywood so that there are no chips?” Typically, this difficulty arises when cutting plywood across the grain. Then the top layer of veneer breaks off and forms chips and burrs. The most unpleasant thing is when this happens when sawing off extra empty fields on a finished burnt work. Chips can appear for several reasons and most often cannot be corrected or disguised. Below in the article we will look at the reasons for the appearance of such chips and burrs. We’ll also consider what to do to prevent chips from appearing next time.
Causes of chipping
Often chips appear because a jigsaw blade that is not suitable for these tasks is used. If you take a saw blade with teeth pointing upward, then such a saw will tear off the top layer of veneer. This happens because there is space between the jigsaw blade and the file. The fracture of the top veneer occurs precisely in this place.
What to do to get rid of chips:
- Disable the pendulum stroke on the jigsaw
- Use a suitable quality file
- Always cut plywood from the rough side
- Buy a splinter guard (or make one yourself)
- Additionally, choose a method that is convenient for you from the “clean cut” experiment
Let's look at all the points in more detail in this article.
Basic and additional functions
To make work easier, many models of jigsaw machines are equipped with a number of additional functions. Among them are:
speed adjustment. The most common function that allows you to set the required number of reciprocating movements of the jigsaw blade per minute. Thanks to its presence, you can get a fairly clean cut, depending on the type of workpiece being cut. There is a smooth and stepwise adjustment of the frequency of movement of the saw blade;
desktop tilt. Allows you to cut material at any angle relative to the horizontal plane. Professional models have the ability to adjust the desktop in several planes. For greater convenience, the mechanism is marked with graduations, allowing you to select the appropriate angle;
illumination of the working area. Allows spot illumination of the work site. Thanks to this, work can be completed faster and with better quality. In addition, the built-in backlight reduces eye fatigue when sawing;
dust extraction An auxiliary function that allows you to instantly remove shavings and sawdust formed during sawing, thereby facilitating the work;
engraver. The presence of a flexible shaft with an engraver allows you to expand the functionality of the machine. It can be used to polish, drill or grind workpieces. The only drawback is the single drive system, which does not allow you to run the saw blade and the engraver at the same time.
Pendulum stroke of jigsaw
The pendulum stroke, or otherwise called “pumping,” is needed to increase the speed of cutting wood, to be able to work with soft materials and to produce complex cuts. The pendulum stroke of the jigsaw is carried out according to the principle of swinging. It significantly worsens the quality of the cut and because of this, chips appear on the surface.
We recommend turning off the pendulum stroke to reduce chipping. For example, on a Makita jigsaw they showed where it turns off. Find out if your jigsaw has such a function and how to disable it. When the function is turned off, the jigsaw makes standard movements, due to which uniform sawing is achieved and the quality of the cut is improved.
Marking the cut line
To cut the material evenly with a jigsaw, you need to correctly mark the cutting line and securely fix the workpiece on the surface. If you have to work with a long blade, you should use a flat rail as a guide and two clamps to secure it and the working material. It is necessary to act in a certain sequence.
First you need to make markings on the chipboard using a ruler. To do this, the required distance is measured on both sides, the marks are connected, forming a cut line. To make a curly line, it is advisable to draw it on paper and then transfer it to wood using carbon paper, having previously sanded the surface.
To cut a circle with a jigsaw, markings are applied with a construction pencil or black marker to the surface using a pre-made stencil made of thick paper or cardboard. In this case, cutting the material begins by drilling a hole in the center. The blade should move from the center to the marking line, and then along the perimeter of the circle.
Important! A jigsaw is inherently designed for curved cuts; cutting it exactly in a straight line is quite difficult. You must constantly monitor the line and point the tool slightly to the side.
To avoid chips on the finished surface, the file during work is not guided along the mark, but near it. The laser guide on the jigsaw will help you cut smoothly.
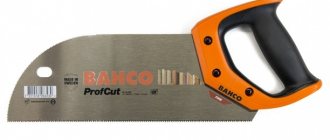
Jigsaw blades
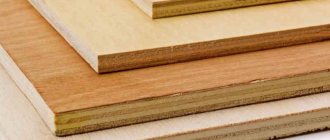
If you have previously worked with a jigsaw, then you know that if you use the wrong saw, you can ruin the top layer of the material, especially for layered material. Plywood is a layered material - it is wood veneer glued together.
In this section we will look at how saw blades affect the quality of the cut and what types they are in principle.
Files come in different tooth sizes and shapes, the length of the file, the material for which they are intended, the direction of the tooth, the material from which the file is made and for what purpose it was developed. For example, a blade with a large tooth is designed for cutting wood at high cutting speed for rough cuts. And files with shorter teeth will make a more even cut. Thin (narrow) files make it possible to cut radius and other non-standard shapes, while wide ones help to maintain a straight cut.
The letters “A, B, C, D” indicate the size of the teeth, the letter “A” indicates that the saw has the smallest teeth.
The numbers indicate the length of the file 1, 2, 3, 7, the length of the blade, the longer the file, the thicker the material it can cut.
For example, the marking of Bosch brand files looks like this:
In addition, files also differ in cutting edge geometry.
An engineer’s personal experience about jigsaw files:
In production, there are tasks both for an even saw when working with finished portraits, and the need to unravel a large sheet of plywood, when speed is required and quality is not so important. The majority of sawing blades are designed for speed, not quality of cut. And even files with a medium tooth will scratch the surface of the material, i.e. spoil the top layer of plywood. Not so much compared to larger tooth files. Therefore, the engineer adapted himself to using metal files with fine teeth up to 1 mm for even cutting of plywood. When working with such a file, the speed suffers greatly and these files become very hot. But when important cutting work is needed, the time spent is justified. An engineer uses such saws when he needs to work on a portrait that has already been burned out.
Sawing chipboard - methods and methods of processing
If you have at least once tried to cut chipboard at home, then you know for sure that this work is by no means easy and requires not only skill, but also the availability of a good tool.
Laminated chipboard is especially difficult to process; when cutting it, many chips often form. That is why many craftsmen, faced with such a problem, come to the conclusion that it is better to cut chipboard when purchasing, especially since many trading organizations provide similar services and the price is quite reasonable. Chipboard sawing is carried out using precise format-cutting machines, which will help obtain workpieces of a given size and shape.
Modern models allow smooth sawing of slab materials not only in horizontal and vertical directions, but also at an angle.
In addition to cutting sheets, they will help you calculate and provide in the form of a visual video file several options for competent and economical cutting of sheet material (using special computer programs) and, if necessary, perform edging. However, if for some reason you prefer to do this work yourself, you will have to do some preparatory work before cutting the chipboard.
- Tools and materials
- How to cut chipboard without chipping?
- Figure cutting
- What not to cut chipboard
Using a hacksaw
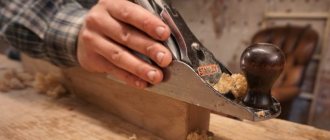
Sawing with a hacksaw at home is quite difficult. First, you need to cut the measuring line with a knife and glue tape along it. This will protect the top layer from damage. Point the tool at an angle of 30 degrees. Carefully move the hacksaw back and forth without pressing hard. To cut laminated chipboard without chipping with a hacksaw at home, choose devices with the finest teeth. In case of damage, the cut area must be passed with a file, directing it from the edge to the center. Finally, rub with sandpaper (fine-grained) and hide the defects under the flexible profile.
Sawing with undercut
The process requires a tire - a thrust ruler. It is secured to the board with clamps. Pruning is carried out according to the markings. The tire is installed along the mowing line, and the cut is made 10 mm deep. The second cut is made through. With this method, there will be no chips on both sides, since the laminate is already cut on the bottom side.
Some elements used in design ideas are cut curvilinearly rather than rectilinearly. In this case, a mixed type of chipboard cutting is used.
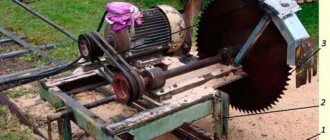
Sawing with a format saw
The workpiece is placed on the table and fixed in a stationary state. The necessary markings are made on the sheet and the saw unit is turned on. When the disk reaches sufficient speed, the table moves forward along with the wooden slabs and hits the disk.
- tile position;
- depth of cut;
- cutting angle.
Chipboard cutting machines are divided into 3 types:
light – for 5 hours of continuous operation; medium – up to 10 hours; heavy – up to 20 hours. The bed is the mount on which the entire mechanism rests. A heavy frame will add stability to the device and eliminate vibrations
This is important for quality cutting. Saw unit - consists of 2 flat metal discs. The first one pre-saws the slab, and the second one finally cuts through it. Desktops
Three people take part in the process. The first is for the location of the unit, the second is for feeding the sawn slabs (movable), the third is for supporting the sawn parts. Carriage – allows the movable table to move. In this case, the workpiece is secured using a stop and rulers in the required position.
Jigsaw
To cut chipboard smoothly with a jigsaw without chipping, you need to choose a device with a minimum tooth size. It is used for small areas of tiles, using smooth movements without pressure at low speed. If you are using a jigsaw for the first time, some cracks may appear on the back of the slab. With further use, the quality of the cut will improve.
Sawing from the rough side
The fact is that standard files have teeth away from the jigsaw (unlike files with the opposite tooth). These saws “eat” the wood as they move from bottom to top. When a tooth catches on the top layer of veneer, it often splits and chips appear. This often leaves the underside with a very good edge. From this, the craftsmen made a simple conclusion that to get a clean saw, it is enough to turn the plywood upside down and saw from the “wrong” side. The method gives the best results, so feel free to use it.
Anti-splinter liner
This is a special pad for a specific brand of jigsaw. It is simply inserted between the jaws of the jigsaw and is not secured in any way. The insert is adjacent to the file, so it does not allow the pile of the top layer to rise (which is what causes chips), so the saw is smooth. Craftsmen advise using files from the same manufacturer as the jigsaw - the quality of the cut will be better with the use of an insert.
The inserts are sold in sets of 3-5 pieces. They are not eternal - they have to be changed periodically.
For example, an insert for a Bosch jigsaw costs about 400 rubles.
If you haven’t found an insert for your jigsaw or don’t want to buy one, then there is a small life hack from the craftsmen - stick ordinary tape in the place where you will be sawing. After this, you need to iron the tape well with your fingernail. Then saw directly on top of the tape. After that you delete it. The result will be similar to the liner.
You can also make such a sole yourself. Here is an example of how our client made a jigsaw pad from a thin sheet of tin.
But it is more convenient to make such a platform from a sheet of plexiglass. And stick it to the bottom of the jigsaw using double sided tape.
With a homemade insert you will also get a clean cut.
How to make a round hole in chipboard?
There are a couple of columns to be made, but I still haven’t learned how to cut with a jigsaw. Why does Caliber lead the file to the left? Fiolent is even stable in this regard. How can you make a hole for a speaker with a diameter of about cm. Using a jigsaw with a compass tool!
I just don’t know if there is such a device for the Chinese. A router, with a similar device, if you have a router. Well, actually, using a jigsaw is easiest. Just take a new file and cut without strong feed. If you have a milling machine, then you can use it. The set includes a special lever for circular cuts. And take a small finger cutter. Mill halfway on one side, then on the other. There are also special compass devices for drills.
Enough for 25 cm. But there you need a good stop for the drill, a stand is better. Again, if the chipboard is wide, then the depth of the cutter may not be enough. Then you can try it on both sides. In general, making good speakers is a great skill, incl.
I’m talking about your words - “but I never learned how to saw with a jigsaw.” I make it for myself, so any will be good. I don't have a router. Where to look for them, approximate cost. Such compasses are called “Device for cutting large diameter holes”, or a jig for drilling large diameter holes. In short, this is a special bushing with a drill shank and a cone for centering.
The bushing has a through hole across it into which a long rod is inserted. At the end of this rod there is a rectangular hole for the cutter with a screw for tightening. The diameter of the hole is adjusted by the position of the rod in the sleeve. Set it as needed and secure the rod in the bushing with a clamping bolt.
Well, actually drill. We have seen such devices many times in construction markets. That's where you need to look. This is not homemade, someone makes it on an industrial scale. If you need to make a careful selection for recessing the head flange, which is correct, and for HF it is absolutely necessary, then perhaps this is only with a router. As for the front panel, take Nickel's good advice. Also, a spacer in the case itself would not hurt, especially if it is large and the walls are thin, and the coating with vibration and sound absorbers. I did this.
Using masking tape
Before sawing, you can glue masking tape to the plywood, then the cut will be cleaner. It is better to use masking tape rather than regular tape. It does not leave sticky residue on the plywood and is easy to remove. Make sure the tape is well attached before cutting.
This method isn't that bad. But personally I don't like this method.
Firstly, the tape often comes off when sawing and chips appear in these places.
Secondly, if you want to saw off plywood on which a picture made on a Pyroprinter has already been burned, there is a risk that small details of the image will remain on the masking tape.
About additional accessories
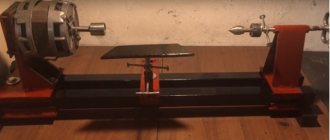
No special effort is required to obtain maximum results. The tool can work as a separate device, without any additions. But there are parts that can improve the performance of a regular jigsaw.
A special table for sawing is installed if the accuracy of the work becomes especially important. Fastening is carried out with the working surface using clamps
Replacement plates are another part in the kit. It prevents parts from slipping. The plates themselves are created from various bases. The supporting soles are involved in fastening. The guide bar and adapter will also help increase the cutting accuracy.
Some materials are not recommended to be processed without pre-cooling. Special tanks attached to the installation will facilitate the solution of this problem. Maintenance is easy by using universal lubricants.
Sawing, using second plywood
Another way to get a very clean cut is to lay another sheet on top of the sheet of plywood you want to cut and clamp them together using clamps. The top sheet of plywood will prevent chips from forming on the bottom sheet of plywood.
The result is a clean and neat cut, no chips on the desired sheet of plywood. But the main disadvantage of this method is the large overuse of plywood.
Trimming with a construction knife
There is also a way to trim the site of the future cut with a construction knife. This way you will cut the top layer of veneer and it will break at the cut point and not beyond. To trim, use a metal ruler to make a straight line. The cutting width is usually 3 mm.
The result is pretty good. I use this method often. If, when sawing, I just need to cut off a piece of plywood and throw away the second part, then I make only one cut - on the finishing side. This option is good to use when cropping a portrait.
What's next
Start with the first clamp. It is clamped after checking the strength of the installation.
Then they turn on the jigsaw. And they do it so that the speed is maximum. The pendulum control is set to the first digit.
The file must be placed close to the cutting line. The guide is compressed with the platform side. After this, they begin cutting.
The tool moves forward smoothly and the platform is carefully controlled. The platform and guide must move closer to each other so that nothing moves. The sawn-off part must be carefully held with a few centimeters remaining to the end. Then the part will not break off.
Conclusion:
To get the perfect cut
- Choose a suitable fine-tooth file. You can take files for metal or laminate. Do not use saws to quickly cut wood.
- Disable pendulum mode, if available.
- If possible, fit a splinter guard or make a solid sole for the jigsaw.
- Saw the plywood from the back side so that chips do not appear on the side of the portrait
- Use masking tape to make the cut cleaner or other life hacks