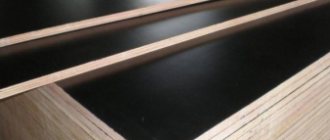
Laminated or plain plywood grades 1 and 2 are widely used in the production of furniture sets. It is noteworthy that this trend is observed not only on an industrial scale. This is the material that novice craftsmen prefer for their first experience in furniture making. The optimal choice of product in this case would be a chair made of plywood - this is the easiest way to learn the basics of design, features of drawing development, and woodworking technology. And later, with more experience, it will be possible to implement more daring design ideas.
Relevance of the project
Before making a plywood chair by hand, it is necessary to highlight the advantages of this idea. After all, not every beginner understands that to make even the simplest design you have to use a bunch of expensive tools.
However, unlike a table or a set of chairs, you have to do a lot. Therefore, the production of at least one thematic unit turns out to be:
- Quick acquisition of carpentry skills;
- Saving money;
- Replacing standard furniture with an exclusive and even high-quality analogue.
Moreover, quality does not always mean durability. For example, plastic furniture does not rot or decompose. However, when broken, it cracks. Such a defect cannot be corrected.
Another thing is a chair made of plywood. Sheets of wood chip material and fasteners are easily replaced with new ones. Therefore, a finished plywood chair can be called comfortable, if only for the reason that it is suitable for repair.
Buy or make it yourself
There are many advantages of furniture (including stools) made by yourself. These include:
- the ability to make a stool with a unique design . In furniture stores, the choice of models is limited, so you can only get a unique design that no one else has by making it yourself;
You can make truly unique stools
- saving money . When making a chair or other furniture, the material is chosen by the craftsman himself, so if plywood is used for this purpose, the finished product will be relatively inexpensive;
- gaining experience working with wood . Every day, template furniture is losing its popularity, and original designer products are gradually taking its place. Therefore, making chairs with your own hands is a unique opportunity to practice a new craft;
Design features of the stool
- ease of manufacture . For some people, the process of creating a stool from plywood may seem very difficult, but if you strictly follow the instructions and follow the recommendations, then even without special skills you can create a masterpiece in just a few hours;
- an opportunity to pleasantly surprise loved ones . Furniture made by yourself can be an excellent gift for a loved one. It is much more pleasant to receive such products, because they are made with your own hands.
Plywood stool - photo
Note! To ensure that the finished product matches the design of the room, it is recommended to use the same upholstery fabric that is present in the house. It is not necessary to look for an identical material - you can choose a fabric of a similar color or with the same pattern.
Stools should match the style of the room
Tools
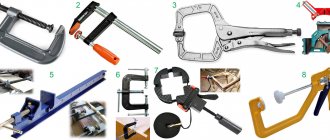
Although the chair looks simple, making it can be challenging. If some masters have to fill their hands, others need to replenish their inventory with the following tools:
- Drill;
- Measuring tools (square, ruler, level);
- Mallet;
- Furniture conductor;
- Hammer;
- Clamps;
- Vise;
- Grinder machine;
- Screwdriver;
- Electric jigsaw.
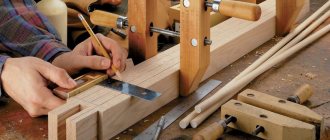
The furniture jig, which is an assembly of cap corners, deserves special attention. The latter can be adjusted for precise sawing as well as drilling holes.
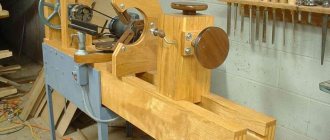
A furniture jig and an electric jigsaw can be replaced with a manual wood milling machine. But the presence of all the listed tools is only welcome, because... The manufacture of a chair involves operations of varying complexity. They must be performed on a workbench in a well-lit place.
Simplicity, convenience and comfort - do-it-yourself folding furniture
It is worth noting that a beautiful plywood chair can perform not only a decorative function, but also a practical one. Especially when we are talking about folding chairs, which, due to their compactness and ease of assembly, will be useful for any summer resident or fisherman. The design of folding plywood furniture we offer is quite simple and allows you to make a chair with your own hands quite quickly and with minimal financial costs.
As the fitter Mechnikov said in the well-known film, when the experienced swindler Ostap Bender is trying to get his goods as quickly as possible - “Money in the morning, chairs in the evening!” So in our case - having spent very little money in the morning, by the evening you can get a comfortable plywood chair with an unusual design.
Consumables
Before making the chair, you will have to make several elements. An appropriate approach turns the event into a convenient assembly.
The main thing is that there are enough consumables:
- Plywood (two different types - for load-bearing and auxiliary elements);
- Bolts with sleeves;
- Screws;
- Wood glue;
- Accessories;
- Foam rubber for filling the soft base;
- Fabric or leather for padding;
- Antiseptic;
- Varnish.
If plywood is a mandatory consumable material, then fasteners are not found in every structure. The fact is that they can be replaced with a tongue-and-groove connection. Foam rubber and fabric can be abandoned altogether if the future user is not picky about convenience. Antiseptic and varnish will be needed if the stool is exposed to precipitation.
General requirements
Homemade plywood chairs differ from each other depending on size, style, shape, weight, and fittings.
However, when making themed seats, you have to follow general rules:
- Firstly, the thickness of the load-bearing elements must be at least 18 mm;
- Secondly, the seat of a chair for an adult user should be above the floor at a height of 42-48 cm (the height of a child seat is 30-34 cm);
- Thirdly, when using a chair outdoors, it is recommended to pre-treat the plywood with an antiseptic and varnish it;
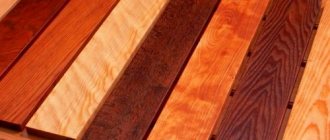
- Fourthly, a high-quality chair is made from first or second grade plywood.
And do not forget that a certain design suits each situation.
For example, a folding chair can be used in the garage and when fishing (if there is a hole, you can even hang it on the wall). Another thing is a slatted stool.
It claims to be a focal point and takes up more space despite the lack of a backrest. Therefore, this design is relevant inside the living room and hallway.
Bending methods
There are two ways to bend plywood, which we will discuss in detail.
Bending of layers during gluing
Bendable plywood using the production method
This technique is most suitable for production and consists of the following:
- Special curved molds are used, heated by steam and electric current.
- They contain veneer sheets glued with fan glue and bent into the required position, the moisture content of which does not exceed twelve percent.
- There they remain until the glue dries enough to firmly hold the new shape of the material.
Bent plywood for school chairs produced in special factories
At home you will not find the necessary equipment and therefore you can limit yourself to the following actions:
- Glue several thin sheets of plywood with wood glue.
- With your own hands, bend them at the angle you want.
- Fix the edges with epoxy mortar.
Wood-laminated board in the process of bending
- Wait for it to completely harden.
Bent plywood products of various shapes
The method is quite good, but you need to remember that it requires, both in production and in home production, the presence of thin veneers. If you already have a ready-made thick plywood board, then move on to the description of the next method.
Bending a sheet of plywood after gluing
Bending a thick sample of wood-laminated board
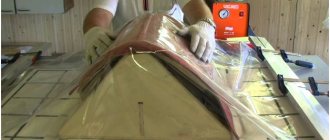
A thick product will not simply bend. It requires special processing to soften the material and make it more pliable. And only after this can the plywood be bent by placing it in a pre-prepared curved template.
The following types of processing are possible:
- The factory uses industrial steam units for this purpose.
- At home, you can use steam from a kettle for small parts or household steam generators.
Steaming with a kettle
Large sheets should be soaked in hot water to give them elasticity.
It is very important at this moment to ensure that the wood-laminated board does not delaminate. Here you can take two routes: Leave the product in a hot bath for half an hour. Then mark it in a hard blank and leave it like that for a week
Soaking in high temperature water
Moisten the workpiece with a generous amount of H2O, bend it slightly and iron it. Wet again, bend and remove moisture. And so on until the plywood takes the proper shape.
- You can also heat the product in an oven to a suitable state. But this method is fraught with the appearance of cracks in case of overheating.
Plywood material, which is pliable after the selected treatment, can be bent in the following ways:
- Place the plywood into the framing template. It is very reliable and neat, but it needs to be done first, which requires additional costs and effort. For fixation in this case, prepared spacers and a belt system are used.
Special design for bending particle board
- Use a steel strip. You tie it together with a wood-laminated board and bend it into any fancy shape. The metal will reliably keep its shape. After this, leave the resulting structure until it hardens completely.
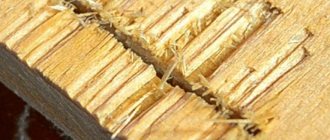
- Using cuts. This is especially useful for particularly thick products. Apply a series of cuts at the bend site, allowing the bend to be made much easier. Place the workpiece in the position you need and fill the resulting gaps with adhesive solution.
Plywood that is bent at the cuts
Folding chair
To make a transforming chair, it is enough to have one sheet of plywood 900x600x24 mm on hand.
In this blank, after creating through openings, individual solid elements remain that can be made movable. In this case, the elements are attached to the load-bearing plywood bracket due to through openings.
To make such a design, you must follow a certain sequence:
- First, a sketch is drawn, according to which the drawing is drawn;
- Next, the drawing is enlarged to create a template;
- The next step is to apply the template to a sheet of plywood to accurately cut the through opening in the form of a “figure of eight” with two side hooks for fixing the seat.
- Next, the “eight” is sawn into a seat and a supporting “slingshot” (the seat looks like a spatula with a protruding handle);
- The edges of all segments are polished;
- The seat handle is fixed in place using a movable rod (you must first drill holes for the rod);
- The slingshot legs are attached to the figure eight using bolts with sleeves or movable rods;
- A 30-mm hole is drilled in the profile of the figure-eight carrier for convenient carrying of the chair.
When folded, this design takes the form of a rectangular shield that does not take up much space. It takes no more than 5 minutes to assemble and disassemble the transformer.
Manufacturing algorithm
And so, when you are armed with the necessary tools, and have a goal in mind, then you can begin the most important and basic process. By following the instructions in the given sequence, you will get amazing results:
- To begin with, it is advisable to transfer the pre-made template onto cardboard using a pencil and ruler. Then you can start cutting out each part. When everything is ready, you should move the samples onto the plywood.
- Next, the elements are cut out using a jigsaw. The main thing is to do everything carefully, along the contour.
- Then you can polish the products using a special machine. If this is not available, it is recommended to use sandpaper.
- After this, you should create holes. They are needed for hinges. To give the most strength, you can use glue on the sleeves.
- Similar recesses will be required for the tenons.
- After the manipulations have been completed, it is possible to begin assembling all components into a single system.
Collapsible stool
The main difference between a stool and a chair is the absence of a backrest. Therefore, the stool is light in weight and easily slides under the table. And if there are no screws among the consumables, then they can be replaced with grooves.
This will not degrade the stability of the structure:
- First, first-grade plywood must be cut into three identical triangles with a length of at least 100 cm (the length of the triangle is three lengths in total);
- Next, a second sheet of plywood is used, which will serve as a blank for sawing the seat in the form of a hexagonal triangle;
- The next stage is the creation of oblique cuts for each load-bearing triangle (in one segment, the two lower cuts are directed in different directions, in the second, the side cuts are directed downward, in the third, the side and bottom cuts are directed downward and upward, respectively);
- Next, the triangular elements are cut into the slices (therefore, the thickness of the slices should correspond to the thickness of the segments);
- A seat is placed on top of the assembled supporting base.
You can use screws to secure the seat. But they need to be screwed into the back of the stool through a small piece of plywood.
What to consider when choosing a design
A stool is a versatile piece of furniture that can be hidden in a closet or garage if desired. But in order for the finished product to be truly functional, the choice of design must be approached competently . Factors such as the shape and size of the stool, as well as the type of upholstery, must be taken into account.
Stools with different upholstery
Form
When choosing a stool design, you need to pay attention to the shape of the finished product - it should match the shape of the table. For example, if the table is rectangular, then round stools will not go well with it. Furniture items should complement each other.
Homemade folding stools
Upholstery type
Due to the fact that the plywood stool will be used intensively, it is advisable to select types of materials for upholstery that do not require special care. Such materials include eco-leather, flock and other washable options. Of course, the color of the upholstery should be combined with the interior of the room.
The upholstery should be durable and low maintenance
Chair dimensions
Another important criterion that you need to pay attention to when choosing a stool design. To make the products convenient to store and use, their height and width should allow stools to be placed under the table. This rule does not apply to bar stools, because they should initially be high.
DIY stool ladder
Slat stool
This product can also be called a home bench, because... his seat goes long.
Like other structures, the slatted stool is made from affordable plywood. However, one must take on a relevant project after gaining extensive experience.
The thing is that the thematic design is assembled from complex lamellas that must be cut out by hand:
- First you need to create a template of two load-bearing supports with ridges and legs (the legs of the load-bearing supports must be bent);
- Next, the mentioned supports are sawn in plywood according to the template;
- The next stage is the creation of five and two ridges in each upper drawer and leg, respectively;
- Next, you need to cut out the lamellas from the plywood, and then make two grooves in each fragment (the thickness of the lamellas should correspond to the thickness of the grooves);
- Each fragment is polished;
- The grooves of the supporting bases are treated with wood glue and filled with lamellas;
- For high-quality fastening, the lamellas are clamped with clamps.
The slatted stool looks presentable. Despite its relatively large dimensions, it is very easy to carry. Light weight is facilitated by through openings and the absence of metal fittings.
To make a rocking chair you will need:
- Canvas with a thickness of 15 millimeters or more for load-bearing structures, such as side supports, racks, etc.
- A sheet of bent plywood 10 mm thick, from which you can easily make any curved part, for example, a backrest strip or other decorative element.
- Graph paper.
- Marker.
- Jigsaw for cutting parts from plywood.
- Sander.
- Wood glue.
- Antiseptic for FC treatment.
- Self-tapping screws.