In order for a house on a columnar foundation to look aesthetically pleasing, and also to prevent debris and moisture from getting into the basement, at the last stage of construction it is necessary to close the gaps between the pillars from the outside with a fence.
There are several options for decorating this space. In the article we will look at how to close a columnar foundation with your own hands, as well as types of decor and closing technology.
Technology and stages of construction of a columnar foundation
Preparatory stage
It starts with cleaning the area. To do this, the top layer of soil is cut off along with the vegetation. The thickness of the layer is about 300 mm, and it is not suitable for a base. If there are clay soils on the site, then a gravel and sand backfill will be needed. Its thickness is determined by calculations based on geological data about the soil. After cleaning the site, it is graded. All irregularities are removed, and soil is poured into the existing holes.
Foundation breakdown
The purpose of this stage is to transfer the house plan from the drawings to the land plot, fixing the axes and main dimensions of the foundation. The accuracy of the layout must be checked by measuring the diagonals of the plan (they must be the same) and checking the corners of the foundation - they must be strictly 90 degrees.
Digging holes
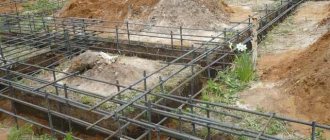
Pits for reinforced concrete foundations are dug using an excavator or manually. All of them are located exclusively along the axes. If the depth does not exceed 1 m, then you can do without wall fastenings. And at a depth of more than 1 m, they dig with slopes and arrange fastenings from boards with spacers (to prevent the soil from falling off). The pits are made at 250-300 mm. greater than the depth of the foundation (for the installation of gravel and sand backfill). In width, the pit should also be larger than the future foundation. This is necessary to ensure that the formwork and spacers can be installed.
Installation of formwork
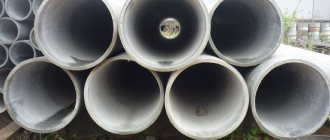
For formwork, planed boards with a thickness of 25 - 40 mm are used. and having a width of 120-150 mm. The planed side is installed against the concrete. Also, chipboard, moisture-resistant plywood, and metal sheets can be used as formwork material. Iron, ceramic or asbestos-cement pipes with a diameter of 100 mm or more can be used as formwork. Concrete is poured into the installed pipes, and they remain with the foundations in the ground.
Foundation reinforcement
Reinforcement of pillars is carried out in the longitudinal direction with reinforcing bars of grade A3 and a diameter of 10 -14 mm. with the installation of horizontal jumpers with a pitch of at least 200 mm. Wire with a diameter of 6 mm is used as jumpers. For the future connection of the reinforcement frame of the pillar and the monolithic grillage, it is necessary to ensure that the rods extend above the edge of the foundation (as can be seen from the photo) by 10-20 cm.
Pouring concrete
Concrete is laid in layers, 200-300 mm each. using deep hand vibrators. This ensures the homogeneity of the mixture and removes air from the solution.
Waterproofing a columnar foundation
Waterproofing is carried out using the same materials as for a strip foundation: various rolled lining membranes, hot and cold mastics, or the “old-fashioned” method - two layers of roofing felt on bitumen.
Grillage installation
The monolithic belt (grillage) provides the necessary longitudinal rigidity and stability of the entire foundation structure. It can be made using prefabricated reinforced concrete rand beams or monolithic. Before installing the prefabricated belt, the jumpers are securely connected to each other using scraps of reinforcement, welding them to the mounting loops using welding. After this, the formwork and reinforcement frame are installed and poured with M200 concrete.
After the concrete has reached the standard strength and carried out waterproofing measures, you can fill the holes in the holes with soil and proceed to the installation of floor slabs.
Articles on the topic
Step-by-step instructions for building a frame house yourself
Calculation of the foundation for a house. What load is permissible?
How to make floors on the ground in a private house with your own hands
Types of soil for the foundation of a frame house and their features
How to save on building a house - profitable tips
The basement of the house - what is it for? We produce finishing + materials
Frame house on stilts: types, pros and cons + Step-by-step video
Do-it-yourself insulation of the foundation of a private house
Reviews ()
What is required: tools and materials
Fixing the fences can be done using two methods:
- With support on the ground.
- Based on the building.
Depending on the chosen design option for the fence, the type of its fastening is selected and the appropriate materials are prepared.
Trenches resting on the ground require excavation work - a trench up to 50 centimeters deep is prepared for them, a sand cushion is created at the bottom, after which the trench is filled with a concrete mixture.
The simplest option is considered to be a suspended pick-up. It requires a frame, which is created from a metal profile or wooden beam.
Closing with timber
One of the most effective methods of closing is tying the base with a special beam. However, this type of work is the most technically complex.
The closing process involves a wooden board placed between the post and the base itself. The board is secured and wrapped with roofing felt.
When working, the following conditions must be observed:
- The process must begin from the corners of the building
- The structure must be connected with special metal brackets
- After completing the strapping, you need to check the strength of the work
Base insulation
If you have to attach the insulation to the piles, without a monolithic base, first sew up the base. It is most convenient to use glass-magnesium sheets - they can withstand being in water, are frost-resistant and quite durable. They are attached to the piles, then covered with a vapor barrier and foam is attached. After this, the siding bars are installed, pulled through with self-tapping screws through the foam to the piles, and the siding is installed.
For a monolithic base and foundation, you can simply attach polystyrene foam from the outside, covering it with waterproofing below the ground level. Through it, siding guides are attached to the concrete.
The main factor when carrying out work is the possibility of maximum insulation of the foundation.
Work process:
- Insulation material should be placed in a pre-dug trench. The most popular is polystyrene foam.
- The insulation is fixed in the trench using glue. No gaps or cracks should be allowed.
- Then the trench must be covered with a layer of sand. It must be compacted well and filled with water. Instead of sand, you can use small crushed stone or gravel.
- Performing a bridge.
- Finishing of external sides with decorative materials. Their choice depends on the preferences of the owner and the design of the building.
We invite you to familiarize yourself with Vanilla Orchid (Vanilla Orchid) care at home: 7 most important rules, propagation, photos of varieties
If the base of the building is high enough (more than 65-70 cm), then the following actions must be taken:
- To increase strength, it is necessary to make a metal frame and install it between the floor beams
- Shields made of metal profile material should be secured to the outside of the frame.
- Plates of insulation material are attached to the inside of the metal structure using special glue. There should be no gaps or empty spaces between them.
- After completion of the work, both the internal and external sides must be treated with the material - expanded clay.
- Every 1.5-2 meters it is necessary to install ventilation holes with a diameter of 14-20 cm. They should be located on opposite sides strictly opposite each other.
A false base made of any material protects against the penetration of precipitation, debris and animals, but not from the cold. To protect the basement from frost, a thermal insulation layer is needed.
It is convenient to mount sheets of polystyrene foam or expanded polystyrene under the base. A film or roofing material is placed between the insulation and the external finishing to prevent the formation of condensation. It is also convenient to install expanded polystyrene boards on the inside of the masonry.
Regardless of the foundation material, ventilation holes are left on each wall. The number and area of the holes are calculated by measuring the total area of the base and dividing it by 400.
Vents are covered with bars to protect against the entry of rodents and other small animals. It is impossible to close the ventilation for the winter, so it is done at a height of at least 25-30 cm above the blind area, otherwise they will be constantly covered with snow.
Types of collection
The false base is created taking into account the size of the materials used for cladding and their thickness, as well as the height of the grillage from the blind area. If the latter rises 0.6 m from the ground level, the following can be used for a false base:
- basement siding with panels up to 47 cm;
- brickwork with a standard joint thickness and an underlying layer to protect against winter swelling;
- asbestos cement sheet with additional finishing with porcelain stoneware, tiles, artificial stone, etc.
The columnar foundation from the outside helps to close:
- tongue and groove or regular boards and timber;
- composite panels;
- building blocks and concrete;
- corrugated sheeting and flexible tiles;
- DSP and other sheet materials.
You can also use natural stone or brick to fill the space between the supports.
Asbestos cement sheet allows you to close the free space, it is easy to install and is attached to the lathing or wooden frame using bolts. In many respects, it is the optimal solution for creating a false base. However, for greater aesthetics, a fence made from other materials will be required.
DSP is characterized by a high degree of adhesion with adhesives , therefore it is possible to decorate the finished backing with porcelain stoneware and clinker tiles. Sheet materials require additional sealing to prevent water from flowing in after snow melts or during high precipitation levels.
Basement siding is attractive because it is equipped with additional elements. This makes it easier to use as a pick-up. The number of components produced allows the base of the building to be closed without gaps.
Brickwork performs both protective and decorative functions . It is enough to use half-brick masonry with standard dressing of vertical seams and without reinforcement. The bottom row requires the installation of a waterproofing layer.
Outbuildings are usually framed with lumber secured with overlaps. Corrugated sheeting can also be used for this. In terms of characteristics and principles of fastening, this option does not differ from those listed.
Whichever pick-up option is chosen, it is necessary to leave ventilation ducts . The total area of the false base is divided by 400 - this gives the area of the necessary service openings that will ensure proper ventilation of the base. Ventilation outlets are covered with grilles to prevent debris or animals from getting inside.
TOP 3 best ways to cover a pile foundation from the outside
The most popular building materials for finishing a pile foundation:
Basement siding
note
When choosing any option for finishing the foundation, you must leave at least 2 dormer holes for ventilation. They should be located on opposite sides.
What is the main function of the foundation plinth?
The base is that part of the building’s foundation that performs one of the most important functions – protective. The protective function of finishing the foundation from the outside is:
- An obstacle to drafts, snow and rain. Thanks to this, heat loss is minimized.
- A method in which large differences in temperature and humidity do not occur, which helps create a normal microclimate under the building, and this in turn has a positive effect on the condition of the screw foundation.
In addition, the closed foundation of the building does not allow various living creatures to set up their homes under the building.
Edged board is an excellent construction and finishing material; it can also be used to cover the outside of a pile foundation.
- The main advantage is environmental friendliness and safety.
- The material does not release toxins into the air either under the influence of moisture or temperature changes.
- The edged board is durable and reliable, it has low thermal conductivity.
- In addition, wooden boards are antistatic and anti-allergenic.
Flaws
But, like any material, edged boards also have their disadvantages, these are:
- Low level of fire safety.
- Low resistance to rotting, deformation, mold and mildew.
- It does not tolerate high humidity.
- Low sound insulation qualities.
note
In order to ensure a long service life for the material, it must be periodically coated with various protective compounds.
The approximate cost of a 25x100 mm edged board is 7,000-11,000 rubles per cubic meter.
Brick is an artificial stone of a rectangular shape, the dimensions of which are 250x120x65 cm. It is used as a construction and finishing material.
It is made from mineral materials, so it has the properties of natural stone.
- Strength.
- High density.
- Environmentally friendly.
- Frost resistance.
- Water resistance.
- Excellent sound insulation.
- Long service life.
Flaws
The disadvantages of this material include:
- High cost (about 10-13 rubles per piece).
- The formation of a white coating (efflorescence), which spoils the entire appearance of the brickwork.
You can begin work on arranging the basement at any time. It is even desirable when the construction of the house has already been completed and all utilities have been connected to it.
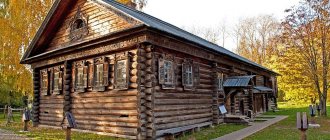
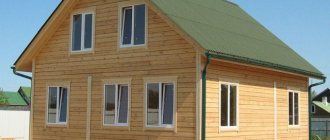
Most private houses built during the Soviet period are built on columnar foundations. A columnar foundation is used as a foundation for buildings with relatively light weight and giving minimal load. Among such buildings one can note ordinary wooden buildings, baths, sheds, barracks, etc. A columnar base is the most popular option for construction. This is due to its cost-effectiveness and ease of implementation. However, many owners, after several years of operation of such structures, are increasingly beginning to wonder: how to cover the columnar foundation from the outside? The fact is that the design of the base allows cold air currents to pass into the building.
Clinker tiles
An excellent solution for walls and foundations, as clinker is durable. In addition, this finish looks attractive and goes equally well with different facades. The main advantages are as follows:
- A huge selection of options, differing in color and texture. You can find almost any shade.
- Long service life. The resource is at least 20 years.
- Low maintenance, the surface does not require the application of protective compounds, although moisture protective agents will not hurt.
Clinker tiles also have some disadvantages:
- High price. This is one of the most expensive solutions.
- Difficulty in installation. The small size of the tiles complicates the process.
Important!
In order for the work to go quickly, you need to level the base as best as possible.
Advantages and disadvantages of NSF
Like any building structure, non-buried point supports have their own advantages and disadvantages.
The reasons why developers choose a shallow columnar foundation are explained by the following advantages over other types of foundations for buildings and structures:
- the simplicity of the design allows land owners to build supports with their own hands, without involving professional builders and special equipment;
- columnar supports can be installed on almost any soil, except for soils with active heaving processes and in places with a high groundwater level (swampy grounds);
- non-buried pillars are erected in areas with differences in elevation, for example on hillsides;
- there is no need to arrange complex and expensive waterproofing of foundation structures;
- the maximum period for erecting supports does not exceed 2 weeks;
- there is no need to carry out excavation work to level the landscape;
- made in compliance with the rules and regulations of construction, the foundation of the building can last 50 years or more;
- The main argument in favor of shallow columnar foundations is the low cost of materials and work.
Compared to the impressive list of advantages, only 2 disadvantages can be noted - these are:
- impossibility of constructing basements and basements;
- intended only for light buildings and structures.
How to avoid mistakes?
To avoid problems with collection, you need to remember the following recommendations:
- When choosing the type of closure for a columnar foundation, a load calculation is first carried out, which allows us to assume how much the structure may sag in the future. The type of soil is taken into account.
- High-quality materials should be used; they are not only more durable and aesthetically pleasing, but also more resistant to negative factors - fluctuations in temperature, humidity, etc.
- Waterproofing is an important point that should not be overlooked. Moisture removal will increase the service life of structures.
You will find a lot of important and useful information about columnar foundations here.
Insulation of false base and material compatibility
The issue of insulation of a false base needs to be resolved based on climatic conditions
If the house will be used only in the summer or the climate is mild, then an insulated floor is sufficient.
For false plinths, it is recommended to use external insulation, which retains heat and shifts the dew point towards a material that is more ready for temperature fluctuations and the appearance of condensation.
Insulation materials are suitable for various insulation options, but they must be used differently depending on it:
- Frame false plinths are insulated on top, after which they can be decorated with a finishing coating, for example, siding.
- The brick lining is first sealed, if there are cracks, covered with a primer, and then the insulation is glued or otherwise installed. Next, you will need to stretch the polymer mesh and plaster the surface. The final finishing is carried out with tiles or the surface is painted.
Profiled sheet
It is made of galvanized steel with a polymer or paint coating. The base made of corrugated board lasts a long time, but at the same time it looks simple and unpretentious. It has many advantages:
- You can choose not a plain option, but a profiled sheet that imitates stone, wood or other material; it looks much better.
- It is not difficult to attach the sheets with your own hands; the process is very similar to installing siding; it also uses lathing.
- The weight of the finish is light and, if necessary, it can be easily dismantled.
As for the disadvantages of corrugated sheets, the most significant of them are the following:
- Low sound and heat insulation characteristics. It is advisable to use mineral wool or polystyrene foam under the metal.
- When the protective layer is damaged, the steel begins to rust.
Important!
It is better to cut profiled sheets with a jigsaw. If you do this with a grinder, the metal overheats and begins to rust at the ends.
Foundation installation
The installation technology will vary depending on the type of foundation. But the general diagram of how to properly make a columnar foundation looks like this:
- Preparatory work, drawing construction.
- Carrying out earthworks: marking, digging holes and trenches.
- Filling cavities or laying blocks.
- Removing formwork and adding sand. Insulation of the base, waterproofing and installation of the fence.
This is the most general scheme, which varies depending on the type and depth of the foundation. However, the first stages of work are the same for everyone.
Preparatory work
Before starting construction of the foundation, it is necessary to draw up drawings.
Example of a foundation drawingSource 2mdom.ru
The drawings indicate the layout of the pillars. They are usually installed in places of heavy loads: in the corners of the building, at the intersection of load-bearing walls, under load-bearing partitions.
In addition to the drawing, it is useful to have a diagram of the foundation itself.
Example of a foundation diagramSource prezentacii.org
When you have all the necessary materials and drawings on hand, you can begin preparing the area for the future building. First of all, the area is cleared of debris. Then two meters are counted from the perimeter of the future building and this area is marked with a cord or sand. This is the boundary from which the top layer of soil must be removed to prevent plants from sprouting. You need to remove approximately 30 cm of soil. A layer of sand or gravel is poured into the dug pit.
Then they move on to the marking stage. The drawing is transferred to a plot of land. The corners of the building are marked with posts with wooden strips nailed to them.
The correctness of the angles must be checked by measuring the diagonals. A rope is attached to the planks, which outlines the boundaries of the building and the location of the supports.
Foundation markingSource sazhaemvsadu.ru
Pit preparation
Holes are dug in the places marked for the posts. You can do this yourself, using an excavator or mechanical drill. The width and depth are dug with reserve for formwork and bedding.
Foundation pitsSource banyagid.com
If the holes are deeper than 1 m, then they may begin to crumble. To prevent this from happening, it should be dug with slopes and spacers made of boards should be installed. After this, you can lay the pillow.
Installation of foundation pillars
Once the holes are dug, you can begin to install the posts. First, a drainage pad is laid. It consists of a layer of sand (10-20 cm) and crushed stone (5 cm).
Pillow for the foundationSource 1landscapedesign.ru
To avoid sagging, the pillow must be compacted well.
Further installation technology depends on the type of foundation.
Why close?
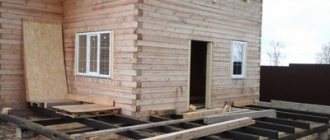
Buildings with a columnar foundation do not have a full basement. The gaps between the supports remain open .
To prevent debris from being blown into the space between them by the wind and water not to flow in, and to make them look more aesthetically pleasing, a fence is used.
Its main task is to protect the base from moisture , which is why preference is given to basement siding or brickwork. Sheet materials are used, less often lumber.
The choice of a fence and how to decorate it largely depends on the overall budget. However, whatever the materials, it is necessary to perform waterproofing and not forget about ventilation.
Which material to choose
Only after considering all possible options for installing a columnar foundation, and assessing all the pros and cons for each of them, will it be possible to settle on the most optimal type of basement partition. When choosing an option, it is imperative to take into account compliance with climatic and operating conditions, as well as other requirements imposed on it, such as: ease of installation, practicality and aesthetics.
Despite the fact that installing a columnar foundation from cobblestones is the most labor-intensive and expensive option, its main and significant advantages are: reliability, strength and durability. Therefore, when building a wooden house, this option for the basement structure is most often chosen.
Conclusion
Comfortable and cozy accommodation, as well as a long service life, depend on the correct and high-quality execution of work on the arrangement of the basement of the building.
Closing process
It is quite possible for each consumer to close the columnar foundation himself. To do this, you must follow the basic requirements of the instructions:
- A small trench should be dug along the entire length of the building. Its depth should not exceed 30 cm and width - no more than 35-40 cm.
- The trench is filled with a layer of sand. It must be compacted well and filled with water.
- Concrete mortar is applied to the layer of sand. After the first layer has dried, reinforcing mesh is applied
- The pick-up is being laid
When carrying out work, you should pay attention to the fact that you cannot connect the screed and the foundation beams. This will lead to the appearance of cracks and subsequent destruction of the entire structure.
Materials
Let's consider how to cover a pile foundation from the outside
It is important that the material used for finishing is durable and frost-resistant, and does not lose its qualities under the influence of temperature changes and ultraviolet radiation.
More reliable is finishing the base of a pile foundation with stone, brick, cinder block, or concrete. This will require excavation work similar to the construction of a shallow foundation.
The suspended structure is lightweight and does not require excavation work. Polymer, wood and composite materials are used, which are quickly and easily installed.
Basement siding
Basement siding is most often used for finishing screw foundations.
It is produced in the form of decorative panels with a thickness of 1 to 2.5 mm.
- Possibility of use in any climate zone, including the north;
- resistance to mechanical stress;
- light weight, ease of installation;
- has low thermal conductivity, retains heat;
- durability 40-50 years;
- does not collapse under the influence of moisture or ultraviolet radiation.
It is possible to cover the foundation of a house with semicircular shapes. For this purpose, a technology was launched into production, thanks to which the material bends easily. Panels of small thickness (1.1 mm) with the addition of synthetic threads are produced.
Profile flooring
Sometimes the question arises of how to cover screw piles so that work can be completed during the day.
In 4-7 hours you can cover the pile foundation with profile sheets.
The width is available from 1 to 4 m, due to this one sheet can cover a significant space.
- sheets with a polymer coating have a service life of 30-50 years, galvanized sheets last 10-15 years;
- Available in various shades and sizes;
- a light weight.
Disadvantages include:
- in places where the coating is damaged, the sheet is susceptible to corrosion;
- The zinc coating gradually evaporates.
Flat slate
Every year this material is losing its popularity; it is being replaced by modern, environmentally friendly materials.
- resistant to atmospheric influences;
- durable.
- asbestos is dangerous to human health and pollutes the environment;
- fragile;
- unattractive appearance.
Frame system
Is a budget option. To install the sheathing, we use vertical posts made of timber (metal) with horizontal slats and metal profiles attached between them. We attach acrylic and vinyl siding to a pre-fabricated frame. For more information on how to close the basement space in a house on screw piles, watch this video:
Leaf system
It is economically beneficial to use a sheet system.
- We fix a metal profile (corner, pipe) or wooden beam vertically;
- we fasten cement-bonded or asbestos-cement slabs;
- We lay tiles, porcelain tiles, and bituminous shingles on the slab.
Composite materials
As a composite material we use:
- lightweight polymer-sand panels reinforced with cellulose threads;
- fiber cement sheets have great strength and reliability;
Facing brick
Brickwork is a reliable, but expensive and labor-intensive method of finishing a foundation on screw piles. To lay the cladding correctly and evenly, you need to have construction skills.
- durability, strength, reliability;
- high thermal insulation qualities;
- additional support for house construction;
- aesthetic appearance.
How to cover a basement space with a brick:
- remove the fertile layer by 30-40 cm;
- we fill in a cushion of sand, crushed stone, and tamp it;
- insulate the sole;
- we lay a brick.
The masonry must be connected using metal pins to the piles. The metal is welded to the sheathing and bonded to the brick using cement mortar.
Plaster
Suitable for concrete surfaces, block structures and other prefabricated elements. The work can be done independently, but if you need to create a certain structure, it is better to practice beforehand. If you don’t know how to cover the strip foundation of a house from the outside cheaply and beautifully, then this solution will be optimal, as it has many advantages:
- Availability. The price of plaster compositions is low; they can be bought at any hardware store.
- Easy to apply. To work, you will need a container for preparing the mixture, a trowel and a small rule for leveling the surface. All features of the process are indicated on the packaging.
- Short terms of work. Finishing the foundation of an average-sized home can be completed in a day.
- Possibility of painting the surface in a suitable color.
There are also disadvantages that are worth considering:
- You need to purchase special plaster; regular façade plaster will begin to crack in a couple of years.
- The surface must be dry and clean, so work cannot be carried out during wet periods.
- If the foundation has significant unevenness, the consumption of plaster increases greatly.
If necessary, you can first fix the thermal insulation material; extruded polystyrene foam is best suited. And a reinforcing mesh must be laid on top of the sheets.
Columnar foundation
To solve this question, first of all, it is worth studying the design of the columnar base and its characteristics.
Its main part is specialized supports located in a special order under the building.
The supports must be combined into a single whole. This can be done using reinforcing mesh, grillage or special beams.
When a columnar foundation is needed:
- When constructing low wooden structures
- When constructing buildings with missing basement structures
- If there are difficult conditions on the land plot
When choosing this type of foundation, it is worth dwelling on its main advantages:
- Ease of manufacture
- Available building materials
- Possibility of step-by-step work that does not require simultaneous expenditure of all available resources
- Ability to carry out construction work independently
However, we should not forget about the obvious negative aspects of the base:
- Construction is possible only for light buildings
- Impossibility of building a basement
- To prevent damage, a rigid grillage should be installed
- Not suitable for tall buildings
Painting
Painting is only suitable for already plastered surfaces or block foundations that do not require finishing. A simple solution that has many advantages:
- Takes minimal time. The work is carried out with a roller; for joints and other difficult places, a brush is used.
- The choice of paints is simply huge; in the store they can choose any shade that is needed.
- You can refresh the color or change it at least every year.
Coloring also has some disadvantages:
- It does not hide surface flaws; if the foundation is uneven, it will be visible.
- It is necessary to prepare the base - clean it from dirt and apply a primer, otherwise the paint may peel off.
It is best to use special paints with moisture-repellent properties. But at the same time they must be vapor permeable.
Device
What does the structure consist of? The construction of a columnar foundation includes the following important elements:
- Pillars. They are made of pipes, wood, brick, reinforced concrete. It is recommended to use asbestos pipes or reinforced concrete, since these materials are more resistant to external influences and have high strength indicators.
- Formwork. It is made of boards that are planed on one side (attached to the concrete part). Wood of any species is used for formwork. Their thickness is 25–40 mm, and their width reaches 120–150 mm. If you use large boards, gaps may form during installation. It is not recommended to use metal to create formwork, since this metal is heavy and adheres more strongly to concrete.
- Fittings. To reinforce the pillars, rods with a diameter of 10–12 mm are used. After every 25 cm, clamps are attached to prevent the reinforcement from moving to the side. The rods are placed vertically and brought out on top of the foundation to weld the reinforcement of a solid grillage.
- Grillage (prefabricated reinforced concrete or monolithic). A monolithic grillage is able to provide the required rigidity, as well as high reliability of the structure. Prefabricated jumpers are connected to each other by tying mounting loops of twisted wire. You can also use welding with cutting reinforcement. Formwork is installed on the lintels, as well as a reinforcement cage, after which the concrete mixture is poured.
- Pickup. In order to insulate the space created during construction under the floors and protect it from the accumulation of debris, a fence is provided. With its help, the wall running between the pillars is fenced. The fence is made from different materials, but brick or stone is often used for such purposes. The creation of this structure involves the presence of a concrete screed, which acts as a base. It is not buried and is laid on a bed of sand. To create a concrete screed, you need a reinforcement cage, as well as formwork. The pick-up is placed on the screed, holes are made in it to provide the possibility of supplying communications.
- Waterproofing system. To protect the structure from moisture, the upper part of the pillars and fences is covered with bitumen. Then roofing material is wrapped.
Slate
A flat version is used, which allows you to quickly create a flat surface. Slate is good because it is easy to use and affordable; it can be bought almost anywhere. The advantages of this solution are:
- Low price: slate is one of the most inexpensive materials today.
- Suitable for both strip and pile foundations.
- The surface can be painted or covered with plaster.
There are also disadvantages:
- When cutting, a lot of harmful dust is generated.
- For painting you need to use special roofing paint, which is expensive.
Important!
Slate can be glued to any suitable composition or attached to the frame with self-tapping screws, having previously drilled holes.
Brickwork
A brick base is the most expensive option, since you will need sand and cement to prepare the mortar, as well as the highest priced facing ceramic brick of all existing ones.
Using traditional brick will only increase costs, since the outside of the base will need to be further decorated.
The minimum thickness of a brick fence is 12 cm (half a brick). Bandaging the rows is offset by half the length of the stone. The masonry protrudes beyond the perimeter of the walls, so the top row is protected with ebbs along the perimeter. The masonry technology is as follows:
- A trench 20 cm deep and 20-30 cm wide is dug along the perimeter of the foundation.
- A cushion is laid at the bottom of the trench - 10 cm of sand, then 10 cm of crushed stone, compacting the layers with a manual tamper or vibrating plate.
- Before laying, a layer of waterproofing is laid on the sand and gravel bed.
- Perform standard masonry with ligation of corners and rows.
- The top, final row is covered with waterproofing, then the ebb is installed.
Additional reliability of the masonry can be made by reinforcement with vertical metal rods.
Finishing with basement siding
Manufacturers offer various types of siding: metal, fiber cement, vinyl.
Each option has a complete set for installation:
- Start and finish bars;
- Low tides;
- Slopes;
- Corners: internal and external.
Installation of basement siding consists of the following steps:
- Preparing the frame.
- Fastening corners in a vertical manner.
- Installation of panels in the corner elements of the foundation with fixing the locks to each other and additionally with self-tapping screws and staples to the sheathing.
- Installation of ebbs and slopes.