This type of base is considered the most budget-friendly. In addition, it is reliable and durable.
What types of terrace structures are there? What are their features and what materials can the foundation be built from?
We will discuss it in detail in the article, and also tell you how to make the foundation for the veranda at home yourself and what mistakes you may encounter.
Design features and application
The foundation looks like a series of columns across the entire area of the extension.
A strapping is made around the pillars, which are located along the perimeter, and logs are attached to the internal supports.
The basis for a veranda made of pillars is considered economical in financial terms and in terms of consumables.
In addition, it is easy to install and is suitable for any type of soil, because... The weight of the structure is small.
Flaws:
- Only low and light buildings can be erected on a columnar foundation;
- such a base does not allow for complete insulation under the veranda.
Most often, a columnar foundation is built from:
- wood;
- metal;
- bricks;
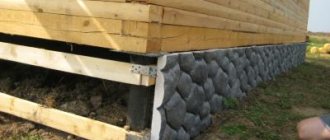
- concrete with cladding made from various natural materials;
- cinder block.
Made from concrete
The design is suitable for an area with dry sandy soil. When using concrete supports, the formwork must be fastened with wooden boards, and the reinforcement box must be fixed inside with concrete mortar.
Attention! Formwork is an auxiliary structure used to give the structure a number of parameters: shape, geometric dimensions, surface structure. Most often created from wooden boards.
The concrete base is the most expensive and labor-intensive , but the result is worth it . The columnar base will perfectly cope with a terrace made of brick or wood measuring 6x4 meters or larger.
From building stone
Stands made of building stone will be the right solution for areas with dry and sandy soil and low water content in the soil.
The service life of such a foundation can reach more than one century. Building stone is used identically to brick.
The height of the base depends on the climatic characteristics of the region of residence - on how much the soil freezes in the winter season.
When constructing a columnar foundation made of stone, it is often necessary to properly strengthen the supports. In this case, the base and stand will be firmly attached.
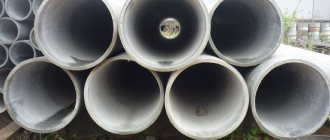
From pipes
If there are financial restrictions, you can consider the option of a base made of asbestos-cement, metal or plastic pipes. A tubular structure will cost an order of magnitude cheaper than a monolith foundation. In addition to the financial benefits, there is also a practical one - a pipe base is very easy and quick to install.
Important! There is no need to treat pipes with special anti-corrosion preparations, since they are already protected from such problems. This type will be the most optimal solution in case of moving soil.
Read more about installing a columnar foundation made of pipes in our article here.
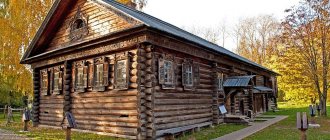
From logs
When building such a foundation, it is important to pay attention to the condition of the wood.
The logs are treated with an antiseptic to prevent rotting and fungus formation. In addition, the logs must undergo a firing procedure.
The wood should not be damp.
When constructing a columnar base, standard wooden beams are used.
The support has not proven itself to be the best.
Excess moisture due to heavy rains and flash floods can damage the structure.
In addition, a log foundation does not easily withstand the load placed on it.
Reference! If the site is located in a flood zone, it is better for its owner to consider another building material for constructing a terrace.
Open area around the pool
A terrace in a private house is often located next to or around the pool. This is especially useful for pools made from large, prefabricated fiberglass tanks. In this case, the terrace performs two functions at once - it provides a comfortable place to relax near the water and hides unaesthetic details (the side of the container, pipes for supplying and draining water, aeration, cleaning devices, and so on).
The principles of arranging the structure are the same as in previous cases: screw piles as a foundation, a cellular frame as a support for the flooring. In this case, the frame is made of metal; wooden elements near water require too serious and expensive protection from moisture
The installation process is discussed in more detail in the video below, but there are some nuances that are worth paying attention to:
- such large containers must be concreted, and the first row of piles (located closest to the side of the pool) may not be screw, but ordinary - installed in concrete;
- the metal frame is necessarily protected from corrosion, galvanized screw piles and stainless steel fasteners are used;
- the frame is positioned so that the flooring hangs over the water and at the same time it is possible to line the vertical fragments of the platform;
- For flooring, a special material is used - the so-called deck board (decking). It can be natural wood with special processing (usually larch), a composite material or pure polymer. A special feature of the board is its increased resistance to moisture and textured surface;
- Built-in lighting fixtures can be mounted flush with the sheathing in the decking.
It is also possible to install a deck below the edge of the pool, if this edge is properly designed.
For bowls of complex shape, the flooring is also usually made with a curved contour.
If the pool bowl is not completely buried in the ground, the terrace flooring is elevated, creating a kind of podium.
Preparation for construction
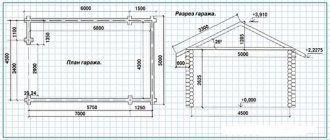
First, the landowner needs to think about the size and shape of the future terrace:
- You can independently transfer all the numbers to paper - draw a diagram of the future construction. In the future, this drawing can be loaded into a computer drawing program.
- A ready-made, and most importantly, correct drawing in all calculations can be ordered from specialists. True, this will require additional costs.
- Ready-made drawings of verandas can also be found on the Internet.
Calculations and drawing
The structure on supports is classified according to the depth of the pillars and depends on a number of conditions - the type of future construction and soil characteristics. Requirements for construction, depending on the type of soil, are specified in SNiP 2.02.01-83.
For lightweight free-standing verandas, non-recessed and shallow-recessed bases are more often used. For extensions to a house, the foundation must be more solid, especially if the building stands on heaving soils.
Attention! Be sure to do test drilling 0.5-0.6 m below the expected depth of the supports. If there is quicksand under the load-bearing soil, then the columnar foundation should be abandoned, since the supports may sink deeper under load.
Based on the weight, including the snow load on the roof, and the dimensions of the building, the number of supports, the distance between them, and the total amount of materials are calculated. If the veranda is built on a turnkey basis, its cost will be calculated free of charge by specialists.
When constructing it yourself, you can use online calculators on construction sites. You will need to enter the initial data of the desired structure and soil type.
Tools for work
To build this base you will need:
laser level or hydraulic level;- shovels;
- rubber hammer;
- tamping;
- trolley on wheels;
- measuring tape;
- construction mixer and/or concrete mixer for self-mixing;
- screwdriver
You also need to purchase:
- reinforcement, ready-made concrete (or its components for self-mixing);
- sand;
- crushed stone;
- wire;
- waterproofing material;
- plywood or boards;
- screws and other fastening materials.
Installation of a shallow structure
This type of foundation is installed 0.4 - 0.7 meters deeper than the soil surface. It is used quite often when constructing a veranda. The formwork is made of brown concrete, plastic and metal pipes.
For a brick veranda, a pipe diameter of up to 0.2 meters is suitable; for lighter variations, a diameter of up to 0.1 meters is sufficient.
The construction of a shallow foundation consists of the following stages:
- At the preparatory stage, we clear the area of rubbish and carry out markings. Places for installing poles are marked with stakes and rope.
- In the designated places, holes are dug to a certain depth. It is important to add 0.15 meters for the arrangement of the sand cushion (the sand is watered and compacted). The bottom is covered with roofing material.
- Then, using a building level, the pipes are leveled. If the water is shallow in the soil, they are treated with a waterproofing base.
- Next, the pipes are filled with a concrete-gravel mixture to a depth of 0.3 meters. After which the support will rise by 0.15 meters, which will further protect the pillars from deformation when the ground moves.
- After the concrete has set, the pipes are lined with roofing felt and the holes are compacted with sand. At the end of the process, reinforcement is carried out and concrete is poured to the surface of the supports.
Note! After several weeks, construction of the veranda continues.
Installation of a non-buried base
Located at ground level. The difference between the installation of pillars varies from 1.5 to 2.5 meters. The sole, provided it is easy to construct, can be erected on non-heaving soils.
During construction, blocks with dimensions of 0.2x0.2x0.4 meters are usually used. Finding out the price of such a foundation is easy. The total amount of material required is multiplied by the cost of one block. Concrete and rubble stone are also used in construction.
The sole can also be made from brick, but we must not forget that ceramic and silicate bricks can be deformed at low air temperatures.
The construction of this type of foundation takes place in several stages:
- First, we clear the construction site and make markings.
- Then, by calculating the load on each support, we determine the number of pillars and the area on which they will be located.
- We carry out excavation work - remove 15 mm of the top part of the soil.
- We create a sand cushion under each support and install pillars. We apply plaster to their upper part.
- Finally, we protect the pillars from moisture with bitumen resin or roofing material.
Rigid docking methods
There are three main methods for rigidly joining the base of an extension to the foundation of a house:
For joining to a strip foundation, the so-called “tape-to-tape” method is used. Pairing using this method occurs in several stages:
- First you need to dig a trench about 2 meters long along the base of the existing house. You should not open the entire foundation at once, this can lead to cracks along the walls of the house;
- Every half a meter in the foundation, holes are drilled in a checkerboard pattern for reinforcement with a depth of about three quarters of the thickness of the base and a diameter equal to the thickness of the reinforcement;
- reinforcement with specially prepared longitudinal slots is driven into all holes, except the outer ones. It is necessary to drive wooden wedges through these slots so that the reinforcement is held tightly in the concrete.
Reinforcement with a periodic profile is driven into the outer holes. For better driving, it would be correct to shape the edges of the reinforcement into a cone using a grinder. The optimal diameter of the selected material is 14-16 mm.
At the final stage, all pieces of reinforcement are tied into a single frame, along the edges of which it is necessary to make an extension of 30-40 centimeters for tying into the main foundation of the extension to the house. The reinforcement frames are welded together.
If the foundation is not closed, then the reinforcement is driven into the base of the house one and a half times more often.
The following method is suitable for houses built from gas silicate.
As a rule, when constructing such structures, builders leave slabs extending from the basement of the house by about 30 cm. This will allow the ends of the reinforcement in the slab to be exposed and joined to the slab foundation of the extension. This method is called "slab-slab".
Most often, it is customary to make a foundation for an extension to a house with the formation of an expansion joint or a separate foundation. When choosing this option, the base of the extension must be poured in close proximity to the foundation of the house.
Under the entire perimeter of the extension it is necessary to make a major tape (grillage). The intermediate space between the bases must be properly separated from each other with waterproofing and thermal insulation materials so that during shrinkage the old foundation is not subject to mechanical damage from the extension.
As waterproofing, you can use roofing felt as the cheapest of all possible options. To pour the foundation for an extension to a house correctly, you need to be guided by the same rules and regulations as when building a regular house.
Saving money when choosing materials to make a foundation may turn out to be imaginary and lead to unnecessary and considerable additional expenses during the operation of the building. It would be correct to buy only high-quality components, starting with the purchase of fittings and ending with the purchase of sand and cement.
But, of course, the most ideal option to achieve rigidity and real reliability of the house structure is to calculate everything from the very beginning of construction. It would be correct to pour the entire foundation monolithically.
And until the family budget has funds to build up the entire base area of the building, the area for an extension to the house can simply be covered with some kind of flooring. With this option, the foundation will shrink naturally, and the strength will be maximum.
Construction of a foundation for a terrace and porch
People knowledgeable in construction advise starting construction of the foundation in the summer - early autumn, since with the end of the winter season a lot of dampness accumulates in the ground, and this can cause the structure to shrink.
The effect of compaction will be enhanced by a large discrepancy in the mass of buildings , that is, when the veranda is close to another architectural object.
Therefore, experts recommend taking a pause between the construction of the house and the terrace.
In order to solder them, it is most reliable to use concrete or reinforced concrete.
The outer side of the veranda is reinforced with a rolled metal frame and interlocks with the previous iron rods.
During construction, it is important to leave a gap of 4 cm between the terrace and the house . Because The weight of the structures is different, they shrink differently, and the gap left will not allow the terrace to warp.
Reference! The depth of the supports should be the same for both the main structure and the base of the extension. The width of the foundation protrudes beyond the walls by at least 10 cm, except for the side adjacent to the house.
First, markings are made for the extension. The area needs to be cleared of vegetation, leveled and the outer corners of the veranda marked with pegs.
Separate base
When using bricks, blocks or logs in construction, a separate foundation is made for the porch, not connected to the base of the veranda. The structure then represents a private foundation without connection to the main structure.
Monolithic design
The two foundations are firmly connected to each other thanks to reinforcement bars. In this case, it is important to accurately calculate the depth of the sole. This will help avoid shrinkage of the new structure.
How to pour the foundation for an extension:
- We place pegs along the perimeter of the veranda and connect them with rope. The marking is ready.
- We prepare pits according to the specified dimensions.
- At the bottom we prepare a sand and gravel cushion.
- Preparing formwork from boards.
- We install reinforcing bars, connecting them together with wire.
- We fill it with cement mortar and after drying and waterproofing, we build a porch.
You can learn about the pros and cons of a monolithic columnar structure here.
Selecting a location
It is not practical to arrange a terrace as a recreation area separately from the house. Only as an addition to an artificial pond or swimming pool. But there it is better to make it open (without a roof), and use umbrellas or awnings to protect from the sun.
Making it as a free-standing area with a wooden floor, roof and light fencing is also impractical. In this case, it is better to build a full-fledged gazebo.
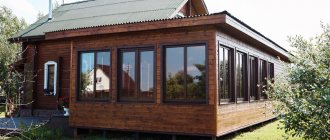
Therefore, they make a terrace either in the form of a large porch, or as an open veranda without glazing.
Note! Regarding terminology. The difference between a veranda and an attached terrace is not so significant. Even experts consider a veranda as a special case of a terrace (or vice versa). By definition, an open veranda (without glazing) is exactly the same building as a closed terrace (with a roof).
An example of a closed terrace or open veranda.
You can call it whatever you like Source kak-peresadit.ru The attached terrace can be of any size. Short or long, along the entire wall near the main door or at the exit from the house to the backyard. You can even make a terrace surrounding the entire building. And the type of foundation depends on where it is located.
At the front porch, the terrace is built on the same base and with the same decorative finishing of the base as on the “main” facade. And for the backyard, you can choose a simpler foundation - for example, a columnar or light pile foundation.
Possible mistakes
Non-professional builders often make mistakes when constructing the base of the veranda.
An obvious defect of the columnar base is the unevenness of its subsidence. This can occur if the foundation depth calculations are carried out incorrectly.
The base also sags when the load on the platform supports is unequal.
Experts do not recommend making a foundation different from the foundation of the common object. The foundation supports must have the same depth of depth.
Beginners in construction may not take into account the terrain features when working, however, the depth of freezing and the height of groundwater are very important. The monolith must be waterproofed and insulated, and before shrinkage, the height of each column must be carefully measured.
It would be a miscalculation to miss the grillage, because it is this that ensures the stability of the extension. If you immediately make a wooden frame from timber, the supporting beams may break, especially in the case of log options.
Attention ! A columnar foundation is not intended for heavy buildings. If this rule is neglected, the foundation will require repairs or even replacement.
Columnar foundation. How to mark + instructions.
If there are no assistants for screwing in piles, and pouring a strip foundation is still expensive, then a foundation on pillars is the best option. This can be reinforcement poured with concrete or brick columns and even wooden logs.
To install a columnar foundation you need:
- Continue to remove the top layer of soil and mark the location of the holes.
The holes are dug deeper than the freezing point of the soil. Their diameter should be at least 10 cm larger than future pillars. A sand cushion is poured onto the bottom. If the bottom layer of soil is already sandy, then a layer of gravel is poured and filled with bitumen for waterproofing. Formwork is installed and concrete mortar with crushed stone is poured so that 15-centimeter foundations are formed above ground level.
The columns are laid out of bricks or blocks on bases treated with bitumen or covered with roofing felt.
You can use the same technology to make a foundation from asbestos pipes.
They are cut to the required length with a concrete saw, installed in the hole and filled with cement to the very top. Crushed stone is poured into the hole along the perimeter or a solution is poured.
Logs for the foundation are taken that are resistant to rotting - larch or oak with a diameter of 25 cm.
The part immersed in the ground is treated with bitumen or fired. A sand cushion is also poured onto the bottom of the pit, and to give the logs stability, their lower end is concreted, increasing the support area. After the solution has hardened, the remaining part of the holes is covered with soil and thoroughly compacted.
An original method of installing a columnar foundation with your own hands on a prepared concrete base with roofing felt formwork is shown in the video:
How to fix damage if it occurs?
After a season of heavy rain, the columnar foundation of the veranda may become warped to such an extent that the front door may not close. In this case, the foundation can be corrected using a design using shoes.
Reinforcement is sometimes carried out, but it is not used in the construction of wooden structures. Most often, concrete is poured to the height of the building level or a new pile is installed and the grillage is restored.
Shoes are cast in the ground or in formwork. You need to install a new base under the veranda alternately with the shoes: on the outside and inside of the veranda.
The formwork is made from various available materials and filled with concrete. Subsequently, it can not be removed, but used as reinforcement for the leg. To fill the shoe in the ground, remove the turf, dig a hole of the required size and cover it with parchment. Then the reinforcement is laid out and the form is filled with concrete solution.
To build a new foundation,
you need to dismantle part of the floor, holding the walls of the extension with a jack.
After the supports are attached to the pillars, concrete lintels are attached. As soon as the concrete begins to harden, the walls of the veranda are lowered.
Old foundations need to be removed or the top part removed from them so that it does not touch the building.
Important! If the reason for raising the base of the terrace lies in the shallow deepening of the pillars during construction, it can be stopped by deepening them even more. On one side the ground is dug up and then the pillars will drop below the freezing mark.
The pillars are broken down to reinforcing bars, to which more iron is welded. Formwork is constructed on the surface and poured with concrete. After a couple of weeks, the structure can be removed and the updated foundation can be buried in the ground.
Insulation of an attached building
In order for a frame extension to a house to be suitable for habitation, it must be insulated. The best insulation is ordinary mineral wool. It can be cut into the required squares and laid between sections of the frame. If the wool is laid in several layers, you need to move the slabs together so that there are no joining seams.
The insulation is sheathed inside and outside with a vapor barrier film so that moisture does not collect inside and spoil the material. After this, decorative finishing is done. From the inside of the extension, the frame walls can be sheathed with wood, plasterboard, chipboard, and on the outside - with siding, block house, and other decorative materials.
In total, the wall pie looks like this:
- interior decoration;
- vapor barrier layer;
- insulation;
- wind protection;
- external finishing.
Insulation of the floor in a frame extension is done in a similar way. Mineral wool is placed in the cracks between the subfloor joists, and the boards are covered with a layer of waterproofing film. Once the insulation is in place, the waterproofing is placed back on top of it, and then the floor is covered with plywood and the final covering is installed.
If you are planning to add an additional room to your house using frame technology, it is extremely important to follow all safety measures. This means that you should not save on personal protective equipment; it is better to purchase a high-quality tool that will not let you down in a critical situation
Then the construction will be a successful event.
Pile foundation for a veranda - erected on any soil
A variation of the columnar base is the screw design. In this case, the foundation is constructed from special piles with blades, which allow the supports to be screwed into the ground with minimal effort. In this case, no special equipment is needed. Installation of piles is done manually.
Pile foundation for terrace
Screw structures are built exclusively for light terraces and verandas according to the following scheme:
Along the perimeter of the future foundation, remove 20 cm of soil for construction. Mark the locations of the screw supports (use pegs and a regular tape measure)
Important! The piles located at the edges of the residential building should be positioned from the foundation of the house at a distance of about 3.5 cm. Screw in the pile elements at a 90-degree angle. The size of the latter is checked after every 2–3 turns. Trim the support screwed into the soil to the required height
It should be installed 0.2–0.3 m below the floor level and 0.3–0.4 m above the ground line. Fill the screw supports with concrete mortar. This part of the work can be omitted if the veranda is built from wood. Cover each pile with a head.
In principle, you have already completed the bulk of the work. Now you can lay wooden beams or edged boards on the heads or fill in the grillage (after installing the formwork), and then begin to build the walls of your terrace.
What material to choose for finishing the flooring?
Larch decking board
For a long time, the “queen” of terraces was the larch board
. And this is understandable. This breed has a very valuable quality - due to its high resin content, it is practically not susceptible to moisture. That is why larch is actively used in shipbuilding. It does not rot, and its strength is 96 MPa - higher than that of oak (94 MPa). Moreover, over time, the wood becomes harder and harder. However, larch cannot be called completely invulnerable. It needs protection, or rather, impregnation with an antiseptic. This significantly extends its lifespan.
Recently, wood has been replaced by the wood-polymer composite mentioned above.
More than half of it consists of sawdust, which is mixed with a synthetic binder with various modifying additives. Externally, such a board resembles a wooden one (only without the grain pattern). But its properties are closer to plastic.
WPC does not rot, does not cause appetite to wood-boring beetles, and burns very poorly. It does not need any protective impregnation. Its only drawback is the relatively high price. But if you consider that the average life of such a floorboard is about 50 years, the costs are justified
Another popular material for decking is the so-called thermal board. We are talking about lumber treated with hot steam under high pressure. As a result of this “bath procedure”, the wood is dried to an optimal 4% humidity. But what is more important is that during the processing process, wood sugar burns out, which serves as food for insects and harmful microorganisms. As a result of heat and steam treatment, a hard, durable, practically impervious to moisture material is obtained that is difficult to burn. All other things being equal, a thermal board lasts three times longer than a regular one. This material has two disadvantages - high price and difficulty in machining. In the oven, the board dries out quite strongly, losing up to 12% in volume. And dense material tends to split. To avoid the formation of cracks, fasteners should be installed in such a floorboard only after pre-drilling the holes.
Burning the board using a gas burner
And finally, the fourth option is burnt wood. If you walk over a board made of resinous rocks with a gas burner, you will get a moisture-resistant and, oddly enough, fire-resistant floorboard. The melted resin will close its pores, which means it will be difficult for woodworms and other small pests to penetrate inside. Surface firing not only protects the wood, but also decorates it. The board darkens, acquires a noble gray or chocolate shade, and the grain pattern appears. Well, the main advantage of this technology is that it costs practically nothing. To get strong and durable floorboards, all you need to do is purchase or borrow a gas burner.
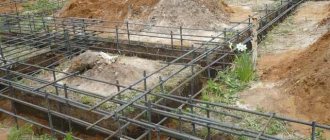
Poured concrete foundation pillars
Monolithic columnar supports made of concrete are made with rectangular (square) and round sections
Monolithic columnar supports made of concrete are made with rectangular (square) and round sections. In the first case, wooden formwork is created and protected with waterproofing material. After reinforcement, the formwork is filled with concrete. This method is labor-intensive, as it involves manually digging a hole in the ground, but it allows you to install pillars with the required support area. Often, under the base of such a pillar, to increase the area of support on the ground, a wider reinforced concrete platform is poured - a shoe.
Round poles are simpler in terms of their design, which is why owners of suburban areas often choose such poles when planning to build a house or veranda with their own hands. A drill is used to make a recess for a round concrete pillar. Pipes or a self-made case of the appropriate diameter from rolled waterproofing materials (waterproofing, roofing felt) are used as permanent formwork for pouring. Pipes made of asbestos cement, steel or plastic (PVC) are used.
The process of pouring round foundation pillars (let’s consider the easiest option in terms of doing it yourself, with plastic pipes) on a previously prepared construction site occurs as follows.
The perimeter of the future building (house, veranda) is marked. To do this, use stakes driven into the ground and threads stretched between them.
It is important to achieve rectangularity of the corners and mark the top of the pillars in one horizontal direction, for which you will need a water level or level. Along the designated perimeter, the locations of the pillars are marked according to the calculations of the load on the foundation. In the marked places, soil is excavated to the required depth with a drill of the appropriate diameter.
For houses, full-fledged recessed pillars are required; for verandas and other light structures, they make do with the installation of shallowly recessed supports. A mixture of fine gravel and sand is added to the bottom of the well, generously moistened with water and compacted. A pipe is installed in the recess and fixed in a vertical position (controlled by a spirit level) with spacers. Reinforcement is being done. To do this, vertical ribbed rods with a thickness of about 10 mm are cut. Their length is made 30 cm longer than the length of the pipe (the reinforcement should protrude above the surface of the post for ligation with the grillage). Vertical rods (4 pieces per post) are tied together with wire with a cross-section of 5-6 mm. The ligation step is about 50 cm. When viewed from above, the tying wire should form a square, with reinforcement in the corners. The distance from the corners of the square to the pipe wall should not be less than 40-50 mm. The assembled reinforcing structure is placed in a pipe and pressed into a sand and gravel bed. The pipes are filled to the top with prepared concrete of liquid consistency. A vibration device is used to compact the solution. The concrete is allowed to stand for about a week (it is not necessary to wait for the material to fully mature), after which they begin constructing the grillage.
When pouring shallow pillars under the veranda (up to half a meter), the technology is practically the same. The difference can only be in a thicker layer of sand and gravel cushion (up to 10 cm). Often, in order to strengthen the base of the pillar, before installing the pipe, a layer of concrete (about 5 cm) is poured on top of the bedding, which serves as an additional support platform for the pillar.
The Ural plant of multifaceted supports offers:
RANGE OF FACETED CONICAL SUPPORTS
OGK-3 support is 3 m high with an upper diameter of 60 mm. It is used mainly for lighting local areas and park areas. The support of OGK-4 is a 4-meter mast with an upper diameter of 60 mm. Installed on a embedded part with a height of 1.25 m. OGK-5 support – height – 5 m, top diameter – 60 mm. The recommended embedded element is FM-0.108-1.5-160(14). OGK 6 supports – a 6-meter mast with a mounting hole for a 60-mm bracket. Installed on a 1.5-meter embedded element. The OGK-7 support is a 7 m high structure with a mounting hole for a 68 mm bracket. OGK-8 support – height – 8 m, mounting hole – 68 mm. The recommended embedded part is FM-0.159-1.5-300(14). OGK-9 support – total height of the mast – 10 m, top size – 68 Dv. The OGK-10 support is a 10-meter mast with mounting holes of 68 and 100 mm. Installed on embedded parts up to 2.5 m high.
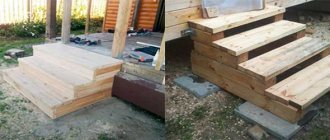
Stage two - construction of the building frame
The structure frame is installed on the finished foundation. A wooden deck can be made quickly, even if done alone. For work you will need construction timber with a cross section of 150x150 and 100x100 mm. The first beam will fit on the lower frame - the base of the veranda floor, the second - on the racks and supports for the railings.
Laying the bottom trim
We lay the timber with a section of 150x150 on a foundation for the terrace pre-lined with roofing felt. If the dimensions of the extension exceed 6 meters - the standard length of lumber in our country - you will have to splice the strapping elements. The technology for corner and longitudinal connection of timber is as follows:
- Select the most even, undisturbed lumber.
- At the ends, mark cuts for half the thickness of the timber. The length of the future groove is in our case 150 mm.
- Saw the timber along the markings using a hand or mechanical tool - a hacksaw, circular saw or chain saw.
- Connect the parts groove to groove at an angle or lengthwise.
- Additionally strengthen the connection by driving in 2-3 nails No. 150.
To avoid possible displacement of the terrace frame relative to the base (this should be thought about at the stage of foundation construction), several scraps of steel reinforcement with a diameter of 8 or 10 mm and a free end length of 200-250 mm are left at the top of the pillars or tape. Before laying the strapping, holes of larger diameter are drilled at the exit points of the steel rods, and the timber is laid on the pins, which are then bent flush.
After completing the timber lining of the terrace floor around the perimeter, lay several transverse beams of the same section in the same way, installing them in pre-marked and cut grooves in increments of about 1 meter, fastening them with long nails.
Installing racks
To support the roof of a wooden veranda, it is necessary to install several vertical bars at the outer corners and along the long side parallel to the wall of the house. The length of which is chosen in such a way that the height of the terrace roof from the floor is at least 2 meters, and the slope of the roof from the main building is maintained.
Connection diagram of harness and racks
If the terrace framing timber is allowed not to be planed, then the racks must be pre-planed with an electric planer. This will give them a more aesthetic appearance and will simplify further finishing and processing of the veranda. The racks should be secured to the frame with self-tapping screws using reinforced steel corners. In the upper part, the ends of the beams are attached to the terrace frame, which is a frame element that serves to increase the strength of the veranda structure.
It is better to make the top trim from planed timber 100x100. Assembly is carried out on the ground in detail, after which it is installed on the ends of the racks and attached to them. In this case, it is necessary to ensure that the vertical parts are perpendicular in two planes. To do this, use a plumb line or a building level.
Lags
When the foundation is prepared, it is time to install the logs, for which, as a rule, bars with a section of 50x55 or boards of 50x100 mm are used.
They can serve for quite a long time, however, provided that they are impregnated with an antiseptic or paint with protective properties. If you leave the wood in its original form, it will not last even a couple of seasons.
A more durable option is wood-polymer composite
, consisting of sawdust and a polymer binder. It has many advantages. Unlike wood, WPC does not support combustion well. In addition, he is much less “afraid” of water. The only disadvantage of such logs is that they are hollow, so water can collect inside. Typically, composite logs are used in conjunction with boards made of the same material.
Well, the most durable and strong are aluminum logs.
. They do not rust, do not burn and are not destroyed by moisture. There is essentially only one drawback - the relatively high cost.
Wooden logs
WPC logs
Aluminum joists
Whatever the logs are made of, they should be securely fixed to the foundation with stainless steel screws. The fastening pitch depends on the material - 50 cm for wooden/composite slats and 80 cm for metal ones.
Important!
You cannot embed logs in concrete and glue them together - this will inevitably lead to deformation of the flooring. And so that long slats do not interfere with the flow of water from the reinforced concrete base, they are attached one after another, not end-to-end, but with a gap of at least 2 cm.
As a rule, the distance between rows of joists when installing decking boards is 30–40 cm.