Any housing intended for permanent residence of a person needs to create thermal comfort, and a frame house in this regard is no exception. Stove heating is the traditional and most common method of heating rooms in a wooden house remote from the gas main. Find out which stove is best to choose and how to install it correctly and safely.
Stove heating in a frame house: pros and cons
Stove heating has many advantages:
- Independence. Residents of the house independently provide themselves with their preferred type of fuel and maintain a comfortable temperature, regardless of external factors.
- Relative simplicity and accessibility. If you have a diagram for laying out the rows and follow simple rules, you can lay out the oven with your own hands. Or simply purchase a factory-made oven.
- Low operating costs. This is due to the ability to use various types of fuel, including firewood.
- The variety of types of stoves gives scope for choosing the most suitable option, taking into account all the requirements for thermal comfort in the house.
But do not forget about the disadvantages of stove heating:
- Physical costs. The stove needs regular lighting, so it is necessary to add fuel quite often, as well as provide a place for its storage.
- The massiveness of the structure. Some types of furnaces may even require their own foundation . In addition, the large size of the heating stove entails a loss of room space.
- Fire hazard. When planning to install a stove in a frame house, we must not forget about the increased risk of fire, because such buildings are made of wood. The risk is aggravated by the high temperature of the furnace elements and the possibility of burning coals and sparks entering the room.
- Uneven heating of rooms.
Beginning of work
Before starting installation, it was necessary to decide on the chimney. The following varieties exist:
- brick;
- ceramic;
- sandwich
On the advice of the master, we took a sandwich type chimney, manufactured by the Research Institute of KM. Russian manufacturer, reliable, steel 1 mm thick. Having purchased the necessary elements in two steps, we took everything to the house.
The first unpleasant moment was that the diameter of the outlet from the firebox to the chimney was too small. This problem was solved with the help of an adapter. Still, it is better when the chimney has a larger diameter.
The second nuance was the lack of a stand for installing the firebox flush with the portal opening. Most likely they simply forgot to put it down during loading from the exhibition, but since a lot of time had passed, it was too late to look for it. Our master was not at a loss, and in a couple of hours he built a stand from metal profiles by welding and painted it with a special black paint.
Before the construction of the box began, a “fitting” was carried out, when, using a simple addition of elements, they looked at the finished portal with a firebox and chose the shape of the structure around the pipes.
Types of stoves for frame houses
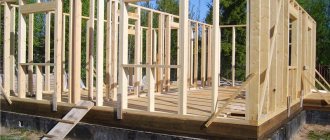
Building a house using frame technology does not limit the choice of heating type. However, feasibility and safety should always be taken into account. If you want to install a stove in a frame cottage, you should think about the fact that you will need an additional massive foundation, possibly exceeding the investment of the foundation of the house itself.
Thus, having considered all the available types of stove equipment, you can choose among them the most appropriate ones for use in a frame house.
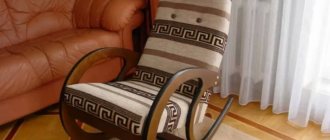
Fireplace
The oldest heating device in human history. It has a shallow, wide combustion chamber and a straight chimney. Unlike a developed stove, it does not play a role in heating the room; the flue gases fly into the chimney, taking with them most of the heat.
Heating of the building is achieved due to the thermal radiation of the flame. Thanks to this, the air in the room heats up quickly enough, but soon after the fuel burns out, heat also quickly leaves the fireplace. Thus, the efficiency of the fireplace is low. But one cannot ignore the high aesthetic properties of a classic hearth, because a burning fireplace in the house creates a special atmosphere of coziness and comfort.
Dutch heating stove
Heats the air in the room by transferring heat from the walls. In the “Dutch”, the walls first heat up and heat accumulates in their thickness. Then, due to the release of heat from the walls and the long stove chimney, the room warms up.
The heat sources are mainly heated flue gases and partly the flame in the firebox. The stove chimney is made in the form of a complex system of channels through which flue gases flow. This design serves to maximize heat retention.
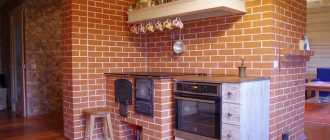
Heating and cooking, or “Russian”, “Swedish”
The design of such ovens involves the use of heated surfaces for cooking food. Owners of frame houses have access to a wide selection of this type of equipment. There are stoves for heating rooms of various sizes and with the possibility of using different types of fuel: coal, firewood, peat waste, wood, fuel briquettes.
Useful: How to calculate dew point
Heating and cooking stoves are characterized by relatively fire safety (no open fire), the presence of heat-accumulating elements and high efficiency. stoves made of cast iron and steel on sale . Stove makers lay classic “Swedish” bricks.
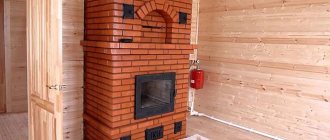
Fireplace stove, or fireplace type stove
The name of this type of heating equipment speaks for itself - it is essentially a hybrid of a stove and a fireplace, combining the aesthetics of a fireplace with the efficiency of a stove. The fireplace stove has been known since the 19th century, when it consisted of two separate units with a common chimney.
By its operating principle, a fireplace-type stove resembles a potbelly stove, but has double walls that allow it to accumulate and retain heat. The firebox is hidden behind a wide glass door. The chimney of such a stove is straight, like a fireplace.
It is most appropriate to install a fireplace stove in a frame cottage or garden house. When the damper and doors are closed, the stove retains and accumulates heat well, and when the doors are open, it will act as a fireplace and fill the house with a cozy atmosphere.
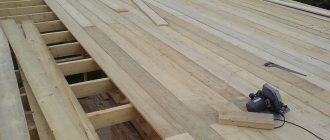
Making a pedestal and protective wall
Next, the pedestal and wall will be covered with bricks.
The screed was poured due to the reliability of the entire foundation. The floor here is plywood with joists. So far everything looks quite reliable; the DSP was screwed to the plywood.
But there are floor fluctuations - this is a big problem. There is a risk that porcelain stoneware or tiles will chip. Cracks may remain permanently. It was decided to fill the floor, but probably it would have been possible not to fill it, but just use superflex glue. The tiles stuck very poorly to the CBPB; it would be better to treat them with concrete contact.
Later, instead of porcelain stoneware, imitation brick was found. The result of the formation of the protective wall and base is visible in the photograph.
How to choose a stove for your home
When choosing a heating stove for a frame-type house, consider not only the cost and appearance, but also the technical characteristics of the equipment.
The main purpose
First of all, you should consider the mode of stay in the house. That is, if you plan to use the building for permanent residence, then it is rational to install a stove with high thermal inertia, since the heat will last a long time and you will be able to heat it less often. If the house is used as a summer cottage in the summer season, and only sometimes in winter, then it is more rational to install a fireplace. A compromise option in this case would be a fireplace stove .
In addition, you need to ask yourself the question: will the stove be used only as a heating device or for constant cooking?
Choice of power and location
The required power is determined at the rate of 1 kW per 10 sq. m of room area with an average ceiling height of 2.5 m.
The power of a factory-made furnace is easy to find in the technical data sheet. To compare with the required one, you should pay attention to the rated power at which the stove can operate for a long time without consequences.
Determining the power of self-built stoves is not an easy task, when solving it it is necessary to take into account the influence of many parameters: surface area, firebox volume, type of fuel used and others. The average value can be obtained by multiplying 400 kcal/h by its free surface area.
As for the location, do not forget that fireplace stoves can heat the air in no more than three adjacent rooms. The ideal place to install a fireplace stove in a frame house is the living room, where time is most often spent.
A good solution for placing the stove is in the wall. Thus, adjacent rooms will be heated from it. In the end, the best option is a stove with a heat exchanger or water boiler . In this case, the location no longer matters much.
Material
When building a brick oven in a house, you can be sure that all the individual wishes of its owners will be taken into account. But this will require a certain time investment in finding a good craftsman, and the construction process itself can drag on for a long time. That is why factory-made heating stoves have become most popular.
If you choose between cast iron and steel stoves for a frame house, it is important to know that cast iron has a greater heat capacity than steel. As a result, such furnaces require long-term heating, but are capable of delivering heat for a long time.
To heat the air in the room faster, the best option is a stove-fireplace made of sheet steel. It heats up instantly, but cools down faster than cast iron .
In addition, you should pay attention to the cladding material. When using ceramics or stone, the body takes longer to warm up, but the time for subsequent heat radiation increases significantly.
Useful: Kitchen hood: installation features
Firebox installation stages
Cast iron firebox
Practice and time have shown that cast iron is considered the best firebox. Don’t try to make complex heating equipment with your own hands; it’s better to earn money and buy a quality product.
https://youtube.com/watch?v=WJB-frciFE0
Fireplace installation: expert recommendations
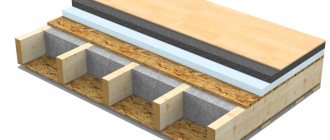
Preparing the base
For a cast iron firebox, it is necessary to properly prepare a reinforced foundation or screed. Thermal insulation material – fire-resistant brick or aerated concrete block – is laid on top of the floor. Fire-resistant materials are laid with your own hands on ordinary cement mortar or special mastic, sold in construction stores.
Installation of the firebox
A correctly selected firebox for the overall design will become a harmonious addition to the design of the house. Before installing it, you need to decide on the facing material. The firebox often comes complete with facing material, however, not all manufacturers provide such a service. In some cases, buyers have to choose the facing material themselves. Before choosing it, consider its compatibility with a cast iron firebox.
The second step is to become familiar with the instructions and features of the firebox.
Construction of a cast iron firebox
The third step is installation of heating equipment. The brickwork is covered with cast iron U-shaped tiles. The plate is fixed using heat-resistant glue or mastic. The side arms of the device must be mounted a few centimeters into the fireplace wall. The tiles are checked with a building level before the glue and mortar have time to set.
The fourth step is to install the fireplace insert on the stove. Maintain a distance of 4-6 cm between the firebox and the wall. After work, the distance between the wall and the heating equipment must be checked again, since it is often broken with your own hands.
The fifth step is lining the firebox. After installation, the fireplace must be beautifully covered. First, the joints are treated with sealant and gypsum plaster. After the plaster has dried, you can begin cladding. It is worth noting that the cladding is made by hand exclusively from heat-resistant materials.
Scheme for installing a sandwich chimney
Step six - installation of the chimney. After facing work, all that remains is to attach the chimney to the stove. Its installation is accompanied by additional work - in the firebox it is necessary to cut a hole of the required diameter for a metal pipe (in most cases this is a circle of 70x50 centimeters). The same cutout is made in the canvas.
If the corner fireplace is too close to the vertical, be careful not to damage the wall when working with a hammer drill.
Step seven - sealing the joints. Practice has shown that ordinary silicone sealant cannot cope with the constant action of high temperatures, so for high-quality sealing it is necessary to select only heat-resistant materials. The cracks treated with sealant are covered on top with heat-insulating material with your own hands.
Step eight - finishing. After bringing the chimney to the roof, you can begin finishing the stove with your own hands. The foot of the firebox is traditionally sealed with decorative stone or ceramic tiles. You can choose any building material you like.
Professionals recommend not laying laminate or linoleum close to the fireplace, especially for open fireboxes. The distance between the open fireplace and the floor covering should exceed 80-100 cm.
Figured firebox grate
For additional security, it is recommended to install an openwork metal grate in front of the fireplace. The wall must also be protected from fire. The wall behind the fireplace is sealed with fire-resistant decorative elements.
The decor is completed with fireplace tongs, a stand, a poker and other accessories. The following decorative elements look very beautiful, and, most importantly, correctly, on the mantelpiece: statues, toys, vases, paintings or homemade trinkets.
Construction of a foundation for a classic fireplace in a frame house
The significant weight of a classic fireplace imposes certain restrictions when choosing the type of foundation. At the design stage of a house, a reinforced foundation should be provided at the location where the stove or fireplace is installed. If this was not done in advance, then you can forget about the idea of installing a classic fireplace in a frame cottage.
A house made of a wooden frame, due to its low weight, usually has a small foundation at its base, most often a shallow foundation. And the fireplace, in turn, requires as a foundation the pouring of a monolithic concrete slab that exceeds the fireplace base area by 30 cm on all sides .
The foundations of the house and the fireplace are not connected, since the tape can swell when the soil freezes and thaws, and the monolithic slab will not respond to these movements.
The most suitable solution is a fireplace stove in a frame house mounted on screw piles. In this case, the foundations of the walls of the house and the fireplace can be connected. For this purpose, sheets of metal are laid under the fireplace, which are connected with a channel and sheet metal. The described method is also used in the construction of barbecues and special outdoor ovens.
Masonry
Scheme for laying rows for a corner fireplaceOrdering an English fireplace
Cover the dried foundation with a double layer of roofing material. This will provide the necessary protection for the base.
Prepare mortar for brickwork. Traditionally, fireplaces are laid using a solution based on pre-soaked clay.
Laying the first row is best done using mortar with a small addition of cement (approximately 10-20% of the total mass of the mixture).
Calibrate the bricks in advance, selecting the most suitable sized products for laying each row.
Before starting laying, immerse the bricks in water for a while. This will allow the products to become saturated with moisture. Otherwise, the bricks will take water from the clay mortar, which will lead to a significant deterioration in the quality of the masonry.
Lay out the first row of bricks edgewise. Check that the row is laid out correctly with a square and level. Make sure the opposite sides and diagonals of the base are the same length.
The recommended thickness of seams is up to 0.5 cm.
The masonry is carried out in accordance with the order. The following will be a procedure that is relevant for most existing types of fireplaces. For the rest, rely on the drawings you have.
Laying a fireplace, step-by-step instructions
Lay out three continuous rows of the base.
Laying a fireplace, step-by-step instructions
Second step
Lay out 4-5 rows with an ash pan.
Fireplace laying, step-by-step instructionsFireplace laying, step-by-step instructions
Third step
Lay out 6-7 rows with the arrangement of the bottom and frame of the brick fireplace.
Laying a fireplace, step-by-step instructions Laying a fireplace, step-by-step instructions Laying a fireplace, step-by-step instructions Laying a fireplace, step-by-step instructions Laying a fireplace, step-by-step instructions Laying a fireplace, step-by-step instructions Circle and formwork for laying an arch subfloor Laying a fireplace, step-by-step instructions Laying a fireplace, step-by-step instructions Laying a fireplace, step-by-step instructions
Fifth step
Lay out rows 14-19 with a smoke collector.
Laying a fireplace, step-by-step instructions Laying a fireplace, step-by-step instructions Laying a fireplace, step-by-step instructions Laying a fireplace, step-by-step instructions Laying a fireplace, step-by-step instructions
Sixth step
Lay out 20-25 rows of the fireplace with a chimney arrangement.
Arrange the base and continuous rows of masonry using a trowel or trowel. The chimney and fuel chamber are laid out manually, because
at these stages it is very important to control the quality of the solution used
Apply fireplace mortar to the middle of the bricks. The edges of the elements must remain free.
When laying out each row, adhere to the chosen order. For greater convenience, you can number the products.
Pay special attention to the quality of the masonry of the fuel compartment and smoke exhaust ducts - these elements must be laid out as evenly as possible and as airtight as possible. Laying a fireplace, step-by-step instructions Laying a fireplace, step-by-step instructions Laying a fireplace, step-by-step instructions Laying a fireplace, step-by-step instructions Laying a fireplace, step-by-step instructions
Laying a fireplace, step-by-step instructions Laying a fireplace, step-by-step instructions Laying a fireplace, step-by-step instructions Laying a fireplace, step-by-step instructions Laying a fireplace, step-by-step instructions
To form a beautiful curved fireplace vault, apply a gradual overlap of masonry elements
It is important that the overlap size does not exceed 50-60 mm in each row
The construction of curved lintels is carried out using temporary formwork - circles. To fix such formwork, use supports under the fireplace vault being installed.
Start laying from the brick installed in the center, and then carry out symmetrical laying in both directions.
Periodically check the verticality of the smoke exhaust pipe. Even the slightest deviations from the vertical can lead to smoke in the room.
Laying a fireplace, step-by-step instructions
To lay the chimney, use a mortar with added cement, similar to the mixture used when laying out the fireplace base.
The smoke exhaust pipe must be covered with a layer of fire-resistant insulation to increase fire safety. Insulation is installed where pipes pass through the structure of the house (floors, roofing, etc.). The most commonly used insulation materials are asbestos based.
Classic fireplace design
The design of the fireplace consists of the following elements:
- The combustion chamber is the space in which fuel combustion occurs.
- Firebox - the lower part of the firebox made of fireproof material.
- Fireplace mouth (hailo) is a stove element that serves to remove combustion products directly into the chimney.
- The lintel and ceiling, the space from the ceiling of the firebox to the mantelpiece, serves to collect smoke, from which the smoke enters the chimney.
- A tooth or gas threshold, its purpose is to prevent soot from falling from the chimney into the firebox.
- Smoke exhaust - provides the removal of carbon monoxide and the supply of oxygen, which is needed to maintain combustion.
The grate is an element that distributes air as it moves into the fireplace firebox. When building a classic fireplace, you need to pay attention to the following important points:
- the thickness of the seams should not exceed 4 mm, as this can result in a poor-quality and fragile structure;
- the cross-section of the chimney is taken equal to 1/16 of the area of the portal window;
- the volume of the fireplace window should be 20 times less than the volume of the room, and the ratio of its height and width should be 2:3;
- in the case when the firebox is equipped with your own hands, it is better to make its internal corners rounded in order to better remove combustion residues and to avoid the accumulation of soot on the walls;
- you should take a responsible approach to choosing a mortar for masonry;
- A cap is installed at the end of the chimney to protect the structure from contamination.
In modern fireplaces, increasing efficiency and maintaining the amount of air in the room is achieved by a certain organization of heat exchange. The air under the grate is not taken from the room, but comes from outside. To do this, holes are made in the floor of the room to supply air flow into the channels from the back wall of the firebox.
Thus, the heated air masses move to the heater just below the pass, then following into the room. As a result, the air takes heat from the combustion products and, transferring it to the room, reduces the temperature of the exiting gas.
This technological solution does not fully solve the problem of removing air from the room. For this reason, a fireplace stove in a frame house should not be installed in rooms with an area of less than 20 square meters. m.
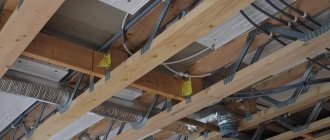
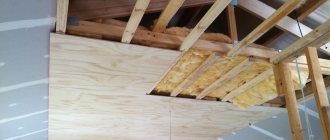
Assembly
The design of the box is a closed, sealed cabinet made of guides and special heat-resistant pink plasterboard. They didn’t find it for regular sale, so I had to order it and go pick it up at a large wholesale warehouse. A special heat-resistant insulation is placed inside the structure, we chose Rockwool Fire Batts, and everything is carefully sealed. For this we used steel heat-resistant foil tape from Izospan.
There is a misconception that stone wool gets into the air, but after we insulated the entire house with this material with our own hands, we could say for sure that it had nowhere to fly, since all possible leakage points were blocked.
Under the portal, tiles were laid, which, according to fire safety standards, formed a platform in front. Installation work was already underway on it. Between the greenboard-clad wall and the chimney, additional insulation and a mineralite sheet were laid.
Since no one in our family is a stove specialist, a topic was created on the construction portal in the appropriate section with the involvement of our master.
This was done with the expectation that nuances and shortcomings could be corrected online while work was underway. But, fortunately, apart from the incomprehensible phrases of the failed contractor who received a refusal from us, no one found any more errors in the installation.
The installation took eight days. During this time the following was done:
- a portal with a firebox on a stand was installed;
- chimney assembled;
- the box design is arranged according to all the rules;
- two hatches installed;
- a passage was made through the interfloor ceiling;
- pipes were brought to the roof;
- insulation has been installed in the attic;
- a protective fungus has been installed;
The first trip is unforgettable. When, after the chaos of building materials and discussions on the Internet, you light a fire and watch how it slowly flares up and then burns calmly - it’s unforgettable.
Master's choice
Almost the future of the entire house depends on how competently the installation of the fireplace stove is carried out. It is necessary to know and strictly follow the technology to avoid deformation of the system, as well as the possibility of fire.
Considering that the majority of customers for fireplace system installation services do not want to deal with the intricacies of the technical side, a large number of companies greatly inflate prices, intimidating consumers with terms and the complexity of the process. At this point we were already seasoned customers. With the help of hired teams:
- they built a box of a house and covered it with a roof;
- made external cladding with log siding;
- We ordered the interior rough finishing with greenboard.
Performers for all these works were looked for on an Internet portal where specialists offer their services. We focused on the number of works, reviews and registration deadlines. If the contractor has been registered for a long time, has positive reviews and has completed many orders, then you can trust him.
As we understand, baking is shrouded in a veil of some strange mystery. During the period of consideration of candidates, many mysteriously did not name the final prices for the work, opaquely describing the strange schemes for constructing the chimney. One of these “specialists” spent about an hour trying to find out at least some prices to no avail. Later, the same person on a construction forum offered to break half of the house for us in order to remove the pipe, and we joyfully understood that refusing the services of such experts was a very right decision.
The choice was made on a man who did not ask for exorbitant fees; having understood the technology several years ago, he installed a fireplace in his home and now took orders for installation. We later learned that he was the deputy chief engineer of a large airline that had recently gone bankrupt, and we realized that the decision was the right one.
Base for a metal stove
A metal heating structure also requires a separate base. The fact is that if the stove does not stand level, this can lead to its deformation and destruction.
The procedure for constructing a base for a stove weighing no more than 150 kg is as follows:
- The trench is marked and excavated. Its depth should be no more than 0.5 m.
- Crushed stone is laid and compacted. The final layer of the pillow must be at least 30 cm thick.
- The concrete mixture is poured. You will need to set aside a day to set it. This solution is made in the following proportions: 1 part cement, 4 parts sand and water.
- After the cement has set, roofing felt is installed. It will serve as a waterproofing layer.
- The remaining space is also filled with concrete, but made in different proportions. You will need to take 1 portion of cement, 4 portions of gravel and 3 portions of sand and water.
- The finishing layer is leveled using a building level.
Metal furnace on a foundation Source sarinform.com
It will also take about 2-3 weeks for such a base to harden. It will need to be moistened periodically.
Decorative finishing
The most creative aspect of making a fireplace is its decorative finish.
How to imitate fire
To create a picture of a fake flame, you can use 3D holograms with stereo effects, LCD technologies and digital panels.
Can be applied:
- an ordinary dummy painted on the back wall;
- LCD TV;
- Christmas tree garland with control of light transmission against the background of a 3D image;
- salt electric lamp;
- decorative firewood made of plastic or ceramics with or without internal lighting.
The listed materials are perfectly combined into a single composition and can both complement each other and create accents.
How to clad the roof
The cladding option depends on the material from which the portal is made. For strong structures made of brick, plywood, plasterboard or chipboard, you can use something heavier.
Such as:
- boards;
- artificial stone floor tiles;
- plywood scraps lined with laminate, porcelain stoneware or glass mosaic.
For more fragile structures, you can use the same material as for the false fireplace, painted in the same or contrasting color.
What to put in the firebox and how to decorate the back wall
If you need to decorate an electric fireplace, then the depth of the niche for it should be at least 40 cm, and it needs an outlet. In other options, a depth of 20 cm is sufficient.
A wide variety of elements can be placed in the firebox:
- candles with and without scent;
- real or artificial logs;
- large pebbles mixed with other colorful pebbles;
- diode tape along the contour of the bottom of the fireplace under transparent plexiglass, on which pebbles can be laid;
- cover the back wall with a photograph or draw the composition yourself;
- vases with flowers, figurines of different sizes and even soft toys.
Decorations for the back wall are selected depending on what will be in the firebox itself.
Finish options:
- continuation of the portal;
- cladding with plastic or gypsum “brick”;
- a painted or pasted picture;
- mirror tiles of different sizes or solid panels;
- mosaic tiles or small tiles with ornaments.
Even without a live flame, a false fireplace can bring a touch of calm and tranquility to an everyday evening.