Wood burning (pyrography) is a simple and affordable way to decorate wooden surfaces. Pyrography allows you to make a unique souvenir with your own hands or transform wooden furniture, making it a real masterpiece. But this is impossible to do without a special device. Modern manufacturers offer a large selection of expensive and not so expensive wood burners.
But if you have no money at all, but have a soldering iron at hand, you can make a burner yourself. To do this, you only need a few tools and materials that almost every owner has on hand, as well as a little time and effort.
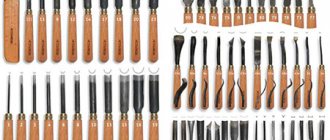
Types of burners
Before you begin, you should purchase the most suitable burner. The quality of the resulting product largely depends on the main characteristics. Beginners and professionals use 2 types of soldering irons:
- With wire stings.
- With hard tip.
Many people compare a burning device with a hard pen to a soldering iron. The working part is represented by a tip of a complex shape, which is heated by nichrome wire when voltage is applied. A distinctive feature is that the delivery set includes a set of attachments. Their geometric shape can differ significantly; it is selected depending on what kind of pattern you need to get. The main advantages of this proposal:
- Relatively low cost.
- Long service life.
- Easy to use.
The only significant drawback is that it takes about 5 minutes or more to warm up. To ensure safety at the time of burning the design, the design is equipped with a large handle, so difficulties may arise when performing delicate work.
A tool with a wire pen is often used to burn small images on wood. In this case, the heating wire comes into contact with the wood. The advantages can be considered:
- The device is ready for use almost immediately after switching on.
- Models from the middle and high price categories have a regulator that allows you to select the most suitable thermal mode.
- The design is optimally suited for a wide variety of work.
- The thin thickness of the heating wire ensures little contact with the material, so there are no problems with fine work.
The disadvantage is the high cost and low maintainability. The heating wire can become deformed even with a slight impact.
Required materials and tools
To create a pyrograph you will need a powerful 100 W Soviet soldering iron, as well as tin solder. A model with a replaceable tip is best suited. You also need to prepare the following materials and tools:
- needle from a syringe;
- sewing needle;
- wooden stick about 10 cm long;
- battery pack;
- two-wire wire;
- strong shoe thread;
- insulating tape;
- pliers;
- electric drill.
The more powerful the battery pack or charger, the better the pyrograph will turn out in the end.
You can take any unnecessary charger for your phone or any compact tool like a screwdriver.
How to choose a tool?
In order to learn how to work with a tool, you should choose it correctly. Recommendations for selecting a suitable burner:
- The volume of work carried out and its complexity are determined. Small burnt designs with fine lines look attractive, but they can be almost invisible on larger pieces.
- Beginners often purchase a tool from a low price category. This decision is justified by the fact that in the absence of experience, mistakes can be made, due to which the device will cease to function.
- The most important parameters include power, tip dimensions, the possibility of using attachments and their number, heating time, etc. All required information is indicated in the operating instructions.
- The classic version of the tool is represented by a combination of a step-down transformer, a handle and a working part. There are also sophisticated burning machines on the market that can be used to produce complex images.
- It is recommended to give preference to products from popular manufacturers, as they can last for a long period.
Only over time will the master, based on personal experience, be able to select the most suitable tool. The choice of design is often made depending on the available options for burners and attachments for them.
Regulatory acts regulating fire safety regime
On January 1, 2021, Resolution No. 1479 approved the New Rules for Compliance with the Fire Safety Regulations in Russia. Before this document came into force, it was impossible to light fires only in public areas (parks, courtyards, plantings, etc.). Since January 2022, it has become prohibited to light a fire in the territory of the dacha. Changes were made to paragraph 218 of the Rules of the Russian Federation regarding the fire regime.
Today in the local area it is prohibited:
- burn leaves and other waste;
- grill kebabs on the fire;
- light fires to warm up.
The question arises, what should summer residents do now with withered leaves, branches and other debris? The new rules have caused outrage among many land owners. But in reality the restrictions are not that strong. Summer residents still have the opportunity to recycle waste. You just need to take a number of points into account.
Burning methods
You can begin burning work after selecting a sketch after the working part of the tool has been heated to the required temperature. If the tip heats up unevenly, this indicates the appearance of defects and the need to replace it. You can eliminate the possibility of the device overheating by periodically disconnecting it from the network. When considering the main burning methods, you should consider:
- Once drawn, the lines cannot be erased. Therefore, before starting complex drawings, you need to gain experience with easy ones.
- Beginners are advised to use stencils. They can be made in a variety of ways or purchased online.
- Three-dimensional drawings are obtained by combining lines of different shades. When you move the tool quickly, you get a thin light line, but by holding the tip you can get a dark line.
- An experienced craftsman takes into account how the fibers are arranged. The easiest way is to guide the tool along the grain.
When using various techniques, you can obtain complex drawings that are practically indistinguishable from paintings. At first, it is recommended to use the simplest methods.
Where to begin?
Using a burner is simple, but to get beautiful drawings you need to have talent and skills. The main recommendations are the following:
- Before directly applying the design, you should choose the right tree. There are a large number of different breeds, all of which react differently to temperature. It is recommended to give preference to soft hardwood: aspen, poplar, linden.
- Some wood can withstand a single point temperature of +250°C, while others ignite at 120°C. The softness of the surface layer simplifies the movement of the sting.
- The surface on which the design is burned must be pre-treated. Even minor defects can cause the tip to accidentally wobble.
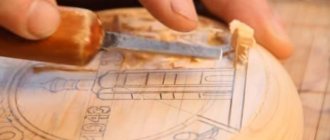
- Contour lines are drawn using a stencil and pencil. Artists can apply the sketch by hand. Complex designs are applied using carbon paper.
To place the tool, a stand is made of non-flammable material. A ceramic plate or glass is often used. Ceramics can withstand high temperatures for long periods.
How to work correctly?
First of all, it is necessary to ensure good and proper lighting. If the work will be done on the street, then properly installed street light poles will help with this.
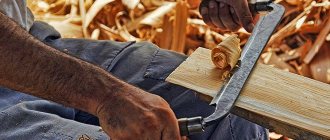
The working tool resembles a simple pencil with a wide working part. Therefore, the work carried out is practically no different from drawing on paper, except that the working part is heated before use. The whole process is divided into several main stages:
- Preparation. It involves choosing the wood on which the design will be applied. The surface should be smooth and even. It is possible to make the board smooth by sanding it.
- Drawing. For those who create pencil drawings, the task will be simple. In the absence of appropriate skills, a suitable design is printed and then applied to a board using stencil paper.
- Burning out. After warming up the working part of the tool, you can begin burning. The handle of the tool, if it has a small thickness, is taken like a pencil. Simple drawings begin with drawing contours, straight lines are created with quick movements without applying strong pressure. If several lines are located in close proximity, they should be applied with some delay, which is required for cooling. The hue changes by setting the appropriate power. Also, to obtain complex patterns, the nozzles are changed.
Many people leave the product after applying the design without carrying out final processing. This may lead to a reduction in the service life of the product.
Is it possible to burn wood with a soldering iron?
Pyrography, or artistic burning of drawings, is familiar to many from childhood.
But for some, the question of whether it is possible to burn wood with a soldering iron remains open. Nowadays there are special kits that contain tools for burning, which creates a number of questions about whether it is possible to burn wood with a regular soldering iron, or whether only specialized models are needed here. It’s easy to understand all this by simply looking at the characteristics of the tools from the kits for these purposes. As a rule, these are 30 W soldering irons, and not of the best quality.
Their structure largely coincides with ordinary models, but the differences consist in additional devices.
In sets you can often find a wide selection of additional attachments, whereas with ordinary devices you have to work with one tip.
Previously, when the Chinese industry did not yet supply soldering irons for every taste and for any purpose, burning was carried out with ordinary home models. This is done both as a hobby and for decorating, creating souvenirs and other purposes.
The main thing is to choose the appropriate tool model. Almost any device with a power of 30 W or more is suitable here. More powerful models are also allowed, but they need to work faster, since they have a higher heating temperature.
Less powerful tools will burn the surface for too long or leave no mark at all.
Burning with a soldering iron on wood
Advantages
This process has a number of advantages, thanks to which it has earned its widespread use. These include: No need for any additional purchases.
The soldering iron is a ready-made tool for burning. Starting from 30 W, there is no longer any dependence on the instrument parameters.
All of them become suitable for this task and you don’t need to think about how to make a burner from a soldering iron.
Using a 60 Watt soldering iron for burning
This is a relatively safe process. There is no great risk of electric shock or fire. Using simple, low-power models, children can also be allowed to use pyrography, but you should still not forget about safety rules.
Easy to learn tool. It is much easier to use for burning than for soldering. There is no need to delve into technical details, the selection of additional consumables and modes. Everything is mastered on an intuitive level.
Flaws
The disadvantages of this process are as follows:
- This is a lengthy process that consumes a lot of electricity, which in a home environment can have a significant impact on your electricity bill.
- There is no way to redo any action. Any wrong movement leaves a mark on the surface of the wood, which cannot be corrected.
- During a long process, high loads are created on the soldering iron, which can lead to its breakdown.
Tools and materials for burning
Before you begin the actual burning, you need to prepare everything in advance. Having basic tools and materials is a must.
Naturally, the arsenal of beginners and professionals may differ. The main necessary tools include:
- A soldering iron with suitable power (the presence of several modes, a temperature regulator, the ability to change the tip and other features do not play a major role, although they can make the burning process more comfortable);
- Aluminum oxide, which is used to clean tool bits and tips;
- Tips of various thicknesses and shapes, or special nozzles for burning;
- Tool holder or stand.
Next, you need to choose what you will have to burn on. The wood should have a smooth surface on both sides. On the one hand, this is necessary for direct application of the design, and on the other, for a stable position.
Beginners are advised to use soft wood, but experienced pyrographers can handle harder wood. Soft rocks are lighter and the pattern will be more visible on them.
Any unnecessary materials at hand are suitable for training.
How to burn correctly?
Next, it’s worth considering the features of how to burn wood with a soldering iron, so that this process is simple and the result is of high quality.
The tool needs to be plugged in and wait until it warms up to maximum. During heating and in those moments when the soldering iron is not in use, it should be kept on a stand.
If irregularities are noticed on the surface of the wood, they can be treated with sandpaper while the tool is heating.
"Note!
Before burning wood with a children's soldering iron, you can apply a design to the material. Sometimes people immediately begin to create a composition without a sketch, but for beginners it is advisable to make a preliminary sketch with a simple pencil.”
When the soldering iron is fully heated, you need to press its tip against the wood itself. Under the influence of high temperatures, the surface of the wood begins to fade. This only happens to the top layer, which affects only 1-2 mm of the total thickness.
Almost any technique involves constant pressure from the tool on the working surface of the workpiece. This is not a time to rush. Evenly moving the tip along the contours with visual control of the result will help to achieve excellent results.
If you do everything quickly, you may end up with uneven cauterization, not to mention the possible mistakes that may occur if you rush. The longer you hold the pen in one place, the deeper and brighter the burning becomes.
The regulation of colors and shades occurs precisely by changing the intensity. Naturally, it will not be possible to achieve smooth transitions and thin lines right away, but this skill will come with experience.
"Important!
If you position the workpiece so that the wood fibers run vertically, this will make the process easier, since when burning most often the movements go from bottom to top.”
To understand new burning techniques and techniques, you need to experiment frequently. Taking any unnecessary wooden part, you can train on it and practice new elements. This also applies to changing tips and soldering irons. If we are talking about simple inexpensive models that do not have a removable tip, then sometimes you have to use several tools for pyrography.
Is it possible to burn leather with a soldering iron?
Just like when working with wood, burning leather with a soldering iron is also possible, and at home.
The process itself occurs approximately the same as in the previous case, with the exception of the peculiarities of preparing the skin itself. For this, pork, goat and sheep leather are most often chosen.
But this is all much less common among hobbyists, since consumables are very expensive, as for a simple hobby.
Leather burning is more common among specialists who do it professionally, creating various things for sale. Here it is more appropriate to use expensive multifunctional soldering irons with replaceable tips. The power of the devices may be less than those used for wood.
Conclusion
The features of the process, like burning with a soldering iron on fabric, wood or leather, are not very different, although they have their own nuances. This is a fairly easy and safe process that does not require any special investment. Fantasy and originality play a much larger role here.
Final processing
After receiving the image, the surface is treated with sandpaper. You can protect wood from the negative effects of the environment as follows:
- The wood is varnished. This substance significantly extends the life of the product. At the same time, the drawing does not lose its contours, remains bright and rich.
- If necessary, partial or complete coloring of the space that is formed between the drawn lines is carried out.
Final processing of the product can be carried out using a variety of protective substances. The choice is made depending on what result needs to be achieved.
Safety precautions
You should work with the burner carefully. The main recommendations are as follows:
- When using the tool, you need to use a special stand, which is made using heat-resistant material. In its absence, ceramic dishes or other products made from this material are used.
- The tool should not be left on the surface being treated for a long time. This is due to the fact that prolonged exposure to high temperatures leads to fire of the material.
- No flammable materials should be located near the work table. Even short exposure may result in a fire.
- Drawing should be done carefully. Clumsy and quick actions can lead to burns.
- Even a high-quality tool can overheat. Therefore, it is recommended to monitor the heating level of the working part.
At the time of burning, unpleasant smoke may appear, which is not recommended to inhale. Work must be carried out in a prepared workplace. Distractions lead to mistakes being made, and the work will have to start all over again.
Is it possible to burn wood with a soldering iron? — Metals, equipment, instructions
A variety of methods can be used to decorate the surface of wood; the most popular are pyrography or wood burning.
Just a few contrasting touches can make a wooden product attractive and unique. You can make a beautiful and original thing using special equipment.
In addition, you should consider how to properly burn wood with a soldering iron.
How to work correctly?
The working tool resembles a simple pencil with a wide working part. Therefore, the work carried out is practically no different from drawing on paper, except that the working part is heated before use. The whole process is divided into several main stages:
- Preparation. It involves choosing the wood on which the design will be applied. The surface should be smooth and even. It is possible to make the board smooth by sanding it.
- Drawing. For those who create pencil drawings, the task will be simple. In the absence of appropriate skills, a suitable design is printed and then applied to a board using stencil paper.
- Burning out. After warming up the working part of the tool, you can begin burning. The handle of the tool, if it has a small thickness, is taken like a pencil. Simple drawings begin with drawing contours, straight lines are created with quick movements without applying strong pressure. If several lines are located in close proximity, they should be applied with some delay, which is required for cooling. The hue changes by setting the appropriate power. Also, to obtain complex patterns, the nozzles are changed.
Many people leave the product after applying the design without carrying out final processing. This may lead to a reduction in the service life of the product.
Final processing
After receiving the image, the surface is treated with sandpaper. You can protect wood from the negative effects of the environment as follows:
- The wood is varnished. This substance significantly extends the life of the product. At the same time, the drawing does not lose its contours, remains bright and rich.
- If necessary, partial or complete coloring of the space that is formed between the drawn lines is carried out.
Safety precautions
You should work with the burner carefully. The main recommendations are as follows:
- When using the tool, you need to use a special stand, which is made using heat-resistant material. In its absence, ceramic dishes or other products made from this material are used.
- The tool should not be left on the surface being treated for a long time. This is due to the fact that prolonged exposure to high temperatures leads to fire of the material.
- No flammable materials should be located near the work table. Even short exposure may result in a fire.
- Drawing should be done carefully. Clumsy and quick actions can lead to burns.
- Even a high-quality tool can overheat. Therefore, it is recommended to monitor the heating level of the working part.
At the time of burning, unpleasant smoke may appear, which is not recommended to inhale. Work must be carried out in a prepared workplace. Distractions lead to mistakes being made, and the work will have to start all over again.
Sergey Odintsov
Is it possible to burn wood with a soldering iron?
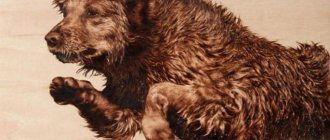
Wood burning is incredibly interesting - it is a popular home hobby for people of all ages.
Experienced pyrographers paint exclusive paintings and create incredible masterpieces.
Children enjoy learning how to burn geometric shapes and various animals on wood.
The burning technology itself has been known for a long time and is quite simple, but beginners in this business will have to show a little patience and perseverance to understand the basic principles of working with an electric burner, as well as study the available methods of applying an ornament or image to a wooden workpiece.
Wood burning for beginners begins with mastering basic practical skills and theory, which also includes safety rules when working with a pyrograph (especially for children).
Before you start creating, you need to properly prepare your workplace and stock up on additional materials.
Let's look at the most important points in the burning process that every pyrographer must know.
How to woodburn for beginners: the best ideas and practical tips
Wood burning is a very common skill today. Not only children, but also adults are interested in it.
And this is not just like that, because during this activity the ingenuity, imagination and, of course, the skill of the person (child) are manifested. Today we will talk about how to burn wood for beginners.
For those who do not know how to burn, this article will show and tell you how to learn.
Also, when choosing a burning tool, many people ask the question: “Is it possible to burn wood with a soldering iron?” The answer is: the most important thing is that the soldering iron itself is powerful, then you can use it to burn. But it is better, of course, to purchase a special device, since it already has suitable power, and the kit includes additional attachments. With their help, burning will be even easier.
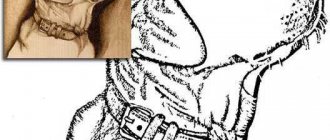
Let's start with a portrait
Burning out a portrait is not so easy. The most important thing is to correctly and efficiently transfer the drawing from the photo to the base.
As already mentioned, first you need to transfer the portrait from a photo or from life to wood. He should look like the person you decided to paint a portrait of.
Then we begin the burning process itself. All thick tips were used for this portrait. In the end, this is what happened:
Create an angel
This master class will describe the step-by-step process of creating a scorched picture, which we will call “Angel”.
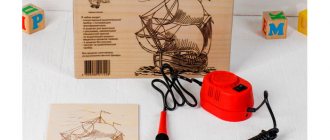
The following tools and equipment are required for work:
- Plywood or wood;
- Burnout apparatus;
- Ready drawn template;
- Copy paper;
- Drill;
- File;
- Jigsaw;
- Varnish;
- Stain;
- Frame;
- PVA glue.
First of all, you need to make a template. We look for a suitable picture on the Internet and print it in the size you need. Next, we cut out or buy a sheet of plywood, which will later be the base.
We transfer the printed template to the base.
Then you need to cut out the necessary parts. To do this, first we use a drill and use it to make holes.
In the future we will insert a file into them and cut them out. First of all, we cut out the smallest parts, gradually moving on to larger ones.
After that, we take a burning device and make touches around the office.
That's it, the painting “Angel” is completely ready.
Easy lesson
For work you will need the following tools and materials:
- Plywood sheet;
- Burning apparatus;
- Sketch (drawing);
- Copy paper;
- A simple black pencil;
- Watermelon (pumpkin) seeds;
- Scotch;
- Paints;
- Brush;
- Sandpaper.
Read this: DIY Baba Yaga: a selection of interesting ideas
So let's get started with the process.
First, let's prepare the base. We take a sheet of plywood of the size we need and sand it with sandpaper. The surface must be flat and smooth.
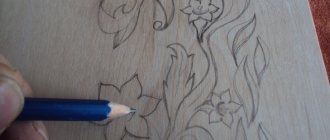
We select a drawing online and print it out. Afterwards, using carbon paper we transfer it to plywood.
Advice! To prevent the carbon copy with the design from moving, you can secure them with pieces of tape.
We transfer the drawing to the base. This is what should happen. Be sure to check that all lines have been drawn.
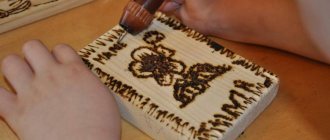
Here we come to the burning process itself. Let the burning device heat up, and then burn along the drawn contour.
After burning the outline, you need to color the drawing. We do this carefully.
The work is almost ready. All that remains is to make a frame using glue and seeds. We remove our work until it dries completely.
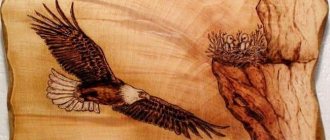
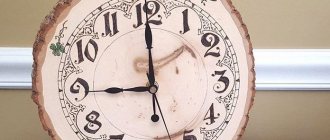
This way you can burn the following:
- Various paintings;
- Logos;
- Various inscriptions;
- Patterns.
And all this can actually be done at home. After all, this skill does not require special expensive equipment as such.
Lush flowers
For work you will need the following tools and materials:
- Clear nail polish;
- Brush;
- Burnout apparatus;
- Eraser;
- A sheet of plywood of the required size;
- carbon copy;
- Sandpaper.
How to perform burning correctly?
To begin with, we select and decide on a pattern. Print it out on a piece of paper. Then we take a sheet of plywood of the size we need.
Before transferring the drawing onto the base, it is necessary to level it. How to do this correctly? To do this, take sandpaper and sand the base.
We place carbon paper on the prepared base, and on top of it a sheet with a design. To prevent the paper and sheet from moving, we suggest securing them to the plywood. We translate the drawing.
Check to see if all the lines are printed. Here's the drawing that came out:
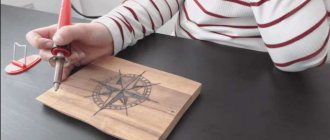
We plug the burning device into the outlet and wait for it to heat up. Then we carefully begin to burn the design along the contour.
After the outline is burned out, you need to fill in the background. We do this with strokes that are parallel to each other.