A hand plane is a planing tool that is used in construction, workshops and everyday life. It consists of a body with a handle, and a blade is fixed in its sole. As the tool passes over the workpiece, the top layer of material is removed. By changing the position of the knife, you can adjust the depth and angle of planing.
Planer (from German Raubank) is a hand-held woodworking tool for planing. Planers are used to give the surfaces of wooden parts the desired roughness, straightness, flatness, shape, reduce the size of parts, as well as to create extended recesses of various shapes in parts (“quarters”, “tongues”, etc.).
With each passage along the surface, the plane cuts off a layer of material to a thickness determined by the amount of extension (“overhang”) of the cutter.
The history of the plane
The name of the plane has nothing to do with the word “chopping”; this is a typical example of folk etymology.
The plane is a fairly ancient human invention (planes found in Pompeii and dating back to the 1st century are known), although it began to be widely used only in the 15th-16th centuries. The first planes had a wooden block, and the blade was fixed with a wooden wedge.
Currently, electric planes are used in industry, since manual planes are not able to provide the necessary productivity. Despite the name, according to the principle of operation, electric planes (essentially, these are milling cutters) have nothing in common with hand planes: in a hand plane, the blade cuts and bends long ribbon shavings, and in an electric one, a rotating drum with knives cuts out short crescent-shaped shavings, which is why the surface after processing with an electric planer it has noticeable waviness.
Sanding parts
Grinding of the finished part is carried out with sanding paper, which is wrapped around the part and held by hand (Fig. 31, a), or with a sanding block (Fig. 31, 6).
Rice. 31. Sanding the part: a - with sandpaper: b - with a sanding block
Sometimes decorative ring strips are applied to the surface of the sanded part. To do this, take a block of wood that is harder than the wood of the workpiece, and apply the edge of the block to the part rotating on the machine. The surface at the point of contact heats up and burns a little. As a result, circular brown stripes remain on the part.
Design and principle of operation of the plane
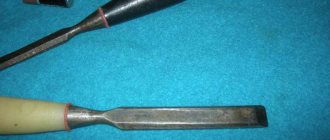
Typically, a plane consists of a sharpened metal blade (“cutter”, “piece of iron”) located at an angle to the surface being processed. The cutter is extended from the tool body (“block”) through the “taphole” (or “mouth”) to the cutting depth desired by the carpenter (depending on the desired cleanliness and processing speed).
A: Taphole - a slot through which the cutter protrudes and the chips exit; B: Cutter (knife, professional - piece of iron) - a sharpened steel plate that cuts material; C: Wedge (clamp) - presses the cutter to the plane body; D: Cutting depth regulator; E: Horn - front handle; F: Chipbreaker, wrapping and breaking off chips; G: Regulator for cutting uniformity across the width of the plane; H: Stop - rear handle; I: Index finger rest; J: Frog - a plate that allows you to adjust the angle of the cutter. Adjustment is made with a screwdriver with the cutter removed.
When the plane moves forward, the piece of iron cuts into the surface of the tree and tends to break off the layer, which is prevented by the pressure created by the front edge of the notch. This way the chips are bent upward, broken and cut cleanly at the base rather than chipped. The steeper the chips are bent, the cleaner the planed surface, therefore in the so-called. “double planers” apply a chipbreaker to the piece of iron (false piece of iron, humpback). By moving the chipbreaker towards the cutting edge, the steepness of the break and the cleanliness of the processing are increased. Also, the purity of processing increases with the narrowing of the tap hole.
The cleanliness of planing and labor costs depend on the angle of installation of the cutter in relation to the sole; in general, the steeper this angle, the cleaner the surface will be, because a plane with a steeply set knife does not chip, but scrapes. Tools for rough planing (sherkhebels, bears) have an installation angle of 45°, single planes - 48°, double planes - 52°, and tsinubels and sizing tools have an even larger angle.
Double planes with a narrow tap hole and chip breaker do not allow large cutter overhangs and cannot remove thick chips that would get stuck in the tap hole, thus, all measures that increase the cleanliness of processing simultaneously reduce its productivity and increase labor intensity. As a result, when processing, sequentially coarse planes (sherhebels) are used, with which the largest irregularities after an ax or saw are removed, large allowances are removed, then single ones, then, for final processing, double ones and occasionally sizing agents.
Design and principle of operation of the tool
The cutting angle of the tzinubel is close to perpendicular. The operating features of this tool allow it to be used even for working with particularly hard rocks. Curliness will not pose any serious problem. The only zinubel knife that works even with mahogany and ebony has a unique cutting edge. In the area opposite the chamfer, it is covered with a small notch. As a result, the cutting edge appears to be jagged. The tooth pitch can vary greatly:
- small - 0.75;
- middle tzinubel - 1;
- large tool - 1.25.
This device is usually classified as a flat planer. Experts note that the cutting angle for most production models is 80 degrees. When the teeth move along the surface, they remove very narrow (0.8 to 1 mm) chips. Such processing, which leads to the appearance of a corrugated surface, is more reminiscent of scratching the material rather than planing.
To bring the wooden workpiece to perfection, after passing through the zinubel, it is additionally cleaned using a scraper. If you replace the special knife in the tool with a standard one, it will be able to replace the grinder. The block of the tzinubel is shortened and narrowed.
It is believed that the use of tsinubel is as gentle as possible. The combination of a ribbed surface with raised pile increases traction characteristics. Therefore, gluing becomes significantly more effective. To use it in grinder mode, you need to change the knife on the zinubel. Instead of the standard tool for this, a double blade with a chipbreaker on the edge is installed.
The blade is positioned at an angle of 50 degrees to the sole. In this case you can:
- cut down bullies;
- remove irregularities;
- smooth the ends;
- achieve perfect alignment of straight sections.
In the next video you can learn more about this type of tool.
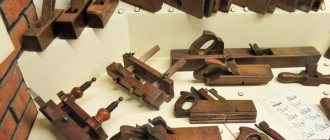
Purpose and types of planes
Terminology in carpentry is unstable, since the original German names of tools in different areas were transferred to the Russian language in different ways.
Depending on the type of planing (flat, profile), the size of the blocks, the profile and angle of installation of the knife, the following planes are distinguished:
Planes for flat planing
Medvedka (elongated with two handles and a wide piece of iron, up to 60 mm), single and double (with chip breaker) plane - for rough planing, a carpenter's tool rather than a joiner's. There are two people working with a bear;
End plane - has an obliquely set knife for cleaner planing, designed for planing the ends of wood;
Joiner and semi-jointer - a single or double plane with a long block (500-750 mm or more) and a wide piece of iron (60 mm or more) for planing large planes for a ruler and fitting (jointing) long parts. Due to the length of the block and the width of the piece of iron, it ensures high straightness and flatness of surfaces;
Tsinubel - with a serrated blade for making small tracks on the surfaces of gluing parts made of hard wood;
Scherhebel - a plane for rough planing with a cutter angle of 45°, sharpening of the cutting edge 32°, with a flat sole of a narrow (30 mm) block and a rounded blade;
The screw is narrower in appearance than sherhebel and is used for initial processing of wood surfaces. The iron cutter of a screw plane is not straight, but rounded, so that when planing, long, flat grooves are obtained.
Sander (lychnik, shlikhtik) - for especially clean planing after a double plane, usually has a double knife (with a chip breaker), set at a large angle (50° instead of the usual 45°);
Planers for figure planing
A fillet is a figured plane for planing various kinds of cornices, baguettes and the like. This type of planes is made in very diverse shapes, and each type of piece of iron must have its own block shape;
Gorbach, American (with curved block) - for processing curved surfaces (convex, concave). Humpbackers make both wooden planes of constant curvature and use American-designed planes with a sole made of a flexible steel plate, the radius of curvature of which is adjustable;
Primer - used for cutting out a groove of a trapezoidal cross-section across the fibers after the groove has been sawed along the sides (edges) with a reward. The primer consists of a block and a cutter inserted on the side in the form of a pointed hook. The cutter is secured in the block with a wedge or a thumbscrew. Wood from a sawn groove is often selected with a chisel or chisel, and only the bottom of the groove is cleaned with a primer;
The additional planer has three fully working planes (left, bottom, right) and a minimum distance between the front part of the plane and the knife itself;
Kalevka - for processing figured edges;
Selector, zenzubel - a plane with a narrow (10-30 mm) block and a special shape of the tap hole (holes for the exit of chips). It has a knife in the shape of a rectangular blade with three cutting edges - the main one and two side ones. The cutting edge can be placed either directly or obliquely to the axis of the block. Designed for processing grooves and folds (quarters) of arbitrary sizes;
Rebate (foldsebel, folded gobel) - has a stepped block, designed for processing folds (quarters) to a given size, that is, rectangular recesses in the edges (for example, recesses for glass in window frames);
Tongue and pile (tongue and pile) - a plane designed for cutting narrow grooves, “tongues” with a width of 2 to 10 mm parallel to the edge of the part. As a rule, it has an adjustable stop on two guides, allowing you to maintain the distance from the edge to the edge of the groove. It has a persistent protrusion under the knife, which allows you to select a thin tongue to a greater depth (the knife does not bend or tremble). Usually the kit includes several knives of different widths;
Shtabgobel (also found staff, shtap) - to give the parts a convex rounded shape, the edge of the knife and the sole of the shtabgobel block have a concave shape.
In addition, planes can also be classified according to the purpose of the material being processed, by design and by material of manufacture:
According to the purpose of the processed material
Wood Planer - The blade of a plane has a sharp edge that cuts the wood, resulting in shavings.
Planer for drywall - the working part has many cutting segments and resembles a fine grater. This plane not only cuts, but also grinds the edge; read more about planes for drywall here.
According to the case material
Wooden planes - these hand planes are lightweight and easy to use, they are suitable for occasional work in the workshop or at home.
Metal planes have a more durable body and reliable fastening of the cutting knife, so they are great for daily work. They have a long service life. In addition, these hand planes make it much more convenient to adjust the position of the blade than wooden ones.
Plastic Planers – Suitable for edging, softwood, drywall and finishing.
As you can see, woodworking is not just a craft, but an entire art. Practice and the right tool help you hone your skills. If you are planning to learn carpentry and want to buy a plane, do not be scared by unfamiliar and difficult to pronounce words: sherhebel, tzinubel, zenzubel. The tools are named so for a reason and serve their purpose. We have already briefly talked about the features and purpose of each, and then we will tell you in detail, but first you need to understand the features of planing with a plane.
Popular manufacturers
Among the manufacturers of professional metal shears, it is necessary to highlight the following companies:
1. GROSS - scissors are made of high-quality steel, so all products, regardless of cost (620-1500 rubles), are suitable for professional use. Thanks to the large assortment, you can easily choose a high-quality tool for right-handed or left-handed cutting of metal.
“PIRANHA”, 250mm, straight cut, steel-CrMo
Without exception, all models of this company use a reliable spring, which allows you to quickly and easily return the blade handles to their original position.
2. Kraftool (kraftul) - allow for high-quality cutting of steel up to 0.8 mm thick. The tool jaws are made of forged steel, which perfectly withstands constant loads. Thanks to such design improvements, metal cutting is carried out without burrs, which can significantly reduce time costs.
A distinctive feature of the tools of this company is the use of a two-component handle, which has special protrusions for the fingers. This design allows you to fully control the process of cutting metal sheets, eliminating the possibility of the handle slipping and causing injury. The average cost is 780 rubles.
3. STAYER - inexpensive (from 260 to 500 rubles), but high-quality professional scissors. With this tool you can easily cut sheets up to 1 mm thick. Almost all models of this company have a lever mechanism, thanks to which the cutting force is significantly increased.
Plastic handles and serrations on the cutting edges allow for stable and long-lasting operation. Using STAYER scissors, you can process both regular steel sheets and stainless steel, as well as non-ferrous alloys.
4. Bison is a tool from a domestic manufacturer, characterized by good quality cutting surfaces due to hardening with high frequency currents. Cost 750 rub.
The scissors can cut flat metal plates up to 0.8 mm thick. It is not difficult to find on sale both straight products and those designed for curved cutting.
Thanks to the high-quality materials used in their manufacture, “Zubr” will last for many years without breakdowns or additional adjustments.
5. SPARTA - excellent quality lever model at an affordable price (215 rubles). The cutting surface is made of hardened steel, so Sparta scissors can easily withstand loads and allow you to work with metal up to 0.8 thick.
The comfortable handle will not allow the hand to slip during operation, and when cutting is completed, the tool is easily fixed in a compressed position.
6. NVS - professional scissors that are great for curly cuts. Cost from 1200 to 2000 rubles.
The blade is equipped with micro-teeth that prevent metal from slipping when cutting. Thanks to the high-quality steel used in the manufacture of the cutting surface, it is possible to obtain a perfectly even cut.
With NVS scissors you can cut high-quality steel up to 1 mm thick. Non-ferrous alloys can be processed up to 1.4 mm thick.
7. BESSEY - the model allows you to work with sheet material up to 1.5 mm thick. Increased productivity of the product is achieved due to the lever transmission, which significantly increases the closing force of the jaws.
Scissors are great for making curved cuts and cutting metal in a straight line. The cutting edges of the tool are made of hardened steel, which easily withstands high loads when working with metals of increased hardness. They ask for German quality - 2500 rubles.
Conclusion
Video:
Both on the Internet and in a regular store, you should pay attention to the purchase price and not purchase too cheap products. Despite the fact that products from well-known brands are much more expensive, you should give preference to time-tested manufacturers in order to maximally insure yourself against purchasing low-quality hand tools
Features of planing with a plane
Planing of a wooden workpiece is usually carried out along the grain or towards the grain of the wood.
Planing wood along the grain produces thin chips and a smooth surface. When planing against the fibers (“in a rush”), the cutting edge cuts deep into the wood and breaks off thick chips; the surface usually turns out uneven with burrs. Planing against the grain is beneficial when roughing a workpiece, since it requires less effort to plan the same thickness from the workpiece. Finishing must be done along the fibers. The direction of the fibers can be determined by examining the side surface of the workpiece.
In some types of wood with a complex structure and complex structure, the fibers on the surface of the workpiece change orientation over small distances and therefore planing towards the grain is inevitable. At the same time, to obtain a smooth surface, it is necessary to use a very sharp piece of iron, well adjusted to prevent distortion, and released to a shallow depth.
Planing across the grain, for example, of the ends of a workpiece, is sometimes called “transverse” planing. For such planing, it is effective to use planes with a large inclination of the cutting plane of the piece of iron to the cutting plane, usually about 12°-15° from the perpendicular to the processing plane.
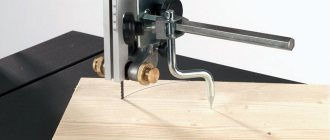
How to install on the machine
To obtain the proper quality and precision of processing, correct installation of the cutter is necessary. Also, installation errors contribute to rapid wear of the cutting edge.
The tool is installed in the tool holder strictly in the center. To adjust it in height, the turner must have metal plates with a thickness of 1 to 4-5 mm in his arsenal. Setting below center causes the part to be pushed out, which is dangerous for both the tool and the worker. If the cutting edge is too high, it overheats and wears out quickly.
When installing a cutting tool, you need to follow simple rules:
- Wipe the supporting surface of the tool holder.
- Secure the tool with at least two bolts.
- The overhang of the head should not exceed 1.5 times the height of the holder.
- When roughing, it is allowed to overestimate the cutting edge by 0.3-1 mm.
After installing the tool, you need to remove test chips. If the surface is flat and smooth, the chips do not wrap around the cutter, you can start working.
Important! Do not use more than three gaskets. Also, they should not protrude beyond the tool holder.
How and by what parameters do you choose a plane?
The average knife size ranges from 12 to 60 mm (some models have more). The wider the working part, the larger the surface of the workpiece can be processed in one pass, but the complexity of working with a plane with a wide blade sometimes increases depending on the type of wood being processed. For more accurate planing the first time, hand planes can have two blades.
Selection according to the material of the working part of the plane.
The most reliable tools are those whose knives are made of high-carbon or chrome-vanadium steel.
Selection by type of required work.
That is, depending on what you need, a plane for flat planing or for figured.
Sharpening a hand plane knife
The working edge of a knife is an edge that has a small radius of curvature. Before you start sharpening, you need to visually check the integrity of the edge: there should be no metal tears on it. If such defects are present, the knife will have to be shortened.
To minimize the radius of curvature on the edge, sharpening should be carried out in two stages. First, primary sharpening is carried out. To do this, the dull knife from the chamfer side must be brought to the periphery of the grinding wheel and pressed firmly. The number of revolutions of the sharpener should be at the level of 600 - 700 min-1. Otherwise, too much metal will be removed.
It is also important not to press too hard because the steel can develop blue-violet hues, which is an unpleasant sign of the metal being tempered. The hardness of the knife will decrease, and there will be a need for heat treatment to restore the strength characteristics of the material
If you don't have a sharpener, you can do this. Sharpen the knife with a coarse-grained whetstone, which must be secured to the workbench. Sharpening is performed by circular movements of the chamfer along the surface of the block. During this work, it is worth moistening the knife with water or soapy water from time to time to clean the surface being sharpened and cool the tool.
When you see burrs, you can begin the second stage of sharpening using a finer-grained stone that removes those same burrs. The gradation of bars by grain size looks like this:
- high grain size from 30 to 180 microns. Such bars are made from silicon carbide or corundum
- average grain size from 7 to 20 microns. Such bars are created from electrocorundum or chromium dioxide
- fine grain size from 3 to 5 microns. This material is used for final sharpening of knives.
At the end of sharpening, you need to run the knife blade along a piece of hard wood. He will finally remove the fragments of the burr.
Let's look at the main types of planes that can be bought currently:
Single plane
Designed to level the surface after primary treatment.
Features of a single plane. It has a straight blade with a slight rounded edge. Therefore, it is used for planing wood after rough processing with Sherhebel. When passing through the workpiece, the knife does not leave burrs or other defects.
Double planer
Designed for final leveling of surfaces and ends of workpieces.
Features of a double plane. In addition to the main blade, the plane has a chipbreaker. Its lower edge is located at a distance of 0.2 - 2 mm from the main cutting edge and is installed parallel to it. The smaller the distance between the edges, the cleaner the planing will be.
Sherhebel
Designed for rough primary processing, planing to great depths to remove a thick layer of wood.
Features of Sherhebel. The working part has a rounded metal blade, fixed at an angle of 45° relative to the sole of the tool and extending beyond its plane by about 3 mm. Typically the blade width is 35mm. The oval cutting edge allows processing across the fibers, eliminating their longitudinal tearing. When planing with a sherhebel, thick chips are removed, which is why the hole for the chips is 3–5 mm larger than in a conventional plane. Using a tool, the workpiece can be given the desired shape, but it will not be possible to achieve a smooth surface. Deep hollows remain at the processing site, requiring subsequent leveling with a planer and jointer.
Sander
Designed for particularly clean planing and surface finishing.
Features of the sander. There is a double knife with a chipbreaker on the edge, which is set at an angle of 50° relative to the sole of the plane. Due to this, it is possible to plan out burrs and irregularities, smooth out the ends and obtain a perfectly flat surface.
Jointer
Designed for leveling planes and edges.
Features of the jointer. The knife has a chipbreaker, which provides the most effective finishing of wood. The block is 2 times longer than that of a conventional plane. This allows you to process large surfaces. During the first movements, the chips are removed in pieces, then continuous chips are formed - this indicates the leveling of the workpiece.
Zinubel
Designed to give wood a corrugated surface for improved adhesion of workpieces when gluing. Finds application in working with plywood and hardwood.
Features of tzinubel. The tzinubel has a single knife with a cutting edge that has a fine notch and teeth. When the plane passes through the workpiece, the teeth remove a narrow path 0.8 - 1 mm wide. The surface becomes rough, which guarantees reliable adhesion of the parts by the adhesive composition. Shape planing tools
Zenzubel
Designed for selecting and stripping quarters, making rectangular cuts, folds, grooves, and sharpening perpendicular surfaces of wooden workpieces.
Features of the zenzubel. The blade of the zenzubel is a spatula, and the width of the cutting edge ranges from 18 to 30 mm. It can be straight or oblique, depending on how the knife is secured relative to the sole of the tool. The blade length is usually 210 – 220 mm. If it is oblique, then it has two cutting edges - the bottom and the side. There are models with a narrow working part, no more than 12 mm. This is an oblique plane, in which the knife is sharpened along two edges converging into an acute angle. It is suitable for making dovetail grooves and planes very cleanly – you can even cut across the grain. When using ordinary chisels, to remove a quarter, first a mark is made along the workpiece, and then a plane is drawn along the line to remove the first layer of wood - a small ledge is obtained. After this, they pass the tool several more times. By the way, it is recommended to select a quarter first with a rebate, since the accuracy of the work is higher and preliminary marking with a thicknesser is not required - the rebate is used only for finishing.
Kantenhobel
Designed for chamfering, processing edges for the purpose of alignment and finishing of dimensions. It is used not only with wood materials, but also with plastic and plasterboard.
Features of Kantenhobel. The Kantenhobel blade has a trapezoidal shape. Some models may have two blades that are angled relative to the side of the sole. Depending on the installation of the knife, a cut along the edge is obtained at an angle, for example, 22.5° or 45°. Thus, it is possible to achieve the required edge angle for joining the workpieces along the entire length, which eliminates gaps and irregularities. This tool is also called an edge plane.
tongue and groove
Designed for making longitudinal grooves along the edges of wooden workpieces.
Features of tongue and groove. The tongue and groove body consists of two blocks, which are connected with screws. One of them is a guide, the other holds the blade. As a rule, the design provides an adjustable stop to set the desired distance from the edge of the workpiece to the edge of the groove. There is a persistent protrusion in front of the blade, which allows for deep cutting without bending the knife. Depending on the width of the blade, a groove is obtained from 2 to 10 mm. When the cutter passes along the edge of the workpiece, a rectangular recess is made, which is called a groove or tongue. The recess is prepared for joining the workpiece with another, which has an appropriately sized protrusion along the edge, made with a federgubel.
Federgubel
Designed to make a longitudinal protrusion along the edge of the workpiece.
Features of federgubel. This type of plane differs from others in the special shape of the blade: it does not have a flat edge, but an opening in the center that forms a ledge. When the federgubel moves along the edge, a rectangular protrusion is formed - a ridge, which subsequently joins the groove (tongue) of the second workpiece processed with the tongue and groove.
Mold
Designed for figure processing, giving a special shape to the profile of the workpiece. Often used in the manufacture of baguettes, wooden cornices, and doors.
Features of molding. This plane has a special cutter with a figured edge. Its sole is multi-stage, you can install different knives depending on what profile you need to get. Passing along the front side of the workpiece, the working part leaves a groove (shaped profile) - hence the name.
Falzgebel
Designed for making a fold (groove) along the edge of long parts without preliminary marking.
Features of folding. The tool has a stepped sole and a wide last. Due to this, it is possible to make grooves of the same size without preliminary marking. To select rebates of different sizes and profiles, some rebates provide for the replacement of a stepped sole. It is possible to install an additional side blade for trimming the vertical wall of the quarter.
Shtap
Designed for rounding edges of parts.
Features of the staple. This plane has a special blade shape: its edge has a semicircular recess. Accordingly, the sole of the instrument is concave. When passing along the edge of a rectangular profile, the working part removes chips in such a way that the edge acquires a semicircular profile.
To summarize, we can say that, as you can see, one plane is not enough in carpentry. When processing workpieces, you have to perform a number of operations. Some tools work in pairs, for example, tongue and groove, others are used sequentially: for roughing - sherhebel, for finishing - jointer.
Now you know what woodworking operations each type of plane is intended for.
Types of planes for figure cutting
| Name | Description |
| Federgubel | Equipped with a blade of a special design. It is used in cases where it is necessary to make a longitudinal protrusion in the workpiece. |
| Staffgobel | Equipped with a knife with a rounded tip. It is used when finishing concave wooden products or parts. |
| Zenzubel | It is equipped with a double-type blade, which in its shape resembles a spatula. It is used for planing perpendicular surfaces, as well as cleaning so-called quarters. The knife width of this tool can reach 33 mm. |
| Falsebel | Equipped with a sole with a ribbed surface. In addition, this device provides for the use of oblique as well as straight cutters. It is the best option for processing quarters. Due to the fact that the sole of this tool has a stepped design, it is easy to select folds of a suitable profile and size for it. |
| tongue and groove | The design of this tool involves the use of 2 blocks connected to each other using clamping screws. This device is used to make longitudinal grooves along the edge of a product. |
| Gruntubel | It is a block, in the side of which there is a trapezoidal cutter. Used for turning grooves in products in the longitudinal direction. Equipped with two handles and a special adjustment mechanism. |
| Mold | Used when creating figured cuts. Often used when decorating cornices and creating frames for doorways. |
| Gorbach | Equipped with a special curved block. Allows you to process products that have a round shape. It is worth noting that this tool is used for external and internal diameters of wooden parts or workpieces. |
How to sharpen a plane?
In the process of using a plane, its knife naturally becomes dull over time and requires sharpening (editing), so we will figure out how to properly sharpen a plane.
By the way, it should be immediately noted that knives made of tool steel must be sharpened, but knives made, for example, from tungsten carbide (on electric planers) must be replaced and cannot be sharpened again.
In order to sharpen a plane knife you will need the following tools:
- emery with grinding wheels;
- fine-grained block;
- a grinding stone or leather belt with polishing paste.
In case of severe damage, it is most reliable to rely on a large circle. During processing, the cutter bends a little, and such a circle will prevent this. However, chamfer alignment cannot be avoided even in this case.
Sandpaper with two wheels works well - one fine-grained and the other coarse-grained. They allow you to perform the most precise editing of knives.
Incorrectly sharpened knives will not ensure proper quality planing of the material being processed.
For high-quality sharpening of the material, it is critical to maintain the correct angle of application of the blade. In many cases it varies from 25 to 45 degrees, but as a rule it is 30 degrees, however, for each knife the figure is individual and depends on the hardness of the steel. The angle should be compared with a template, which you can make yourself or follow the angle originally available on your plane.
It is not recommended to put too much pressure on the blade, otherwise the emery wheel will wear away the metal in thick layers - this can ultimately lead to the unusability of the material. The steel heats up from friction against the surface of the circle, so it is advisable to periodically immerse it in cold water. This way you avoid possible distortion of the knife blade during heating.
After processing with a grinding wheel, the blade must be adjusted using a fine-grained stone. At the end of the procedure, the material is polished in a grinding stone, or, in its absence, in a leather belt with polishing paste.
The entire operation described is very labor-intensive and time-consuming. However, you need to sharpen your knives in a timely manner - best at the first hint of a decrease in the quality of the plane. If you ignore this point, the knives may eventually become unsuitable for further use and will have to be replaced.
If you don't have sandpaper, you can put together a simple handheld tool for sharpening your plane. To do this you will need:
- bar;
- abrasive.
Secure the knife to the top of the block and place the blade on the surface of the abrasive. The angle of inclination of the knife will be geometrically determined by the height of the block. Move the block without putting too much pressure on the abrasive, and to make it easier to move, place it on the glass.
If you do not have experience sharpening a plane with your own hands, then of course it is better to turn to a specialist, but then you will never learn how to sharpen a plane yourself.
Checking the plane blade adjustment
After sharpening the device, it is necessary to adjust it correctly. To do this, after installing the cutter, you need to inspect the plane and evaluate the distance by which the blade extends beyond the surface.
The optimal case is when the element protrudes by 0.5 mm, and for rougher processing - by 1 mm.
Too much clearance will result in large chips and you will not be able to achieve the desired result. On the contrary, if the protrusion is insignificant, then there will be very few chips and processing of the wood will take a lot of time.
Compared to other carpentry tools, for example, a shekhrebel, which is used for primary hewing, a plane is designed for finer processing of wood, and therefore the shavings when working with it should be of small thickness.
How to install the blade
Initially, it is necessary to focus on the fact that the knives of carpentry tools are used, as a rule, under maximum loads.
In this case, we are talking about the maximum shear stress. One of the key points in this case will be the characteristics of the material being processed.
If you do not take this parameter into account, then the stability of the Scherhebel knife during operation is directly determined by the size of the passage. This refers to the maximum length of the breaking off parts of the removed chips
With a decrease in this span and a parallel decrease in the planing depth, the surface of the workpiece is gradually leveled. At the same time, there is a significant weakening of the shear load on the metal from which the blade is made.
To understand how to properly set up a Scherhebel knife, you should pay attention to some important points. First of all, we are talking about the design features of this element
It includes support and working parts. The configuration of the latter includes the following:
- a chamfer formed on the back side and providing a reduction in the force of cutting the blade into the wood being processed; this is due to the fact that friction of this very rear plane on the surface being processed is eliminated;
- rake angle - a parameter, as a rule, identical to the inclination of the cutting element to the Scherhebel body;
- rear corner;
- working angle - in this case we are talking about the difference between the angles of inclination and chamfer.
When choosing the optimal value of this angle, you need to pay special attention to several points:
Physical characteristics and individual characteristics of the processed wood. In particular, we are talking about the fact that as the hardness of the material increases, the angle increases. If work is carried out with larch, pine, aspen or linden, then it is recommended to position the blade at an angle of 45 degrees (±5). When processing harder species (oak, hornbeam, pear and others), this parameter is 60 degrees (±5). If the density of the material is even greater, then the angle is increased to 80 degrees.
Type of planing. As a rule, for each type of wood there is an optimal angle of inclination of the blade and the tool itself in relation to the plane of the workpiece. So, for pine it will be 40–45 degrees. The change in this indicator determines the quality of planing
However, it is important to take into account that in this case the metal will heat up more intensely and, therefore, dull much faster.
The material from which the knife itself is made and its main characteristics First of all, attention is focused on the hardness of the steel. Most often, in the production of blades, high-speed cutting grades P12 and P18 are used. By the way, some craftsmen, when making knives on their own, quite successfully use elements of friction saw discs as blanks.
At the preparatory stage, before each use of the tool, it is configured taking into account existing norms and rules. To do this you will need to do the following:
- place the tool so that its sole is directed upward;
- visually determine how much the edge of the blade protrudes - in a situation with a sherhebel, this value should be 3 millimeters; You can use a ruler to measure the height of the knife;
- make sure that there are no even minor distortions; the blade should be positioned strictly parallel to the sole.
To properly secure the knife in the tool body, it will need to be disassembled. In situations with wooden models that have a locking wedge, the algorithm of actions includes the following points:
- the plow is placed in the left hand, holding it by the block;
- with the other hand, using a hammer or mallet, apply gentle blows to the back of the tool until the wedge is completely released;
- the blade is set in the appropriate position and wedged;
- using a hammer, the wedge is driven in completely; as a result of such manipulations, the part is held motionless;
- The correct installation of the cutting element is checked.
In situations with metal models, the entire procedure described is as simple as possible. As noted above, the blade of such cherhebels is fixed using a screw mechanism. By the way, this unit also serves as a chip breaker or chip breaker. This unit prevents chipping of the layers of wood removed during planing.