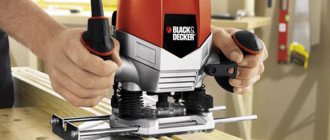
Sharpening a knife correctly by hand is quite difficult. It will take some time to develop the habit of maintaining a constant sharpening angle, which is not at all easy. A knife sharpening device can make the task easier. There are factory options. But for good copies you have to pay a couple of hundred dollars, and this is clearly a lot. The good news is that these devices are easy to make yourself. Moreover, many homemade knife sharpeners are no worse in functionality than those from famous manufacturers, but they are many times cheaper.
A simple device for sharpening knives
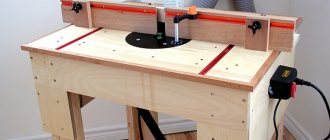
The simplest device for sharpening knives is based on the use of an angular frame and a whetstone. The price of such a primitive factory-made device is quite high, as is the price of replaceable whetstones, but making such a device for sharpening knives at home will not be difficult for a craftsman. You will need the following equipment:
- Wooden blocks of the same size - 4 pcs.
- Drill (or any other drilling tool).
- Bolts and nuts (about 4 pieces each).
- Touchstone.
- Protractor.
First you need to make a pair of wooden corners, placing the bars to each other strictly at an angle of 90º (Fig. 1). Close the resulting wooden corners together parallel to each other as a single whole and drill holes through the diameter of the bolts. Insert bolts into the holes and tighten the corners slightly with nuts.
The simplest device for sharpening knives
The point of this invention is that it is possible to sharpen simply by holding the knife vertically in relation to the sharpening surface located at a given angle.
The most important thing is to properly secure the whetstone between the wooden corners of the device. To do this, using a protractor, you need to set the desired angle of inclination of the touchstone and tighten the bolts tightly to clearly fix the position of the touchstone.
With some modification of the device, you can also fix the position of the knife relative to the sharpening stone. A significant disadvantage of such a machine for manual sharpening is the inability to smoothly adjust the angle of inclination of the sharpening stone.
What could cause such a significant difference?
The fact is that the sharpening angle depends on what materials the blade is supposed to cut. The smaller the angle, the softer the materials should be and vice versa.
The fact is that a blade with a small sharpening angle will not only be easier to cut, but will also become dull more easily. That is why there is not and cannot be a single universal sharpening angle.
Note!
Do-it-yourself compressor: selection of materials and tools for assembly at home + step-by-step instructions for making and assembling yourselfHomemade products for the garage with your own hands: options for products for arranging a garage, detailed diagrams and drawings for creating with your own hands
Do-it-yourself press - design features, choice of manufacturing materials. Step-by-step instructions for making it yourself + simple diagrams and drawings
After reading this article, you will not only learn how to properly sharpen a knife so that it can serve you for a long time until the next sharpening, but also answer your question about how to make such sharpening easier.
To facilitate the correct sharpening of knives, a lot of different tools have been invented, from the simplest devices to the most exotic ones, at a quick glance at which it is not only unclear how to work with them, but it is also difficult to figure out what it is in general.
Device for sharpening from mounting angles
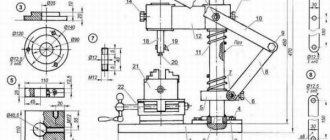
The diagram and drawings of a homemade knife sharpener made from mounting angles, based on a Lansky device, are clearly shown below.
Diagram of a homemade sharpener made from mounting corners
To assemble this device you will need:
- Metal corners 90*90 mm with a wall thickness of 6 mm.
- Stud with M6 thread and length 160 mm.
- Thin rod (electrode, knitting needle, etc.).
- Touchstone.
- 2 rectangular pieces of metal (sponges for clamping the whetstone).
- Pliers.
- Hacksaw for metal.
- File (or any other tool for processing sharp corners).
- Set of hardware (nuts and bolts).
Drawing of clamping jaws of a Lansky type device
Drawing of clamping jaws of a Lansky type device
Holes should be made in the metal corners and threads cut into them according to the drawings. Then grind off the bevels on the jaws that secure the knife blade in order to prevent interference with the movement of the whetstone. All sharp corners and edges of the future sharpening device must be processed with a file.
Diagram of a finished sharpening device made from mounting angles
In both metal jaws intended for fixing the keystone, you need to drill holes and cut a thread for the connecting bolt. Fix the touchstone. A thin smooth knitting needle, previously bent at an angle of 90º, must be inserted and secured in the hole of one of the jaws. In the future, using this knitting needle-shaped clamp, a certain angle of inclination of the touchstone will be set. Such a device for sharpening knives is characterized by a wide range of sharpening angles, which will undoubtedly be of interest to most craftsmen.
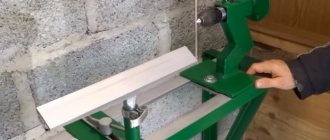
Locking blade machines
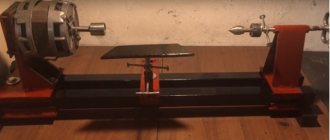
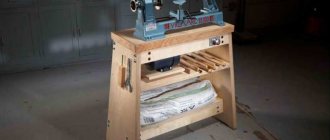
Knife sharpening machines with locking blades will attract the attention of those people who want to sharpen a knife not only efficiently, but also quickly. The design, which rigidly fixes the knife blade relative to the sharpening stone moving at a set angle, allows you to accurately set the angle of inclination.
To create such a homemade machine with your own hands you will need:
- The base is a rectangular wooden plate with dimensions 440*92 mm and a thickness of 18 mm.
- Wooden die 92*45*45 mm (for fixing the vertical threaded rod).
- A wooden block 245*92 mm and 18 mm thick (the plate to which the knife will be attached).
- Iron plate 200*65 mm and metal thickness 4 mm.
- Piano hinge, 92 mm long.
- M8 hairpin 325 mm long.
- Nuts and bolts with M8 thread.
- Drill 6.5 mm.
- M8 tap.
- Self-tapping screws 50 mm, 4 pcs.
The die intended for fixing the vertical threaded rod must be drilled through with a 6.5 mm drill. The hole should be located at a distance of 15 mm from the edge of the die, approximately in the center.
Layout of the hole in a wooden die
Next, in the resulting hole you need to cut a thread for an M8 stud. The wooden block prepared in this way must be screwed to the base at a distance of 265 mm from the edge using ordinary self-tapping screws 50 mm long, screwed into the back of the base.
Determining the location of the bar attachment
Screw location diagram
After the block and the base are securely fastened, you need to insert an M8 pin into the hole in the block. The pin should run across the entire cross-section of the beam and the base; thus the risk of changing its position is minimized. The pin at the base of the block must be firmly fixed with an M8 nut, slightly recessed when twisting it into the wood of the block.
The second part of the work involves assembling a clamping device to fix the position of the knife. To do this, a piano loop is attached to a block of wood 245*92 mm with three self-tapping screws from the end of the wooden plate, with the help of which it will be attached to the base of the device.
Attaching the fixing bar to the base using a piano loop
After securing the wooden part of the holding device, you can begin to attach the iron plate. In the center of the 200*65 mm plate, you need to drill an oblong groove, 90 mm long and about 1 cm wide. The groove should be located from the edge of the clamping plate at a distance of 60 mm. Additionally, you need to drill a hole at a distance of 20 mm from the opposite edge and cut a thread in it for an M8 bolt. Then you need to attach the clamping plate to the previously prepared wooden base using this bolt. Using another bolt and a suitable washer, you need to fix the clamping plate in the center of the cut groove. The fixation should be clear, but at the same time neat, so as not to damage the surface of the blade.
Attaching the Iron Clamp Plate
The most difficult part of assembling this device is preparing the control device that will set the sharpening angle of the knife. For this you will need:
- metal square profile 40×40 mm;
- furniture bracket, 40 mm wide;
- a pair of rivets;
- a piece of plywood 42×25 and 18 mm thick;
- bolt and nut M5;
- a pair of M8 wing nuts;
- whetstone;
- steel bar with a diameter of 0.8 cm and a length of 40 cm.
It is necessary to drill a couple of holes on a piece of plywood: a through hole with a diameter of 8 mm along a cross-section of 42×18 mm (the distance from the edge on the 42 mm side should be set at 15 mm) and a through hole with a diameter of 5 mm along the side with a cross-section of 42×25 mm (the distance from edges 10 mm). The square pipe should be cut in half so that you get a “U”-shaped bracket with a width of 40 * 15 mm and ears of 20 mm. You need to drill 8 mm holes in the ears, into which an M8 pin will later be inserted. Connect the resulting bracket to a furniture hinge using rivets. Using the second part of the furniture bracket, attach a block of plywood to the resulting structure with an M5 bolt.
Location on the spoke of the guide mechanism
Connect the touchstone to a guide rod, which is a steel rod with a cross-section of 8 mm. When connecting the keystone and the guide rod, you should strictly ensure that their center lines coincide. If desired, for ease of use of the sharpener, a handle-holder can be attached to the whetstone on the reverse side. All that remains is to secure the whetstone in the guide mechanism, secure it with a thumb and the homemade device for sharpening knives is ready.
Sharpener assembly
Possibility of adjusting the position of the knife
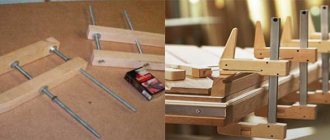
An alternative to a machine with a moving sharpening stone is a device where it is possible to adjust the position of the knife relative to the whetstone. Basically, its design is similar to the machine with an adjustable bar, a little easier to manufacture.
A movable block is mounted on the base plane to secure the rod with the bar. Clamps are also installed on it, one is adjustable, the other is persistent. Using an adjustable clamp, you can adjust the sharpening angle.
The only drawback of this model is the appearance of wear on the bar in one specific place. This drawback can be eliminated by installing a long pin to adjust the edge relative to the surface being processed.
Each option described above has its own advantages and disadvantages. When making your choice in favor of one model or another, you need to focus on the level of skills and the magnitude of the needs for operating the machine.
Machines with fixed sharpening surfaces
Machines with fixed sharpened surfaces are a simple modification of the device for processing household knives. In such a device there is no possibility of adjusting the sharpening angle, but you can pre-set several different angles for sharpening different types of knives. The work of sharpening blades using such machines is not difficult; you just need to move the blade along the abrasive surfaces in the recess.
The device consists of a pair of planes inclined to each other at a certain angle, one of which is a grindstone.
Rules
Often, when sharpening knives at home, household members use abrasive whetstones. However, in order to use them in practice, you need the necessary skills and experience working with them. After all, if the knife is sharpened at the wrong angle, the blade remains dull.
Layout of the block to the blade.
Before actually manufacturing the machine, you need to listen to the advice of sharpeners.
When sharpening a knife, the master performs the following actions:
Defines the angle between the working area of the blade and the block. Moreover, for each model the angles are different;
The knife is located at an angle of 90 degrees to the direction of the block. The grooves that are formed when the razor blade of the knife rubs against the block should be at 90 degrees to the knife line. The angle in such a situation is equal to half the sharpening;
Typically the angle is 25 degrees;
The mechanic begins processing from the beginning of the foot blade;
When adjusting the sharpening angle, the master paints over part of the foot blade with any marker. As a result, the mechanic directly controls the work area.
As a rule, after sharpening the working blade has non-uniform deformations. Therefore, when processing independently, the “point of reference” should not be the sharp part of the knife.
Choosing whetstones for sharpening a knife
The main indicator of a block is its grain size.
The whetstone is the main component that makes the blade thin and sharp. As a result, before choosing a design, you need to select the necessary blocks.
When sharpening knives on their own, household members use these types of whetstones
which have a high grain size. Using such bars, the shape of the leg blade is corrected.
having medium grain size. With the help of such bars, the mechanic removes the grooves that are formed during the initial processing of the knife
whetstone, which is covered with GOM paste. In such a situation, the mechanic polishes the blade.
When processing knives for the kitchen, you can use two types - with medium and high grain. And also in this case it is necessary to use a touchstone.
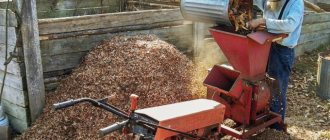
Electric knife sharpeners
The procedure for creating an electric sharpening machine is simple: it is enough to equip almost any device for sharpening knives and scissors with an electric drive. Such a sharpening machine allows you to quickly and efficiently sharpen the product and at the same time provides a better concave shelf at the edge of the blade.
The mechanism of an electric sharpener for sharpening knives contains a guide, which is located along the axis of rotation of the sharpening stone, and with the help of which the blade is adjusted at a given angle. The sharpening angle is set and set by the guide, and the clamping force is determined by the master.
Particular attention must be paid to the speed of sharpening, because... The electric drive allows you to sharpen the product at high speed, as a result of which the surface of the knife heats up. Such surface heating leads to tempering of the hardened steel, as a result of which the knife can quickly lose its hardness and its service life will be noticeably reduced. To prevent tempering of the steel, sharpening should be done on a high-speed electric sharpener in short periods of time and with sufficient breaks to allow the knife to cool.
Sharpening angle, what is it?
So, since it is impossible to stop the process of dulling the cutting edge, then at least try to slow it down, and for this you need to sharpen your tool very well. Earlier in this article you have already come across such a concept as the sharpening angle of the cutting edge. And now more about it.
Blade sharpening angles can vary greatly. From an angle of about 10 degrees for razors and scalpels, to an angle of about 50 degrees for various Machete-type knives.
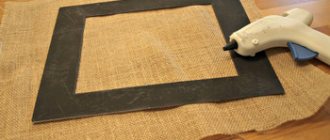
Making sharpening stones
It will not be difficult for a modern craftsman to make sharpening stones with his own hands. For this you will need:
- a wooden die to the size of the future sharpener;
- epoxy resin;
- cardboard boxes according to the size of the block;
- abrasive;
- protective rubber gloves.
You can use ready-made powder as an abrasive, or you can prepare your own abrasive, for example, from an old Soviet-made green block. Such a block can be ground into powder and used in the future as an abrasive.
Knife sharpening device
The wooden die needs to be treated on one side with sandpaper and frequent cuts must be made with a saw. Mix epoxy resin with abrasive chips. Having previously placed the block in a cardboard box glued to the size of the block, cover the prepared surface of the wooden block with a mixture of epoxy resin and abrasive. Once the resin has completely cured, the block is ready for use.
Another option for making your own sharpening stones is to create a sharpening stone from small rectangular glass plates about 5 mm thick. Using double-sided adhesive tape, sandpaper is glued to the surface of the glass plate. The sharpening stone is ready for use.
Device for sharpening from wooden blocks
A simple device for sharpening knives is a tool consisting of a pair of wooden slats and a pair of abrasive bars with the same geometric dimensions.
Wooden slats should be thoroughly sanded with abrasive sandpaper. Then, after applying auxiliary markings, depending on the sharpening angle of the knife, make cuts to a depth of 15 mm. Insert sanding blocks into the resulting holes so that each groove matches, then secure them with bolts. To give the sharpening device greater stability, the lower part of the surface can be padded with a piece of rubber.
The types of devices for sharpening cutting tools are different and each master will be able to choose the manual machine that will fully satisfy his needs.
Why do knives get dull?
In order to ensure long and comfortable work with a knife after sharpening, first of all try to answer the question, “Why do knives become dull?” Why is it necessary to sharpen the knife again some time after sharpening, and sometimes to completely sharpen the knife again?
The reason for the loss of sharpness by the cutting edge of any tool is this: when working, the cutting edge of a knife or any other tool is exposed to the smallest abrasive particles of the material being cut.
Such particles are found in any material, be it stone, wood, or food.
Even soft vegetables and fruits contain such particles. There may just be more or less of them, but they will definitely be there. Their size, sharpness and quantity only determine the speed at which the instrument will become dull.