Each carpenter uses clamps during work, reliably fixing workpieces with their help. You can make such a device yourself, and there are several options.
Clamps are simple, universal and specialized. Not so long ago, a new type of product appeared - quick-clamping. Such an element can compress up to 450 kg. It will be useful to study the instructions for making wood clamps with your own hands.
DIY corner clamp
At the time of machining of workpieces, to improve quality, they must be securely fixed.
Otherwise, the task becomes significantly more complicated; when working with hand tools, the surface may shift. Clamps, which are used for direct clamping and fixation of the workpiece, have become quite widespread. There are quite a lot of different versions of clamps; the master’s set often includes an angular one.
To seriously reduce costs, the assembly of the mechanism is carried out using scrap materials.
What is an angle clamp?
In most cases, duralumin is used in the manufacture of the main part of the structure. That is why it is characterized by high strength. Ease of use is ensured by the presence of special fasteners. Among the features of the corner clamp, we note the following points:
- In most cases, the tool is used for parts such as frames, as well as various corners and similar structures.
- A situation often occurs when, when assembling furniture, individual elements are fixed. This is required when applying glue and carrying out other similar work.
The corner clamp is purchased by mechanics and layout designers. At the same time, such equipment is also useful when working in a private workshop. The structural elements can be called the following:
- Clamp with two elements acting as a stop.
- A block characterized by increased mobility.
- Lever mechanism, which ensures the transmission of high force.
- A screw that is used to clamp a moving part in a desired position.
- Runners for a device designed for weaker clamping of the workpiece.
Knowing the basic elements of a corner clamp, you can make it yourself. In this case, a variety of materials can be used, most often metal, characterized by increased resistance to high humidity.
Angle Clamps for Metal Workpieces
The use of a clamping device is also possible if it is necessary to ensure reliable fixation of metal elements. Also, for fastening metal parts, corner clamps are used, made using metal. This is due to the fact that metal workpieces must be fastened more securely, since serious stress occurs during processing.
It is worth considering that a metal corner clamp is made in the same way as a wooden one.
In this case, sheet metal is used as a base, the thickness of which is 8-10 mm. To significantly increase the fastening, individual elements are welded.
What is a tool needed for, its design and types of tools
The clamp is an additional carpentry tool. The main purpose of clamps is to fix a workpiece on a support surface or several workpieces for gluing them together; therefore, the design of the tool must include at least two elements: a support surface and a movable jaw equipped with a fixation mechanism. The movable jaw is usually moved using a screw or lever, which allows for increased compression and prevents backlash during operation. Depending on the specialization and design features, the following types of clamps are distinguished:
- Screw G-shaped ones are the most common, characterized by their simple design and relatively low cost. They are represented by a metal bracket, on one side of which there is a supporting surface, and on the other - a threaded eyelet with an adjusting screw screwed into it. The inner part of the screw is equipped with a working jaw, the outer part with a handle. The tool is effective when working with heavy, large workpieces of simple shape.
Clamps of this type are suitable for working with large workpieces
- Quick-clamping F-shaped ones are more universal; their supporting surface is fixedly fixed on a long rod along which a working block with a sponge slides. Movement and fixation of the block is ensured by an auxiliary screw or a stepper pressure mechanism.
Objects are fixed using an auxiliary screw and a stepper mechanism
- Pipe - allow you to fix large-sized workpieces by varying the length of the pipe. They consist of two separate elements - a base plate with a screw clamp and a jaw that slides along the pipe.
The clamp is suitable for working with large workpieces
- Angular - designed to simplify the joining of workpieces at right angles, for which they have two supporting and working surfaces. They are divided into two subspecies. The first involves the presence of two clamping screws located perpendicular to each other; the second is equipped with a single screw with a double-sided corner block at the end. Very rarely there are specialized clamps that allow you to position workpieces at an acute or obtuse angle.
Clamps of this type simplify joining workpieces at right angles
Corner clamp with double-sided corner block
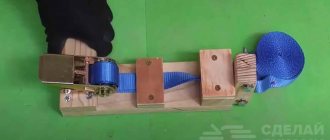
- Tape - equipped with a flexible element and several jaws floating on it. By fixing the jaws in certain places on the belt and adjusting its tension, you can process workpieces of complex shapes.
The band clamp is equipped with a band element that allows you to fix the workpiece around the perimeter
- Pincers - consist of two hinged parts and a spacer spring. In practice, they are rarely used due to the relatively low reliability of the joint, but they provide maximum speed for installing and removing the workpiece.
This clamp is rarely used due to the low reliability of the joint
At home, the first three types of clamps are most often made, since they are not too demanding on materials and production technologies, and also allow solving most household problems that require the use of auxiliary tools.
This is interesting: How to glue meter-long non-woven wallpaper: let's look at it in detail
Purpose
The corner clamp has become very widespread. In this case, the main purpose is only one - fixing the workpieces relative to each other. Among the features we note the following:
- When machining, reliable fixation must be carried out. Otherwise, there is a possibility of a significant reduction in the quality of the resulting surface.
- The angular design provides strong pressure and reliable fixation of the two elements when gluing them together.
The design of the clamp may differ slightly, it all depends on the specific case. When fixing fragile materials, an elastic gasket is used, which eliminates the possibility of damage to the surface layer.
Making a clamp with your own hands
You can create with your own hands:
- the required strength of the device;
- equipment for fixing metal parts;
- clamps of all sizes and varieties.
If the work ahead is simple, then the tool can be made from simple and cheap materials.
Corner clamp made of plywood
To make a tool you need:
- Prepare pieces of plywood 1.5 cm thick and 10x10 cm in size.
- Divide the squares into two parts diagonally.
- Mark holes at a distance of 2 cm from the edge and drill with a diameter of 40 mm.
- Cut the side along the holes so that excess glue under the fasteners can be conveniently removed.
The plywood tool is ready. You can’t count on its long-term use, but it is made from the simplest materials at hand.
Making and assembling a wooden corner clamp with your own hands
you should choose the right material
From the selected material you will need to prepare:
- two plates 15 cm wide, 20 cm long and 2 cm thick;
- two bars 2 cm wide and 25 cm long;
- metal bolts;
- self-tapping screws with a diameter of 5 mm (2 x 20 cm long and 2 x 12 cm).
After everything is prepared, you can begin assembling the device with your own hands:
- Place two long slats on the table. In this case, one should be laid edge down, and the second – up.
- Drill holes in the slats for connection using a drill. They must match for both parts.
- Attach one plate to the lower bar and fasten the second parallel to it. For this purpose, a self-tapping screw passing through the elements is used, which will regulate the degree of clamping of the part between them.
- Drill holes at the ends of the slats and attach solders or plates to them. The angle between the elements should be 90 degrees.
The manufacture and installation of the corner wooden clamp is completed, now you can check its operation.
DIY corner metal clamp
has good fixation rigidity
Using a metal clamp you can:
- fix structural elements at different angles;
- perform preliminary installation of products;
- align structural parts relative to each other.
In addition, metal corner clamps are widely used during welding work. Such instruments are divided into two types:
- Two-coordinate.
- Three-coordinate.
Using the device, you can fix two elements of a metal structure, and then secure them by welding. Even the simplest type of such equipment will make welding work more comfortable, ensure high quality seams, facilitate various manipulations with structural parts and significantly save time.
Making a corner clamp from metal with your own hands is quite simple. To do this you will need to prepare:
- steel sheet 10 mm thick;
- nuts – 3 pcs;
- steel sheet with external thread to fit the nuts;
- large diameter washers.
Manufacturing technology:
- Cut two blanks from the sheet, 50 cm long and 4 cm wide.
- Weld an auxiliary part to the main part of the part in the shape of the letter “L”.
- Weld the support element flat onto the short edge.
- Weld three nuts together, placing them with their edge towards the moving part. In this case, the screwed rod must run parallel to the base of the device.
- Weld all parts along the outer edge, inserting a strip of tool between them.
- When attaching the movable bar to the structure, weld along the inner edge.
- Weld large washers to the edge of the metal rod.
Work on the manufacture of corner metal clamps has been completed. When carrying out carpentry, plumbing or welding work, it can be used to securely fix the structure. Such a tool can replace one assistant and speed up the work time. And its moving elements will allow you to connect the parts at the required inclination and angle.
Having studied the types and options for creating corner clamps, making and assembling the tool with your own hands will not be difficult. In this case, the type of structure should be selected depending on the required fixation strength. Such a device will be useful both in the home and in professional activities.
How to do which
Any of the clamps described above can be made independently in a home workshop. Carpentry clamps are made of metal - the wooden frame and jaws of the tool will not withstand the back pressure of the material of the part(s), the clamp will weaken during operation, and the clamp itself will become unusable. With welded and soldered clamps it’s already clear: only metal; wood is a flammable material.
Carpentry clamps for working with valuable wood or products are best made of wood, but you can also use metal ones with spacers made of plywood or even shingles. It is better to use wooden clamps for gluing into a layer (on thick workpieces from several thin ones), even if metal or plastic is being glued - wooden jaws provide a more uniform distribution of pressure over the plane and, accordingly, better gluing quality. Fragile parts (glass, etc.) are compressed for gluing only with wooden clamps.
G-shaped
The frames of factory-produced G-clamps are cast. It is impossible to organize a steel foundry in a garage or barn, even in a forge on your own property. Since G-clamps, being the most “graspy” ones, are used mainly in metalworking and welding work with rather long and/or heavy parts, a homemade G-shaped clamp must be made of welded or solid metal.
Craftsmen often weld themselves clamps from sheet steel, pos. 1 in Fig.:
Apparently, copying the profile of the frames of factory products, which in this case is incorrect. Profiles of cast frames of clamps are shown in pos. 2. Pay attention to the fairings and fillets (shown by arrows). Smoothing the profile is necessary to avoid the concentration of mechanical stress: they “love” corners and crevices, like bed bugs. But the weld does not work like a fillet! No, the clamp most likely will not break or bend. However, the recoil of the clamped part will move the frame a little, and it will be difficult to achieve precise fixation, and it is possible that the part may rotate when the clamp is tightened.
Homemade clamps made from channel sections are quite reliable (item 3). Disadvantages: labor-intensive, disproportionately heavy compared to the working width. You can cut a channel into clamp frames if you need to compress the parts very tightly. The best option for clamp frames for normal work is made from a square profile pipe, pos. 4. Depending on the size and wall thickness of the workpiece, clamps from corrugated pipe can be made for a working width of up to 1 m or more.
Quick-clamping
Pistol type clamp. When the trigger is pressed, the jaws move apart. By releasing the locking screw, you can change the gap between the jaws. The clamping force is small. You can make it yourself, but it is not economically profitable. It's a lot of work, but it's inexpensive.
Clamp in the form of a caliper
Devices that are shaped like calipers are used to firmly hold small parts. For a homemade clamp, you will need, as before, plywood and small thickness bars.
For screws, it is best to take studs with rectangular or trapezoidal threads. The thread pitch is 2 turns per cm. It is very good if the stud has a rear sight on one side of a slightly smaller diameter than the thread. It can be used to seat the handle. On the other hand, a rear sight with a slightly larger diameter to accommodate the bearing is desirable.
So, in the simplest clamp, one end will be stationary, and the second will move through a worm gear.
To release the workpiece, you need to move the bracket to the required distance and turn the knob a few turns. This will fix the element. After this, you can release the mechanism and the workpiece will be released.
The simplest version of this model is equipped with a rail structure. The guides, which are arranged in parallel, have cut grooves at equal distances. Fixed stops are secured using rods made of metal. They can move exactly along the width of the workpieces. At the end of the beams, fixed stops should be installed, which have a worm mechanism. The usual method is to clamp it with a hairpin and a furniture nut.
Self-clamping option
For gluing parts, it is better to choose the simplest clamp model, which has an F-shape. The stores sell various models that consist not only of wood, but also of metal. The cost of such instruments is high. Therefore, many craftsmen prefer to make them with their own hands.
For small jobs, a cam-type clamp is ideal. For example, if you need to glue small parts or fix workpieces. This model works in the same way as the f-shaped element. The tool includes 2 jaws and guide bars. Sponges: movable and fixed. For reliable clamping, it is necessary to fix the workpiece well and rotate the cam 90 degrees.
You can make such a tool yourself with a minimum set of tools and materials. Before you begin, you should draw a drawing of the product. You can use any material for manufacturing, and also change the standard sizes as you wish.
The tire is made of wood or metal. Small bolts and rivets can be used instead of metal pins. It is recommended to make movable and fixed jaws at the same time, since they mirror each other. Their width and length can be changed to increase the grip of the product.
For gluing boards (boards)
Clamps are needed for fixing sections, which, after the glue has dried, are used for furniture panels. Such products differ from simple ones in their length. In other words, they have a large jaw span. If you buy such material in a store, you will have to pay a decent amount. Therefore, craftsmen prefer to make clamping mechanisms themselves.
Blueprints
A drawing of a homemade rectangular clamp for welding has the following dimensions.
- Running pin – M14 bolt.
- The collar is a reinforcement (without figured ribs, a simple smooth rod) with a diameter of 12 mm.
- Internal and external clamping parts - professional pipe from 20*40 to 30*60 mm.
- A running strip of 5 mm steel – up to 15 cm, with a section width of up to 4 cm – is welded to the main plate.
- The length of each side of the corner of the outer jaws is 20 cm, the inner jaws are 15 cm.
- A square sheet (or half of it in the form of a triangle) - with a side of 20 cm, the length of the outer jaws of the clamp. If a triangle is used, its legs are 20 cm long, a right angle is required. The sheet section prevents the frame from breaking its right angle; this strengthens it.
- A box-shaped assembly at the end of the sheet steel strip guides the movement of the clamp. It consists of square pieces of steel 4*4 cm, to which lock nuts are welded.
- Triangular strips reinforcing the moving part are welded on both sides. They are selected according to the size of the internal free space formed by the pressure jaw on the side of the lead screw. The running nut is also welded to it.
So, to make a rectangular clamp you need:
- sheet of steel 3-5 mm thick;
- a piece of professional pipe 20*40 or 30*60 cm;
- M14 stud, washers and nuts for it;
- M12 bolts, washers and nuts for them (optional).
These are used as tools.
- Welding machine, electrodes. A protective helmet that blocks up to 98% of arc light is required.
- Grinder with cutting discs for metal. Be sure to use a protective steel cover to protect the disc from flying sparks.
- A hammer drill with an adapter head for conventional metal drills or a smaller electric drill. You also need drills with a diameter of less than 12 mm.
- A screwdriver with a wrench attachment (optional, depending on the preference of the master). You can also use an adjustable wrench for bolts with heads up to 30-40 mm - such wrenches are used, for example, by plumbers and gas workers.
- Square ruler (right angle), construction marker. Non-drying markers are produced - oil-based.
- Cutter for cutting internal threads (M12). It is used when there are solid pieces of square reinforcement, and additional nuts could not be obtained.
Materials and assembly steps
In order to make tree clamps, you will need the following elements:
- beech or birch block;
- feather drill;
- pipe 2.5 cm;
- mortise nuts of suitable diameter;
- a nut that has a rounded knob (used for decoration);
- a cutter with a diameter of 2.5 cm and a long pin.
- The basis of the material is a pipe, from which a piece of the required length is cut. Depending on the size of the jaws, it is necessary to cut the block. The pieces should be from 15 to 20 cm. For free movement of the timber along the pipe, a hole with a diameter of 2.5 cm should be made at a distance of 2.5 cm from the edge. Parallel to the hole, a cut should be made from the same end. To fix the sponge on the pipe, connect the hole to the end.
- For the driving nut, you need to drill an additional hole on the side of the cut. You need to drive a nut into it and tighten it with a bolt on the back side. To fix the sponge, clamp the pipe in the hole. To move the pipe, you need to unscrew the bolt, then move the element and repeat all the steps again.
- The lower clamping part has 2 jaws; it is slightly larger than the upper one and has an additional nut. The structure of both parts is identical. An additional driving nut is located at the opposite end of the pipe into which a stud with a wing nut is installed.
- In the second collapsible moving part there are no clamping parts such as cuts and nuts. The dimensions of such an element are also rather large. In this part it is necessary to make a recess for the stud device.
Corner option
Regardless of the type of clamp, it must firmly clamp the parts for joining or processing. A corner joiner helps to fasten wood pieces at a certain angle (most often 90°, but there are others). You cannot do without this when assembling furniture and frames.
In order to make such a clamp from wood with your own hands, you will need the following materials:
- two wooden blocks 25 mm thick made of hardwood;
- plywood 12 mm thick or more;
- screws, studs;
- jigsaw or hacksaw;
- drill.
A square board with a side of 25 or 30 cm is cut out of plywood. Two bars are fixed on it at an angle of 90 °.
First, the bars are glued, then countersunk, holes are drilled and screws or other fasteners are tightened. Perpendiculars are drawn from the center of the bars - screw studs will pass here.
At a distance of 20 mm from the corners, thrust bars are attached, maintaining a gap between them. It should be slightly larger than the width of the parts that are to be clamped with a homemade clamp. It is better to screw in the studs immediately, before fixing the stops. You will also need to cut out the movable blocks that will be connected to the pin (when it is unscrewed, the workpiece will be pressed against the corner bar).
In the same way, a clamp is made from plywood or chipboard sheets. In it, instead of wooden blocks, a thick plywood sheet is taken. There are other options for making clamps yourself, but the principle of their assembly is generally similar.
general characteristics
A clamp comes in handy when you need to secure parts to give time for glue to dry or to perform welding. When assembling furniture, the device will help you assemble elements without displacement and drill holes for fasteners in the right place. The homemade tool weighs a little, but it handles the fixation perfectly. It is easier to move from place to place than a regular construction vice. The corner clamp for welding is made of metal.
There are two stops on the clamp of the homemade device. There must be a block clamp with good mobility, so it can be used for workpieces of different sizes. For high rigidity of fixation, a screw and a lever mechanism must be present. For the carpentry option, the use of a runner and a strip is allowed. But with any design, the stop parts must be movable.
Benefits of the tool
Due to the high cost of factory-made products, it is profitable to make a clamp yourself, but savings are not the only advantage of the tool. Clamp calibration tailored to specific jobs will help secure parts better. If the clamp is made for a one-time job, cheap materials are used in production.
Types of clamps
Today, such a tool can be made from various materials in several variations. Typically, making a clamp requires wood or metal. When installing the specified device in the right place, you can not hold individual parts, but can fully work with other tools.
Homemade clamps
The simplest version of a carpentry clamp involves the presence of a pair of moving components and a frame for them. The tool operates using additional clamps and levers. With the help of which the force is selected, the parts are compressed and they are fixed.
There are also quick-clamping designs of the lever type. These are specialized clamps.
Their peculiarity is that clamping occurs instantly, but this will require a certain force.
There are different types of carpentry clamps. Depending on the mechanism installed in them and its features, they are:
- Corner designs.
- Screw installations.
- Quick-release devices.
- Mounting structures.
- Hand clamps.
Made of wood and steel
This model involves the use of special steel, which is indispensable for working with important parts. Here both durability and strength of the metal are essential. The goal is to provide a lightweight clamp that isn't too bulky but is quite durable and easy to adjust. The most difficult part is making the plate where the strip is inserted.
It is best to make several holes and then cut out the material. It remains in the shape of a small round file. When the main part is cut out, use a grinder to clean the work area. The result may not be so perfect, but the bar will be easy to pass.
A hole must be drilled at the opposite end of the plate. It should correspond to the helix. The final metal part is the locking plate. Its end should be oblique and match the neckline.
This is interesting: Do-it-yourself miracle shovel - drawings and dimensions, how to make it?
Varieties
The purpose of this publication is not to build something like an encyclopedia of mounting clamps - there are many types of them, and there are even more patents for new, “super-super” ones. Our task is to show which clamps are most needed in a home workshop, and how best to make a clamp without wasting a lot of material and time.
The most common types of clamps in handicraft production are shown in Fig:
- G-shaped (G-cramp; G-clamp) is the most reliable, reliable and cheapest of the general-purpose clamps. Disadvantages: it takes a long time to tighten and can turn the parts being glued if the stop hinge is of poor quality or not maintained. The latter is quite important: an adhesive layer that has not set is a good lubricant, but it is undesirable to separate and recompress the surfaces being glued together, as the strength of the dried joint decreases sharply. In addition, a regular G-clamp does not hold round parts well, so a special pipe clamp is used to secure pipes or a round profile for welding or butt soldering (see next figure). Assembled from ordinary structural steel s=(2.5-4) mm, such a welded clamp provides reliable fixation of pipes up to d(120-150)x(1.5-4) mm.
- F-shaped (F-cramp). Quick-clamping, operates on the principle of jamming the sliding stop in the dead center position. Pressure until it is firmly secured is most often provided by a screw clamp, as in a G-shaped clamp. An even “softer” and faster clamping, but less reliable, is provided by a trigger-eccentric clamping mechanism, see below. The most versatile and widespread of the clamps. The main disadvantage is that due to vibrations and shocks during operation, it can self-unclip and release. Or, on the contrary, it jams tightly, and when wedged with a hammer blow (see below), either the clamp or the part “shoots out”. It is not suitable for adaptation to butt welding of pipes: the jaws are driven by indirect heating and the pipe joint moves apart.
- C-shaped (C-clamp, fixing tongs). A fairly narrowly specialized tool. The main purpose is to compress the parts to be glued. Simple C-clamps are made with a spring clamp. The trigger-lever clamp allows you to precisely set the clamping force.
- Angle clamps for welding linear parts (pipes, profiles) at a given angle. There is no completely established special Anglo-American term. The most commonly used are welding clamp and dead-lock clamp.
- Joiner's bench - a carpentry clamp for joining panels from boards, slats and beams, assembling units from shaped parts (for example, railings with balusters). On the trail. rice. a rail clamp is shown; There are also rack and pipe ones, see below. Please note that pipe clamps are sold under the name “pipe clamp”, and clamps for end-to-end welding/soldering of round timber should be searched for under the query “welded clamp”.
- E-shaped (E-clamp). A highly specialized tool for edging carpentry with glue. If you need to carefully glue an edge on existing valuable furniture/interior design, it is difficult to do without an E-clamp.
- O-shaped or tape, or crimp grip (loop stay, loop brace). Band clamps are most often used by virtuoso carpenters and furniture makers-restorers. If you can fetch up to $1000 or more for a well-restored antique Viennese chair, then for a slightly skewed or wobbly chair they will fetch, at best, 15-20 of the same ones. Making a frame for a large painting or photograph without a tape clamp is also not so easy.
- Lever-plunger (precision clamp). When the trigger is pressed, the plunger (pusher) with the clamping stop moves smoothly forward. The trigger is released - the plunger is fixed by a spring-loaded slide, which becomes in the dead center position. Pressing again releases the slide and further advances the plunger. A good lever-plunger clamp can securely clamp a chicken egg without damaging its shell. In a home workshop, such precision clamping is unlikely to be needed, but suddenly a good precision clamp can be obtained from a mounting gun for tubes with silicone, etc. viscous compounds. A fixed jaw can be easily installed into the opening (window) for the neck of the tube, and a movable one is mounted on the rod instead of the standard pusher. If necessary, both can be removed and the tool can be used for its intended purpose.
Screw terminals
Very popular models that have another name - beam clamps. They have a frame arc in the shape of the letter U, as well as a movable screw with a massive platform (the so-called “patch”).
Note!
- Do-it-yourself wind generator: TOP-170 photo reviews of finished devices. Detailed DIY instructions for beginners
- Do-it-yourself spot welding - the best master class on making homemade spot welding with step-by-step photo diagrams of do-it-yourself work
- Do-it-yourself tennis table: TOP-150 photos of the best manufacturing ideas. Master class on creating a tennis table at home
A do-it-yourself clamp makes the craftsman’s work easier and saves him money
A clamp is a tool that allows you to fix a part during processing. Craftsmen often use various types of clamps in their work. Whether you are a carpenter or a metalworker, there is always a need to use it.
This device is available in different versions, from universal to specialized. Relatively recently, a new modification has appeared: a quick-release clamp. Develops compression force up to 450 kg.
The task for all types is common - to fix the workpieces for processing or connecting to each other.
Angle clamp
However, most often, an angle clamp is used as a jig for welding metal parts at right angles.
For production you will need:
- steel corner 40 mm, thickness 3-4 mm;
- steel plates 40-50 mm wide;
- threaded studs, preferably hardened;
- rods for gates;
- nuts for the worm gear;
- welding machine;
- drill, taps.
We weld the corners to the steel plates at a strictly 90° angle.
We attach a worm structure to each side by welding. This is the same corner with a welded-on thrust nut or thickening, in which a thread is cut in accordance with the collar pin. The width of the working gap is selected according to the potential workpiece.
IMPORTANT! If the range of sizes of the parts being processed is too wide, it is better to make several clamps. Too large a stroke of the knob does not contribute to a strong fixation. Do-it-yourself workbench - drawings, design principles
Do-it-yourself workbench - drawings, design principles
On the back side of the knob we drill a hole into which we insert a metal rod as a lever.
Carpentry clamp made from available materials
The simplest wooden clamp used in carpentry is made from the following materials:
- Two pieces of wood and a soft but durable material. Pine will do. Wood that is too hard will leave marks on the workpiece when clamped tightly;
- Furniture nuts with wood-look lock.
- Steel studs, not necessarily expensive hardened steel.
- The nuts are wing nuts with threads that match the studs.
- Thrust washers, you can also use ordinary, inexpensive ones.
Working pliers are cut out of the bars. Holes for the studs are drilled in them strictly parallel, with a slight backlash.
ADVICE! If you make two sets of identical clamps, the scope of application will expand. Then you can use the device like a carpenter's vice.
Carpentry clamp made of wood and plywood
For quick fixation of small parts, a clamp made in the form of a caliper is used.
The device is made of bars and thin plywood. The worm system is familiar - furniture nuts and a pin-turn. The fixed stop is firmly attached to one end of the guide rail. Recesses are cut out on the rail itself to secure the moving mechanism.
Having moved the bracket to the required distance, all that remains is to turn the knob a few turns, and the part is fixed. After releasing the stop mechanism, the carriage moves easily, releasing the workpiece.
The stationary version of this clamp has a rail design. On two guides installed in parallel, grooves are cut at the same distance.
Homemade pipe bender, how to make it at home
The clamp is carried out in the usual way - a furniture nut, a hairpin, a knob.
Carpenter's clamp option 3
Sometimes it is necessary to simply press the workpiece against the table for processing. There is a self-clamping clamp for this purpose. The illustration shows how to make metal or wooden brackets.
You can attach two clamps of this type to a movable template for mass milling of identical workpieces.
This type of quick-release clamps is made individually for each matrix, or is rearranged onto a new substrate for cutting out the next shape.
Pipe clamp
Welding metal pipes end to end is a rather complex task, requiring precise orientation of the workpieces in space. If you weld a piece of pipe to a finished system fixed indoors, the task is simplified. And welding freely lying sections requires an assistant or a special device.
A clamp for welding pipes is easily made from a metal angle and steel plates.
Oak models
For such a product, an octagon template is first printed. It must match the required width. After this, place the workpiece in a vice and use a plane to round both ends of the resulting corners. Holes are made on the handle in the central part of the workpiece. In this case it corresponds to the bolts on the clamp.
Shelf dimensions are determined according to the desired length and available equipment. After this, the system components are sawn to the required size, the pads for the sponge are cut out and the necessary holes are drilled, and the handles are glued with five-minute epoxy resin. When the screw shaft is jagged with a file or sandpaper, fix the handles with epoxy glue.
Manufacturing technology
A do-it-yourself metal clamp is much more reliable and practical than a wooden structure. To manufacture homemade units, you will need welding equipment and plumbing units.
Tools for making any type of clamp
1 option
Following the instructions, you can make a homemade clamp from metal reinforcement.
Let's start:
- We cut the reinforcement into separate elements to begin making the jaw for fixation, as shown in the photo with instructions.
- First we make the sliding part and add a nut to the moving arm.
- Then we begin to make a screw and a rotating stand for turning.
- We cut a thread in the rod, then construct the shoulder.
- The final stage will be the manufacture of handles and panels on the jaw.
Option 2
To make a corner clamping tool with your own hands, we will need the following materials: steel scraps from a corner 40*40, 50*50 and 30*50 200 mm each, 2 F-shaped clamps and a strip 10*50 to 250 mm long.
Let's get started:
- Using a construction locksmith angle, we place all the parts as in the photo.
- We turn the corner face down and weld the strip to the corner.
- Then we weld a clamp to the base to make the structure more secure.
Purchasing clamps in hardware stores is quite expensive. Everyone wants to save themselves from unnecessary costs if there are alternative options. You may need several such tools at once, this is especially true when assembling, manufacturing or repairing pieces of furniture. Homemade clamps will replace your hand vice, as you can choose the model, type and size of the tool. By following the instructions in the photo and video, you can quickly understand the manufacturing mechanism and quickly make a manual clamp from scrap materials.
Device of the simplest design
There are quite a lot of varieties of this tool, depending on a number of criteria (shape, size, material, operating principle of the device). However, all models have a standard structure:
- Frame in the shape of the letter P.
- One permanent fixing part.
Note!
- DIY induction heater ️ - reviews of the best manufacturing options. Varieties of homemade device designs + step-by-step master class (160 photos)
- Do-it-yourself Gauss cannon: TOP-130 photos of the best ways to create it yourself. Design features + master class for beginners
- Do-it-yourself electric scooter - a master class with step-by-step instructions for doing it yourself. Tips and simple patterns for beginners + the best photo reviews
The design is complemented by a movable element for firmly fixing objects (namely, a screw). Clamp drawings allow you to familiarize yourself with the design features.
Types of clamps
There are three categories of clamps:
- Simple, ensuring the fixation of parts with the working plane of the workbench.
- Angled, designed to hold two workpieces at the required angle.
- Volumetric, capable of fixing three workpieces in three different directions.
The first type is made in the form of a C-shaped bracket with a threaded clamp. Scope of application: processing of wood, metal, plastic bases. The second type is the most commonly used.
Most often, an angle clamp is used to fix workpieces at an angle of 90°. But there are samples that allow you to change the angle to the required value.
The third type of clamps is needed if the specifics of the work involve performing large, similar processes.
Factory models are quite expensive. The solution is to make your own clamps.
Angle and volumetric clamps are made based on a simple design classified as the first category, and additional parts that can be found in a home workshop. Dimensions and strength characteristics depend on the material of manufacture. Usually the parameters are focused on the type of parts being processed. The article describes how to make carpentry clamps from plywood and presents a diagram for assembling corner clamps for working with metal parts.
Plywood clamps
To assemble furniture, chipboard sheets are often used, which are fixed at right angles. It is recommended to make a device based on simple clamps. To do this you will need:
- sheet of plywood or chipboard 8–12 mm thick;
- square or rectangular wooden block;
- jigsaw or hacksaw;
- electric drill with a set of attachments.
Two or more right-angled triangles with legs 30–40 cm long are cut out of plywood or particleboard. The 90° angle of each segment must be as accurate as possible, otherwise the finished structure will be of poor quality. A hole is formed in each corner of the triangle. It should correspond to the dimensions of the simple clamps taken as a basis.
It is necessary that the distance from the edge of the hole to the leg of the triangle is 10–15 mm.
The device is tested in practice. To do this, press a homemade triangle onto the sheet being processed with a regular clamp and align it along the edge. Using a second simple clamp, fix the next part at an angle of 90°. To ensure reliable fastening, two triangular shapes are used along the edges of the joint.
Angle Clamps for Metal Workpieces
To work with metal parts, iron corner clamps are used to strengthen the clamping. Metals are stronger than wood; they need to be fixed with a stronger tool. Processing often involves a welding process; high temperatures will quickly damage wooden elements. It is better to give preference to iron. It is not afraid of electric arc, high temperatures, or mechanical stress.
A metal corner clamp is made in the same way as a plywood one. But the auxiliary tool is made of sheet metal 8–10 mm thick. The fixing elements are assembled from a metal corner of a given size. For greater reliability, the corners are welded. A threaded mount will also work.
A screw clamp is made from three nuts welded together. You can create a bracket with a 35-40mm diameter threaded hole in the center. The device is secured with bolts, which allows quick replacement in case of thread failure.
The internal base of the device is moved along the guides. To make them, a groove about 10 mm wide is formed in the bisector of the triangle. Drill a technological hole in the upper base of the figure. Provide it with a bolt and tighten it with a nut from below. To ensure that mutual movement of the bases is not difficult, the work is performed correctly, the threads should not reach the bolt head.
It is easy to make an angle clamp yourself; there is no need to purchase a factory clamp.
Choosing a clamp for the home and garage: criteria and recommendations
Choosing a clamping tool, even for a professional craftsman, can raise a lot of questions, let alone for beginners. When visiting a modern hardware store, you may encounter a wide variety of types of clamps that are designed to solve specific problems. And in order to solve these problems as correctly as possible, you should take a responsible approach to the process of choosing a clamp
Experts recommend taking into account the following criteria:
- Workpiece fixation mechanism - the most popular are models equipped with screw clamps. They are practical, convenient and inexpensive. When choosing a clamp with a threaded mechanism, it is recommended to give preference to models with a movable jaw. Their advantage is that they allow you to work with workpieces of any size.
- Clamping force is another very important parameter, because not only the quality and speed of work, but also safety depends on it. This parameter depends directly on the type of tool used, and can vary from 20 kg to 1 ton. Maximum force is naturally provided by hydraulic and vacuum clamps.
- The presence of auxiliary elements - with the help of a clamp you can not only compress workpieces, thereby ensuring their temporary connection, but also use it as a spacer tool. This option in the device will definitely not be superfluous.
- Weight - the heavier the tool, the more difficult it is to operate. The weight of the device is influenced by factors such as the size of the tool and the material from which it is made. The heaviest ones are cast iron and steel, while the light ones are made of wood, aluminum and plastic. When choosing a tool by weight, it is also worth considering that the smaller the mass, the correspondingly lower its reliability and strength.
- Susceptibility to corrosion - the metal parts of the clamps are protected with paint or a special zinc coating, which allows you to increase the service life of the tool. Electroplated units are more expensive than painted ones.
- Additional accessories - to increase the convenience of working with clamps, many manufacturers equip them with various elements. One of these elements is a T-shaped handle, the main purpose of which is to adjust the clamping force. Rubber pads are attached to the jaws, which prevent damage to the surface of the clamped parts. When working with metal parts, such overlays also play an important role. Their absence will not entail deformation of the metal blanks, but the possibility of their displacement cannot be excluded.
Although a clamp is a multifunctional clamping tool, when using it it is necessary to take into account the operating conditions; for example, it is not recommended to use a plastic tool with metal workpieces. If you are a self-respecting craftsman, you should definitely have at least five types of clamps at your disposal.
Wooden quick-release clamp
Homemade wooden clamps can be made in various versions. Below we will look at some of the most practical carpentry options.
Option 1
The simplest clamp made of wooden elements, which is used for carpentry work, can be made using the following materials:
- Wooden blocks (2 pcs.) made of soft but durable wood, such as pine. Due to the hard wood, imprints may remain on the product if held firmly.
- A furniture nut with a wood lock.
- Four steel studs. They must be made of expensive hardened steel grades.
- Wing nut (4 pcs.) . Their thread must match the thread of the studs.
- Four thrust washers.
The block is cut in the form of working pliers. In which it is necessary to drill in parallel the required number of holes for each stud, allowing for a small backlash. Each pin is screwed into a furniture nut and locked. Tight alignment can be achieved using wings or regular nuts with open-end wrenches (to obtain a strong grip).
It is noteworthy that by producing two identical sets of clamps, the scope of their use can be significantly expanded. In such cases, you can work with the tool as a carpenter's vice.
Option 2
To ensure quick fixation of small parts, you can use a clamp, which is similar to a caliper.
To make the device you will need bars and thin plywood. You will also need to provide a worm system, which will require the use of furniture nuts and a socket pin. On one side of the guide rails, a fixed stop is firmly attached. On the slats themselves, it is necessary to cut several recesses that secure the moving mechanism.
When moving the bracket to the desired value, to fix the part you need to make several turns with the crank. If you release the thrust mechanism, the carriage can be easily moved, freeing the part.
Option 3
In some cases, it becomes necessary to press the workpiece to the table surface. For this purpose, a self-clamping clamp is used, which must be equipped with a metal or wooden bracket.
The swivel end must have a lever on which there is an eccentric. When you turn it at certain angles, it automatically locks. The overall height can be adjusted with studs that are attached to the device. By turning it to a certain angle, we get an automatic quick clamp.
To perform mass milling, two such clamps must be secured to movable templates. These types of quick-clamping clamps should be made individually, tailored for each matrix, or by rearranging them onto new substrates when cutting out subsequent forms.
What is a furniture jig and how to use it
If you have a furniture jig, this will make it much easier for you to mark and drill holes for any type of fastener. A jig is essentially the same template, which is a special device or bar on which holes of different diameters and at different distances are applied. With their help, you can make perfectly accurate markings and drill passages of the size you need. Various materials are used to make this assistant:
The product is a solid base with many holes at different distances required from each other. Additionally, it can be equipped with a mechanism for fixing and adjusting the distance between the holes.
Use a special drilling jig to help you hold the drill at the right angle.
Thanks to the device, you will install the drill exactly at a right angle to the blade, without deviations. This is a great help when working on narrow surfaces, such as the ends of chipboards. After all, if the groove is not located at an angle of 90 degrees, assembling the body elements into a single whole may become impossible.
Types of conductors
Depending on the functions performed and design features, templates can be of several types:
All types of templates can have a sliding or fixed type of fit to the surface. The sliding type allows you to move the product along the surface of the workpiece. Fixed option - firmly fixed in the desired position and does not move.
The conductor is the furniture maker’s best assistant, without him it would not have been possible to connect furniture so beautifully
What to look for when choosing a conductor
When choosing a furniture jig in a store, you should carefully examine the product and pay attention to the material from which it is made. For example, stainless steel products will be of high quality and reliable.
The manufacturer matters too. World-famous brands, as a rule, produce high-quality tools with a long service life and a warranty from the manufacturer.
The more famous the brand, the higher the quality - a rule that works flawlessly in the case of construction tools
When purchasing such an assistant, take an interest in the additional equipment that comes with the kit. The versatility of the device will make your work easier. The more tools included in the package, the more cases you will be able to use it. For example, a set may include
There are a significant number of advantages in using this device.
By using a template when manufacturing and assembling cases, you will save yourself from many inconveniences. For example, you don't need to mark places with a ruler and pencil. The jig allows you to fix the distance and drill several absolutely identical holes at the same distance from each other. There is no inaccuracy here.
But a factory-made conductor also has a drawback - its rather high price.
Therefore, craftsmen are quite capable of making such an assistant with their own hands. Our instructions will help you with this.
Instructions for making a furniture jig
Step No. 1 – prepare tools and materials:
First, let's collect all the tools and materials necessary for the work.
Step No. 2 – make the base and markings. Using a grinder, cut off a piece of the required length from the block. Sand any burrs with a file. Mark the locations for future holes. The generally accepted dimensions are the distance between the grooves is 32 mm, the distance from the centers of the slots to the side edge is 8 mm. To make the markings accurate, use a caliper. It is convenient if you mark the centers of future grooves using an awl or needle.
Make the markings, you can first do it on paper, then transfer it to the material itself that requires connection
Step No. 3 – install the tool. Next, we drill passages in the required quantity. Then we take a metal plate and grind it with sandpaper if necessary. Clamping it with a vice, we bend our plate at a right angle. Align the resulting parts and clamp them with a clamp. Fasten the parts with screws, having previously cut the thread to the desired size. Thus, you can create a very convenient tool for yourself.
Next we drill the holes
