A good master never has too many clamps. Why? Yes, because specific types of work require specific clamping devices. In addition, they differ in size: in some places you need a small clamp, in others you need a larger one.
I know one master who has more than a hundred different clamps stored in his workshop: small, medium and large. Despite this, he constantly complains that he doesn’t have enough of them... Well, it’s understandable - the more different operations you have to perform, the more clamps you will need.
If you suddenly urgently need some kind of clamp that you don’t have, don’t rush to go to the store: you’ll only waste time and money.
It is much easier to make a clamp with your own hands, using materials (new or used) that are available. Many home craftsmen do this. I recommend that you do the same.
Why is this beneficial? Firstly, you will reduce the “deposits” of scrap metal. Secondly, you can make a clamp of the required shape and size (you may not find the required clamp in stores).
As for materials, to make homemade clamps you can use profile pipes, sheet metal, corners, car and bicycle spare parts.
As a rule, metal is used to make metalwork clamps - they must be reliable and durable, and withstand heavy loads.
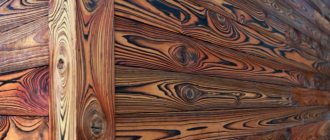
Whereas carpentry clamps are usually made from hardwood (oak, walnut, acacia, hornbeam) or plywood.
But if necessary, they can also be made of metal - for example, corner clamps designed for gluing workpieces at an angle of 90 degrees are usually made of metal so that they can also be used when performing metalwork operations.
Homemade clamping devices differ not only in their actual purpose (for example, they are used specifically for plumbing or only for carpentry work) and the materials from which they are made, but also in their scope - in production, during construction or at home.
For example, F-shaped and G-shaped clamps are considered universal - they allow you to work with parts made of different materials and different shapes, fasten workpieces together or fix them to the table. That is, these are both metalwork and carpentry clamps.
In addition to this, there are also other modifications that you can make yourself from metal: for example, corner clamps for welding (they are used to connect and rigidly fix workpieces at a certain angle - usually at 90 or 45 degrees) or pipe clamps - designed to work with large blanks (for example, you can use them for gluing wooden panels).
Do you need to make drawings? This is everyone’s business, but we recommend doing them anyway, since it is very difficult to keep in mind the sizes of the parts used. You may also need them if you want to share your project (how to make a DIY clamp) with other people.
Homemade clamps also differ in design features - for example, most often in workshops they use classic clamps with a screw clamp. But you can also find quick-release clamps, which are convenient to use when performing a large amount of work.
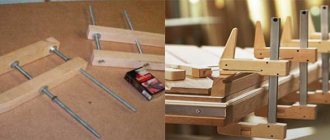
DIY corner clamps
Angle clamp with tightening connection
John Heisz, in his blog and on his channel, showed the design of an angular clamp, which allows not only to fix workpieces at right angles, but also provides the ability to press the surfaces being glued together. The clamping is carried out due to the force of the transverse bolt on the outer jaws of the clamp. The mobility of the jaws is ensured by the cuts in the base of the clamp.
Corner clamps made from regular bolts
How to easily make corner clamps with your own hands from wood and ordinary bolts. From the channel “Carpentry Lessons Aquila Workshop”
Manufacturing process of corner clamps:
Do-it-yourself tape clamp for gluing frames
A tape clamp is one of the most convenient and simplest tools in the workshop, both for gluing frames or making boxes, and for making furniture. Definitely, in all carpentry workshops that produce interior items or furniture, there is a process of manufacturing frame structures. Such miter joints require special compression and gluing methods.
On the HeARTwood , its host Mikhail showed how he makes a clamp for gluing frames.
The main materials used to make the band clamp are duralumin and artificial stone (Corian). The main tools are a circular saw, a jigsaw, and a screwdriver. A simple and very reliable tension mechanism is used. An M10 stud, a piece of polypropylene pipe and a pair of oversized nuts were used for it.
Video of a master class on making a band clamp with your own hands:
Homemade clamps
Made of metal. It is advisable to use a steel pipe in the manufacture. As a result, you can get a reliable tubular clamp.
Note! It is important to understand that a clamp for home use should be easy to use so that you can fix any part in a matter of seconds.
You will also need 3 steel rings. Their internal diameter should be the same as the external diameter of the pipe. You can also use a steel rod instead of a pipe. For manufacturing, you will need a welding machine of any type (you can carry out metal welding work with a regular inverter machine).
The process of creating a clamp consists of the following steps:
- The bases of the structure are welded to two rings; the supports are easier and better made from angle steel.
- A nut is installed on the last ring, and it is welded to the pipe.
- Then a handle is mounted on the top of the long bolt for ease of working with the future clamp, and the bolt is screwed into the ring.
- At the other end of the pipe, 2 holes are drilled for mounting the fastening pins.
Wood clamps
Now we will share with you an option for making a quick-release wooden clamp. It takes a long time to make, but in the future you can save a lot of time during use.
The creation process is as follows:
- First of all, a layout is created, then the required elements are cut out of durable wood. If you want your clamps to last a long time, you should stabilize the wood to increase its strength and resistance to external environmental factors.
- A jigsaw or handsaw is used to cut a groove in which there will be a pin for the movable jaw.
- Next, work is done with a chisel, a groove for the cam lock is marked with a pencil, after which all unnecessary material is removed using different chisels.
- Using a drill, holes are made to place the pins.
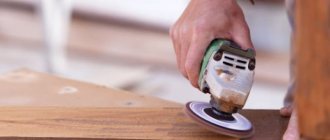
- To make the clamp look aesthetically pleasing and not leave a burr, it can be processed with a grinder or simply sandpaper of various grain sizes.
- The axial element for the operation of the tool is cut out of a metal sheet or rod. Next, holes are drilled in it to install the pins.
- After this, the clamp is assembled and its functionality is checked; if there are any shortcomings in the work, you can immediately correct them.
Helpful advice! Wooden clamps can be easily protected from external influences; for this you will need wax candles and a gas burner. The wood is lightly burned and simultaneously rubbed with a candle, as a result the wax penetrates deep into the pores of the wood. After this, the wood can be sanded and used; such a tool is not afraid of moisture and biological pests.
Jack clamps
Many experienced motorists have 2-3 jacks in their garage that are partially broken, and it would be a pity to throw them away. But such jacks can be put into use and made into excellent clamps.
And now we will share with you instructions on how to do this:
- The jack is disassembled (preferably in the order in which it is supposed to be disassembled at the factory), after that the excess structural elements are removed, you can drink them off with a grinder.
- When the 2 main elements fit closely, they are securely connected by welding.
- Next, the clamping part is created from steel spires, which are cut to size. After this, they are securely welded to the clamping part.
- Finally, all burrs are sanded off and the instrument is painted.
This clamp has a wide clamping area and enormous compression force, so it will be useful in any workshop.
Clamps from brake pads
This is one of the most reliable options, but most of these clamps are assembled with a threaded clamp, which may not appeal to everyone. The assembly is done like this:
- First, 2 crescents are cut out of the blocks using a grinder.
- You can immediately weld small pieces of steel sheet to the edges of one part of the pads; this will be the main clamping part of the clamp.
- Next, the hinged structural element is welded to the other ends of the crescent; it is important to first check that the clamping parts fit well together.
- A nut is welded to the side of one crescent.
- Plastic with a hole for the diameter of the bolt is welded to the other crescent. Already at this stage of work you can test the device.
Important! For a long service life of the clamp, it is worth removing all defects in metal processing, and then covering it with good wear-resistant paint.
If you want to significantly improve the design, you can weld a small steering wheel in the central part of the bolt, which will increase the workpiece clamping speed several times.
We hope that our article was useful and interesting for you, now you know how you can make your own clamps. We wish you all the best!
Clamp made of profile pipe
We assembled the first version of the quick-release clamp, discussed at the very beginning of the article, from a metal strip, and this clamp is intended for working with small workpieces. This is the simplest and most affordable option.
Also, a homemade quick-release clamp can be made from corrugated pipe. Its main purpose is fixation and mechanical compression of workpieces when gluing wooden panels.
These clamps are easy to make and are also quite easy to use.
They, of course, are inferior to screw clamps - the spring force is clearly not enough to glue large panels, but these clamps will still find use in a home workshop.
Since gluing wooden furniture panels requires at least two clamps, we will immediately make a set of carpentry clamps.
To make two homemade clamps, you will need to cut two blanks from a 25x25 mm corrugated pipe and two blanks from a 30x30 mm corrugated pipe. That is, one profile pipe must fit into another.
Next, we cut six more blanks from 30x30 mm corrugated pipe. We weld two parts to profile pipes 25x25 mm (perpendicular). We weld the remaining blanks to two 30x30 mm profile pipes - as shown in the photo below.
After this, we clean the metal with a grinder, cover the workpieces with primer and paint. The author uses alkyd auto enamel as paint.
We drill one hole in the profile pipes. After this, we prepare the springs and screws with nuts.
Let's start assembling. We close the ends of the profile pipes with plastic plugs.
For details on how to make clamps from a profile pipe, see the video below. This idea was shared with us by the author of the YouTube channel “Alexey Chezganov”.
Quick release clamp or don't throw away the door spring
Please note that the effectiveness of the clamps made for carpentry will directly depend on the stiffness of the spring.
Self-clamping option
For gluing parts, it is better to choose the simplest clamp model, which has an F-shape. The stores sell various models that consist not only of wood, but also of metal. The cost of such instruments is high. Therefore, many craftsmen prefer to make them with their own hands.
For small jobs, a cam-type clamp is ideal. For example, if you need to glue small parts or fix workpieces. This model works in the same way as the f-shaped element. The tool includes 2 jaws and guide bars. Sponges: movable and fixed. For reliable clamping, it is necessary to fix the workpiece well and rotate the cam 90 degrees.
You can make such a tool yourself with a minimum set of tools and materials. Before you begin, you should draw a drawing of the product. You can use any material for manufacturing, and also change the standard sizes as you wish.
The tire is made of wood or metal. Small bolts and rivets can be used instead of metal pins. It is recommended to make movable and fixed jaws at the same time, since they mirror each other. Their width and length can be changed to increase the grip of the product.
Materials and assembly steps
In order to make tree clamps, you will need the following elements:
- beech or birch block;
- feather drill;
- pipe 2.5 cm;
- mortise nuts of suitable diameter;
- a nut that has a rounded knob (used for decoration);
- a cutter with a diameter of 2.5 cm and a long pin.
The basis of the material is a pipe, from which a piece of the required length is cut. Depending on the size of the jaws, it is necessary to cut the block. The pieces should be from 15 to 20 cm. For free movement of the timber along the pipe, a hole with a diameter of 2.5 cm should be made at a distance of 2.5 cm from the edge. Parallel to the hole, a cut should be made from the same end. To fix the sponge on the pipe, connect the hole to the end.
For the driving nut, you need to drill an additional hole on the side of the cut. You need to drive a nut into it and tighten it with a bolt on the back side. To fix the sponge, clamp the pipe in the hole. To move the pipe, you need to unscrew the bolt, then move the element and repeat all the steps again.
The lower clamping part has 2 jaws; it is slightly larger than the upper one and has an additional nut. The structure of both parts is identical. An additional driving nut is located at the opposite end of the pipe into which a stud with a wing nut is installed.
In the second collapsible moving part there are no clamping parts such as cuts and nuts. The dimensions of such an element are also rather large. In this part it is necessary to make a recess for the stud device.
Operating principle
The principle of operation of the clamp is very simple. It is necessary to separate the jaws so that they are separated from each other at a distance of 3 cm greater than the width of the shield that will be installed. Next you need to fix them on the pipe. To do this, tighten the nuts that are located at the edges. The blanks must be placed on the tubes and sealed with glue. Then they need to be pulled together by rotating the “lamb”.
If you know how to use a grinder and a welding machine, you can make the same clamp for gluing wood from metal.
To maintain the plane of the plot with tubes, it is recommended to arrange the clamps in a checkerboard pattern. The main advantage of such a tool is its ease of manufacture and operation.