All materials in any production, in addition to manufacturing, require additional and finishing processing. Vivid examples of such treatments include grinding and polishing the product. These two types of mechanical action on the surface of the part bring its appearance to perfection. However, everyone knows that performing these operations by hand will take a lot of time and effort, and even processing can only be ensured by a very experienced craftsman. To facilitate this kind of work, people have come up with various devices and mechanisms to help them. Some of them will be discussed further.
Areas of use
The grinder is good and useful everywhere, including in the household - from competently sharpening a high-quality knife or tailor's scissors to grinding a complex part made of metal or other “difficult” material. In other words, the tool is needed and will be useful on the farm.
Moreover, it is quite possible to make it with your own hands. To do this, it is not at all necessary to have special equipment and solid professional experience.
Of course, you will have to tinker, but you will do exactly what you need and, most importantly, you will save a serious amount of money, up to several thousand American dollars.
Characteristics that a belt for a sanding unit must meet
Selecting an abrasive strip is an important step when assembling a mini-grinder with your own hands. First of all, you need to decide on the length of the tape and its width. The geometric parameters of the strip are influenced by two main factors:
- grinder dimensions;
- purpose of the unit.
Fabric base withstands surface tension better
Endless abrasive strips are also classified into grit types. The length of the sanding strips can be different (from 610 to 1830 mm). Such tapes have a width of 50 or 100 mm. The first option is most often found in units assembled by hand at home.
A high-quality abrasive strip must have an elastic fabric base
When choosing the right tool, you also need to pay attention to how many revolutions the strip can withstand. It is recommended to purchase products that can operate at 1500 rpm. This option is best suited for making a do-it-yourself belt grinder
The drawing drawn up earlier must contain information about the dimensions of the abrasive strip and its other characteristics
This option is best suited for making a belt grinder with your own hands. The drawing drawn up earlier must contain information about the dimensions of the abrasive strip and its other characteristics.
A good tape must have high abrasive resistance. The wear resistance of the tape depends on this indicator. For homemade machines, it is recommended to use belts whose length is no more than 123 cm. The abrasive strip must not only be resistant to wear, but also have good resistance to high temperatures generated during friction against the workpiece during operation.
It is worth noting that short-length tapes are much more susceptible to wear than longer products.
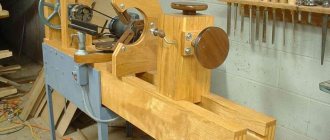
Experts advise paying attention to pictures depicting finished products. Photos of the machines allow us to answer the question of how to make a grinder with your own hands. The drawing of the device can be significantly simplified if ready-made elements purchased separately are used in its assembly
The design of the device can be significantly simplified if ready-made elements purchased separately are used in its assembly.
The speed and quality of product processing depends on the choice of tape.
And finally, special attention must be paid to the place where the abrasive tape is glued. The junction of the two ends of the strip should be as neat as possible, without any defects or protrusions
How to glue the tape for the sanding unit yourself
Belt grinders contain a spring, which performs a very important function: it tensions the belt that has sagged due to wear. The belt is changed several times even when processing a small workpiece. This should be remembered.
When assembling a grinder with your own hands from plywood or metal, you can make an abrasive strip yourself. Gluing such tape is a complex undertaking that does not tolerate mistakes. There is a lot of advice on the Internet on how to properly glue tape, but many of them are incorrect.
The gluing process is as follows. First you need to select a fabric-based sanding material. Then you should prepare both ends of the abrasive strip. To do this, they are cleaned. The seam on the strip is made exclusively using the butt method. Experts definitely recommend reinforcing the glued tape from the inside with a thick strip of fabric, which is fixed with a special adhesive composition.
Gluing tape is a complex process that does not tolerate mistakes.
In order to connect the ends of the abrasive strip, you need to purchase a special adhesive composition. The best option is to use elastic glue. There is no point in saving money, since cheap products, as a rule, are not of good quality.
Before gluing, it is necessary to prepare a strip for sanding tape. A do-it-yourself grinder (from scrap materials) needs a reliable abrasive strip, which is difficult to do at home. The process is carried out using a glue stick, which is installed on hot-melt guns. First, the composition is heated. To do this, you can use a regular hairdryer, which is found in every home.
Do we do it with a disk or with a tape?
Grinder drawing.
In terms of the breadth of the product line, grinding machines can only be rivaled by lathes. There are a huge number of grinders on the market – of all shapes and sizes.
The most famous and primitive one is in the form of the famous emery - a pair of grinding stone wheels with a screwed-on motor. These machines are sold with a wide variety of schemes and operating principles.
But if you're planning on making a DIY sander yourself, it's best to stop and choose between two options: disc or belt.
- Disc grinder - a grinding layer of abrasive is applied to the disk, which rotates when turned on.
- A belt machine in which the abrasive is applied to a belt wound on rollers.
Which one is better is a matter of debate. The correct criterion would be “which one is more necessary.” The choice should depend on what exactly you are going to sand. If these are relatively simple parts made of, say, wood, homemade disc wood sanders will be more suitable for you.
If you have serious grinding work ahead for precise finishing with complex parts, choose a tape.
It is necessary to take into account the difference between a suit and a tape, not only in terms of their functional features. Another important factor is drive power. If you are sanding small wooden sanders, you will have enough power in the range of 160 - 170 W.
This can easily be produced by a simple motor from a washing machine or even from an old drill.
Old household motors are in no way suitable for a belt grinder. There you will need an engine with a power of at least 400 - 500 W, and not a simple one, but a three-phase one with starting and running capacitors.
For grinding massive and large parts, higher power will be needed: up to 1200 W. Let us immediately note that purchasing capacitors for the machine will cost you not much less than the motor itself.
Electric motor for machine
The performance of the machine depends on the engine installed in its design
When assembling homemade equipment, it is important to carefully consider the choice of electric motor:
- Simple machines can be made using an electric motor from a washing machine. These are cheap models that surprise with their reliability, performance and durability.
- The ideal option is considered to be engines that make 1000–1500 rpm. Powerful electric motors with a rotation speed of more than 3 thousand revolutions per minute are unsafe for homemade structures. Due to the heavy load, the parts may not be able to withstand it and the machine will break.
- The optimal power indicator for homemade equipment is 100–200 W. It is desirable that the power could be increased to 400 W. You don't need more power for homemade products.
- It is best to install a three-phase motor.
Electric motor for machine
Belt
To drive the grinding wheel, you need a high-quality belt. The optimal belt width is 12 mm. Thinner models overload the engine less, but they are less durable.
Selecting a feed
A machine with a tape is more versatile in terms of functionality: it does everything that disk models do, plus much more. Let us immediately note that there are a great many options for amateur models of belt sanding machines.
The fact is that the nature of this machine is very flexible, allowing you to use a variety of available materials, including finds in scrap metal dumps.
The main thing is to know and adhere to three rules:
- The abrasive side of the belt must be adjusted very precisely so that only the workpiece that is being sanded touches it.
- The tape must be evenly tensioned at any time and regardless of the type of work.
- The speed of movement of the machine should be different and should depend only on one thing: the type of part and the nature of the grinding.
General information
Types of grinding machines
Modern manufacturers can provide three types of machine designs, namely belt, disk and cylinder. Each species has special, highly specific varieties.
For example, belt sanding machines are produced in the following design:
- Narrow-belt (you can grind wooden structures that have complex geometric shapes).
- Devices equipped with a fixed table (can only process wood pieces that have a flat, rectangular surface).
- Machines that are equipped with a freely moving bed (it is used for grinding large wooden structures - panels, doors and slopes).
The nature of the tasks that can be solved by such a device determines the class of equipment.
There are main classes (or “models” as they are also called), and these are:
- Belt grinding machines.
- Vibrating tools, for example, delta grinders.
- Disc-type grinding machines (eccentric and orbital).
- Special devices for angular grinding.
- Combined type grinding systems.
Despite the variety of ready-made factory tools, amateur craftsmen prefer for home operations to use a machine for wood and its grinding, which will be made by hand.
Operating principle
The operation of a belt-type grinding machine is based on the principle of counter-movements of the abrasive belt, which is located on two rotating drums, and the wood part being processed. Both drums are located at some distance from the desktop surface.
Incorrect selection of parameters greatly impairs the quality of grinding. For example, with a low pressure on the workpiece or a high rotation speed of the main drum, certain places on the workpiece will remain unprocessed, that is, they will not be polished. Conversely, with very strong pressure of the tape on the surface and low speed of the tape, burns may appear and even the color of the wood may change. For this reason, when assembling a mini grinding machine with your own hands, you should provide the ability to adjust the parameters.
Design Features
The machine design will depend on the chosen principle for processing the part. If you have chosen the principle of belt grinding, then the machine will contain such elements as an electric motor, two shafts (driven and driven), a housing, a base (bed), as well as a working surface and an abrasive belt. In disk-type machines on a frame with an engine, discs are used as a grinding device, which rotate with abrasive wheels attached to them.
Application area
Each of the manufactured machines will perform a predetermined list of operations. The drum-type system will produce very high-quality sanding on wood flat pieces, and it can also sand particle board, MDF or OSB, even if they are covered with veneer. Processing of large, long, non-standard wood products (for example, linear structures) is done using profile grinding equipment. Finished workpieces can be transported to the grinding unit using a transport chain. To grind the surface of wood products that have a complex geometric shape (artwork or decorative frames), belt sanding machines are used, which are equipped with a freely moving table.
Construction of a homemade belt sanding machine
Grinding machine device.
The main parts of the machine are as follows:
- A motor or motor-driven engine powered by electricity. It is better to install the drive next to the main diameter drive roller.
- Base or bed. It is often fixed directly on the floor, sometimes this thing rides on wheels - whatever is more convenient and necessary for you.
- Two tension rollers - driving and driven. Make of metal or very durable wood with a thin layer of cushioning rubber to prevent the tape from slipping onto the rollers or drum.
- Spring and lever for the belt tension system. The spring is pressed, and the lever is attached to the base and driven roller.
- Base for placing a motor with a drive.
- For abrasive tape you need to use paper or cloth. Its width can be very different - in the range from 5 to 30 cm. Grit level - from 80.
- Metal pipes with a thickness of 2 mm or more.
- Metal corners in accordance with the dimensions of the machine.
- Special magnetic stand for metal parts.
- Rail type guides.
https://youtu.be/GwylmVI7PG8
Diagram of the grinding machine.
Stages of work:
- We make the frame of the base or bed. — we cut the corners according to the dimensions of the bed; — We weld the frame and corners; — we fix a chipboard board at the bottom of the frame to reduce vibration during operation.
- Making a work surface. — cut a steel sheet to size and weld it directly to the base; — weld the rail guides to the top of the frame; — we make a carriage from corners with wheels for moving along the guides of the bed; — on both sides of the working surface we mount and fix bearing supports; — fix the screw with the handle on the carriage;
- We fix the electric motor to the working area lifting system.
- We fix the gear supports.
- We install a tape with an abrasive coating. — cut the tape with a margin of a few centimeters at an angle of 45°; — we glue it together with an overlap and coat the sides with glue with the abrasive washed off with water; — dry the gluing area with a hairdryer;
- We are preparing for a test launch of the machine. — we treat all machine parts with machine oil; — supply electrical power; - We do a trial run.
Making a do-it-yourself grinding machine
The desire to make wood structures yourself always pushes you to equip your workshop with grinding and sawing machines. Modern manufacturers produce them in a large assortment. Such machines have excellent characteristics, as well as a high degree of reliability. The most basic and significant disadvantage is the high cost. For this reason, many craftsmen try to assemble their own grinding machines from what they have at hand.
The most experienced ones try not to limit themselves to a machine that performs only one function, and assemble a universal device that can cut wooden blanks, grind and polish, remove old coatings and prepare surfaces for renovation. This is possible due to the fact that the basis of each machine is a frame on which an electric motor, driven and driven drums, and a set of additional accessories (mills, saws, grinding wheels, etc.) are mounted.
Machine power calculation
Before you start assembling the machine, you need to calculate the power.
To do everything correctly, you will need to decide on the following parameters:
- The power consumed by an electric motor.
- Motor rotation speed.
- The area of contact between the surface of the part and the moving abrasive belt.
- Grinding ratio.
- The indicator of friction between the back side of the used belt and the surface of the rotating drums.
Based on data on such parameters, the power of the future device can be determined.
How to make a belt sanding machine
To make a grinding machine with your own hands, you will need to take many points into account. The basis of the machine will be a powerful base that can support the weight of the equipment and will perform the function of damping the resulting vibration. The frame of the frame should be fastened by welding. Attach a plate on top, and as such a plate you can use chipboard, which is at least 2.2 cm thick. Next, attach an electric motor to the frame, and its power should not be lower than previously calculated. The engine speed must be at least 15,000 revolutions per minute. Attach a gearbox to the anchor to transmit rotation to the drive drum. The required diameter will depend on the rotation speed of the motor, and this will also determine the speed of movement of the belt during friction at the moment of friction against the surface of the parts.
By the way, the following ratios can be cited as an example. At a belt speed of 20 m/sec, the diameter should also be 20 cm. In order to prevent the slipping effect, rubber covers must be pulled over the drums. The platform for mounting the drums should be made at a slight slope, which will allow smooth contact when moving with the surface being treated. If you plan to process parts made of different types of wood, then it would be advisable to provide the ability to change the rotation speeds of the drum. This technique shows that it is not difficult to assemble a grinding machine with your own hands.
What to make the base (bed) from
The frame to which all other machine elements are attached is a stable, good bed. It should have a large margin of safety and also have excellent weight and size characteristics. It is made of sheet steel, with a thickness of no more than 0.5 cm. The most acceptable dimensions of a do-it-yourself frame are approximately 50 * 18 * 2 cm. For a base of this size, the optimal size of the working platform will be 18 * 16 * 1 cm. For the convenience of future work, you should make markings on the working platform, and for fastening you should make three holes, and then use three bolts to attach everything to the frame.
Selection and installation of a motor for the machine
Calculations and experience in using this type of device show that the electric motor must have a power of at least 2.5 kW, but no less. The shaft rotation speed should be from 1,500 revolutions per minute or more. The speed of movement of the abrasive belt will significantly depend on the rotation speed of the electric motor. This greatly affects how the build quality will be. In turn, the speed of movement of the belt will affect the diameter of both drums. As a finished device, you can use a motor that is usually used for washing machines. You can also choose an electric motor from another household unit, for example, a very powerful pump or other device that is suitable in terms of speed and power.
Slave and driving drum
The driving drum must be firmly fixed to the electric motor pulley, and the driven drum will be mounted on a separate axis. In order to ensure free rotation, bearings should be attached between the drum and the shaft.
Sanding belt
When making a mini grinding machine, you should take care of an abrasive belt for grinding in advance. They usually have a fabric base, and calico or another fabric of similar density is used as the base. On the surface of the material, on one side, abrasive crumbs are applied using special glue, and depending on the grain size of the crumbs, they will be divided into large, medium, small and zero.
In general, you can make such a tape yourself. To do this, select a fabric and apply abrasive powder of the desired fraction to it. After applying the adhesive to the surface of the material, sprinkle everything with powder and you will get a sanding belt of the desired size. But here it should be recognized that modern industry produces an incredibly large range of consumables, and therefore it is better to buy a finished product.
Safety precautions when working on a sanding grinder
Like any other work on any other machines, grinding on a homemade belt sanding machine is subject to fairly strict safety rules that must be strictly adhered to.
The principle of operation of the grinder.
These rules are as follows:
- It is strictly forbidden to touch anything that moves with your hands while the machine and working surface are operating.
- Wear safety glasses while working to protect against hot abrasive particles.
- Carefully check that the connections and fastenings of all moving parts of the grinder are tight.
- Monitor the condition of the braiding of electrical wires.
- A protective casing is a must, even though it slightly narrows the viewing angle.
Advantages and disadvantages
The advantages of grinding machines include:
- Quality and speed of processing.
- High performance.
- The ability to obtain the surface of the desired roughness.
- The ability to process not only the wood itself, but also pre-grind the finishing layer.
The disadvantages are:
- Release of a large amount of dust, requiring the organization of a dust removal system.
- Large quantities of consumables (abrasive) of several sizes.
- Difficult to manufacture and maintain (this especially applies to belt installations).
Considering the existing shortcomings, before starting assembly, you need to decide how necessary the machine is. If it will be used only occasionally, it is not practical to spend time on manufacturing - you can get by with hand tools.
Correct operation of equipment is the key to successful operation
The process of installing a wood sanding machine with your own hands must meet all the requirements of safety regulations. Every master should remember this in order to prevent injuries in the workplace:
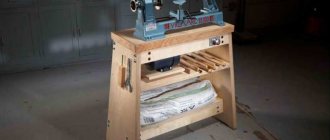
The manufactured machine is made from high-quality materials and has a reliable design
During surface treatment, do not touch the working tool or moving parts of the mechanism with your hands. When working with homemade grinding equipment, you need to wear safety glasses. For woodworking, you cannot use discs designed for metal processing, since they have a different surface structure. Before starting work, it is important to check the serviceability of the structural parts. The use of a protective guard for grinding wheels increases work safety.
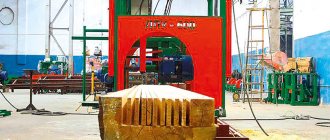
Grinder “from Chapai” - a brief overview
Grinders from Andrey Chapai have already become a household name. Hundreds and thousands of samples of grinding machines “from Chapay” have settled in the workshops of craftsmen in Russia and neighboring countries. The peculiarity of GCs (grinders from Chapai) is that they are universal and are created based on the needs of the customer: for sharpening knives or processing wood, with or without a certain type of engine. There are both mobile versions for home processing of products, and professional models.
Grinder “from Chapaya” is a universal machine for processing complex-shaped products made of metal, plastic and wood
You can buy a product, as they say, “turnkey”, or you can choose a modest set of tools and equipment.
At the moment, the most popular models of MGs are: GC-10, GC-12, GC-16 (professional series), as well as new mobile versions of the grinder 610 series GC610-63 and GC610 -71" - manufactured with zinc coating
General points characteristic of all machines:
- All mating surfaces of the grinder are polished. This helps to eliminate distortions during the running of the belt.
- Grinders come without painting or coating. The surfaces of the MS (short for grinder from Chapai) work for sliding. To prevent corrosion of the product, it is enough to periodically wipe it with a special oil or silicone spray.
- Unique pressure pad design.
I would like to dwell on the last point in more detail. The master came up with a unique design for this platform with the same size of 165x50 mm, there are 2 rotation positions for the base and two stop positions for the frame.
Options for rotating the pressure table and attaching it to the stop
Additionally, the set of tools and equipment includes a wheel for installation instead of the drive roller. It is recommended to be used when working on metal, when large amounts of paint or rust have to be removed.
Turning wheel with polyurethane coating, it is very convenient when adjusting and grinding concave slopes of products
Let's take a closer look at one of the professional models. The GC-16 is made on a reinforced rotary frame with 2 racks made of 12 mm thick sheet, which provides the necessary rigidity and allows you to quickly move the grinder to a vertical or horizontal position.
Grinder “from Chapai” – GCH -16. Appearance:
The design uses an enlarged sanding belt - 1600−1800×50 mm. And a fairly powerful engine - 2.2 kW. The machine has higher productivity and is ideal for continuous work in large industrial production. The price of such a product currently varies from 55,000 to 60,000 rubles.
Types of equipment
Woodworking machines have the same operating principle - the surface is sanded using an abrasive material, for example, a sandpaper belt or circles with a rough surface.
Grinding machines differ from each other in structure and scope of use. The purpose of the device determines which drawings should be used in the work.
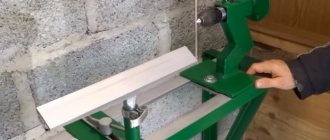
Band machine
The simplest of all models for domestic use. It allows you to make adjustments in different planes, clean and give the desired shape to products.
The basis of its mechanism is an abrasive belt stretched between the shafts, which is located in a horizontal and vertical position or at a certain angle. Below it is a low-friction working surface against which the tool rests.
Wood Belt Sanding Machine
During operation of the device, the speed of the mechanism can be adjusted. There are several models of belt sanders. They can be with a stable and movable work table, and with a free tape.
A mandatory element of their design is an exhaust device for removing dust. To make a homemade product, you will need an electric motor that can be removed from an old washing machine, rollers and a strong frame made of sheet metal.
Working elements are made of chipboard. The drive shaft is directly connected by an electric motor, and the other rotates freely on an axis, for which bearings are used for mounting.
To assemble the structure you may need the following consumables:
- wooden boards and beams;
- metal pipes;
- bearings;
- electric motor;
- pulley;
- rubber belt;
- fasteners;
- abrasive material;
- working tool for installation;
- welding machine, if the frame body is made of metal.
Drum device
Necessary for horizontal leveling and calibration of surfaces. It can be used to process slats and MDF and chipboard materials. The design of the device consists of two rollers with an abrasive belt stretched in a spiral.
Under them there is a smooth tabletop on which the workpiece is located. The distance between the shafts and the working surface is adjustable.
Drum grinding device
The work of manufacturing a drum machine is carried out in stages. First, a body is made from sheet steel or plexiglass, then the engine is mounted. An abrasive belt or cone with cutting edges is attached to the drum.
A desktop is installed at the top of the diagram. It must be adjustable in relation to the vertical cylinder. The on and off buttons are used as controls.
Disk device
Another simple homemade grinding machine is a disc grinder. It is necessary for turning large wooden products. An abrasive wheel is used as a working tool, which is attached to the axis of the electric motor.
Disc grinding machine
A special stand is installed in the center of the disk on a hinged mount, fixing the part at a certain angle. To improve the equipment, experts advise using wooden disks with different types of sandpaper.