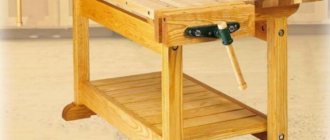
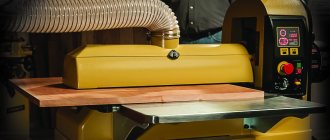
A do-it-yourself belt grinder (grinder) was conceived for such tasks as finishing grinding and polishing parts made of different materials. It can be used to process, polish, grind wood surfaces, and various other coatings. This device is mainly used in furniture production, as well as in blacksmith shops.
Such a machine will also be useful in a home workshop, but factory-made models are usually quite expensive for the average plumbing enthusiast. A much more profitable and realistic solution is to make a grinding machine yourself. It is assembled from an electric motor of 550 W, 2400 rpm, with a belt of 15 m/s, which is a very good result. The machine is based on a 120 mm channel frame, and standard 30 mm wide wheels are also used. To make a spring-loaded holder rod, a profile pipe with a square cross-section is taken. The sanding belt is tensioned by a spring.
List of materials used:
• electric motor 550 W, 2400 rpm; • channel 120 mm; • wheel, width 30 mm – 2 pcs.; • bearing; • sanding belt.
List of tools:
• welding machine; • Bulgarian; • spanners; • screwdriver.
Step-by-step description of the work on manufacturing a grinder (grinding machine)
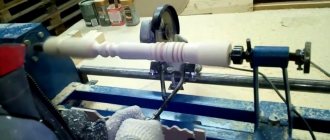
Drawings, diagrams, prototypes, which are taken as a basis.
We bore the flange on the electric motor using a lathe.
Source: www.umeltsi.ru
Device Features
The 3G71 spindle has a horizontal arrangement. This arrangement determines that the cross-type table support moves on the frame. The movement is carried out along the rolling guides. During operation, it is possible to move the workpiece in two mutually perpendicular directions.
Circuit diagram 3G71
In any passport you can find the features of the cross table:
- The instructions indicate that the mechanized feed from a hydraulic cylinder works.
- During operation, you can use a manual or mechanical feed mechanism.
- Longitudinal movement of the workpiece also allows you to speed up the work process.
- The longitudinal reverse of the table and the transverse reverse mechanism also significantly increase the functionality of the model.
There is a control panel. The back side of the frame has a column; a 3G71 spindle moves along vertical guides, which belong to the rolling category.
Other design features include the fact that there is a hydraulic type unit inside the frame. Repair of the 3G71, namely the hydraulic system, can be carried out through the left door located in the frame. The system also has a special cooling tank, which is located on the right side.
3G71 repair video
Tape grinder. Knife maker's grinding machine
A tabletop belt grinder, or, in short, a belt grinder (although, if you really pronounce this English word, it’s a grinder) is a drive device designed for grinding and finishing flat surfaces, removing a layer of rust or paint, as well as eliminating sharp edges and burrs from steel and any non-metallic parts. But the price of industrial models, even domestic ones, starts from 16...18 thousand rubles. It’s worth thinking about a homemade grinder...
Surface grinding machine device
To construct sanding equipment for wood processing, you will need the following components and available tools:
- This mechanism forms the working surface on which the performing organ is mounted. The table can be mounted relative to the tabletop in any position, depending on technological needs.
- The machine is equipped with a drive, the purpose of which is to move the work table in the required direction.
- Above this table there is a working belt. Its location is determined by a screw mechanism.
- The grinding process is carried out using the transverse movement of the table and the possibility of longitudinal movement of the iron.
- The belt moves by an electric motor.
- The machine is also equipped with a dust collector, where waste generated after grinding is transported.
When setting technical characteristics for grinding, you need to proceed from the properties of the material being processed and its roughness. Thus, the following parameters are adjusted:
- speed;
- “roughness” of the working skin;
- the force with which the surface of the workpiece or semi-finished product must be pressed against the sandpaper.
The choice regarding the grain size of the skin is made based on the desired end result. The force used to adhere the belt and the speed are the fundamental indicators. If the belt is not pressed sufficiently and the speed of the grinding process is significant, then there is a possibility of fragmentary (incomplete) processing.
This means that certain areas will not be treatable. If we simulate the opposite situation, with significant pressure and weak feed, the semi-finished product will most likely turn black.
Operation and design of the belt grinder
The principle of operation of the grinder is simple. There is a group of rollers through which a sanding belt of the required grit is passed. If you rotate the drive roller mounted on the output shaft of the electric motor, the others will automatically begin to rotate. By adjusting the relative position of the driven rollers, it is possible to grind surfaces with defects of varying depths. To compensate for the possible stretching of the belt (during its long-term operation), a mechanism is provided for tensioning one of the rollers (as a rule, the one that is located somewhere between the driving and driven ones in the kinematic chain of the machine).
The design of the belt grinder includes a table on which the product being processed should be fixed. It is better if such a table has the ability to rotate along one of the axes at an angle of up to 90º: then it is possible to grind two mutually perpendicular planes from one installation of the part. As a safety feature, it makes sense to provide a folding protective glass made of transparent acrylic on the machine frame - then there is no fear that flakes of sanded paint or scale will get into the operator’s eye. Naturally, you will need controls that are located in the bed or on the frame of the machine. Portable versions are equipped with a durable stand, on the base of which there are mounting holes, with which the grinder can be mounted on a workbench.
Let's try to abstract from the elegance of design and color, and take a sober look at the design. The visual instability of the machine immediately catches your eye: the overhang of the cantilevered rollers is much greater than the supporting surface under the bed. In addition, the absence of a table does not allow processing relatively massive surfaces, which are simply inconvenient to keep in a canopy for a long time. The increased length of the belt (and the accompanying mechanical friction losses) becomes the reason for the use of increased power in the motor drive, and, consequently, energy intensity. The tension unit is elegant and easy to set up, and the machine comes with replaceable grinding attachments that allow you to grind even internal surfaces - but is it worth shelling out more than 100 thousand rubles for this?
How do surface grinding machines work?
The vast majority of parts made of metal undergo a technological operation such as grinding. To perform it with high efficiency and accuracy, groups are used.
A rather difficult to manufacture banding machine with excellent functionality
Surface grinding machines of serial models can process both flat and profile parts. The surface processing accuracy that can be achieved using such devices is 0.16 microns. Of course, it is almost impossible to achieve such a result when processing on machines made by yourself. However, even the accuracy that homemade machines allow to obtain is quite sufficient for many metal products.
The load-bearing structural element of the machines of this group (as well as any other equipment) is the bed. Its dimensions directly determine what size parts can be processed on the machine.
The most common material for manufacturing beds of surface grinding equipment is cast iron, since this metal, due to its characteristics, perfectly dampens vibrations, which is especially important for devices of this type
Work table and controls of the 3G71M grinding machine
The structural element of surface grinding machines on which the workpiece is fixed is a work table having a round or rectangular shape. Its dimensions can vary significantly depending on the specific model of surface grinding equipment. The workpieces can be fixed on such a work table due to its magnetized surface or using special clamping elements. During processing, the work table makes reciprocating and circular movements.
In mass-produced surface grinding machines, the work tables are driven by a hydraulic system. In self-assembled equipment, mechanical transmissions are used for this.
Grinding a steel workpiece fixed on the working surface of the machine using a magnetic field
Important elements of the design of surface grinding equipment, which ensure the accuracy and smooth movement of the work table, are guides. In addition to high precision manufacturing, the guides must have exceptional strength, since in the process of almost constant movements of the desktop they are subject to active wear.
To achieve high processing accuracy, the guides must ensure accurate, smooth (without jerking) movement of the worktable with minimal friction of the contacting elements. That is why high-strength steel is used for the manufacture of these structural elements, which is hardened after the guides are made from it.
Option for manufacturing guides using angles and bearings
The working tool of a surface grinding machine, which can be a grinding wheel or an abrasive belt, is mounted on the spindle of the headstock. Rotation of the working tool, for which the main electric motor is responsible, can be transmitted through a gearbox or belt drive.
For do-it-yourself surface grinding machines, you can choose a simpler option: select the diameter of the grinding wheel so that it can be mounted directly on the electric motor shaft. This will eliminate the need to use a gear or belt drive.
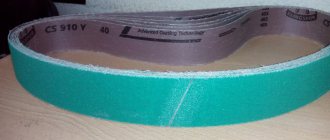
Choosing a grinder belt
It is advisable to start selecting a belt grinder from the end, namely, to determine what width and height of the surface will be processed by grinding. Then compare these needs with the actual sizes of sanding belts that are commercially available.
As you know, endless sanding belts differ in their length, width and grit level. The size range of sanding belts of domestic and imported production, which are intended for use in grinders, is as follows: length 610, 915, 1230, 1600, 1830 mm, with a width of 50 and 100 mm. You can look for others, but subject to the unconditional fulfillment of the following requirements:
- The sanding belt must have an elastic fabric base;
- Maintain angular speeds of at least 1500 min -1 ;
- Possess high abrasive resistance;
- Allow relative elongation without rupture of the material of at least 10...15%;
- Minimum heating during prolonged continuous grinding.
It should be noted that for a homemade grinder, sanding belts with a length of no more than 1230 mm are better suited. Short belts wear out more because they do not have time to cool down during their idle movement, and longer ones automatically increase the dimensions of the machine without giving any visible advantages in return.
The mechanical strength of the tape material is also important. It is strictly not recommended to rely on composite tapes, even if glued with double tape: during operation, the joint stretches, and the tension of the tape weakens. Moreover, a sudden rupture of the tape with all the ensuing consequences is possible. Taking into account the fast speed of movement of the belt along the surfaces of the rollers, the specific grinding forces should not exceed 0.7...0.8 kg/cm 2 . This corresponds to the parameters of the mechanical strength of the electrocorundum tape within the range of 800...900 MPa.
It is important that before use the tape must be hung on a cylinder with a diameter of 50...60 mm for at least 48 hours. This will ensure natural elongation of the product before use.
Homemade grinder. Important points.
There are many designs of homemade grinders. Some make them using an engine from an old washing machine, others make them from an old grinder or drill, but all these models share the same technical details. Let's look at them in more detail.
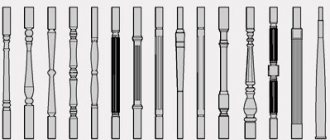
Dimensions and design
There are no specific sizes that are the same for all grinders; they can be purely individual in each specific case. When choosing the overall dimensions and design of a belt grinding machine, you need to be guided by the free space in your workshop and the rule that the longer the belt, the more resistant to abrasion it will be and, accordingly, the less often it will have to be changed. If you are going to purchase ready-made, already glued tapes for the grinder, then the machine needs to be designed taking into account the size of these tapes. If you are going to glue the tapes yourself, then the dimensions of the machine can be arbitrary, but it is best to stick to the standard sizes of the tapes.
Abrasive belts for grinders are available in two widths: 50 and 100 m. The length of such tapes can be 610, 915, 1230, 1600, 1800, 2000 millimeters.
It is best if you have an abrasive belt of the required length, then it will be easier to adjust the size of the grinder to it.
The main components of the grinder are a machine frame with a work table and a tape clamp, an electric motor with a drive roller, a tension roller, a barrel-shaped roller and, if necessary, additional driven rollers. The barrel roller can also be a tension roller.
The most compact grinder can be made with just two rollers, one driven on the electric motor shaft, and the second barrel-shaped tension roller.
Belt grinding machine with a washing machine motor.
The same machine with an engine from a washing machine. View from a different angle.
Drawing.
The machine is made with a plywood frame.
Grinder.
Grinder with furniture gas shock absorber.
This machine is made using rollers from the car's timing belt.
Another band saw with a plywood frame.
Grinder driven by an angle grinder.
Compact machine with furniture gas shock absorber.
Compact belt sanding machine on two rollers.
Machine with a plywood frame.
If the grinder will work with long abrasive belts, then it will not be possible to do without additional driven rollers.
Why do you need a barrel shaped roller? When assembling the machine, it is almost impossible to maintain perfect parallelism of the axes of all rollers. For this reason, the tape tends to come off the rollers. To eliminate this drawback, a barrel-shaped roller is used. By adjusting the tilt of its axis, you can “force” the abrasive belt to remain in place.
To adjust the axis of the barrel roller, you can use the principle of a regular door hinge. The roller axis is welded to the movable part of the hinge, and adjustment is made using a bolt. Which rests on the movable part of the loop.
The photo shows a barrel-shaped grinder roller.
Note the barrel roller and adjustment bolt.
Barrel roller with adjustment mechanism.
Barrel-shaped grinder roller.
The mechanism for tensioning the abrasive belt can be made in several ways. The most common is using a spring, the second is using a furniture gas shock absorber and the third is using regular rubber, for example from a bicycle inner tube. If you use a furniture gas shock absorber, you need to know that it does not work well at low temperatures.
It is recommended to make the tape support two-layer. Make the base of the stop from a metal sheet and glue smooth porcelain tiles onto it. Thus, the emphasis will practically not heat up during intensive work on the grinder. Also, porcelain tiles wear out much slower than metal. It can be conveniently replaced as it wears out; you just need to heat the connection with a hair dryer, and it will come off. You can glue it to a regular silicone sealant for marble, for example Silirub MA from Soudal.
The stop must be adjustable relative to the tape. It must be moved to the tape tangentially to it or with a slight overhang of up to 0.5 mm. This overhang does not cause excessive wear of the belt, but it allows you to grind long strips longitudinally without touching the convex parts of the rollers.
Porcelain tiles on a grinder.
How to calculate the diameter of the drive roller.
To calculate the diameter of the drive roller, you need to know the belt speed at which the grinder will operate and the number of engine revolutions.
Belt speed should be selected according to the belt manufacturer's recommendations. For example, for a 3M Cubitron tape on steel it should be 22-25 m/s; from the same manufacturer, a speed of 30-35 m/s is recommended for tapes with aluminum zirconate. Belt speed is highly dependent not only on the type of abrasive, but also on the grain size. And so on average it is recommended for carbon steel 32 - 38 m/sec, alloy and stainless steel 18-30 m/sec, Titanium -15 m/sec, non-ferrous metals 35-45 m/sec, plastics 10-30 m/sec, malleable cast iron 38-34 m/sec, gray cast iron 35-45. As for wood, it is recommended not to exceed 20 m/sec, and you also need to know that different wood will burn at different speeds.
Formula for calculating belt speed:
V tape (m/s) = (3.14* D * N) / 60000,
where D is the diameter of the drive wheel in mm, N is the engine revolutions per minute.
Formula for calculating drive roller diameter:
D(mm)=(V*19108) / N,
where V is the belt speed in m/s, N is the engine revolutions per minute.
Calculation example. It is necessary to calculate the diameter of the drive roller for processing steel (22-25 m/s). Electric motor 2800 rpm.
D=25*19108\2800=170.6mm
The speed of rotation of the belt for different materials can be adjusted by changing the diameter of the drive roller or adjusting the engine speed. It should also be understood that as the diameter of the drive roller increases, the load on the engine increases and if it is of low power, for example, from a washing machine, then it will often stop even from a slight load.
Which engine to choose for a grinder.
On the Internet you can find information about machines made using electric motors from old washing machines. Such electric motors are low-power and low-revving. Most often it is 180 watts and 1400 rpm. Such grinders, as a rule, do not have enough belt speed and engine power, so they can be used to perform light work, for example, sharpening knives or processing small pieces of wood. They are not designed for anything more serious.
Below is the formula for calculating engine power for a grinder.
Formula for calculating engine power:
P(W)=(D*N)\570,
where D is the diameter of the drive wheel in mm, N is the engine revolutions per minute.
If a three-phase motor is used, but connected to a single-phase 220V network, then its calculated power when connected in a delta with a working capacitor is approximately 1.5...1.6 times lower than the nominal value. This must be taken into account. For example, according to calculations, an electric motor with a power of 800 watts is required, and the motor will be used three-phase, but on a 220V network. Then the required power of such an engine will be equal to: 800 * 1.6 = 1280 watts.
The optimal choice is a single-phase motor with a speed of at least 2800-3000 and a power of at least 800 watts. With such an electric motor, it will be possible to process hardened steel on a grinder, and not just sharpen “pencils.”
We recommend reading:
How to choose and glue grinder tape.
If an open-type motor is used in the manufacture of a belt grinding machine, as in washing machines, then you should think about protecting it from abrasive and metal dust. Such protection can be made from a 5-liter plastic bottle or any other plastic container.
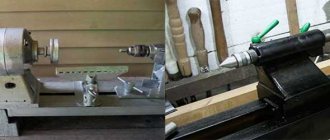
How to make rollers for a belt sander
If you know a turner, then you should not have a similar question. Well, if there are no such acquaintances, then this information will be useful to you.
There are several ways to make videos.
It is convenient to make the drive roller from a sheet of plywood. First, circles of the required diameter are marked, then they are cut out using a jigsaw. After this, the plywood circles are glued together.
Glue the plywood circles together.
After gluing, the central hole of the roller is drilled to match the diameter of the electric motor shaft. Now you need to make a keyway in the hole. It is easy to do with a file.
Making a keyway in a plywood roller.
Driven plywood roller with keyway.
Then we put the roller on the electric motor and grind it using a chisel, a large file or an angle grinder (grinder) with a grinding wheel.
We grind the plywood roller with a grinder.
To make the drive roller slip less, it can be treated with liquid rosin.
The easiest way to make driven rollers is to simply assemble them from bearings of a suitable diameter on a shaft. Partially threaded bolts can be used as a shaft. Bearings need to be sealed, otherwise they will quickly become clogged with dust and fail.
You can use timing belt rollers from your car as rollers, but don’t buy new ones, ask them at any service station. It is only desirable that the rollers be flat without shoulders. These beads can cut the edges of the tape.
Another way is to cut the rollers with a crown made from a sheet of plywood and glue the resulting washers together. You can additionally secure them with self-tapping screws. Afterwards, inside the roller you need to drill two holes on both sides of the roller for the bearings. The depth of such holes should be equal to the width of the bearings. It is convenient to drill such holes using a wood drill bit. When the holes are ready, we drill a through hole in the center of the roller for the roller axis. The diameter of this hole should be slightly larger than the diameter of the inner race of the bearing, otherwise the bearing will jam inside the roller.
After this, the roller is almost ready, all that remains is to sand it on the outside and give it the desired shape, if it is a barrel-shaped roller.
Plywood roller.
We sharpen the roller using a grinder.
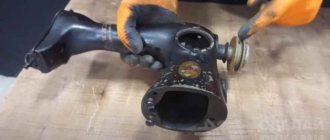
The rollers can be made from round caprolon or another name for this material is polyamide-6. The process of making a video is no different from the previous ones. We cut the workpiece to the required length, drill holes with a feather drill for the bearings and grind it on the outside using a grinder.
Another way to make driven rollers is to use couplings from a polypropylene pipe. Barrel couplings are available for sale. For example, a Czech-made coupling d 32 Wavin Ekoplastik.
Plastic plumbing coupling.
This photo clearly shows that this plastic coupling has the shape of a barrel.
Bearing No. 201 fits well under this coupling. The bearing can be pressed into the coupling using a vice.
If you need to make a straight driven roller or you couldn’t find a barrel-shaped coupling, then you can make a roller from two straight couplings. If necessary, this roller can be ground to a barrel-shaped state.
Diagram of a roller made of two plastic couplings.
Parts for making a grinder roller.
For one roller you will need two plastic couplings with an internal diameter of 32 mm, three bearings No. 201 and washers for the M12 bolt. First, the plastic couplings are cut, on one side, so that the distance from the edge of the coupling to the inner rib is 5 mm. We need the bearing to be able to enter the coupling only half its width, that is, 5mm. The bearing should rest against the internal rib of the coupling.
The photo shows a plastic coupling marked before cutting.
After cutting the couplings, use a vice to press the bearing between the two couplings. It will be inside exactly in the middle of the future video.
Now we put washers and press two bearings along the edges of the roller.
We place washers between the bearings.
All that remains is to sand the outside of the roller.
We grind the roller using a grinder.
I recommend watching a video on this topic.
Do-it-yourself grinder. Drawings with dimensions
During development, the main attention should be paid to the design of the rollers, fixation of the product during grinding and the choice of electric motor power. Let's consider these points in more detail.
Designing rollers
It is especially important to correctly manufacture the head and drive roller. It must be massive enough so that, having a noticeable moment of inertia, it does not immediately accelerate the belt to the actual values of the peripheral speed. Let's take into account that to drive a homemade belt grinder, a standard electric motor will obviously be adopted, with a slip of no higher than 9%, then this speed at a nominal 1500 min -1 will be no more than 1380...1400 min -1 . On the other hand, this roller cannot be made of steel either: when starting, the engine may not immediately turn the massive roller.
Advantages and disadvantages
The advantages of grinding machines include:
- Quality and speed of processing.
- High performance.
- The ability to obtain the surface of the desired roughness.
- The ability to process not only the wood itself, but also pre-grind the finishing layer.
The disadvantages are:
- Release of a large amount of dust, requiring the organization of a dust removal system.
- Large quantities of consumables (abrasive) of several sizes.
- Difficult to manufacture and maintain (this especially applies to belt installations).
Considering the existing shortcomings, before starting assembly, you need to decide how necessary the machine is. If it will be used only occasionally, it is not practical to spend time on manufacturing - you can get by with hand tools.
Belt grinding machine: study and do it yourself
A belt grinding machine is used in cases where it is necessary to perform finishing processing of parts, that is, as equipment for carrying out finishing technological operations. Most often, such machines are used in the furniture industry; they are used to process parts made from various types of wood. But a belt grinding machine can also be used to process metal parts, for which a belt with an appropriate abrasive material is used.
Sanding machine from a hand sander
Very often, to carry out simple grinding operations, homemade wood grinding machines are made using ready-made grinding machines.
A mounting system for a grinding machine is being manufactured. It is mounted on a pre-prepared frame. Grinding wheels intended for processing wooden workpieces are attached to its shaft. Instead of such a machine, you can use an ordinary electric drill. This design allows sanding of simple wooden parts of limited size.
Application areas of the machine
The main tasks performed by the belt grinding machine are: final leveling of the surface being processed, bringing the level of surface roughness to the required level, bringing the processed surfaces to the level of smoothness before covering them with varnish and other finishing materials. The belt machine is also used to eliminate minor defects of the processed surface: depressions, elevations and burrs, processing the finishing coating: removing sagging primer and varnish, burr, grinding internal surfaces, processing roundings on the surface of the part.
A factory-produced option, the drawings of which can be used to create a similar homemade device.
The tape machine can be used for processing parts made of various materials: wood, plain and alloy steel, non-ferrous metals. What’s convenient is that using a belt machine you can process parts that have different shapes: quadrangular, round and flat. Using such equipment, it is possible to process round and tubular parts with a large cross-sectional diameter.
The process of assembling the machine to make it as high quality as possible
Thus, a modern grinding machine can be made with your own hands, but taking into account the fact that the bars must be made of birch or pine. The most significant elements for high-quality processing of products are glued together with PVA glue, and installation of the unit is not complete without screws of different sizes.
In this case, gluing can be two simple pieces of chipboard boards, which are connected by hinges. It is best to fasten with M6 bolts.
The bottom of the machine is supported on block blocks, which are first adjusted to the dimensions of the machine, then small pieces of rubber are attached to maintain the balance of the unit during operation. From the front part, the grinding unit is attached with European screws for the manufacture of furniture to the mill and for processing the product.
This is the most convenient way to change the height of the rack if necessary - much easier than if you used nails. This helps to align the grinding surface in the desired direction.
Design features of the machine
The working tool of any belt surface grinding machine is a belt on the surface of which abrasive powder is applied. It is made in the form of a ring and is placed between two rotating drums, one of which is the leading one and the second is the driven one.
Recommendations for the direction of rotation of the machine belt
Rotation to the drive shaft of the tape machine is transmitted from an electric motor, which is connected to it via a belt drive. The speed of movement of the belt mechanism can be adjusted, thereby changing the processing modes of parts. The belt of a surface grinding machine can be positioned horizontally or vertically, as well as at a certain angle, which is allowed by some models of equipment in this category.
When choosing a belt sanding machine model for processing a particular part, it is important to consider the length of the surface that needs to be sanded. It is much more convenient to process parts on such machines whose surface length is shorter than the length of the abrasive belt and work table. If such conditions are met, the quality of processing will be much higher.
A homemade version of the machine is not so difficult to implement in a home workshop
The belt grinding machine can have different designs: with a movable and fixed work table, with a free belt. A separate category includes wide-belt equipment, the peculiarity of which is that their work table, which is also a feed element, is made in the shape of a caterpillar. In those equipment models that have a work table in their design, the abrasive belt is located in a horizontal plane, and in equipment with a free belt that does not have a work table, it can have a different spatial position.
How to make a desktop work surface with your own hands?
The best option is to choose a thick canvas for high-quality coverage. The larger the size of the desktop, the more complex the product can be manufactured. The functionality of the work bed directly depends on the ease of processing a metal or wooden surface on it.
Mechanisms for manufacturing a volumetric bed:
- Make the necessary markings.
- Drill three sockets for bolts.
- Using three bolts, secure the surface for work.
Principle of operation
The main operating parameters of a belt sanding machine include the feed speed and the force with which the belt is pressed against the workpiece. Parameters such as the degree of grain size of the abrasive belt should be selected depending on the material from which the workpiece is made, as well as the degree of roughness that the surface of the machined product should have.
The characteristics of the material being processed, in particular its hardness, primarily influence the grit size of the abrasive belt to be selected. Processing modes that are directly related to each other are feed speed and tape clamping force. So, if grinding is carried out at high speed, but with insignificant pressing force of the abrasive belt, then some areas of the surface of the part may turn out to be untreated. If, on the contrary, you increase the clamping force and reduce the feed speed, you may encounter the fact that burns and blackening of the material may appear in certain areas of the surface being processed.
Another variation of the machine - view from the working surface of the belt
The results of grinding are also influenced by how well the abrasive tape is glued together. In order to obtain high quality processing and not encounter malfunctions in the operation of the belt machine, you should not use abrasive belts that are glued incorrectly or have torn edges. When putting the tape on the equipment shafts, it should be positioned so that the overlapping end of the seam does not ride up against the surface of the workpiece, but slides along it. Learn more about gluing tape in the video below.
Any, including a manual grinding machine, must provide the ability to adjust the belt tension, which is ensured by moving a movable shaft that is not driven. Tape tension is a very important parameter, when choosing which you should follow the “golden mean” rule. If the sanding machine belt is pulled too tightly, this can lead to its rupture during operation, and if its tension is too weak, it will cause slippage and, as a result, excessive heating. The main characteristic for determining the degree of tension of the tape is its deflection, which is measured by lightly pressing on its surface in a tense state.
A manual belt grinding machine can be serviced by one operator, who moves the work table with the workpiece and rotates it so as to bring all areas of its surface under the abrasive belt.
Disadvantages of my grinding machine
We recommend reading our other articles
- Advantages of agrofibre greenhouses
- Souvenirs with a logo are the best present for partners or employees
- Why do you sell scrap metal?
- How to make the city clean
Practice has shown that the machine has the following disadvantages:
- When I got used to the machine, I realized that a 380 W motor was not enough, now I plan to convert the machine to a 1 kW motor. A machine with this engine allows you to sharpen wooden, plastic, and plywood blanks, but does not allow you to grind, for example, large boards and bars. Metal on this sharpening and grinding machine can be processed with a thickness of up to 2-3mm, a corner with a thickness of 4-5mm is already quite tedious to grind. It all depends on the goals, for me the machine performs 90% of the goals perfectly, but when I need to grind a large workpiece, there is not enough power...
- Sometimes the speed controller is missing, this can be solved by connecting a frequency converter.
- Rearranging a wheel with sandpaper takes about 5 minutes - you need to remove 2 casings and a table, and then unscrew the wheel with sandpaper - for some this is “5 minutes of work”, but for me it’s inconvenient when you need to sharpen something with finer sandpaper, but then work again with coarse sandpaper. For small jobs I use a universal machine with a drill chuck. Otherwise, it would be convenient to attach the emery to the circle with Velcro, or I’ll just make a second machine with a 1 kW motor for large jobs, and leave this one for smaller jobs.
- As I said above, replacing the sandpaper on a wheel is quite difficult - you need to tear off the old sandpaper, you can use heat or make a Velcro fastening. Although Velcro may have its drawbacks - I have not seen sandpaper for Velcro sold in our city - only small circles for a drill, and it can also fall off over time, because will become clogged with sawdust. And replacing the sandpaper on the wheel is not necessary so often - only once every few months.
- When processing wood there is a lot of dust, you need to connect a vacuum cleaner, so I started installing covers on the machine.
How to make a belt sander
Many home craftsmen and professionals are wondering how to make a grinding machine with their own hands. The reason for this question is quite simple: the high cost of serial grinding equipment, which not everyone can pay off if not used regularly. In order to make such equipment, you will need several main components: an electric motor, rollers and a reliable frame. Naturally, drawings of such a device or a photo of it would not be superfluous. Also at the end of the article you can watch videos on assembling a tape machine on your own.
The motor for belt grinding equipment is not difficult to find; it can be removed from an old washing machine. You will have to make the frame yourself; for this you can use a sheet of metal with dimensions 500x180x20 mm. One side of the frame should be cut very evenly, since it will be necessary to attach the platform on which the electric motor will be mounted to it. The platform for the electric motor should also be made of a sheet of metal with dimensions 180x160x10 mm. Such a platform must be secured to the frame very securely using several bolts.
Another version of the bed
The efficiency of a belt sanding machine directly depends on the characteristics of the electric motor that is installed on it. If you are planning to make a grinding machine with your own hands, then an electric motor with a power of 2.5–3 kW, developing about 1500 rpm, is quite suitable for you. In order for the sanding belt to move at a speed of 20 m/s when using such a motor, the drums must have a diameter of about 200 mm. What’s convenient is that if you choose an engine with these characteristics, you won’t need to make a gearbox for your grinding machine.
The drive shaft is connected directly to the electric motor shaft, and the second - driven - must rotate freely on an axis, which is installed in bearing units. In order for the abrasive belt to touch the surface of the workpiece more smoothly, the section of the frame on which the driven shaft is installed should be made with a slight bevel.
You can make shafts for a belt sanding machine from a chipboard with minimal financial costs. Simply cut square blanks of 200x200 mm in size from such a plate, drill central holes in them and place them on the axle with a package with a total thickness of 240 mm. After this, all you have to do is grind the resulting package and make it into a round shaft with a diameter of about 200 mm.
Drawings and detailed analysis of some parts of a machine made of wood.
Wood belt sander (click to enlarge)
In order for the tape to be located strictly in the middle of the shaft, the diameter of its central part should be 2–3 mm larger than at the edges. And to prevent the tape from slipping on the drum, it is necessary to wrap a layer of thin rubber on it, for which you can use an old tire from a bicycle wheel, having previously cut it along its entire length.
The sanding belt for such a machine, the optimal width of which should be 200 mm, is made from ordinary emery cloth. The standard cloth is cut into strips of the required width, and an abrasive tape is already glued from them. It should be borne in mind that the material is glued end-to-end; for this purpose, dense material is placed on the reverse side, which will strengthen the resulting seam. The properties of such a seam are greatly influenced by the glue; it must be of very high quality, then the material will not tear along the seam after a short period of use.
How to assemble a grinder from a washing machine motor: instructions
Now take the prepared corners. Using welding, connect the corners, as seen in the photo below. Parallel weld two small metal plates with holes for the bolt to the bottom.
A bolt with a spring attached to it, installed in the end hole of the structure made of corners, will help you adjust the tension of the tape on the machine. Make a hole in the top of the angle for a short bolt. Screw the short part of the corner into this place, which is not fully secured with a bolt. The short part should move, allowing you to change the tension of the tape.
Then install the roller with the bearing mechanism. Do not tighten the roller on the corner too much; it should rotate freely. Secure one end of the roller with a nut, and weld the other end to the corner with a welding machine.
Install the stud. To do this, make an additional hole in the corner under the roller. After threading the pin, secure it with two nuts on one side. When installing the stud, make sure that it fits into the thread.
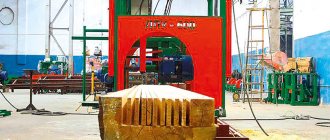
Belt grinding machine based on a grinding machine
In this instruction we will show you how to make a simple belt sander using a sharpening machine with your own hands. The homemade product does not change the design of the sharpening machine; it is an attachment that is installed instead of one of the grinding wheels. The machine copes with its tasks without problems; the materials used for assembly are quite simple. The only difficulty is making the wheels; the author makes them on a lathe. If you don’t have a lathe, you can make them out of plywood by gluing them together or use wheels from a skateboard. So, if the homemade product interests you, I suggest you study the project in more detail.
Materials and tools used by the author:
List of materials:
— plastic for turning wheels; — bearings for driven rollers; — bolts, nuts, washers, etc.; - Sheet steel; - grinder; - sandpaper or ready-made sanding belt.
List of tools:
- lathe; - drilling machine; - spanners; - Bulgarian; - a can of spray paint.
Homemade manufacturing process:
Step one. Preparing the grinder
First, let's prepare a sharpening machine. We need to unscrew the protective shield and also remove the grinding wheel, in the end only the axle will remain. On the body you can see threaded holes for attaching the shield; this is where we will now attach our attachment.
Step four. Installation of wheels and tensioner
We install the wheels on the frame, fasten the drive to the motor shaft with a nut, and the driven wheels will rotate on bolts. The side wheel will act as a belt tensioner and will also be used to center the belt on the wheels. The design of these units is very simple, everything is also made of sheet steel; you can see the design in more detail in the photo. If desired, you can install a spring that will automatically tension the sanding belt.
Most of the machine is done, you can install the sanding belt and try to start the machine. If there is no belt, you can glue it together using sandpaper.
Step five. Thrust planes
First of all, we will establish a vertical plane against which we will rest the product when grinding. We weld the plate to the frame, it is advisable to grind off its edges and polish the plate itself so that the sanding belt lasts longer. Of course, over time, the tape will polish this plane itself.
After this, we also weld the horizontal platform at a right angle.
After painting, we assemble everything and test the machine in practice. To begin with, the author tries to sand a piece of board on it, this works without any problems. A knife was also sharpened as an experiment. Of course, the speeds here are not very high, so the machine is not well suited for working with metal, but for processing wood and other household needs the machine turned out to be excellent.
That's all, the project is finished, I hope you liked the homemade product. Good luck and creative inspiration if you decide to do this again. Don't forget to share your ideas and crafts with us!
Source: usamodelkina.ru
Preparatory work
You will need to make a moving element with your own hands along which the tape will move. If you buy it separately to assemble the structure, it will cost about the same amount as a new machine.
What parts are needed for the job:
- corners: one 40 cm long and two 15 and 25 cm long;
- 2 long bolts and several regular ones, nuts, washers, spring;
- hairpin;
- a piece of metal measuring 30x100 mm.
What tools will you need:
- lathe;
- drill;
- welding machine;
- pliers;
- open-end wrenches;
- Bulgarian.
You also need parts that can only be made on a machine or ordered in a workshop. This:
- roller;
- bearing;
- sleeve;
- screw;
- shaft.