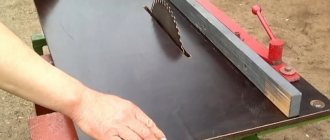
A circular saw is used to cut wood.
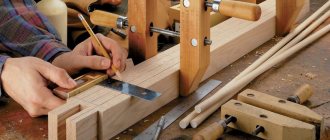
Using a hand saw is not always comfortable; using a table allows you to make the sawing process smoother and more accurate.
The cutting base has a disc-like plane equipped with an outer edge with teeth. There are models not only of the manual type, but also with the ability to be fixed on the table.
It is difficult to work with large volumes of wood with a regular circular saw, so it is better to place it on a table
There are several ways to acquire the latter for ease of manipulation. You can build a table for a circular saw yourself, strictly following a certain pattern.
Table arrangement for a circular saw
Materials
When assembling a cutting table from chipboard with your own hands, you should maintain an optimal balance between functionality, safety, time and money. This can be achieved by selecting parts and materials with the necessary parameters. It is possible to reduce costs by using old parts of other structures - furniture, frames of wooden houses and outbuildings.
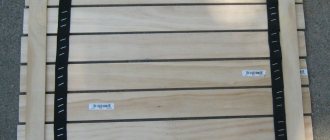
Tabletop
The main requirements for a saw table are resistance to heavy loads, shocks and vibration. The tabletop must be smooth enough to move and not bend under a weight of 50 kg or more. Suitable options might be:
- Metal (steel or duralumin) 3–5 mm thick. The advantages of metal countertops are high strength, almost unlimited service life, the disadvantages are heavy weight, decent cost.
- Laminated chipboard or moisture-resistant plywood with a thickness of at least 2 cm. The cost of this option will be the most profitable, but the strength is noticeably reduced.
- Textolite 15–20 mm thick. The material is more durable than plywood, but inferior to metal. In terms of cost, textolite countertops are also between metal and plywood sheets.
Plastic, chipboard or OSB are not recommended as countertop materials. A structure made from this raw material will be unstable to vibration from the saw. It is possible to make a table entirely from natural wood, but it is too expensive.
Metal
laminated chipboard
Textolite
bed
At the base of the table for sawing boards there can be wooden beams, secured under the lid to increase rigidity. Elements with a cross-section of at least 5 x 5 cm are placed at a distance of 50–90 mm from the edge of the tabletop. For the sawing table, it is recommended to choose bars made of hard wood - beech, hornbeam, oak. The advantages of wood are low cost, easy installation using self-tapping screws. Disadvantages - less strength and service life, high probability of fire.
The upper part of the table frame for cutting chipboard and other materials is often made by hand from the same sheets that were chosen for the table top. For the legs of a wooden structure, it is recommended to use timber, securing it with metal corners. The pros and cons of wooden supports are similar to the features of a frame made of the same material.
The basis of the table for cutting and sawing boards can be metal. Stability increases when choosing metal corners or channels with sides of 25–50 mm. To save money, they are purchased at scrap metal collection points or replaced with profile pipes. The frame parts are connected by welding. The use of bolted connections is not recommended due to the possibility of loosening due to vibration. The reasons for choosing a metal frame are maximum strength, reliability, and easy maintenance. Disadvantages: high cost, need to use a welding machine.
Wooden beams
Chipboard plywood
Miniature machine made from a washing machine engine
The circular is distinguished by its extreme simplicity and availability of materials for its manufacture. Perhaps its only expensive part is the electric motor. Stationary machines are equipped with a powerful asynchronous motor, which ensures cutting of thick wood of any species, but in a home workshop you can limit yourself to less power.
Note! To cut boards of medium thickness, it is enough to make your own circular table driven by a washing machine motor.
This design has a number of advantages. An engine from an old washing machine is inexpensive; moreover, a similar unit can probably be found in a home craftsman’s household. Connecting this motor is not particularly difficult; there is no need to look for circuit diagrams or do soldering. With all this, the power of such a unit is quite sufficient for most types of work.
The machine diagram can be simplified as much as possible by eliminating the belt drive. In this embodiment, the cutting tool will be mounted directly on the motor shaft. The base of the desktop mini-machine will be a frame assembled from a block with a cross-section of 40 x 40 mm. If desired, it can be welded from a corner or profile pipe.
Part of the body of an old TV, coated chipboard, is ideal as a stand (tabletop) for a circular table. As practice shows, this part is quite durable, and thanks to the varnish coating, it does not prevent the workpiece from sliding.
Using a jigsaw, two parallel cuts are made in the tabletop perpendicular to the cutout for the disk. A movable square will slide along them, playing the role of a side stop. It will help you make an even cut, if necessary, at a given angle.
Features of a circular saw
Knowledge of these features is extremely important; you must take into account the operating modes of the saw, know the type of loads and take all possible measures to strengthen the most important components. Only with this approach can long-term and safe operation of a homemade machine be achieved.
What are the common features of woodworking machinery?
High speed saw teeth. This ensures the quality of sawing. But high speeds of the saw blade cause serious injuries; during the manufacture of the machine, great attention must be paid to safety precautions. All devices available on industrial copies must be installed without fail. Do not think that some of them are superfluous, and you will be able to modernize factory samples for the better. All safety rules are written in the blood of injured people, do not repeat tragic mistakes.
Strength of all nodes
This means the inability to withstand significant static loads, although this is very important. The table can easily absorb large forces of this type, but at the same time vibrate under the influence of even relatively minor dynamic multidirectional loads. This condition does not have a negative impact on safety, but noticeably deteriorates the quality of the cut.
Marks of teeth are noticeable on the surface of lumber, it is difficult to maintain specified linear dimensions, etc.
Fire and electrical safety. Absolutely all electrical devices, motors, starters and other special fittings must be installed in strict accordance with the requirements of the PUE. You need to know that dry sawdust not only burns well, but also forms an explosive mixture at a certain concentration in the air. By the way, burning sawdust is difficult to extinguish; it floats on the water and continues to burn.
There is no need to make the simplest machine at the expense of safety devices; strictly follow the recommendations of the designers. Decide what you need, a woodworking machine or fresh problems?
Adviсe
- Before you start using an electric saw on a table, you should check the blade of the saw itself using a square, since some unscrupulous manufacturers do not install the blade exactly at an angle of 90 degrees, as a result of which the cuts end up beveled.
- If during work you plan to use the table also to store tools on it, then the dimensions of the tabletop should be larger than a square meter in area.
- For manufacturing it is better to use high-quality and durable materials, otherwise the table will not last long.
- The table can be supplemented with anything you like, for example, some manage to attach a special vacuum cleaner or a riving knife with protection for the disk to it, so that shavings and residues from cutting wood do not fly to the sides.
- Select a place to install the table in advance, and also make sure that the floor where the table will be installed is level.
- If you have the desire and certain skills, you can make a folding tabletop or a lifting table, but this will require more time and materials.
- If the table wobbles or vibrates during operation, adjust the height of the legs using suitable pieces of rubber.
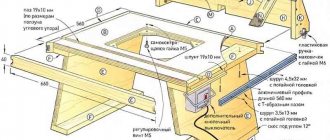
Manufacturing process: step-by-step instructions
Marking the place where the saw is attached to the table
Marking and fastening of stiffeners
Tabletop for a circular saw in finished form
To make a quality structure, you need to follow some tips. The process consists of several steps presented in the table.
| Steps | Description |
| 1 | The block should be leveled on all sides using a plane. Then the frame of the future table is assembled from it. Several 5 mm holes need to be drilled in each side of the tabletop. Additionally, one through one is made for the legs of the product. |
| 2 | The drawers have several holes of the same diameter. In the legs one through one is made. The diameter remains the same, 5 mm. |
| 3 | Proceed to install the dowels into the tabletop. Before this, they are coated with wood glue. The legs and drawers are placed on top. If there are clamps with ties, the product should be secured using them. When the glue has completely dried, you need to fasten the drawers and legs using special metal fasteners. Additionally, it should be tightened with self-tapping screws. You can add reliability and strength to the structure by using corners. They will become an element of additional fastening and give the product stability. For the short side, 2 pieces are enough, and for the long side, 3 are suitable. |
| 4 | The next step involves securing the saw to the product from the inside. There are several methods to accomplish the task. M4 bolts or bars with self-tapping screws are suitable for fastening. The first case is fast and reliable. The second method does not require additional holes, eliminating the need for drilling. You need to make a cut in bars, the width of which is equal to the dimensions of the saw platform. Next, self-tapping screws and bars on both sides fasten the equipment and the tabletop |
| 5 | After installing the saw, you will need another larger block. It is secured to the base of the structure using self-tapping screws. Screwing is carried out on the marks made when setting the platform in a level position. These manipulations will help, when removing the saw, to return it usually quickly without searching for markings |
| 6 | The saw blade is installed in its proper place. The base is sawed to obtain a longitudinal hole. Then the product must be turned over |
| 7 | Then the production of the rip fence begins. Two strips are sawn off from the plywood. Their length should match the width of the table. On average, these dimensions are 10 cm. The corners should be rounded |
| 8 | The resulting strips are polished. They need to be fastened at an angle with self-tapping screws. A metal corner should be screwed inside |
| 9 | If you need to attach a stop to the base and the structure will be used frequently, you should attach the guide so that it is perpendicular to the disk. Attach the roller to the bottom. This will allow him to move. |
Attaching the legs to the table
Attaching the saw to the tabletop
Fixing the start button
The design is completed and ready for use. When performing the described manipulations, it is important to remember to follow safety precautions. This also applies to any manipulations with a circular saw.
Regularly check the position of the table and its strength. The structure must be stable, without loosening.
An example of a manufactured work table for a circular saw
Table version for hand-held circular saw with lifting mechanism
First make sure the saw is securely fastened, only then turn it on. Do not hold the cut material with your hands. This will help prevent wood from hitting your face when the knots start to bounce. Additionally, it is recommended to use special safety glasses when working.
For safety, be sure to wear safety glasses
These simple tips will help you avoid injuries in the workplace.
Table saw
When choosing a circular saw, you need to be guided by the following characteristics:
- Saw power. If the amount of work is quite large, it is advisable to take a tool with a power of at least 1.2 kW.
- Cutting depth. The thickness of the material to be processed depends on this parameter. For hand saws it is 40–70 mm. But when installing it in a table there will be a decrease of around 10 mm.
- Button placement. The design of the sawing table must provide free and safe access to all control buttons, otherwise it will be necessary to modify the control system yourself.
- Rotational speed. For cutting wood, high rotation speed is preferred. This affects the cutting quality. For plastic, for example, this is not very good. Due to the high rotation speed of the circle, the plastic heats up. You need to choose average characteristics. 3-4 thousand rpm will be enough.
Review and comparison of factory models
| Model | Einhell RT-TS 920 | Hitachi C10RD | Jet JBTS-10 | Metabo TKHS 315 |
| Power, W | 900 | 1600 | 1700 | 2000 |
| Cutting depth, mm | 45 | 73 | 76 | 85 |
| Diameter, mm | 205 | 250 | 254 | 315 |
| Spindle frequency, rpm | 4800 | 4800 | 5000 | 2990 |
| Weight, kg | 13,2 | 27,7 | 35 | 62 |
| Dimensions, mm | 580*455*340 | 730*590*370 | 1100*800*1020 | 860*620*470 |
Einhell RT-TS 920
Hitachi C10RD
Jet JBTS-10
Metabo TKHS 315
Selection of dimensions
It is worth choosing the size of the sawing table depending on the square footage of the workshop. The small area of the room allows you to use a tabletop of 50 x 50 cm. Making the sawing table smaller does not make sense - it will be difficult to use it when processing long workpieces. The universal size, ensuring convenient sawing of laminated chipboards, is 80 x 80 cm.
To comply with safety requirements, it is recommended to place the saw in the middle of the tabletop at a distance of at least 25 cm from the edge - it is this indicator that leads to the minimum width of 500 mm. The location of the saw blade also depends on how it will be used. There are three types of design:
- for longitudinal sawing;
- for cross cutting;
- universal.
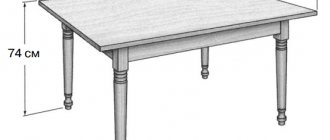
The depth and location of the disk installation depend on the workpieces processed on the machine. For boards and plywood, it should protrude above the tabletop by 50-80 mm, for logs - by 110-125 mm. The height of the upper part of the frame made of sheets of plywood or chipboard can be in the range of 35–40 cm. If you make the frame only from timber, this parameter depends on the cross-section. The remaining part of the structure consists of wooden legs, the size of which craftsmen usually choose to suit their height. The overall height of the sawing table is about 1.0–1.1 m, but can be reduced to 900 mm.
Safety requirements
One of the most common causes of injuries when using a circular saw is a cluttered workplace.
In addition, it is important to monitor the stability and strength of absolutely all components of the system, and if there is imbalance, take measures to eliminate difficulties. Before connecting the saw, you must make sure that it is well secured. If necessary, tighten the screws/bolts. It is strictly forbidden to hold the material close to the cutting site! This is dangerous due to the rebound of knots and shavings into the eyes or onto open parts of the body.
Be sure to wear glasses before work and clothes with sleeves.
Making your own saw table is not as difficult a task as it might seem. If you have good material at hand, its characteristics are chosen correctly, and the power of the device ranges from 500 to 1000 W, the above instructions will be the basis of the work.
You should not lose sight of the fact that at any stage of table production you should control the accuracy of your own operations. Otherwise, if deviations in size or deformation of the legs appear when the ribs are tightened, it will be very difficult to restore stability. Nevertheless, making a table for a circular table with your own hands is an absolutely realistic task that will take several hours.