Every person who has used a circular saw at least once knows how difficult it is to make an even cut. To somehow simplify this task, some use a special guide. This design will help you make perfectly straight cuts. Create a guide for a circular saw with your own hands.
A circular saw is often used in the household for cutting wood.
Guide bar - what is it?
Before you create such a design yourself, you need to familiarize yourself with its main features.
A guide bar is a special rail that is responsible for sliding the saw forward and backward. At the same time, it limits the movement of the tool and therefore it cannot be directed to the left or right.
This device is used not only to ensure an even cut. It also helps reduce the number of chips in places where the saw came into contact with the wood being cut.
Additional Information! Sometimes guides are included with circular saws from Bosch and Interskol.
Guide rail functions
There are several main functions that these structures perform:
- increased accuracy when sawing large materials;
- improved quality when creating a curved cut;
- simplifying the creation of parts in accordance with a certain standard;
- the ability to manufacture several parts using one template;
- increasing safety when using circular saws.
Also, with the help of guides, it will be possible to make cuttings with high accuracy.
How to make homemade accessories for a circular saw?
Materials and tools you will need:
- Textolite or plywood.
- Screws with countersunk heads.
- Support bars.
- Clamps.
- Double-sided tape.
- Hardboard.
- Silicone spray.
- Aluminum corners.
- Paraffin.
- Fiberboard.
Making a guide
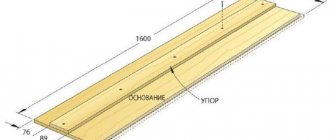
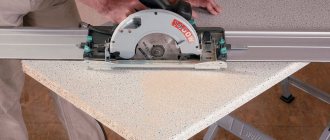
A plywood sheet that has factory edges that are even in length can be used to make a guide bar. To do this, you need to cut a strip from the sheet with a width equal to the maximum possible width of the circular saw. You need to add 20 cm to the resulting value. The length of this sheet should be slightly greater than the maximum length of the material.
First of all, you need to retreat 6-7 cm from the factory edge on the prepared piece of plywood and cut off the strip. This strip will be the ruler along which the bed of a saw of this type will move. The part of the cut sheet of plywood that remains will serve as the base on which the ruler will be fixed. The saw moves along the ruler during the cutting process.
It is important to ensure that the height of the ruler is equal to the thickness of the saw bed.
Circular saw assembly diagram.
Next you will need to install the ruler on the base. It is fixed at a distance of 10 cm from the edge. The distance may be smaller, but it should be sufficient to use clamps.
The factory edge must be directed in the direction where cutting will be done. The guide is glued to the base and additionally secured with screws.
Finally, you need to remove the excess part of the base. This can be done by using a circular saw. The finished edge on the base will be the same length as the edge of the plywood sheet on the ruler.
This guide is very easy to work with. The base with a ruler is fixed on a workpiece, for example, on chipboard. You can secure using several options. In the first method, the part of the sheet to be cut will be located on the side of the saw blade, in the second method - under the base on which the guide ruler is fixed.
Along the length of the sheet, 2 marks are made on the side that corresponds to the specified cutting methods, at the distance where the cut is located. The distance between marks should be maximum. In this case, it is important to take into account the thickness of the disk. The base of the ruler is installed using two marks and secured with clamps. The depth of the clamp jaws should ensure their installation so that at the end of the cut the saw can freely extend beyond the sheet.
If the guide ruler is long, then making a transverse cut is not very convenient. Therefore, it is advisable to make a structure that will have a shorter length. For example, for cabinets that are 60 cm wide, you will need to make a guide 1 m long.
Such devices are only suitable for working with materials that have a large width and length. It is impossible to cut the board into even beams of this design.
Designs for a circular saw that will help you make precise cuts
If a saw blade of this type leaves torn fibers and chips on the edges of the cut, then you can try to make a structure to obtain a zero gap. You will need to cut a piece of hardboard that is 6 mm thick. Next, you need to remove the disk, lift the protective casing and glue the cut piece to the base. This can be done by using double-sided tape. Next, the saw is turned on and the disc is slowly immersed in hardboard so that it is possible to obtain a cut with zero clearance.
On the resulting base it will be necessary to saw with a small feed.
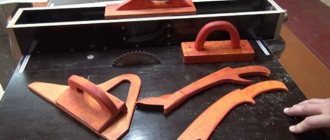
You can also make a special template. If you make a template, you can make precise cuts anywhere. The design is intended for boards 15 cm wide, but it is not difficult to adjust the device to any size or angle.
https://youtu.be/7sWCaSTCox8
The structure is made with a small allowance, after which the saw is pressed against the stop and the edge of the base is removed to the final length. The distant edge of the structure determines the line along which a saw of this type will make a cut. A mark is placed on the board in the place where it needs to be sawed off. Next, you need to press the lower stop of the product against the edge of the material and align the edge of the base with the cut mark. By passing the tool through the structure, it will be possible to cut boards with high precision.
Advantages of a homemade guide bar
The guide allows you to make straight cuts.
Many people think that homemade splints have no advantages. However, in fact they have a number of advantages:
- ease of use;
- repeated use;
- durability;
- versatility.
Homemade designs also have their drawbacks. The main disadvantage is that they are not easy to make. Therefore, to avoid problems, you need to figure out in advance how to make guides for a circular saw with your own hands.
Required materials and tools
Before you begin manufacturing the structure, you need to familiarize yourself with the list of necessary tools and materials:
- wooden blanks: boards, plywood, laminate;
- wooden bars with a thickness of 10 cm;
- self-tapping screws, screws, bolts or nuts;
- drill with drills;
- screwdrivers or screwdriver.
Additional Information! The above tools must be prepared in advance so that they are at hand while creating the guide.
Detailed instructions for manufacturing
To make a circular tire yourself, you need to familiarize yourself with the basic rules for its manufacture in advance.
From plywood
Plywood is often used to create a tire.
The plywood structure is made in several sequential steps:
- Disconnect the circular saw from the power source.
- Measure the distance from the saw blade to the groove located on the support platform.
- Cut the plywood strip so that its width is a millimeter less than the distance obtained in the previous step.
- Fasten the strip to a wide piece of plywood.
- Attach the second strip parallel to the base of the instrument.
Important! Before you make a guide yourself, you need to create a drawing with accurate calculations.
Aluminum profile tire
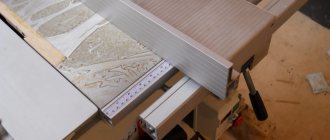
Some people want to make a more durable and high-quality structure. For this they use an aluminum profile. The only serious difference between such products and plywood is that a U-shaped aluminum profile is installed in the guide gap. With its help, it is possible to significantly increase the rigidity of the entire structure. Thanks to this, the cutting accuracy also increases.
When creating aluminum busbars, thick plywood is often used as restraints. However, it is better to install several fluoroplastic plates instead. This material is more efficient because it has a low coefficient of friction.
Other varieties
The construction rule is often used as a guide.
You can make a guide bar for a circular saw with your own hands from a miter box rail. Most often, this device is used for cross-sectioning materials. It consists of two corners that are connected in parallel to each other. Their ends must be attached to an iron or plywood base.
If the rail miter box will be used in a circular saw, it must be attached using metal pins or bolts. The structure must be installed higher so that it does not come into contact with the work surface.
Additional Information! Some people use a ruler from the building code as a guide bar. However, this design is not very convenient, since it must be configured before each use.
How to make a simple guide and cutting device with your own hands?
Diagram of the bearing assembly of a circular saw.
It makes sense to make a simple guide. In order to make cuts using a portable circular saw, you can purchase an expensive guide at a hardware store or make several homemade products in a workshop if you need to cut a large number of sheets. However, you should know that there is a simpler solution - to make a device from scraps that are not used.
In order to make a saw guide with your own hands, you need to select the factory edge of a strip of plywood or durable fiberboard 25-30 cm wide. The strip is fixed along the cutting line so that the base of the tool moves along the smooth edge. If a foam backing is used to protect the saw blade, then you need to make cutouts in it for the jaws of the clamps.
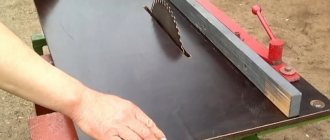
You can also make a cutting device for a similar type of saw. A clean and even cross cut can be quite difficult to make using a circular saw in some cases. It is almost impossible to drive the tool perfectly straight, and pieces of materials most often fly off, leaving behind chips and uneven edges. Therefore, it makes sense to try to make a crosscut structure from several pieces of wood and an aluminum angle.
You need to assemble the base, for which to the upper side of a piece of wooden board or plywood measuring 1.8x30x122 cm, glue and tighten with screws several parallel strips measuring 2.5x5 cm. Using countersunk screws, you need to attach aluminum corners to the strips at an angle of 90° . You need to fasten it at a distance that is equal to the width of the base of a similar type of saw. The slab will need to be adjusted so that it can cut through all the planks and make a shallow cut in the base.
The device is secured with clamps on the workbench, the workpiece is inserted under the aluminum guides and a cut is made. It may be that the saw will not slide well along the guides. To solve this problem, you will need to use silicone spray or paraffin.
Additional guide bar functions
Using a guide bar, it is extremely difficult to damage the material being cut.
Such designs have a number of additional functions that you should familiarize yourself with before using a homemade guide bar for a hand-held circular saw:
- protects the sawn material from damage;
- allows you to adjust the exact length of the cut;
- significantly speeds up the process of sawing wood;
- securely fixes the wood to the work surface.
Additional Information! Both branded guides and homemade designs can boast of the above additional functions.
Do-it-yourself accessories for a circular saw – Machine tools, welding, metalworking
How to make a circular saw with your own hands from a hand-held circular saw
If a person lives in a private home or has a garden plot, then having a stationary circular saw in the home craftsman’s arsenal is not only better, but sometimes even necessary. The simplest homemade guide bar for a circular saw or DIY.
Unfortunately, the price of an industrially made standard of such a saw does not correspond to the frequency of its home use, and for some Russians it is simply not affordable. At the same time, making a “circular” with your own hands is quite simple, using the drive of a sewing machine or an ordinary electric drill. Selecting a saw blade for a circular saw blade. The disc is needed for Selecting a 190mm disc for.
But the quality of work performed and the range of operations performed depend almost entirely on the circular saw .
Bed design
The simplest circular saw frame, the drive power of which does not exceed 0.8...12 kilowatts, is quite easy to make with your own hands from thick plywood and wooden blocks. Below are several ways to make a table from a hand-held circular saw.
For the drive, you can use an electric drill “BOSCH GSB 19-2” (power 0.85 kilowatts) or “DWT SBM-1050” (power 1.05 kilowatts), which is attached to under the stove using a special bracket. The length of the bed will depend on the length of the material being cut. For the table, you must purchase bakelite plywood with a thickness of at least 50.0 millimeters. DIY table for a circular saw.
DIY guide for a hand-held circular saw. Of course, a wooden bed is not suitable for professional work, but in order to unravel boards and quickly saw through bars, such a homemade design is quite sufficient.
In general, the bed will consist of a base and a tabletop (desktop).
Of course, when manually making a circular saw , you must strive to simplify the design as much as possible.
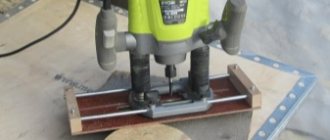
The design of the work table will primarily be determined by the design of the cutting blade mounting unit. DIY guide bar for a hand-held circular saw.
Homemade circular devices use either a circular disk mounted directly in the chuck of an electric drill, or (more preferably) a two-support shaft driven into rotation by an electric motor through a belt drive.
Making a countertop
At the first stage of making a frame with a wooden tabletop with your own hands, the existing sheet of plywood is placed in accordance with the existing sketch or drawing. In order to reduce the number of cuts, markings are carried out from the edges of the sheet. DIY accessories for circular saws. The tool used is a fine-toothed hacksaw or a jigsaw.
A few simple accessories for a hand-held circular saw. Part 1
These simple and very useful devices
for
a hand-held
circular
saw
- rip fence,
device
.
Do-it-yourself miter box or miter cutter for a hand-held circular saw
Group VK This is an easy-to-manufacture device
, for sawing at different angles, c.
A slot for the disk is marked on the underside of the sawn piece. The cut can be made with a finger cutter, securing it with your own hands in the chuck of an electric drill. DIY circular table made from a hand-held circular saw. DIY table for a circular saw.
In order to maintain the straightness of the cut edges, a simple homemade copier made from two metal corners is attached to the tabletop with clamps. Further work depends on the mechanism for attaching the circular
saws.
The easiest way is to install it manually on two bearing supports, and drive it through a belt drive from a separate electric motor or from an electric drill.
To add additional rigidity to the tabletop, it is advisable to attach stiffening ribs along its edges, which can be made from bars or aluminum corners. The stiffeners are fastened to the table using self-tapping screws.
To give greater strength to the entire structure, an additional layer of epoxy glue can be applied to the joint, which will fix the block to the tabletop along the entire plane of the joint.
The distance from the edge of the tabletop to the block should be 2.0...4.0 centimeters.
After this, in accordance with the selected drive design, the circular disk support assembly is attached.
For reliable fastening, it is better to fix the bearing housings to the frame using a screw, threaded connection.
In this case, the countersunk screw heads are located on the upper plane of the tabletop and should not protrude above its plane. The upper working surface of the desktop should be coated with wear-resistant varnish and polished.
For greater safety when working with a homemade device, it is advisable to install a swinging protective cover over the cutting edge of the disk.
Base design
For safe operation of a homemade circular saw, the table must be installed on a sufficiently rigid and durable base. To make it manually, the master’s imagination is given complete freedom. The base can be made in the form of a wooden base, but it is better to weld it from a corner (such as an aquarium frame) in accordance with the size of the tabletop.
Some manufacturing nuances
The main parameter that determines the design of a homemade “circular saw” is the thickness of the boards being cut. A circular saw is a circular hand saw for sawing boards, like.
For household work with your own hands, it is usually not necessary to saw wood thicker than 15.0 ... 20.0 millimeters.
To change the depth of the cut, you can use and/or make a special mechanism for lifting the disk, but this will significantly complicate the design of the homemade product.
Using a belt drive, you can change the speed with your own hands.
If you plan to use an electric drill as a drive, then preference should be given to models with variable chuck rotation speed, then use a DIY circular saw like this
, it will be a pleasure.
Conclusion
Despite the primitiveness of the described design, it will significantly facilitate DIY homework, from carpentry operations with boards to cross-cutting thick branches cut from garden trees.
DIY circular machine: possible design options, description of the manufacturing process
Surely most men are familiar with a hand-held circular saw. It's a useful thing, no one argues. However, it is not suitable for processing large quantities of wood. Only a circular machine can replace it. Having such a device on the farm, you can easily saw the required amount of material, give it any shape, cut blanks at any angle.
Circular machine: device and application
So, circular machines are:
- Manual (regular hand saw).
- Stationary,
which are divided into:
- household (maximum cut depth 4-5 cm),
- desktop (5-5.5 cm),
- on the bed (6-14 cm).
They are used in private households, as well as in small and medium-sized woodworking businesses. The design of such machines may differ in the materials from which they are made and in power.
Typically, the frame is made of metal and can be cast or welded , that is, collapsible. The cast frame is placed on a concrete pad reinforced with reinforcement and, accordingly, it is difficult to move it anywhere. Collapsible, on the contrary, differs, as you understand, in mobility and low weight compared to cast.
A working surface is installed on the frame - a tabletop, which is made of sheet aluminum, steel or cast iron. It must be equipped with guide rulers and a slot for saw blades.
For all this to work, you need a saw shaft on which a saw blade and an electric motor are mounted. In addition, large machines are equipped with a wood feeding mechanism. The circular saw can also be equipped with a riving knife, which prevents the sawn halves from closing together, and a protective casing , which prevents sawdust from flying in different directions.
We briefly described the structure of a factory circular saw. The cost of such devices is quite high. Therefore, sometimes the question arises: is it possible to assemble a machine to suit your needs with your own hands? Of course you can.
DIY circular machine: options
Before you move on to making a homemade machine, you need to decide what volume of work it will be designed for? If you are building something and will constantly use it, then the machine should be larger, more stable with a large tabletop . Well, if a circular saw is required periodically or for processing small-sized parts, then there is no need to make the machine large.
The simplest option is a machine made from a hand saw drilled to the tabletop. Make a cut with the same saw and get a hole for the disk. You cut out a block of the required length, attach it, and the ruler is ready. Attach the tabletop to the base so that the saw body is at the bottom, and the ruler and disk are on top. And that's it, you can start working.
How to adjust correctly
Before you start working, you need to properly adjust the structure. You will have to independently choose the optimal location and point for further fixation.
It is necessary to position the device so that its edge lies flat against the cut line and without distortion. After this, you need to adjust the placement of the saw blade. It must be torn off from the casing and aligned perpendicularly to the cutting line.
When the disk and guides are adjusted, the structure is fixed with clamps. This is done to minimize vibrations that may occur while the saw is running.
Important! To cut wood at an angle of 45 degrees, you will need to adjust the saw blade or adjust the angle on the bar itself. This must be done very carefully to avoid mistakes when adjusting the tilt.
Useful tips
Blank templates make the work much easier.
There are several useful recommendations that will help beginners use a circular saw with a guide:
- It is necessary to use special blank templates. With their help you can quickly make identical parts.
- Before starting work, you need to adjust and configure everything in advance. Only with a properly configured tool will it be possible to cut wood efficiently.
- Do not work at the circular saw for too long. The tool must be turned off periodically to prevent it from overheating.
- The tire must be securely attached. It must not slide on the work surface. Bolts or screws can be used as fastenings.
- If, during sawing, the circular saw begins to sharply slow down, it must be turned off. This often happens when a tool works continuously for a long time and begins to overheat.
Important! If you need to cut an even cut, you must use a guide. Without it, it is quite difficult to do this.
A circular saw is an indispensable tool that allows you to quickly cut wood products. People who want to do quality work should use special guides. Such designs can be purchased or made independently.
What is a circular saw?
In everyday life and in production, a circular saw is necessary for sawing various materials (wood, slate, plasterboard, soft metal, plywood, etc.). This hand-held electric tool (as standard) is designed to perform straight cuts with a depth of 40 to 140 mm (most models produced by manufacturers allow you to make right angle cuts up to 85 mm, but there is a line of more powerful equipment for construction sites). During the operation, the operator holds the device firmly in his hands and carries out sawing, moving along the workpiece. At the same time, there are no restrictions on the size of the workpieces in terms of length and width. It is possible to cut at an angle to the surface of the part.
Circular saw device
Saw models vary in power. The most budget devices have a power of up to 1.2 kW and are designed for sawing workpieces up to 4.5 cm thick. They are excellent for household needs, carrying out periodic work for short periods of time and are simple and unpretentious. If you need to make a cut up to 6.5 cm, and this needs to be done often and for a long time, you will need a semi-professional tool with a power of up to 1.8 kW . To carry out production tasks, professional equipment with a power of up to 2.2 kW , withstanding long-term loads and capable of cutting parts up to 8.5 cm thick. In addition, tools are produced intended for use in woodworking enterprises, capable of sawing workpieces up to 14 cm thick. 1 cm. Its power reaches 5.5 kW , and weight - up to 100 kg.
A circular saw
Important! For home workshops, devices with a power of about 1 kW are usually sufficient. Before purchasing a model, it is important to take this point into account, since overpaying for the saw itself and for the electricity it consumes, as a rule, is not justified by necessity.
Choosing a modification based on the purpose
When choosing disks for a tool, you need to pay attention to their technical parameters.
- Tooth sharpening angle . Soft materials are sawed with discs that have teeth inclined in the direction of rotation of the disc. To work with metal, models with a negative sharpening angle are required.
- Number of teeth . For sawing different materials, you should select discs with different numbers of teeth: for soft ones - models with a large number of teeth, for hard ones - with a small number. For example, for wood, the minimum number of teeth is 24.
The marking of the blades includes data on its diameter and the size of the seat.
To use a circular saw for a long period of time, it is important that it does not weigh too much, is ergonomic, and has well-sharpened blades. Holding the unit in your hand for a long time is not at all easy. Operator fatigue can lead to poor sawing quality. Therefore, many craftsmen who work with saws practice placing them on a table.
Circular saws are often mounted on a table
The point of such a device is to secure the saw body under the tabletop so that only one sawing disc is above the table. The workpiece moves along the tabletop and is sawed by a rotating disk. Such a stationary device greatly facilitates work and allows continuous work without loss of quality and quickly. Manufacturers offer a large number of models of saws placed on tables. The cost of structures varies from 8 (equipped with the most primitive saws) to 140 thousand rubles. Self-manufacturing of the structure allows you not only to save money, but also to have a unit at your disposal in accordance with your own requirements.
Making a table for a circular saw is easy