A successful interior is not only a harmonious combination of furniture and design, but also correctly and intelligently placed lighting. Lighting devices allow you to place certain accents on certain areas of the room and can visually enlarge the space. In addition, with the help of lamps, a special warmth and comfort is added to the living room and bedroom, conducive to relaxation.
Sconces play a special role in the modern design of a room. Today there are a lot of options that are presented in a wide range in specialized lighting stores. This allows everyone to find their own suitable option without any difficulties.
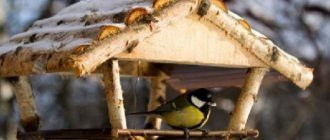
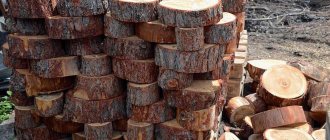
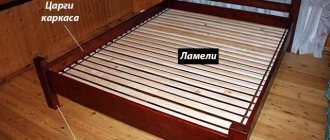
If you want something unusual and unique, then you can make an unusual sconce from an untreated tree branch. Finding a suitable base will not be difficult - you just need to go out into the park or garden, and the abundance of branches will delight you with their shapes.
Features of branch selection
- You can collect or cut down dry branches for a chandelier both in the forest and in a forest park. The smoothest and strongest pieces of wood are collected along the coastline; they are saturated with salt, polished with water and can serve as decoration for a long time.
- It is better to collect dry branches than wet ones (and, accordingly, do this in dry weather). Otherwise, the procedure for drying the branches may take some time.
- Take care of nature, do not destroy trees, do not break off living healthy branches. Try to collect fallen twigs.
- Don't take rotten pieces of wood. Even if they look artistic and make a beautiful lamp, their lifespan will be quite short.
- Before producing a wooden chandelier, the prepared material should be impregnated with a solution for wood. This way the branches will remain in their original form for a long time.
The choice of material for production depends on the purpose and design of the chandelier you plan to make:
- Floor lamps need a solid base.
- Table lamps can be made from anything.
- Hanging chandeliers look light and elegant with intricately curved thin branches.
When the format of the future chandelier has been determined, the branches have been selected, and production can begin.
What kind of wood should I take?
The surest way to find a suitable driftwood for a lamp is to go for a walk in the forest. Most often, branches can be found under old trees. Your task is to find one that has not undergone the process of rotting. It is best to look for snags immediately after a storm, since at this time fallen branches have not yet had time to begin to break down.
9 years ago Andy Whitfield passed away. How his son and daughter are growing up (photo)
Dandelion tea improves the skeletal system. 10 benefits of the drink
It's time to find out your future: on what dates in January 2022 is it customary to guess?
Take several options for driftwood at once, and as you work, you can choose the one that suits you best. For example, for this project, my husband decided to take a bird cherry branch. You can later turn the remaining driftwood into decorative lamps.
Unusual compositions
To create a non-trivial decor, you can choose floating wood. Similar branches and snags are washed up on the coast. Due to their exposure to salt water, they acquire a special beige and grayish tint.
From driftwood of an original configuration, you can create a colorful composition from natural materials. It uses moss, plant twigs and unusual cones. Similar decor can be used in marine-style interiors.
How to make a lampshade for a floor lamp or lamp - master classes
Floating wood features natural and uncluttered lines. Light shades of the material allow it to be used in any interior. Wood can also be combined with other natural materials, such as pebbles and shells.
You can make interesting decor from ordinary branches. A bunch of branches is tied with ribbon.
From large branches you can create an intricate partition. Using a screen made of natural materials, you can zone a room. A curved partition looks especially stylish. To do this, you need to make the base of a curved configuration.
Wood elements go well with unusually shaped stones. You need to pick up several flat stones and place them on top of each other, and place sprigs of greenery on top. You can place a small piece of wood nearby and add some greenery to it.
Non-standard compositions include hanging variations. Wood of different sizes is hung on a rope.
You can make a custom craft in the form of a bow. You can alternate small elements of wood and beads on the rope. You can create a similar decor together with your children.
Application in various interiors
Homemade wooden chandeliers are suitable for placement in rooms of various styles. It is recommended to use the products in houses decorated with wood (for example, in “country” or “Provence” styles). Chandeliers, stylized as a wheel, fit into the interior of the room in a “retro” style. A similar finish is used in restaurants or bars in country hotels. Additional spotlights integrated into wooden panels provide illumination of corner areas of rooms or halls.
In the “country” style, rectangular chandeliers without additional ornament are used. The rough design will once again emphasize the originality of the lamp and will not create disharmony with the surrounding interior items. In rooms with oriental notes, lamps with smooth lines, trimmed with additional decorative elements or decorated with carvings, are used.
Rooms decorated in high-tech style involve the use of wooden lamps finished with metal plates and glass, as well as additional elements made of plastic or stone. For a classic room, a lamp or chandelier with stained glass inserts is suitable. The final appearance of the light source depends only on the wishes of the customer and the skill level of the performer.
Option #5. Branches for bouquet decoration
Floral arrangements always evoke special admiration. And there is nothing surprising in this, since each such composition is unique. Let's look at how to decorate a bouquet in an original way using branches.
Stylish bouquet decoration with branches
To work you will need:
- the branches themselves (including those with leaves);
- decorative tape;
- flowers;
- pruner;
- wire cutters;
- decorative wire.
What you need for work
Step 1. First of all, the branches are cut - they should ultimately have the same length. Then a couple of pieces of wire (also the same length) are cut and folded in half. A stick is placed between the pieces of wire; one turn must be made on each side. This way it will be securely fixed.
The sticks are fixed with wire
Step 2. The remaining sticks are added one by one.
Forming a path from sticks
Step 3. The ends of the wire are securely fixed. The result will be a kind of path made of sticks.
Ready-made path made of sticks
Step 4. The finished path is laid on the table, branches with leaves and flowers are evenly distributed on it (as in the image below). The distance between them should be small. After this, the track curls, but not very tightly.
Distribute flowers and twigs with leaves evenly
Step 5. The ends of the track are connected using a small piece of decorative wire.
The path is twisting
Step 6. The composition thus obtained is decorated with a bright satin ribbon.
The composition is decorated with ribbon
Step 7. The finished composition is placed in a low glass container filled with water. Thanks to this craft, even the simplest and most monotonous interior will be transformed, filled with freshness and lightness!
Place it in a low glass vase with water.
Variety of stylistic options
To make your interior as natural, relaxed and at the same time sophisticated as possible, the main thing when choosing a floor lamp should not be confused with its stylistic design.
Art Nouveau floor lamps
A combination of modern design solutions, natural patterns and materials with traditional and familiar forms, but without brilliance or pretentiousness. They come in various design forms, from the simplest and most “strict” geometric shapes with clear lines to complex “winding” ones with many decorative elements.
Hi-tech floor lamps
Functional, aesthetic and practical lamps. High-tech floor lamps in high-tech style allow you to change the angle and direction of the light beam, ceiling height and lighting intensity. Futuristic, bold and creative, experiment with geometric shapes and lines - these are high-tech floor lamps.
Floor lamps in loft style
Loft is the most free style, it allows you to freely mix different styles and styles, it is completely open to all kinds of experiments and special design solutions.
Strict beauty and minimalism, straight lines and discreet shades will perfectly complement the design of the room. Their original design captivates true fans of modern art and connoisseurs of everything unusual and non-standard.
How to properly process branches before use?
Proper treatment of wood is a prerequisite for its long-term service. Therefore, you should always remember this fact, even if you plan to use branches to make various interior items with your own hands.
Particular attention should be paid to the state of the branch
It is important that it is dry. If dampness is detected, you will have to subject them to additional drying yourself.
To do this, you can use the oven. The fire in it should be at a minimum, and the door should be left slightly open. Leave the branches there for about an hour or two until they are completely dry. It may take a maximum of 15 minutes.
If dampness is detected, you will have to subject them to additional drying yourself. To do this, you can use the oven. The fire in it should be at a minimum, and the door should be left slightly open. Leave the branches there for about an hour or two until they are completely dry. It may take a maximum of 15 minutes.
To work with branches, it is not necessary to use them in their original form. You can use your imagination and use the following design options:
- coating the surface with wood varnish;
- paint the branches using spray paint;
- It is allowed to use enamel in any color.
Dry branches not only look beautiful and aesthetically pleasing, but will also help you become closer to nature. They are used by world famous designers to create unique and inimitable items for the home. They make excellent sconces, room dividers, bed headboards, bathroom/kitchen/hall decorations, etc.
Advantages and disadvantages
The undeniable advantages of wooden lamps: • environmentally friendly raw materials, the product is absolutely hypoallergenic; • ease of processing and installation; • presentable colorful design; • high strength. Among the disadvantages: the flammability of the material, the need for certain temperature conditions and humidity parameters, and the possibility of damage by insects.
To avoid the effects of negative factors, the product is coated with a special composition. Impregnated with the necessary substances, the tree is not subject to delamination, ignition, deformation and damage by insects.
Tip: it is better to use LED or energy-saving lamps, as they heat up less during operation.
The best option for a wooden lamp in the interior is a living room or bedroom. In rooms with high humidity (kitchen or bathroom), it is still better to use appliances made of other materials. Wooden products in a damp room require more careful care, but still lose their former luster over time. When exposed to moisture, the material may shrink or swell.
Other types of wooden chandeliers
The easiest to manufacture and assemble is a pendant lamp made from driftwood. It is also called a branch chandelier. The basis is one large piece of driftwood, which is decorated with elegant light bulbs. They look like fruits or are mounted on driftwood in simulated candlesticks.
The main difficulty is how to disguise the wiring in the snag.
Stages of work
- To assemble, trim the selected large piece of driftwood from the bark, dry it and sand it with sandpaper.
- Choose energy-saving light bulbs that are suitable in size and will not cause the chandelier to heat up.
- Make thin cuts in the driftwood using a drill. You will place the wiring in them, and then mask the holes with putty.
- Install the lamps on the branches of the structure. They can either hang freely from branches or be placed on top of lampshades.
- Such a branch chandelier can be decorated with interesting wooden toys, Soviet-era Christmas tree decorations, antique beads, chains, rhinestones - anything.
- The structure is attached to the ceiling with screws or a chain.
An interesting option is a wheel-shaped chandelier. To make this type of lamp, you need to make a wheel, which will determine the diameter of the supporting base. The wheel must include at least 2-3 layers of sheets connected with self-tapping screws. Having marked the center and rim of the wheel, carefully cut it out.
The structure is assembled using copper wire, ceramic lamp sockets and bolts for hanging the chandelier. Place the wiring between the sheets or on top of the rim.
Problems with choosing lamps are familiar to many. Lamps are purchased last, so combining them with all other interior elements can be difficult. But there is no need to despair. After all, you can make spectacular lamps yourself without spending a lot of time and money.
Preparation of a sketch and production of lamp parts
Diagram of a plywood lamp: 1,2,3 - bracket parts. 4,5,6 - details of the lampshade.
For a beginner, it is best to choose model options with parts that are easier to implement. You can make an invented item yourself or choose a model you like from any source: a magazine, the Internet, etc. It is advisable to have sketches of each part and instructions for implementation. If instead of a sketch there is only a diagram, you first need to draw each detail in natural size on a sheet and cut it out, then attach them to each other and, if necessary, make adjustments, and only after that transfer the template drawing to a sheet of plywood. If you have minimal experience working with a jigsaw, it is better to choose models without a large number of openwork elements.
After all the parts have been transferred to the plywood, you can start cutting them out. The next stage is processing them with sandpaper, first coarser, then fine, and finally, to ensure the smoothest possible surface, “zero”. After this, each part can be coated with colorless varnish or paint.
It is important to take into account the fact that the surface may “heave” - then you need to go over the painted layer again with sandpaper, and then apply one or two more, depending on the required color intensity, layer of paint or varnish
Related article: Ceramic tile thickness
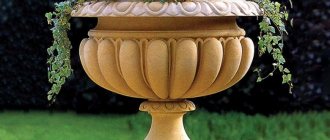
Decorative branches for a floor vase
Dry wooden branches should be appropriate in the interior. A floor vase with branches is best suited for:
- Classic style. Among the luxurious furniture, a large vase with dry branches looks great.
- Modern style. Simple compositions will suit this interior.
- Eco-style. For this direction, wooden elements are the main ones.
- Provence. This design is characterized by the use of natural materials and plant decorations. A neat vase with thin, delicate branches will be an excellent interior decoration.
- Minimalism. Here it is permissible to use a few simple, neat branches.
Branches in the interiorSource nevesta.info
Decorative branches for a floor vase can be bought at a specialty store or made with your own hands. Decor purchased in a store may have a similar shape and color. With the help of such branches you can create a symmetrical composition.
Decor made from branches made by yourself can have a natural shade.
Branch decorSource pix-feed.com
You can also paint them, giving them a shade that matches the interior of the room.
Branches in a potSource rmnt.ru
The branches in the vase can be complemented with other decorative elements or small lamps. Large branches can be placed in a pot.
Making a product by hand
It is not necessary to purchase expensive wooden chandeliers and antique lamps made in a store. It is quite possible to make an original piece of art at home with your own hands.
To do this you will need the following materials and tools:
- yardstick;
- screwdriver and pliers;
- electric wire, light bulbs and socket;
- wood drill;
- saw and hammer;
- antiseptic and varnish for wood products;
- decorative elements.
If necessary, other available means can be used. To create the most functional and safe lamp, you should follow a few simple rules:
- carefully and thoroughly treat the wood with a special antiseptic solution;
- do not neglect the quality of materials for fastening and installing the chandelier;
- use safe fluorescent or LED light bulbs;
- cover the surface of the wood with a protective impregnation from the harmful effects on the material of the environment and insects.
If you take into account all the nuances and requirements, you can easily realize any original idea for creating a wooden lamp
Such a thing will become an integral part of the interior design, will attract attention and delight the owner’s eye. Well-placed light accents using wooden lighting structures are a guarantee of unique unity and coherence in the design of the room.
Such decor will add a feeling of peace, tranquility and homeliness.
Important nuances when creating lamps
To make any type of lamps for a wooden house, apartment or cottage, do not forget to follow the recommendations of specialists and standard rules, for example:
- When working with wood, it is imperative to take safety precautions in the form of a mask, gloves, safety glasses, etc.
- Do-it-yourself bathhouse lamps, wall sconces and their analogues with one lamp have only 2 wires, and the connection principle is to connect a phase to a switch. Already from the switch, the conductor passes to the input phase, and the neutral wire is connected directly to the input zero.
- If there is not one lamp, but 2, 3 or 4, the connection remains the same with one difference - more wires.
It is also necessary to take into account the location of lighting fixtures, for example, how to make sure that table lamps made of wood simultaneously illuminate the required area of the table and do not distract attention?
Or take wall sconces for example. All this depends primarily on the room itself, what its parameters are in terms of width, height and purpose, for example:
- If the selected room is a bedroom, the optimal height from the floor level will be from 120 cm to 150.
- The living room has its own indicator. Wall lamps in it should be mounted no lower than 130 cm from the floor and no higher than 140; the difference would seem insignificant, but in practice it is noticeable.
- If the lamps are for the dacha, then if there are children, the main rule is that the child should not have direct access to them. The same goes for the children's room itself.
- For corridors there is a third rule. Based on the geometry and interior, it is recommended to install wall sconces in them at a height of 180 to 200 cm.
The main thing when making lamps from wood is to strictly follow safety rules, and when installing, make sure that, if equipped with incandescent lamps, they do not come into contact with a flammable surface.
Review of models from different manufacturers
Among the models presented on the domestic lighting equipment market, you can find wooden pendant chandeliers in the form of geometric shapes and an unusual abstract look, design developments and lamps put into mass production.
Here are some models of wooden lamps that can be purchased currently:
"VELANTE 588-706-03."
The Italian brand chandelier is produced in China, its technical characteristics:
The average cost of the model as of the second quarter of 2022 is 5000.0 rubles.
"Crystal Lux Sueno SP6".
The chandelier is manufactured in Spain, its technical characteristics:
The average cost of the model as of the second quarter of 2022 is 21,000.0 rubles.
"Eurosvet Clark 70056/6".
The model is produced in Russia, its technical characteristics:
"Alfa Pyramid 24533".
The model is produced in Poland, its technical characteristics:
The average cost of a lamp as of the second quarter of 2019 is 7,000.0 rubles.
"Arte Lamp Villaggio A3400LM-8WH".
The chandelier is made in Italy, its technical characteristics:
The average cost of the model as of the second quarter of 2022 is 14,000.0 rubles.
Draw and color
Prepare an acrylic or metal primer with acrylic paints. In addition, stock up on pearlescent aerosol, paints: metallic and fluorescent, as well as colorless acrylic varnish.
You will also need a product to degrease the surface and tape for protection.
Before painting, remove anything that can be removed from the chandelier and seal the non-removable parts. Clean and dry the chandelier, then degrease.
Drawing:
- Treat the surface with an aerosol primer, moving from top to bottom.
- After drying, apply 2 more layers.
- Draw patterns and outline with a marker.
- Paint over the elements of the drawing.
- Coat the product with varnish. After drying, remove the tape and install the removed parts.
Master class on creating a floor lamp from scrap materials
When you get tired of ordinary lampshades and want something original and exclusive, you just need to dream up your imagination and give yourself some time to implement the idea. Anything that can be useful for a floor lamp (that comes to hand) will be used, for example: the frame of an old (possibly broken) lampshade, a rope, a bunch of branches. So let's get started:
Step one is preparing the base. To make a floor lamp, it is necessary to select a suitable structure for the frame. In our case, we use a retro floor lamp that has been gathering dust in the attic for half a century. You can also make a frame from wooden planks. We remove the remaining fabric, various screws and other unnecessary parts, completely exposing the frame. Use sandpaper to remove rust.
Step two is lighting. The base for the lighting set is made of wood. You will need a round timber 5 cm high. Using a metal bracket, we attach it to the frame. At a hardware store we purchase a pre-assembled lighting kit and a dimmer. We mount it to the base.
Step three – decoration. Having prepared the branches, long from the top to the base, we begin to form the floor lamp. First, we tie a rope around the structure, which will serve as a holder for branches and a decorative element. The branches are laid out in a row and attached to the frame. The upper edges of the branches are trimmed and given an aesthetic appearance. The branches are tied with rope in several places.
Step four - finishing work. The floor lamp is equipped with a light diffuser, which can be made using tracing paper. It is rolled up and inserted into the center of the lampshade. The lamp is screwed in, it’s better if it’s a “housekeeper” - it doesn’t get so hot. Ready! Making a floor lamp is not that difficult.
The dimmer will help you choose the degree of illumination you need, depending on the situation and your preferences.
In this simple way you can make such an original and practical decorative element yourself using improvised materials. Bring your ideas to life and create exclusive things that will decorate your cozy nest.
A floor lamp, created with soul and with your own hands, will give you warmth and comfort.
Types of wooden chandeliers
Wood is truly an ageless material. And we’re not just talking about furniture production or methods of interior and exterior decoration. Today, wooden chandeliers are very popular. They can increasingly be found not only in private houses and country cottages, but also in the interiors of modern apartments. Despite the wide variety of other materials and the latest technologies, we still strive to bring at least a small piece of real nature into our home, thereby making it more comfortable and warmer. Wooden chandeliers were found even in the times of medieval castles and are now a symbol of that era. Fortunately, the choice of lamps today is much wider than in those days and is simply amazing with its shapes and style solutions.
All types of wooden chandeliers can be divided into two large groups:
Even if you fall in love with a chic hanging chandelier at first sight, be sure to consider the height of the ceilings of your apartment. Otherwise, such an amazing thing, despite all its advantages, will instantly make the room even smaller and cramped. Do not forget that it is unlikely that you will be able to create a cozy atmosphere in the room with the help of a chandelier alone. And we are not talking about a lack of light, but about the atmosphere reigning in the room. Therefore, many design experts recommend using different levels of lighting, which, moreover, can visually increase the height of the ceilings in the room. For these purposes, wall sconces with directional light output are most often used. For example, closed lamps that form a noticeable column of light above and below the ceiling will be an excellent frame for the sleeping area and “raise” the ceiling. In living rooms, be sure to use floor lamps or table lamps to create a cozy and intimate atmosphere. To make a composition of lighting fixtures for various purposes look harmonious, select elements in the same style. For wooden chandeliers - sconces or floor lamps with wooden shades, etc. Thus, it is fashionable to combine all mobile devices into a single group of portable lamps.
Original night light ideas
It is a mistake to believe that homemade night lights will necessarily look simple. After all, you can get creative with your work and create a unique and beautiful night light.
Moon
A moon-shaped lamp will require a lot of free time and effort. To create this space object you will need:
- Balloon.
- Disposable wipes.
- PVA glue.
- Paints.
- Sponge.
Progress:
- The area around the node must be outlined with a felt-tip pen with a radius of approximately 3-4 cm.
- The ball must be placed in a container with glue. The glue should cover the entire surface of the ball.
- You need to cover the surface with paper napkins. It is necessary to make at least three layers, otherwise the ball will be soft.
- When all the layers are dry, you need to apply acrylic paint to the sphere.
- Using a sponge, you need to draw lunar craters on the surface of the sphere.
- When the paint dries, you need to carefully cut a hole and remove the unnecessary ball.
- You need to place a garland in the moon night light or make a lampshade out of it.
Cloud
A budget option for a night lamp is a light source in the form of a cloud. For it you need to find:
- Shade.
- Thick wire.
- Vatu.
- LED garland.
Progress:
- You need to make a hole in the lampshade for a light source in order to place a light bulb in it. You need to pass a thick thread through the hole.
- The lampshade needs to be covered with cotton wool. There is no need to use a large amount of glue for this: you only need a few drops.
- The lampshade should be placed under the ceiling. During the daytime it will resemble an ordinary cloud, and at night it will resemble a thundercloud.
Flower
The night light will look impressive and chic, but it will take a lot of time to make.
It will require thick cardboard, rigid thick wire, paints of different colors (red, maroon or pale pink), corrugated paper, glue stick, scissors and other office supplies.
Progress:
- You need to cut out petals of different shapes and sizes from thick cardboard. These are templates for the future night light.
- You need to cut out the petals using the resulting templates.
- Corrugated paper needs to be rounded using scissors. This must be done carefully so as not to tear the thin paper.
- The resulting petals are fastened together to form a flower. You need to insert an LED into the middle. An original solution if the LED differs from the color scheme of the flower, although you can try different options.
- You can show your imagination and glue LEDs of different colors to the leaves. Although the rose night light itself will look original.
starry sky
Today, the original idea is considered to be a night light in the form of a galaxy and starry sky. If you have a lot of time, you can completely repeat the star map with constellations, or make your own fantastic scenes.
To create this original lighting device you will need:
- Glass container (a simple jar with a lid will do).
- Durable foil.
- Small flashlight.
- Base for the night light: plywood or board.
- Felt pen.
Progress:
- Use a felt-tip pen to draw stars (or other shapes) on the foil.
- Using an awl, you need to pierce the shapes and carefully work out each of them with scissors.
- After the stars are worked out, you need to put the foil in the jar so that the inside of the foil is pressed tightly against the walls.
- Place a flashlight in a makeshift night light and turn it over.
- You can use an LED garland with different lights, or an indigo light bulb.
Lace
A lamp of this type will decorate any romantic evening, and during the daytime it will fit into the classic style of the room or the Provence style. To make a night light you will need:
- Lace.
- Glass container.
- Scissors.
- LED garland.
Progress:
- The glass container must be wrapped in lace so that there is no excess left, but the edges of the fabric do not overlap each other.
- The lace needs to be stitched so that it looks like a sleeve.
- The resulting work must be placed in a jar, and a small flashlight or garland should also be placed there. Close the lid and the work is ready!
How to make your own lamp for seedlings
To grow seedlings, it is necessary to maintain a certain lighting level. In the absence of sufficient natural sunlight, it is necessary to highlight the seedlings.
You should also consider the color spectrum, which consists of colors:
- red;
- blue;
- green.
These colors are capable of producing photosynthesis in plants.
There are many different phytolamps:
- luminescent;
- sodium;
- induction;
- LED
The easiest way to make them is from phytodiodes, which can be bought at any radio parts store. Each diode has a rating. Three-watt phytodiodes are more effective. They have a fairly large resource and efficiency. The current consumption is 700 mA and the voltage is 3.2 V. These conditions must be maintained by the controller at the input. The diodes must be installed on an aluminum radiator for cooling.
What you will need
To assemble a phyto-lamp at home, you need to prepare the following materials and tools:
- soldering iron;
- drill with a drill bit with a diameter of 3 mm;
- sandpaper;
- thermal paste;
- aluminum radiator;
- phytodiodes;
- wooden beam 20 mm;
- stranded wire with a cross section of 1 mm;
- wood screws.
Step-by-step instruction
The assembly sequence is as follows:
- It is necessary to make a frame from wooden beams.
- We install the phytodiodes on an aluminum U-shaped profile using thermal paste.
- It is necessary to solder the wires to the elements.
- After connecting the diodes according to the diagram, you need to install the profile on the frame.
Phytodiodes connection diagram
The GrowByLEDs com channel presents a detailed production of a lamp for seedlings from phytodiodes.
We work with electricity
After your decor has acquired its shape, you can tackle the most difficult part, namely, connecting the electricity. Wires sold in hardware stores usually come in three colors: brown, blue and yellow-green. The latter is intended for grounding. However, outlets usually rarely have room for it.
So if you are using a ground cord, you can simply wrap it with electrical tape and leave it. All that remains is to connect the brown and blue wires. The neutral wire should be connected to the screw sheath and the phase should be tied to the center pin in the center of the socket. This is necessary because when screwing and unscrewing the lamp, the hot wire must be connected to the screw shell. If you touch the lamp threads, you may receive an electric shock.
Mum spent £5,000 renovating dingy house and now it's unrecognizable: photo
It will fall: it became known about the weather for Christmas in the European part of Russia
Sledding: a dog handler spoke about New Year's activities with a dog
Step by step instructions
Regardless of the DIY craft option, the wood needs to be prepared. For this purpose, the following are used: fungicidal impregnations, which protect against the development of mold, impregnations to protect against moisture absorption. After treatment with impregnations, the workpieces are well dried.
Simple wooden chandelier
To create a pendant ceiling lamp with your own hands, you can use straight, thick sticks. The main requirement: the diameter must be sufficient to pull the cord. For a do-it-yourself wooden chandelier we will need:
- thick sticks;
- LED Strip Light;
- water-repellent impregnation.
Sequencing:
- drill each stick in the middle;
- cover with impregnation and dry for 24 hours;
- insert LED strip into the holes;
- connect the contacts of each tape to the cable and insulate;
- hang from the ceiling with staples or a hook.
Interesting video on the topic:
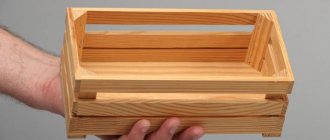
Board lamp
To create a lamp from boards you will need:
- Four plank blanks to form a rectangular frame;
- Rectangular mirror as a reflector;
- Varnish, glue;
- Drill.
Sequencing:
- We make a groove on the edge of each board for installing a mirror element.
- We make a rectangular blank from four planks, into which we insert a reflector on one side. Secure with glue.
- We make a hole with a drill in one block, insert a cable with a socket.
- Varnish or paint.
Another option is to insert darkened or multi-colored glass on both sides instead of a mirror. Then the lamp will produce multi-colored light or a muted diffused glow.
Making sconces
For a DIY wall lamp, it is better to choose geometrically correct shapes in the form of a rectangle or square. To create a wooden sconce we will need:
- flat rectangular blanks 2 pcs;
- corner block;
- self-tapping screws;
- drill;
- varnish, glue gun.
What to do:
- We treat the workpieces with fungicidal and water-repellent impregnation. After drying for two days, varnish or paint.
- We connect two blanks in the form of the letter “G” with self-tapping screws.
- Between them we install a corner with glue to impart rigidity.
- We drill a hole in the upper part for the wire and install the base.
The wooden sconce is attached to the wall with self-tapping screws or on a bracket.
We recommend videos on the topic:
An additional lamp can be installed in the L-shaped wall lamp. The color and texture of the wood will be emphasized by the warm, amber shade of the lampshade, and silver-coated glass will add contrast to the texture and color.
Features of making a floor lamp
You can make a wooden floor lamp with your own hands. For the floor lamp, wooden elements will serve as a stand. If you have a lathe, the stand can be made from cut timber. If there is no processing tool, the base for a floor lamp can be the trunk of a small tree.
In this case, dry the workpiece, remove the bark from the trunk, and sand the surface with sandpaper. Treat with anti-fungal and anti-moisture impregnations. Make a recess on the back side for the wires.
Place the trunk on a stable base. Make a frame on top with wire to install the base. On top you can put a lampshade made of fabric, paper or wood.
Wooden lampshade
You can make it yourself from thin branches. Due to their small diameter they dry faster. Small branches are more suitable for a ceiling chandelier because they have less weight than timber or solid wood. With a combination of thin elements, the lamp has an airy silhouette that does not weigh down the interior and makes the light diffuse, giving it an intimate feel.
For the lampshade you will need:
- branches;
- thick wire;
- glue gun;
- pruner
What we do:
- We sort out the sticks. Depending on the shape, we select either identical and even ones, or, conversely, with a large number of bends.
- We treat the branches with an antiseptic. If there are no special impregnations, soak for a day in a solution of potassium permanganate, dry at room temperature for a week.
- We make a frame from thick stainless wire. The shape can be any: classic trapezoid, ball, rectangle.
- We attach the sticks to the frame with glue. Don't forget to leave a gap for installing the base.
- We coat the wooden lamp with varnish. It will protect against moisture and fungus.
- We insert the lamp socket and secure it with wire.
Threads, yarn, twine
These materials will be useful to us for making a ball lampshade. Even those who are sure that needlework and crafts are not at all their element can make such a lampshade for a floor lamp with their own hands. We will use a balloon or an old rubber ball as a base. We will also need PVA glue, a deep bowl and a wide brush. The essence of the method is to wind threads around an inflated balloon. The color, thickness and number of threads used are purely individual. If you want to get a more textured and dense shade that will let in little light, use twine and wind until you cover almost the entire surface of the ball.
Before you start wrapping, lubricate the surface of the ball with rich hand cream or oil. You will thank yourself for this when you remove it from its dried-out lampshade. Pre-soak the selected threads in glue, adding a little water to it. Let them lie down and soak up this solution. This must be done so that the layers of wound threads not only adhere to the ball, but also stick together. Inflate the balloon to the desired size and draw a border on it at the top and bottom with a marker. The upper border will serve as a place for the light bulb socket. There should be no threads in these places. Start wrapping from the top edge. First, carefully lay out several turns of thread at the level of the mark. You should end up with a small circle, then bring the thread to the bottom border and do the same. If you don't want to, you can do without the bottom hole. Now that you see your limits, you can wind in different directions, creating as many intersections as possible and pulling the thread a little. Apply glue to each layer using a brush. When you reach the desired density, cut the thread and hide its edge under the circle of the upper border. Leave your creation in a warm place until completely dry. Just do not place it near the battery under any circumstances. The flow of hot air will cause the ball to deflate faster than all the layers dry, and you will get a lampshade of any shape, but definitely not round. Once dry, puncture the ball. By the way, using threads of several colors you can achieve very interesting combinations. A composition of several such lampshades of different sizes will look very harmonious.
Installing a light bulb in a lamp
The lamp, with a light bulb installed inside, creates spectacular shadows on the ceiling and walls, however, the greatest play of light and shadow will be when only incandescent lamps are installed inside the lamp. The specific method of mounting the lamp inside the chandelier will depend on the type of lamp and the socket for its installation. The photo shows a chandelier with a 22o Volt 60 Watt incandescent lamp installed inside with a standard socket. The lamp socket is secured with pieces of wire glued to the side surfaces of the lampshade. The lamp is suspended from the ceiling of the gazebo.
Homemade chandelier Play of light and shadow Chandelier made of branches
How to Make a Chandelier from Natural Material with Your Hands / Wooden Ball / Crafts Sekretmastera
Watch this video on YouTube
The idea of such a chandelier design can be further developed. For example, spray paint the entire chandelier in some color or metallic color, or pre-paint the twig blanks in different colors. A very beautiful chandelier will be made by gluing branches peeled from the bark. The spherical contour can be disrupted by knots protruding outward, which will also create an effect. If you fantasize, experiment. Without spending a lot of time and a minimum of money, you can make a very stylish gift or interior decoration.
Equipment and tools
The diameter of the future homemade chandelier is determined by the form for securing the knots. As a form, you can take a children's inflatable PVC ball of suitable diameter. When deflated, such a ball takes up little space and is easily removed from the finished lampshade. We will connect the pieces of branches together using hot-melt adhesive applied with a hot-melt gun. Hot-melt adhesive is very convenient for fastening branches, since with a small amount of glue it hardens very quickly and the connection immediately becomes strong. The difficulty in making such a lamp is in securing the first belt of branches to the form. To facilitate the process, a well-inflated ball is wrapped in one layer of stretch polyethylene packaging tape. This will allow you to attach individual pieces to the mold with hot glue.
Ball PVC Stretch Tape Ball Wrapped
How to make lamps from branches with your own hands
Nature creates beautiful forms, we just have to see and preserve this perfection. Surely you have at least once noticed the unusual shape of a branch or snag. Their beauty can be used in interior decoration not only as decoration, but also as a completely functional element.
Many ideas for the home using wood have been implemented by designers and craftsmen in order to make stylish lamps from branches with their own hands.
Almost any lamp from a branch can be made with your own hands; you will need some simple tools and skill. But working with wood will bring you pleasure; it is a responsive and warm material. You can easily find strange tree branches that have already dried up in a forest or park. Use this branch as a base for a lamp. You should not take a completely rotten tree; the base must withstand the weight of the lampshades and last a long time.
Depending on the length, diameter and shape of the branch, you can make a ceiling, floor or table lamp. For floor lamps, you need to make a reliable leg from branches, for example, pour cement mortar into some kind of container or formwork, where you insert a tree branch. Then remove the formwork and leave the bare cement or leave it in a container (large ceramic pot, bucket, flowerpot).
When the base of the lamp is ready, attach a cord with a socket and a light bulb to the branch. The cord can either be simply wound around a branch or passed through metal corners attached to the tree. Vintage lampshades, old lampshades or just bare light bulbs will look equally interesting and stylish with a branch.
Ecological lamps made from branches will harmoniously fit into almost any interior; the main thing to remember is that moderation is needed in everything. You should not literally clutter up the space with decorative twigs, snags and branches.
And here's another interesting way to make a lamp:
And this is absolutely lovely:
DIY PICTURE LAMP FROM FRAME AND BRANCHES
- 2 frames with a side of about 50 cm and a thickness of 4-5 cm,
- LED cord, power supply for LED,
- electrical cable with plug and switch,
- drill, paint, double-sided tape, wooden rods.
A DIY lamp with the effect of illuminating a painting will decorate any room
1. First of all, carefully remove the glass and the back surface of the frame. Put it all aside, we will need it later. We still have the frame of the frame together with the passe-partout in our work.
2. In the upper part of the frame, retreating 10 cm from the left and right, carefully drill 12 holes in the central part with a drill. The distance between the holes is the same; the size of the holes should allow you to insert the rods you have chosen for the lamp.
Drill holes for the rods in the top of the frame for the lamp
3. On the opposite side of the frame, opposite the one where you drilled the holes, glue two strips of double-sided tape. Attach an LED cord with 3-4 light-emitting elements to them. Connect them to an electrical cord with a switch and plug.
Attach LED elements to the lamp with tape.
4. The back surface of our frame, which will be visible behind the bars, can be decorated in a variety of ways, for example, painted brown, or applied with gypsum putty to add texture. Before finally assembling the painting lamp, make sure that the painted surface is completely dry.
A painting lamp that you made with your own hands will add style to your interior.
5. Insert the rods into the holes at the top of the frame. If necessary, trim them so that they form a beautiful composition. Insert the back of the frame with the painted side facing the bars. Your unusual painting lamp is ready!
6. When your first lamp is ready, follow the same steps for the second lamp. By making such an amazing lamp with your own hands in a couple of hours, you will create a bright, interesting accent in the interior of your home.
And another portion of ideas using branches:
This kind of panel thing can definitely be used to collect branches in our forests.
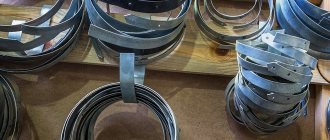
The branches for the bowl seem to be simply connected with thin wires and painted. Although birch branches, plastic and flexible, can be intertwined and the fortresses can still be connected at the points of contact.
Wall or ceiling painting chandelier
Materials that will be needed for work:
- frame with glass of the same size (one side is 50-60 cm, thickness is 5-8 cm)
- LED Strip Light
- LED wiring
- plug and switch
- drill
- double sided tape
- wooden rods
- paint (acrylic)
Step-by-step instruction
- Remove the glass and backing from the frames, leaving only the frame.
- On the crossbar of the frame, retreat 15 cm from both edges and mark with a pencil.
- Drill 8-10 holes between the notches at equal distances from each other. Marks in the places under the hole will help you avoid unevenness. The holes must have a diameter that matches the diameter of the prepared rods.
- Apply 2 strips of double-sided tape along the edges of the frame. Glue the LED strip onto it.
- Connect the light elements with a cord to an electrical plug, do not forget about the switch.
- Since the back of the frame will be visible behind the decorative branches, it needs to be decorated. The backdrop can be improved by decoupage or covering it with special paints that add an interesting texture to the material.
- Dry all elements thoroughly and check the light range for functionality. Now the picture lamp can be assembled.
- Insert the prepared branches into the drilled holes. If necessary, trim them so that they look harmonious. Connect the frame to the dried, decorated backdrop.
Such a lamp will look harmonious on the ceiling above the dining table or seating area, as well as on the wall. If you place the composition in a frame on the wall, you can make a second similar chandelier for the opposite wall as a design solution.
Wooden balls
The most popular DIY lamps often have a spherical shape. So, in fact, you can make an original twig ball-shade out of waste. The same technique is used here as when creating thread balls. To do this, wrap an inflatable ball of the correct shape in film, attach small pieces of sticks using a thermal gun (10-12 cm centimeters - based on the size of the ball, the smaller it is, the shorter the length of the sticks.)
Ball-shaped lampshade
Done, you can enjoy your exclusive lampshade. If desired, open it with paint, varnish or silver from a spray can.
In the same way, you can randomly wrap fresh willow twigs (or young bamboo shoots) around a round (square or cylindrical) base. True, the finished lamp will have to stand longer so that the branches dry out properly.
Willow lampshade
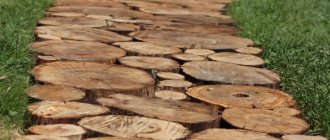
Truly magnificent ball lamps are made from medium-thick branches, cut into round shapes. Drill a hole in the center in each, do not make it too small - the light transmission of the “shade” will depend on this. And glue them together according to the algorithm described above.
Lamp made of branches
Take branches of different diameters to fill the surface of the base as tightly as possible when gluing. Such an original lamp will decorate a country house even during the daytime. Definitely worth spending a few hours creating.
Country ceiling lamps
A spectacular chandelier can be made from thin slices of wood and sections of bark - the most difficult thing is to make a neat cut. Connect them one by one, taking into account that the tiers should be of different sizes and arranged in descending order, imitating a cone.
Chandelier pinecone
We found a lush rhizome - great. This is a ready-made lamp for the bedroom - you just need to paint it to match the existing interior.
Rhizome chandelier
And in the evening your room turns into a forest thicket - the chiaroscuro is so realistic.
Preparation of material
Preparations of twigs
We will need pieces of thin branches with a maximum diameter of 5-6 mm and a length of 7 - 12 cm. The material is cut out with your own hands using garden pruners from the branches remaining after pruning bushes or trees; you need to cut twigs with one or two side branches, all side branches must almost lie in the same plane (if you have experience, this rule may not be followed further). Branches that look like the letter “Y” are ideal. It is very good if the branches are dry and the bark on them holds tightly; if the branches are fresh, then the harvested material should be dried for several days to give the branches strength. The number of branches depends on their size and the diameter of the chandelier; it is better to make a lot of blanks with a reserve so that there is a choice of different branches.
Ball chandelier made of branches
The principle of working on such a chandelier is similar to the design of hollow elegant balls of yarn.
Materials that will be needed for work:
- thin dry twigs
- inflatable beach ball
- double sided tape
- paint in a can
- wood varnish
- chandelier hanging chain
- wood glue
- cling film
- a tool for cutting branches (for example, pruning shears)
Step-by-step instruction
- Clear the branches of twigs and leaves, cut them into pieces of equal length, for example, 10-20 cm.
- Inflate the beach ball. Wrap it in cling film.
- Secure the film-wrapped ball onto the work surface with tape to keep it stable.
- Place twigs on top of the ball, coating them with wood glue. It will work out beautifully if the branches do not protrude more than 3 cm from the surface of the ball.
- Wait at least 5-6 hours until the glue is completely dry. Then remove it from the tape and turn it slightly to the side. Re-attach with tape to your work surface.
- Continue gluing the branches in the same way, leaving only a small window measuring 10 by 10 cm uncovered. It will serve as a hole for installing the lamp and socket on top of the chandelier.
- Leave the chandelier for several hours until it is completely glued.
- The base - the ball - should be deflated (or cut) and removed from the almost finished chandelier through a mini-window created in the branches.
- Now the chandelier can be spray painted or varnished. However, you can decorate it in any way.
- Attach a chain to the product and secure it to the ceiling by threading the socket and lamp inside the ball.
When choosing a light bulb, you should be careful - wood is a fire hazard. Therefore, it is necessary to choose a lamp that will not heat up.
Fabric lampshade decoration
A table lamp with a lampshade looks much nicer than just an ordinary bare lamp. But if a monochromatic color is chosen for the lampshade, then you can decorate it in an original way. Here are some ideas on how you can make an interesting lampshade decoration out of fabric.
Lampshade in Provencal style
In order to decorate a plain lampshade, you will need a piece of fabric and fringe. Typically, green, turquoise and pastel shades of colors are used for the Provence style; checkered colors or floral patterns are also suitable.
First, you need to select a suitable fabric for a plain lampshade and cut two strips from it - one to decorate the top of the lampshade. This strip of fabric should be long enough to completely wrap the circle and make a bow. The second strip should be the length of the circumference of the bottom of the lampshade, and fringe must be sewn to it. This can be done on a sewing machine.
All free edges of the fabric must be processed so that it does not fray. After this, using glue or thread with a needle, you need to attach the fringed ribbon to the base of the lampshade so that the fringe hangs down.
Then you need to decorate the top of the lampshade. To do this, you need to glue or also sew a ribbon along the circumference, and tie the free edges with a bow.
You can also use lace for a Provencal style lampshade. The good thing about this element is that it can simply be glued to the fabric.
You can make lace flowers, stripes, or completely cover the fabric lampshade with lace napkins.
Lampshade with fabric flowers
Another unusual idea that will allow a table lamp with a lampshade to look like a flowerbed is to decorate it with fabric flowers.
Fabric in delicate shades is perfect for flowers; you can use, for example, organza or chiffon, or you can simply take, for example, an old jacket, cut strips and twist them into roses.
You can decorate a lampshade with just a few flowers, but if you have time and patience, you can make a whole bunch of flowers to completely cover the lampshade.
DIY lampshade made from scraps
If you have many pieces of different fabric at home, you can make a lampshade from multi-colored scraps.
In order to make such a lampshade, you need to use the technique of sewing pieces to a fabric base. The easiest way is to cut a piece of fabric to the size of the frame and divide it into several wedges.
Then you need to sew patches to each wedge the way you like - you can sew strips of fabric diagonally, or make small squares. To avoid delaying the process, it is better to use a sewing machine.
After this, all the wedges with patches will need to be sewn together and glued to the base of the lampshade.
This lamp can fit perfectly into a country style!