When the phrase “wooden box” is mentioned, many people immediately imagine a standard fruit box. Although in fact boxes can be very different and used for all sorts of purposes.
This is a very useful product that can be used in everyday life, not only somewhere in the country, but also just in the house. Let's figure out how to make a wooden box with your own hands, because only a homemade thing can be not only unique and as convenient as possible, but also completely safe.
DIY wooden box
Materials for creating a box
To create a box with your own hands, you can use a variety of materials.
It includes:
- Wood;
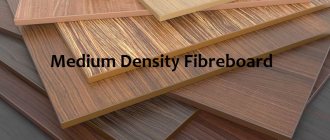
- Chipboard, fibreboard, plywood;
- Sheets of plastic and metal.
Any such raw material has its own characteristics:
- Plywood with wood is easy to process;
- The use of plastic makes it possible to use the structure in a humid environment;
Metal allows you to build boxes of high strength, which can then store heavy objects.
Pros and cons of using a vegetable box on the balcony
Vegetables spoil quickly and storing them is very troublesome.
In a room with high humidity, potatoes will quickly germinate, and other vegetables will begin to rot. At high temperatures there is a risk of parasites. If the winter is too cold, the potatoes lose their taste and become sweet.
Vegetables should be stored correctly in a special box. In an apartment it can be placed on the balcony.
Advantages of a container or box for storing vegetables:
- Optimal humidity level.
- Potatoes don't sprout.
- Condensation does not accumulate in the middle.
- Sun protection.
- Convenience.
- Beautiful appearance.
You can place the box in the closet under the window and fit it beautifully into the design of the balcony.
There are also disadvantages:
- Before storage, all vegetables are sorted, dried, and prepared ;
- in any case, you will have to pay for a ready-made box, or for materials and build it yourself.
Choose healthy and large potatoes for storage. But washing it is prohibited.
The container should be disinfected with a solution of potassium permanganate before use.
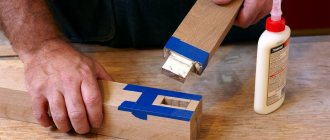
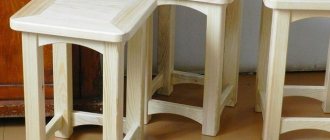
Making a wooden box with your own hands (step-by-step instructions)
Since the distant past, people have learned to make various crafts from wood. This material is known for its durability and affordability. Moreover, it is easy to process mechanically.
When planning to make a wooden box, you need to understand some requirements for it:
- Find out the dimensions of the future structure;
- For what purposes will it be used?
- The conditions under which this product will be used.
These aspects will help you design the box correctly and use it for its intended purpose for a long time.
Installation and connection of elements
All modern automatic devices and RCDs have a unified mounting for a standard mounting rail (DIN rail). On the back they have a plastic stop that snaps onto the bar. Place the device on the rail, hooking it with the recess on the back wall, and press the lower part with your finger. Once clicked, the item is installed. All that remains is to connect it. They do it according to the scheme. The corresponding wires are inserted into the terminals and the contact is pressed with a screwdriver, tightening the screw. There is no need to tighten it too much - you can squeeze the wire.
They operate with the power off, all switches are turned to the “off” position. Try not to grasp the wires with both hands . Having connected several elements, turn on the power (input switch), then turn on the installed elements one by one, checking them for the absence of a short circuit (short circuit).
Connecting the input machine and RCD
The phase from the input is supplied to the input circuit breaker, from its output it goes to the corresponding input of the RCD (place a jumper with a copper wire of the selected cross-section). In some circuits, the neutral wire from the water is supplied directly to the corresponding input of the RCD, and from its output it goes to the bus. The phase wire from the output of the protective device is connected to the connecting comb of the machines.
In modern circuits, the input circuit breaker is installed two-pole : it must simultaneously disconnect both wires (phase and zero) in order to completely de-energize the network in the event of a malfunction: this is safer and these are the latest electrical safety requirements. Then the circuit diagram for switching on the RCD looks like in the photo below.
When using a two-pole input circuit breaker
To learn how to install an RCD on a DIN rail, watch the video.
In any circuit, the protective grounding wire is connected to its own bus, where similar conductors from electrical appliances are connected. Grounding is a sign of a secure network and doing so is vital. Literally.
To learn how to properly connect an RCD, watch the video tutorial.
When assembling the panel yourself, please note that the input machine and the meter will be sealed by the energy supply organization. If the meter has a special screw onto which a seal is attached, then the input machine does not have such devices. If it is not possible to seal it, you will either be denied entry or the entire panel will be sealed. Therefore, inside the common panel, a box is placed in one or two places (depending on the size and type of machine), and the input machine is mounted in it. This box is sealed upon acceptance.
Individual automatic machines are installed on the rails exactly like an RCD: they are pressed against the rail until it clicks. Depending on the type of machine (one or two poles - wires), the corresponding wires are connected to them. What types of circuit breakers are there, and how devices differ for single- and three-phase networks, see the video; the choice of circuit breaker rating is described here.
After the required number of devices are installed on the mounting rail, their inputs are connected. As they said earlier, this can be done with wire jumpers or a special connecting comb. See the photo for what the wire connections look like.
The machines in one group are connected by jumpers: the common phase arrives
There are two ways to make jumpers:
- Cut the conductors into the required sections, expose their edges and bend them in an arc. Insert two conductors into one terminal, then tighten.
- Take a long enough conductor and strip off 1-1.5 cm of insulation every 4-5 cm. Take pliers and bend the exposed conductors so that you get interconnected arcs. Insert these exposed areas into the appropriate sockets and tighten.
They do this, but electricians say the quality of the connection is poor. It is safer to use special tires. Under them on the case there are special connectors (narrow slots, closer to the front edge), into which bus contacts are inserted. These tires are sold by the meter and cut into pieces of the required length using ordinary wire cutters. Having inserted it and installed the supply conductor in the first of the machines, tighten the contacts on all connected devices. Watch the video on how to connect machines in a panel using a bus.
A phase wire is connected to the output of the machines, which goes to the load: to household appliances, to sockets, switches, etc. Actually, the assembly of the shield is completed.
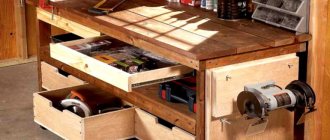
Tools for creating a box
Based on the selected material for making the box, suitable tools are selected.
This includes:
- Planer and jigsaw;
- Welded unit and grinder;
- Hand tool.
Of course, when creating different designs, you will need a tape measure and a pencil to take measurements.
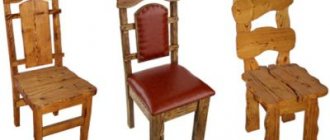
Beautiful ideas
Often the space for storing vegetables is combined with the furnishings of the balcony, based on its interior.
Originally attach furniture casters from below. Then the container can be easily moved to any place if desired.
A good option would be to integrate a vegetable drawer into a corner cabinet
Some paint the storage with a special water-based paint in any color of your choice. You can also line the outside of the container with any decorative fabric. They use decoupage (you can choose napkins, just cover them with varnish - be sure to choose a harmless composition).
An interesting design of a box for an insulated balcony can be created using the decoupage technique
The box can be placed under a small sofa
Many people decorate the lid with foam rubber, covering the top with leatherette or other fabric. This box will complement any balcony interior.
Above the seating area hang shelves filled with indoor plants cascading down. It looks original and beautiful.
It is convenient to store vegetables and fruits of all kinds in a box on the balcony. The main thing is to make the structure correctly with your own hands, taking into account all the nuances: insulation, ventilation, cladding, exterior decoration. Then the container will serve as additional furniture for relaxation and an original design solution for the loggia.
Flower box (original ideas)
Wood seems to be an environmentally friendly raw material. You can use it to assemble containers for flowers.
The following materials are suitable: A sheet of plywood and OSB, an electric jigsaw, pieces of materials left over after repairs, a plane, a drill, a hacksaw, a screwdriver, a grinder, self-tapping screws and a square.
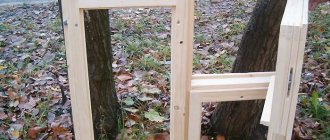
Instructions for creation:
- Parts for the bottom and sides are created from boards 15-20 cm wide.
- Using a planer, the parts are adjusted and finished using a grinding machine.
- Holes for self-tapping screws are drilled along the edges.
- The structure is assembled, first the sides and bottom are fastened together, and finally the ends.
- The product is processed by a grinding machine.
- The wood is impregnated with an antiseptic and covered with stain or varnish.
Varieties
To make a good mailbox with your own hands, you need to take into account the general style of the landscape design and home. As a result, the overall design of such a box should be harmonious with the image of the site. The capacity of the mailbox, as well as its location, also plays an important role in choosing a style. Designers recommend that before making or purchasing a correspondence box, think about whether the box will only serve as a container for letters or will become the highlight of the design. Classic styles of correspondence cells:
- Traditional types of mailboxes are common in the CIS countries. These mailboxes can be purchased at hardware stores or found in old home inventory. They are universal, simple and easy to use, but do not stand out for their originality.
- American-style mailboxes are made according to a general principle, but you can design such a box in your own way. Common details are an elongated volumetric box with a door and a flag. Such an alarm is raised at an American mailbox for the postman - if there are letters to be sent, he will pick them up.
- The British version of the correspondence box is made in the format of a large stationary cabinet on the ground. They are decorated in different ways - a box made of brick, metal, a simple cylinder, or a miniature house is built.
On a note!
The capacity of mailboxes varies, but they are intended only for paper correspondence. In England, the upper surface of the cabinet serves as a place for newspapers and advertising brochures, and in America, an additional platform is installed next to the box.
Pallet flower box
Making such a product will not be difficult. Here are the manufacturing steps:
- The pallet is disassembled into individual parts using a nail puller;
- Rotten and damaged boards are discarded;
- A drawing with dimensions is drawn up;
- In accordance with them, the workpieces are cut off and sanded with sandpaper;
- The base of the box and the upper frame are assembled;
- 2 side panels are fastened with nails;
- The joints are covered with decorative strips;
The product is treated with paint or varnish. It is allowed to decorate with clapboard, saw cuts, shells, and pebbles.
The wood box is created according to the needs. It is important to draw up a work plan and follow it in practice.
Decoupage
Next we move on to decoupage.
This master class uses a printout on a napkin. The white background of the design allows you to apply the applique without cutting it along the contour. When gluing, the torn edges of the napkin will easily merge with the white surface and after drying will become invisible. If you have a drawing on a napkin with a colorful background, then in this case the image needs to be carefully cut out.
Think about the placement of the picture on the sides of the box and apply a little decoupage glue to the appropriate places - then the picture will lie flat and without wrinkles. Attach the picture (it’s more convenient to use the file method) and with an almost dry brush, press it more firmly to the surface, thoroughly soaking it in a layer of glue.
When the glue is completely dry, cover the surface with one layer of acrylic varnish.