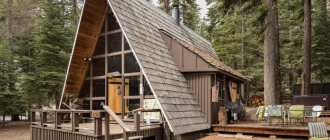
A variety of materials are used to build a wooden house.
Recently, timber has been considered a popular material for the construction of cottages. It is lightweight, durable, warm, and easy to install.
A house made of timber can be built with your own hands quickly, in a short time, even without construction experience. The main thing is to know the technology and nuances of its construction. Today we will tell you how to build a house from timber.
Selection of timber
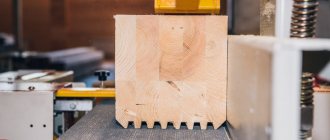
Timber is a material of square or rectangular cross-section, hewn on all sides. The correct choice of material requires deciding on its size, paying attention to the time of its preparation, and appearance.
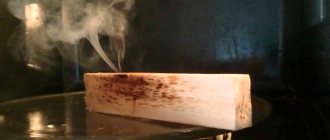
It is best to purchase timber from wood harvested in winter. It contains a lot of resin, which will increase the service life of the material.
When purchasing, its dimensions should be checked with a tape measure so that they correspond to the sizes stated by the seller. The material must be inspected to see if there are any fallen knots, damage to the wood by bark beetles or other pests, and whether the surface of the timber is even. It is not easy to build a house from 150x150 timber with your own hands due to its heaviness. It is easier to take a beam measuring 150x100.
The timber can be regular, glued or profiled. To determine which one you need, consider the features of each of them.
Material calculation
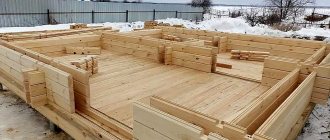
If you decide to assemble a dwelling from timber with your own hands, at the initial stage of construction you should carry out calculations of the volumes of the required building material. To do this, the perimeter of the future building is calculated and multiplied by the estimated floor height. The resulting result is multiplied by the thickness of the lumber. The result will be a figure equal to the number of cubes of material to build one floor. Wood should be added to the resulting volume to assemble interior partitions.
Ordinary construction
It is a blank of square or rectangular cross-section with planed edges. Its side can be 10-25 cm.
It is used for simple wooden buildings.
Due to the fact that it dries naturally, it shrinks to a significant extent during use. After a few years, cracks appear on it. Due to deformation and loose fit of the bars to each other, the cracks and gaps between them increase and require compaction and insulation.
Wall made of ordinary timber
A house built from ordinary timber requires reinforcement of corners and load-bearing walls. Before use, the material must be treated with antiseptic agents. Its cost is low. Subsequently, most likely, such a house will need to be insulated if you live in the middle zone and to the north.
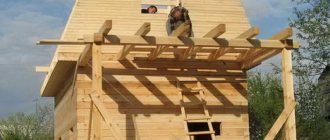
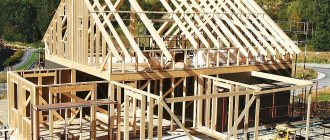
Installation of the house frame and construction of walls
Frame construction is considered the most convenient and fastest way to build your own home today.
After installing the foundation, load-bearing walls are erected from the base material. You can independently build a wooden house, block (cinder blocks, wood concrete, expanded clay blocks), from sawn stone, brick.
For your information! Arbolite blocks are made from a mixture of sawdust, cement and special additives. With their help, you can build a warm, fire-resistant house in a short time on your own.
Frame construction is considered the most convenient and fastest way to build your own home today.
The wood of the lower beam frame must be impregnated with an antiseptic to protect it from rotting and fungus. And for fire resistance, antiprene is used.
The foundation itself is checked for horizontalness, and the surface is leveled if necessary. Next, waterproofing is laid. The lower timber frame is firmly attached to the foundation. As a rule, it is made from coniferous wood. Fastening is provided by anchors. From the installed timber frame, the frame and walls are erected.
Profiled
Profiled timber is made from logs that are thoroughly dried before processing. The residual moisture content of the wood should not exceed 22%.
Profiled timber. Various profiles.
Profiled timber has a flat surface and ideal dimensions because it is made on a precision woodworking machine. It has a tongue-and-groove connection, which makes the house assembly process easier. The crowns are tightly adjacent to each other, eliminating the passage of air and moisture into the joints between them.
Structure made of profiled laminated timber
This type of timber also has its disadvantages:
Site preparation
At the same time, you should think about how to arrange the fence. A fence is required to ensure that the area is protected from prying eyes and unwanted guests. You can make a temporary fence if you use unplaned boards from slab, which is inexpensive. You can also make a fence from a picket fence, and if possible, take care to create a more durable fence from a profiled sheet or chain-link mesh.
It will be important to arrange a toilet on the site. It is advisable that all the nuances associated with the construction be thought out in advance, and that a septic tank or cesspool be prepared. In this case, you will not have to redo the sewer system in several steps, but just spend one time on arranging and connecting a high-quality septic tank or immediately make a connection to the sewer system, if possible.
Insulated
The best is insulated laminated veneer lumber. It arose recently, but its popularity is growing every year. Insulated timber retains heat much more effectively than regular timber. There is no need to additionally insulate the walls of the house. Insulated timber shrinks by only 1%.
A special feature of such products is the thorough drying of the wood before production to 12%.
Slats 5 cm thick are cut from wood. They serve as the side walls of the beam. The lamellas are fastened with jumpers that have special grooves. All parts are firmly glued together.
Further processing is carried out using extrusion equipment. The voids are filled with polystyrene foam or polyurethane foam.
Then the product is processed on a machine, giving it the required configuration and turning the grooves. The insulation must extend beyond the timber so that the parts fit tightly together during assembly.
The insulation in such timber can also be ecowool. It insulates the room from the inside. Glued laminated timber with voids is made, the ends are closed. The voids are filled with ecowool using special equipment under pressure. The result is an insulated eco-wool beam.
When insulating walls, it is important not to forget about insulating the floor, since up to 20% of heat loss occurs through the floor.
Do-it-yourself communications for a one-story house
The “apartment outside the city” was immediately designed without a boiler room, without a stove or fireplace. For heating, an air-to-air heat pump, also known as a ducted air conditioner, was chosen. In low-rise housing construction in our country, air heating is rarely used. Victor was one of the first to use it, and believes that heat pumps are the future.
VictorborisovFORUMHOUSE Member
The heat output of an ordinary electric convector is equal to the amount of energy consumed, while a heat pump can “produce” 4 times more energy than it consumes. And the use of air heating also solves the issue of room ventilation.
The external air conditioner unit is installed on the bracket of the northern wall of the house,
internal - on the ceiling.
In the photo below you can see how the layout of air ducts in rooms has evolved. The final version is below right.
The budget for water supply was limited: “we are solving the problem of how to do it cool with minimal costs.”
A five-meter deep well is located five meters from the house. The water supply system was installed from a 24-liter hydraulic tank, a mechanical filter with a pressure regulator, a well pump and reinforced plastic pipes.
The filter turns on the pump when the pressure drops below the set values and turns off when the pressure returns to normal.
There is a sewer pipe in the floor: it’s interesting here - an ordinary, several-layer 110th sewer pipe leads to the well, into which an insulated HDPE pipe is inserted, which can be pulled out and replaced.
Project development
Before building a house, it is important to develop its design.
Design begins with drawing up a sketch of the future building. This is a drawing diagram of the location of the premises in it. When designing, one should take into account the climatic and natural conditions of the area: wind rose, groundwater level, depth of soil freezing. In the project, you should also note what type of timber is used and what type of wood it is made from. It is important to show how the wood is processed and how it is painted in order to predict the degree of its shrinkage.
In the process of developing a project, the stages of construction are taken into account, the time to complete the work is calculated, and an estimate is drawn up. A detailed drawing of the house is made. It notes the number of rooms, their sizes, and calculates the area of the stairs. The roof is being designed. Lastly, drawings of utility lines are drawn up. The project can be done independently or ordered from qualified specialists.
Budgeting
The estimate is compiled in the form of a table. It includes all materials, tools and equipment, construction work and their cost.
The estimate should include:
- wall construction costs. The amount of financing will depend on what type of timber you purchase and its diameter. Wall costs also include insulation, fittings and fasteners;
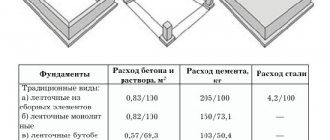
- costs for arranging the foundation and subfloor. They are sometimes reduced by using a lightweight type of foundation for the construction of a log house;
- costs for finishing materials inside and outside the building. To determine the financial costs of them, it is important to know the area of the external and internal walls;
- roof installation costs. These include the costs of roofing materials, fasteners, insulation, waterproofing film, timber for rafters and sheathing. The amount is determined by the roof area;
- If you invite specialists for construction, then the estimate also includes financing for their work. If you do the house construction work yourself, then you can skip this section;
- communication costs: electrical wiring, sewerage, water supply.
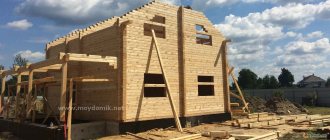
Roof installation
Experts advise installing an armored belt before assembling the rafter system
After the walls of the house have been built, they move on to building the roof. Experts advise installing an armored belt before assembling the rafter system. This technique eliminates improper distribution of the load on the walls of the building and allows you to securely secure the roof.
Advice! If you want to avoid unnecessary expenses on roof construction, choose a gable type - this is the most budget-friendly design option.
Installation of armored belt
Step-by-step instructions for installing armored belts and rafters:
Repairing the foundation under a wooden house
- Every 60 cm, fixed studs and a reinforced concrete crown are installed in the walls of the building.
- Waterproofing is laid on top of the crown.
- A wooden beam pre-drilled for studs is laid on top of the waterproofing.
- The beam is secured to the crown using large nuts and washers.
- In the armored belt, cuts are made for the installation of rafters.
Note! The cuts in the armored belt must have no gaps!
- The rafters are secured using steel plates, bolts, brackets and nails.
Roofing
Before laying the roof on the rafters, it is necessary to make lathing for the selected material
Before laying the roof on the rafters, it is necessary to make a sheathing for the selected material: ondulin, soft tiles, slate, etc. For each type of material, the sheathing has different parameters.
As a rule, the usual lathing pitch is 20-40 cm between the bars (boards). If a solid structure is being made, then the step is 10-15 cm.
If you want to lay insulation with a large layer thickness, then you need to perform double lathing. The sheathing is fastened using self-tapping screws or nails.
Note! The sheathing is installed around the chimney pipes in a special way, and the distance to the pipe must be at least 15 cm.
Upon completion of the construction of the sheathing, the selected roofing material is laid and fastened. Raising it to a height is quite a difficult task and you will need help.
Attention! When laying the roof, follow safety precautions when working at height. Failure to follow these precautions may result in serious injury or death!
Construction stages
A one-story house made of timber is built in the same way as houses made of other materials. But there are some nuances to its construction. Let's consider the stages of its construction.
Site preparation
To prepare a site for the construction of a new house
- dismantling old buildings;
- trees and bushes that interfere with construction are cut down. Trees growing near the foundation can cause damage to it;
- clear the construction site of debris and stones;
- remove the fertile layer of soil to prevent the growth of vegetation;
- The terrain is leveled for the construction of the house. Remove excess soil from the hills and fill in low-lying areas.
Purchase of materials
Materials are purchased according to the estimate. It is important to buy building material right away, because the moisture level of the timber may vary from one purchase to another.
In addition to timber, you will need:
- roofing materials;
- edged and unedged boards;
- insulation;
- it is important to purchase windows and doors;
- fasteners: staples, screws, nails;
- hand tools;
- waterproofing film.
Timber processing
The material must be prepared before starting construction:
- First, it is treated with antiseptic agents to prevent the appearance of pathogenic microorganisms, mold and mildew. It is important to wait until the product is well absorbed.
- Then fire retardants are applied to it. They have a greenish or yellowish tint, so they are used to cover materials for painting. Fire retardants protect against fire. When ignited, they foam and the wood burns more slowly. They do not wash off, so it is enough to treat the timber once.
- After this, coating materials are used: varnishes, stains. When they interact with air, they polymerize, forming a film that is durable and resistant to various influences. The building is thus protected from ultraviolet radiation and water.
Where to begin?
Before starting construction, you should, at least in theory, study all the main milestones and not be afraid of possible failures or difficulties that you will surely encounter. Those who own the information own the world. It is worth starting construction with information about the site you took.
You should find out from your neighbors what the characteristics of groundwater are, and learn about all the characteristics of the land. Groundwater is important not only for organizing water supply. The level of occurrence will determine which type of foundation you will use.
Now let's talk about the project. This is quite an important process and without experience in creating design projects it is better not to even try. Not only the final price of accommodation, but also the comfort and speed of construction of the house will depend on the professionalism and quality with which the project was completed.
Consequently, you can place an order for an individual project or buy a ready-made typical one, which is a guarantee of reliability and a long service life of the building.