Projects of boats, boats, yachts for self-build
Subscribe Free Silver Newsletter
Subscribers 587 RSS
| March 2022 | ||||||
| 1 | 2 | 3 | 4 | 5 | 6 | |
| 7 | 8 | 9 | 10 | 11 | 12 | 13 |
| 14 | 15 | 16 | 17 | 18 | 19 | 20 |
| 21 | 22 | 23 | 24 | 25 | 26 | 27 |
| 28 | 29 | 30 | 31 | |||
Haven't gone out once in the last 60 days
Opened: 16-12-2009
Author vodnyimir.ru
Free projects of motor, rowing boats, boats, yachts. Build a boat with your own hands!
Statistics
587 subscribers 0 per week
- Issues
- Statistics
Issues
Statistics
Projects of boats, boats, yachts for self-build
Subscribe
Rowing catamaran project Modern rowing originated in England in the 18th century. racing on the Thames, today it is an elite sport. The dimensions of academic rowing boats have been experimentally determined in practice, allowing them to develop high speed: the length of the oar for paired boats is about 290 cm, the distance between the oarlocks is 156-160 cm, the width of the single hull is about 30 cm. The movable seat (slide) allows you to turn on into the work of the rower's legs, which, in addition to increasing speed, gives a load on almost the entire weight...
2021-10-11 12:41:19 + Comment
Projects of boats, boats, yachts for self-build
Subscribe
Two-section universal map boat <Domashka> As I already wrote, “Domashka” is an improved version of “Compromise-2”. Its main difference is that the boat is made of two sections, the decked bow section (a trunk with a hatch has appeared) 1.1 m long is docked with the main stern section 2.1 m long. When the bow section is laid bottom up in the stern, the space dimensions are only 2.1 × 0.98×0.59 m instead of 3.24×1.26 for “Compromise-2”; this simplifies the transportation of the boat, and during winter storage “Domashka” occupies a garage…
2021-04-12 11:05:30 + Comment
Projects of boats, boats, yachts for self-build
Subscribe
Motorized fishing boat "Ryba-5.4" The time has come for the publication of the project "Ryba-5.4", especially since outboard motors of the required power have become available in our conditions. Basic data of the motorboat "Fish-5.4" Length, m 5.4 Width, m 2.1 Height, m 0.95 Overall height, m 1.65 Hull weight, kg approx. 220 Displacement, t 1.1 Waterline draft, m 0.22 Number of jobs, pers. 2-4 Motor, l. With. 90 Speed, km/h 62 Side view and sketch of the contours, view of the bottom and deck of the motorboat This project combines the features of a fishing …
2020-10-13 11:36:04 + Comment
Liktros
This is an element of the boat, thanks to which the cans (seats) are attached. This fastening allows you to move the seats even while driving, which provides certain convenience. Plus, the lyctros makes it possible to install various additional blocks, be it an echo sounder, rod holders, etc. So lyktros is a necessary and functional thing.
But the can itself, as a seat, is not particularly comfortable - there is no back support. You can, of course, take a boat chair and attach it to the can, but then the problem of insufficient rigidity arises, and the chair leans back strongly, especially in the initial phase of the boat’s movement. The solution to this issue could be to install a special boat mount on the floor, but then the mobility of the chair is lost, and a rather bulky, non-demountable pedestal appears.
In addition to the pedestal, the can has at least two more alternatives. In one case, the boat seat fastening block is made such that one side of it is attached to the cable line, and the other rests on the bottom of the boat. This solution makes it possible to move the chair around the boat, both for convenience and to adjust the weight distribution in the boat, thereby improving the sailing characteristics.
Instead of a lycrop, you can attach the seats to the cylinder permanently, providing for the possibility of removing the seat and tipping it on board. This solution frees up space in the boat at any time, which sometimes allows you to fish more comfortably. Well, there’s no need to talk about the convenience of a soft chair on the shore after fishing. By the way, the possibility of using a boat chair on the shore is available in both cases. Comfort while fishing is an extremely important thing.
By the way, on my boat, I decided to attach a “second deck” on the lycrop, under which the equipment is located. This solution allows you to go ashore more comfortably without trampling on your equipment, and you have to do this very often in a day, especially on rivers.
Projects of boats, boats, yachts for self-build
Subscribe
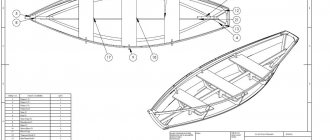
Car motor boat Basic data of the motor boat Maximum length (without plates, mm 3310 Overall length, mm 3500 Chine width, mm 1170 Overall width, mm 1400 Side height (bow/midship/transom, mm 545/560/430 Net load capacity, kg up to 350 Normal passenger capacity, persons 3 Outboard motor power, hp 12-23 Theoretical drawing of contours General layout diagram 1 - eye-duck; 2 - rubber mat; 3 - handrails; 4 - headlight; 5 - removable windshield ; 6 — mirror; 7 — remote control; 8 — chair…
2020-04-14 12:16:00 + Comment
Projects of boats, boats, yachts for self-build
Subscribe
Project of a two-section collapsible motor boat Sectional boat for a medium-power motor The idea of building such a sectional pleasure boat was born back in 1979, when long-distance trips on motorized vessels along inland waterways were popular in the USSR. Sketch of a general view of a collapsible boat Basic data of a two-section motor boat Overall length, m 4.2 Overall width, m 1.54 Side height at midship, m 0.55 Bottom deadrise angle, degrees 12 Length and weight of bow section, m (kg) 2 .2 (45) Length and weight of feed...
2019-09-16 12:58:17 + Comment
Projects of boats, boats, yachts for self-build
Subscribe
Fofan boat - project of a rowing boat with slatted sheathing <Nevka> - fofan with slatted sheathing The author set out to at least to some extent again get closer to the wooden original, which has its own buoyancy, but at the same time simplify the design and manufacture of the boat, replacing the plank sheathing edge to edge with a “monolithic” slatted sheathing smoothly, reducing the number of frames and making the frame, fenders and stem laminated, i.e. made not from solid bent blanks, but glued from...
2019-03-18 11:06:00 + Comment
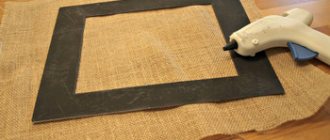
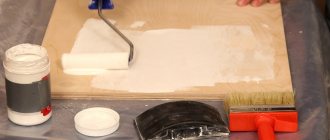
Gluing
Before gluing the parts, they must be degreased at the joints. Acetone is usually used for these purposes.
To glue PVC boats, use special glue for rubber, PVC or linoleum. First, you need to coat both parts with glue and set them aside for a few minutes - the time is usually indicated on the package with glue and ranges from 20 minutes to half an hour.
After this, the parts are heated with a construction hairdryer and pressed against each other. Then you need to roll them well with a special PVC roller.
In industrial production, in addition to gluing boats, they also use vulcanization technology, but since this equipment is not used at home, we will not dwell on it.
Projects of boats, boats, yachts for self-build
Subscribe
Project of a fiberglass boat for a powerful outboard motor Boat <Barnsey. Basic data of the boat Maximum length, m 9.0 Maximum width, m 2.45 Minimum side height, m 0.84 Spacing, mm 500 So, a little about the history of creating a boat for a powerful imported outboard motor. Looking at the photo, you probably noticed that the ratio of its length and width is somewhat unusual. The explanation is very simple: at first the boat was shorter - only 7 m. The hull was already partially ready when the shipowner’s requirements...
2018-09-17 10:18:52 + Comment
Homemade plywood boat (master class, 50 photos, step by step)
Homemade plywood boat (master class, photo, step by step)
So we finally got around to fulfilling our old dream and started building a boat. For the first time I chose an easy project, so to speak for training. I went to the production of similar boats in Cherepovets and there I spied something and bought the missing materials, for which special thanks to the owner of the shipyard. This is what the boat should look like:
Today I cut out sheets of plywood and began the most important and difficult process, in my opinion, which is cutting and gluing sheets of plywood. Because If the length of the boat exceeds the length of standard sheets of plywood, then they have to be spliced; there are many ways to do this, but I chose the most technically complex, but also more aesthetic option of miter gluing. Let's mark it.
We process the plywood sheets first with a plane and then with a sander.
This is what it looks like during processing.
This is how the sheets should fit and stick together.
After adjusting the parts, I glued them together and placed them under the press.
That's all the preparatory work on the boat for now; after the sheets are glued together, I'll start marking and cutting out the parts. At first I practiced the miter connection on scraps of plywood and it was scary to look at, but experience came from working on the “finish” version. I hope I can continue to master everything.
That's about the boat. Basic data: Maximum length…………….2.64 m Maximum width………….1.28 m Side height……………………..0.38 m Hull weight……………… ……30 kg Load capacity………………180 kg Crew……………………………..2 people. Permissible power p/motor...2.5 hp Today was a day of fruitful work and great progress. I pulled out the sheets from under the press and removed the strips between which they were sandwiched. The joint turned out to be smooth and very strong (then we tried to break the scraps from the bottom, but it did not break at the joint of the sheets). In this way we obtained blanks of the required length for making the boat.
I start marking by marking the center line, from which all the dimensions will then go.
Here I drew the bottom of the boat, it looks like it turned out beautifully:
I start cutting. It is advisable to use a jigsaw at high speeds, and use files for shaped cutting of plywood so as not to tear the edges of the sheets.
We follow the markings strictly
Half of the bottom is ready.
Here's the whole bottom
We mark one side, then we put two blanks on top of each other and fasten them with clamps, after which we cut out both sides at once.
I mark and cut out the transom.
At the joints of the plywood sheets, we remove the chamfer with a grinder and begin sewing the boat with copper wire clips.
We carry out work from stern to bow.
You can't do this without an assistant.
I also try hard to sew everything beautifully.
These are the seams you get.
Here the boat is ready
Trying on for yourself
And upside down.
Today I really made progress towards the final stage of completing the project. The first thing I did was pull all the staples tighter. I checked the geometry of the boat. Then I used a chisel to edge the brackets at the internal joints of the sides. After all this, I cut out temporary spacers and secured them in the places where the frames were installed.
While doing these things in the new room, I constantly felt eyes on me. By the way, here is a view of the straightened boat from the stern.
To make the seams more even, I decided to fill the lines with masking tape, it turned out beautifully.
I decided to glue it in the evening, but in the meantime I drew out the frame templates and began assembling them. Here are the finished frames, assembled using epoxy glue and self-tapping screws.
I finally started gluing the internal seams; I didn’t think it would be such a painstaking job. For the first time, everything seemed to work out great. The resin has saturated the fiberglass fabric normally, there are no bubbles anywhere.
This is how the seam turns out, smooth and transparent. The photo shows that the structure of the wood is visible through three layers of glass tape, which means everything is normal.
Here's what was done last time: the frames were adjusted and the fenders were screwed on.
Today I installed the frames in place and secured them with glue and screws, and cut out reinforcing linings for the transom.
After that, I turned the boat over, removed all the staples from the wire and began rounding the seam joints.
And now that everything was prepared, I started gluing the external seams.
Nose.
The seams turned out smooth and well saturated, even I like it myself.
Seams on the transom.
Today I finished shaping the boat’s hull, next time I’ll install the benches and start preparing for painting. The sides are fastened not only with glue, but also reinforced with three layers of glass tape on each side, this turns out to be fiberglass. The self-tapping screws from the frames can be completely removed; after gluing, they will no longer be needed. By the way, some people do just that. Such a boat can be assembled without a single screw in the hull. Today I went to make a boat only in the evening, because... I waited for the glue to set well. I checked the external seams, I really liked how it was done, it turned out to be strong fiberglass. After that I decided to make slats for the benches. I also cut out and fitted the stem to the bow of the boat. Here are the slats of the front bench attached.
Here is the middle bench.
I also cut slats for the rear bench, but it’s too early to install them. Apparently prolonging the pleasure of the process, or maybe out of a desire to do everything efficiently, I am making the boat slowly and little by little. Today I bought glue, screws and high-quality lumber without knots. All this was intended to install the keel and outer stringers. These necessary elements will give greater strength to the bottom, as well as protect the boat while mooring to the shore, and protect the paintwork from scratches. I cut out the slats, sanded them and installed them in place using glue and screws.
Also today I installed a stem and a bow eye bolt for tying a rope or anchor rope.
Work had to be stopped for today because... the whole thing should be firmly grasped; for this I used additional weights.
By the way, the bench blanks have already been cut out, but they will be installed after painting the inside of the boat.
Download:
My first boats.pdf
Based on materials from the site www.fishing35.ru
Projects of boats, boats, yachts for self-build
Subscribe
The tuzik boat is a compact, collapsible single-seat cartop boat. This tuzik was built at the Brigantine young sailors club in Elektrostal. Since the boat was intended to be stored on the deck of a small yacht, its hull is made of a collapsible design. In the stowed position, the floats are placed inside the middle part of the hull and in this position the boat is attached to the deck. Compact single boat 1 - line (mash); 2 — foam float; 3 — middle part of the plywood body; 4 - loops for connecting floats with...
2018-03-19 10:35:33 + Comment
Materials
You can purchase them at any hardware store. But don’t forget that they must be of high quality!
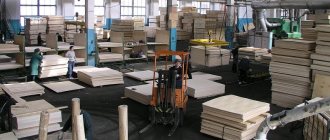
1) Plywood. For building a boat with your own hands, only one type is suitable - “sea”, 4-5 mm thick. It is made from hardwood, which means that the boat will be built from birch veneer. The plywood sheet must be undamaged. The price will be slightly higher than usual, but quality is very important here, since the reliability of the product depends on it. The average cost of one such sheet is 250 rubles.
2) Planed boards 25-40 mm thick. The price of such a board starts from 11,000 rubles. for 1 sq.m.
3) Reiki. They will cost you about 2000 rubles.
4) Electric jigsaw. Price from 3000 rub.
5) Steel wire. It costs from 80 rubles. per meter
6) Epoxy resin. A bucket of this material will cost from 4,500 rubles.
7) Varnish. Costs from 300 rubles. per jar.
Fiberglass tape (thick T11 or thin T13). From 200 rub. per skein.
9) Drill and screwdriver. From 2000 rub. for each of the instruments.
10) Screws, self-tapping screws, brass nails and various clamps (useful for gluing boat elements with your own hands). All together will cost you about 1000 rubles.
11) Set of clamps. You will need to spend about 1,500 rubles on them.
12) Grinding machine (from 2000 rubles) or sandpaper (from 50 rubles per meter).
Projects of boats, boats, yachts for self-build
Subscribe
Two amphibian projects - design, drawings and do-it-yourself construction Many water recreation enthusiasts are well aware of the difficulties that usually arise when transporting a vessel to the coastline and launching it, providing guarded parking in the summer and during winter storage. In addition, the problem of transferring a boat from one basin to another across watersheds when passing difficult routes poses great and often insurmountable difficulties for motor boaters. <amphibian> vehicle...
2017-09-18 16:52:06 + Comment
Manufacturing Features
When building a boat, it is worth considering that the most significant element of the frame part is the base on which the remaining parts (keel) are attached.
The bow area is formed by the stem and is fixed on one side. In the aft part, the fastening is carried out by the sternpost - elements responsible for ensuring the longitudinal rigidity of the structure.
They can be made from wooden materials (solid) or glued together separately and fixed with nails and screws.
The transverse parts of the hull allow you to achieve bends and transverse contours, which adds the necessary rigidity to the craft. In the upper part of the stem and sternpost there are boards connected to the frames. This design forms the sides.
The resulting frame is covered with plywood. A deck (slant) is placed in the inside of the boat. This creates the lower deck.
Boats made of plywood material can be equipped with a motor or oars. The main difference in the design is the aft part. For motorized watercraft, a transom (made of multi-layer plywood) is installed in the stern.
Upon request, the boats can be equipped with a cockpit, deck stringers and side stringers. To ensure good buoyancy, the niches must be filled with foam, which will prevent the vessel from capsizing.
Projects of boats, boats, yachts for self-build
Subscribe
Mini trimaran "Vega" Motor boat "Vega" planes with one driver at a speed of about 50 km/h. When developing the project, I set out to create a reliable high-speed mini-motorboat for a 20-25 hp engine. With. Basic data of the mini-trimaran "Vega" Length, m 2.75 Width, m 1.28 Side height, m 0.52 Outboard motor power, kW (hp) 14.9-18.5 (20-25) Passenger capacity, persons 2 Vessels with trimaran hulls, in principle, are distinguished by high stability, a spacious cockpit and can be operated under…
2017-02-20 11:07:45 + Comment
- 1
What qualities should a fisherman’s wooden boat have that need to be ensured?
Let me immediately note that fishing is not the only purpose of having a punt on hand. In warm summer weather, you can simply drive into the middle of the lake, jump into the water, swim, cool off, and climb back over the stern.
With the onset of the mushroom season, a quiet hunt begins on the islands. And this is a hobby for the whole family: we got together, went and received a lot of positive emotions.
Even just sitting down at the oars, rowing for half an hour or an hour in calm water and fresh air is a pleasant walk, good for health. Children and adults enjoy these trips so much that they become a regular ritual.
However, for all these purposes the boat must meet the following requirements:
- be durable and reliably withstand physical stress when transporting various categories of people, especially children and the elderly who cannot swim;
- have good stability during strong rolling, when you have to row along a large side wave created by a strong autumn wind;
- do not leak from cracks and joints between boards;
- have good buoyancy, ease of movement, requiring low muscular effort when covering long distances;
- combine the ability to install a simple outboard motor and rowing with oars;
- maintain the listed performance characteristics for a long time for at least 10 years.
I explain further in the text how to optimally implement all these six conditions with your own hands.