How to make a lamp with your own hands in Oriental, Japanese, Chinese style?
Lamps play an important role in the design of premises. A lamp successfully chosen in style and color can transform an ordinary room interior into a stylish and modern one. There are many options for lamps: wall, pendant, floor, table.
Let's talk about table lamps. They can be used in various rooms: in offices, bedrooms, living rooms. You can make a table lamp yourself. With some effort, you can invent an original designer lamp. This way you will emphasize the uniqueness of your interior.
First you need to decide on the style of your lamp. Oriental style is popular. Let's consider what features a Japanese-style :
- Simplicity
- Strict geometry
- Convenience
- No acid colors
Japanese lamps are usually rectangular in shape. Sometimes you can find round-shaped lamps. In Japanese style, table lamps are rarely used; soft light should come from them. The color range is not rich: black, white, brown.
The decor of the lamp may include the following elements:
- Japanese or Chinese characters
- Applications
- Painting in Chinese or Japanese style.
Important: An oriental-style lamp will fit perfectly into the interior of a room that is also decorated in this style. When choosing the style of your future lamp, be sure to consider the overall style of your room.
To make a lamp in an oriental style you will need the following tools and equipment:
- Base with an old lamp socket
- Wood slats
- Rice paper, tracing paper or plywood
- Wood glue
- Saw
- Square
- Scissors
- Brush
- Paints
Step-by-step production:
- The first step is to make blanks from wooden slats. Using a saw and square, prepare 4 long slats and 8 short ones. Select the size yourself, based on the size of the room, the size of the table or bedside table on which the lamp will stand.
- Sand all the slats with sandpaper to avoid any roughness or nicks.
- Next, you need to glue all the parts together and let them dry. Assembled nails of this design should not be used. You can fasten the slats with rope.
- Paint the lamp frame black, white or brown. Let the paint dry. You can open the structure with varnish.
- After this, cut out 4 layers of the required size from rice paper or tracing paper. For this you can also use plywood, which will be more durable and practical.
- Apply the drawing with paints. You can cut out an ornament on paper by first printing the finished design on a printer.
- If you took plywood, then first print the drawing on paper and then transfer it with a pencil onto the plywood. Cut out the picture on plywood.
- Glue paper or sheets of plywood between the frame frames with glue.
- Place the frame on the base of the old lamp with socket.
Important: For such a lamp, choose an LED or “housekeeper” bulb.
Lamp frame assembly diagram
Japanese style lamp
Features of plywood
This material is used for various purposes and is also suitable for making lamps. It has its own characteristics, it’s best to start with the advantages:
- Availability. Plywood can be bought at any hardware store; there are sheets of different thicknesses, which allows you to find material for any project. The cost is low, but the products are sold in large sheets.
- Attractive view.
High grade plywood has a beautiful woody surface. Or you can find an option covered with valuable wood veneer. The plywood chandelier looks original. - Wood is a safe and environmentally friendly material that does not emit any harmful substances when heated.
- Plywood is easy to process. You can cut it with a hand saw or an electric jigsaw, or drill with a screwdriver. It is easy to sand the parts manually to perfect smoothness using sandpaper.
- The surface can be easily coated with decorative compounds to highlight the texture of the wood. Or paint the product in any color. In the future, you can repaint the lamp.
By the way! Now you can cut perfectly straight parts using a laser, if there is a company in the city that provides such services.
Plywood has disadvantages that must be taken into account:
- Wood does not tolerate heat well, so it is better not to use incandescent lamps in lamps. Fluorescent or LED options are suitable.
- The material ignites when exposed to open flame and high temperatures.
- If there are changes in humidity in the room, plywood can become deformed over time.
How to make a lamp with your own hands in a rustic, antique, Scandinavian style?
Rustic style is popular in modern interior design. This style involves filling the home with elements that highlight the rough natural beauty. At the same time, the decor and material of the structures are made from natural materials. People are trying to get rid of all artificial elements and surround themselves with natural things. This interior looks rich.
The rustic style has the following characteristics:
- Naturalness of natural forms;
- Natural, simple materials, fabrics;
- Dullness, roughness of products;
- Simple patterns;
- Massiveness.
Important: Rustic style lamps should have warm lighting. It resembles fire and recreates the spirit of antiquity.
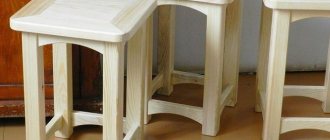
To make a lamp with your own hands in a rustic style, wood is suitable. Wood should not be painted with acidic, bright colors. There is also no need to open it with varnish. Rustic style requires as close to a natural look as possible. You can also use stones in decoration. These must be rough stones.
You can make a lamp in a rustic style from a small old stump. To do this, you need to make a hole in the stump for the lamp and cord.
Lamp in rustic style Lamp from an old tree stump
Another option is to decorate the lamp shade with branches of various sizes. The base of the lamp will be a tree stump. The lampshade can be made from wire, and then decorative elements can be attached using coarse thread of a suitable color.
Rustic table lamp
Scandinavian-style lamp should also be made from natural materials. But unlike the rustic style, there may be delicate lines and a light color. A Scandinavian-style table lamp should have features such as simplicity and elegance.
Scandinavian style lamp
To make a laconic lamp from copper pipes you will need the following materials:
- Pipe cutter
- Felt pen
- Roulette
- Pliers
- Screwdrivers: flat and Phillips
- Copper pipes and angles
- Super glue
- Electrical base of the lamp: socket, plug, switch, electrical cord
Step-by-step production:
- Use a felt-tip pen to mark where you need to cut the copper pipe. Take measurements with maximum accuracy.
- Use a pipe cutter to cut the pipes.
- Lay the cable, glue the pipes with the corners.
- The next step is to assemble the electrical circuit. You should connect the cartridge, plug, switch. If you do not know how to do this, it is better to contact a familiar electrician who can easily help you assemble the structure.
DIY lamp Required materials
Connecting parts
A table lamp made from a bottle will also fit into the Scandinavian style. You have to make a hole in the bottle for laying the cable, and also make a beautiful lampshade. The basis of the lampshade will be a wire frame, and linen will be suitable for decoration.
DIY lamp: Scandinavian style
Timeless classic
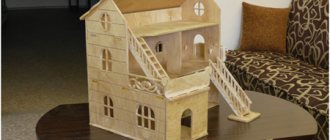
Massive wooden ceiling chandeliers appeared at the dawn of the 16th century. Most often, the main ones were tree branches, the edges of which were crowned with candles. Castles of wealthy gentlemen and churches were the main area of application for unique lighting devices at that time
But if previously wooden chandeliers performed a purely practical lighting function, now more attention is paid to the appearance from the point of view of decorating the room
The emergence of new practical materials and the development of technology have not weakened interest in natural sources. The tendency to care about the environmental friendliness of surrounding objects and one’s own health is one of the reasons for the growing popularity of wooden chandeliers.
Attention! The variety of forms of wooden lamps allows them to be used not only in traditional rustic styles, but harmoniously introduced into more modern interior trends. Antique wooden chandeliers are still relevant for country and chalets
Adherents of a brutalist interior can easily assemble a simple chandelier with their own hands, where the frame is a powerful wooden beam. For lovers of original configurations, the designers have prepared a lot of interesting ideas, many of which can be implemented independently
For country and chalets, antique wooden chandeliers are still relevant. Adherents of a brutalist interior can easily assemble a simple chandelier with their own hands, where the frame is a powerful wooden beam. For lovers of original configurations, the designers have prepared a lot of interesting ideas, many of which can be implemented independently.
Concern about the high cost of a chandelier is justified only when choosing complex configurations that require jewelry processing of the array or where additional expensive materials are present. In most cases, the price is in the budget category.
A variety of wooden chandeliers are shown in the photo:
How to make a New Year's lamp from LEDs, a lamp from disks in the shape of a ball?
It’s worth talking separately about hand-made New Year’s lamps. On the eve of the New Year holidays, which evoke associations of miracle and magic, I want to decorate my apartment with something glowing and bright. At the same time, you want the decorative elements to fit harmoniously into the interior of the room. Lamps are perfect for these purposes; making them will not be difficult. Below are some simple options.
Important: A lamp made from an LED garland - nothing could be simpler. Choose a beautiful glass container: it could be a vase, serving cap, bottle. Place an LED garland inside.
The LED garland does not heat up, so it is the safest for lamps of this type.
New Year's lamps
It is advisable that the garland be battery-powered so that you do not have to make a hole in the glass container for the wire. This is what lamps made from bottles and garlands look like in the dark.
Bottle lamps in the dark
Another option for making an elegant bright lamp is from old music CDs. The discs are attached with a glue gun, it is quick and reliable. At the base of the lamp, one disk is placed in the center, then the rest are glued together in the shape of a ball. When the ball of disks is formed, place the garland inside. Take the garland out of the disc holes so that it looks out. Then cover the top of the lamp with a disk, placing it parallel to the base.
Such lamps are suitable not only for decorating a room for the New Year. They can become everyday decorative elements in your room if you love bright, glowing elements.
Lamp made from scrap materials
Fantasy - in the right direction
We can be inspired to create a masterpiece in the form of a homemade lamp not only by a meager budget, but also by the lack of choice of lighting fixtures in stores, especially when it comes to small towns and settlements with not very developed infrastructure. And in big cities you won’t always find something interesting, unique and low-cost that suits your interior.
Meanwhile, a lamp is exactly the kind of item that can be made from almost anything. Many people are endowed with creative imagination, and as comedians say, especially Russian people. Well, let's together follow the flight of someone else's thoughts, and maybe at the same time your own creative idea will be born in your head.
Lamp cord
The lamp, depending on the design, may, in one or another combination, consist of a body or stand, lampshade, shades, and a rod (chain). And, of course, it is impossible to do without wire, which can play a leading role in the design of the finished product. This is possible due to the fact that the range of such products has a very rich range of colors. The textile braiding of the wire imitates silk, bronze, copper, silver - you can always choose the desired option.
Variety of wire braids
At the same time, the simplest lampshade made from an old plastic flower pot, or a simple wooden or metal frame, will look simply irresistible. And in general, ceiling lamps with a long suspension are now in great fashion.
For such devices, the cord is the most important part - especially since sometimes they have neither a body nor lampshades, but simply suspended bases with lamps of different shapes and sizes. This manufacturing principle can be adopted by you too.
Lampshades made of plastic flower pots covered with fabric are suspended on a cord. Colored wire with textile braiding in the design of the lampshades.
Lamps of different configurations on an extended stem
Long wire passed through holes in a wooden stand
What to make a lampshade from
Glassware is often used as shades in such homemade chandeliers: jars with screw caps, bottles, decanters or vases with the bottom cut off, glasses and even tea cups glued to saucers. In this case, the wire braid should be matched to the color of the glass, and if it remains transparent, then it is better to take the wire not in a textile braid, but in a polyethylene braid.
Cans as lampshades on cords in polyethylene braid
A table lamp made from a screw-on jar - pieces of colored glass inside. An old decanter and a flower vase as shades.
A jar or bottle can be used not only as a lampshade, but also as a stand. Filled with small pebbles, it will be stable and will not tip over. A base with a lamp is installed on the neck of the bottle, the wire passes through a hole drilled in the bottom or side. All that remains is to put the lampshade on top - and the table lamp is ready.
Night light made from a bottle and a homemade lampshade Portable candlesticks made from cans and twine Night light made from a bottle
By the way, a night light can be made from a bottle without a lampshade - just drill a hole in it large enough to push a Christmas tree garland inside. At the same time, in order to leave a beautifully designed neck, you don’t even have to open the bottle of wine, but drain it through a drilled hole. This way your lamp will have a more harmonious appearance.
Hat for floor lamp
A lampshade, rather than a lampshade, can be used as a diffuser for a lamp. In the classic version, it consists of a wire frame and a fabric cover placed on it. You can borrow the frame from an old floor lamp or twist it from wire yourself. The configuration and size of the frame can be different, it all depends on the dimensions of the lighting device for which it is made.
Lampshade designs for table lamps
The most important thing here is the cover that is pulled over it, and a variety of techniques can be used to make it. The decorative part of the lampshade can be sewn from beautiful fabric; take a simple fabric, but decorate it with kanzashi flowers; use guipure, lace, braid; knit the cover with knitting needles or crochet; perform using the macrame technique or braid the frame with terry thread. In general, whoever has enough skill and imagination for what.
Lampshades made using the kanzashi technique
Knitted lampshade Guipure cover for floor lamp
Decorating the “cap” of the night light with wide braid Braiding the wire frame with terry thread
Lampshade made of beads
Sewing, knitting, weaving - all this belongs to the category of needlework. The materials used here are quite traditional, and I must say, not cheap.
On a note! However, when it comes to creativity, you have to think outside the box and use something that was not intended for this purpose to create your masterpieces. In this case, the rigid base of the lampshade may not be a traditional wire frame, but, for example, a plastic five-liter water bottle.
So, let's see what items are suitable for making a lampshade:
Cocktail straws Wooden clothespins Disposable plastic spoons
Playing cards Circles cut from a geographical map
Silicone spoons
Eggshell
Thick paper Sticks or rolled up old newspapers
Lampshade made of threads - what could be easier?
As you can see, the options are very different, but the easiest way is to make a lampshade like the one in the picture below. To make it, you need a regular balloon, thread and glue.
Beautiful and light lampshade made of threads
The work process is incredibly simple, and looks like this:
- The balloon is inflated and its surface is lubricated with Vaseline. This is necessary so that the threads do not stick to it.
- Take a small bottle of PVA glue. The container must be plastic, as it will have to be pierced with a needle.
- A thread, preferably a strong one, is threaded into a gypsy needle, which is used to stitch through a bottle of glue. When pulled through the hole, the thread is coated with glue, which is necessary to give the lampshade its shape.
- The thread soaked in glue is wound randomly around the ball.
- After a day, when the glue has dried, the threads at the base of the ball are cut so that it can be pierced and pulled out.
The lampshade is ready. Now you can put it on a lamp, and decorate the base with some flower made using the same technique.
Video - DIY thread lampshade
Flower pot table lamps
Flower pots of different sizes can serve as decoration for a table lamp leg. To do this, take pots of different sizes, make suitable holes in them, and place them on the leg of a table lamp. The pots can be glued together using a glue gun or superglue.
Flower pots in the decor of table lamps
Flower pots are not used for table lamp shades as they are opaque. It is logical that light will not pass through such lampshades. But for pendant lamps, flower pots are quite suitable. To do this, cut out the bottom of the pot, attach it to the frame, and then decorate the pot in any way.
Lightweight and elegant cardboard lampshade
For a paper lampshade, paper or thin cardboard is suitable. Such a lampshade can be either rectangular or square. First you need to think about the size of the lampshade; the larger the room, the wider the structure can be.
In a small nursery or hallway, a lampshade with a diameter of 30–35 centimeters will look good.
The frame can be made of wire; it will consist of an upper and lower part; consider making a lampshade in the shape of a cylinder.
- You need to make two circles of wire of the required diameter. They are connected to each other using a fishing line, the distance between the lower and upper frames is 12 - 15 cm, the hoops are fastened with fishing line in three or four places. The larger the diameter of the base, the more connecting elements need to be made.
- On a piece of paper you can draw circles of different diameters and figures of cartoon characters. Outline drawings can be taken from the Internet and printed, then redrawn using carbon paper.
- A special ruler is suitable for drawing circles, or you can outline lids or buttons of different diameters. Some designs are cut out completely with a stationery knife, others are cut along the contour.
- The paper is tried on the base and glued with an overlap. Then glued to the wire; it can also be secured with thin wire.
- To do this, first make a hole in the paper with a thick needle or awl, then thread the wire and carefully tie it to the frame. It is advisable to glue thin paper, as it can easily be damaged.
The best DIY decorative table lamps: ideas, photos
Designers and people with creative abilities try to decorate the whole world around them. This is why you can find many unique pot designs. What kind of items are not used to decorate lampshades?
For example, a lampshade can be decorated with buttons of various shapes and colors. You will get a bright positive lamp. This lamp will fit well into the interior of a child's room or a teenager's room.
Lampshade decorated with buttons
A lampshade decorated with photographs of family and friends will constantly attract attention.
Lampshade with photo
If you know how to embroider with ribbons, put your skill to good use. The lampshade decorated with embroidered ribbons looks luxurious.
Lampshade decorated with ribbons
The leg of the table lamp can be decorated with voluminous paper flowers. You will get a beautiful delicate lamp.
Table lamp decor
A loft-style lamp made from water pipes and fittings will become a real designer decoration for your interior.
Laconic lamp
You can decorate the lampshade with pencils. The result will be a very bright, not boring lamp. A real decoration for your desktop.
DIY lamps
Stylish lamps can be made from ordinary glasses. To do this, make a lampshade of suitable size and place a small candle inside. This lamp will be an excellent miniature evening lamp with soft light.
Stylish lamps
You can update an old lamp using denim. To do this, you should make a pattern for a lampshade of appropriate sizes.
Simple lamp decor
Table lamps can be used only for lighting, but can also serve as room decor. Here the lamp can have a leading position in comparison with many other interior elements, because the lamp is almost always in the most visible place. Before you start decorating your table lamp, take into account the overall style of the interior. If you combine styles incorrectly, then even the most beautiful lamp can look ridiculous against the general background. And vice versa - the most minimal and simple decor can highlight your taste and ability to create.
Constructive creativity
A lamp can look original even without a lampshade. Instead, the emphasis is on its structural part, which holds the lamp. It can be made of wood, metal or plastic plumbing fittings, plaster or fiber-reinforced concrete.
So we found a use for old kerosene lamps Chandelier for a country interior A plumber's dream
Spider made of plastic fittings Option made of metal pipes for an industrial interior
Where else to attach a tea strainer if not on a lamp Concrete lamp bases
Concrete night light
You can come up with a lot more, but we will bring to your attention three interesting and simple options for making lamps from wood, plaster, and concrete.
Lampshade made of wooden slats
So, we bring to your attention several interesting options for making lamps yourself. The first is made from wooden moldings with a small cross-section: slats, window beads, door layout. You can take material from laminated MDF, but keep in mind that gluing it will be more difficult.
To work, you will need a minimum arsenal of tools and materials. In addition to the glazing bead, this is a piece of plastic sewer pipe, a reel of LED strip, a miter box with a hacksaw, a glue gun, a tape measure and a stationery knife.
Required Tools
Table 1. Instructions for making a lampshade from wooden slats
| Steps, photo | Description |
| First you need to decide on the size of the lamp. His lampshade will be assembled from frames glued together from these slats. Ideally, their size is 20 cm. Please note! Both edges are cut at 45 degrees, which is why you need to use a miter box. |
| Step 2 – coat the cut areas with glue | After all the blanks have been cut out, you can begin gluing the frames. To do this, apply glue to the cut areas... |
| ... and press the two parts at right angles. |
| Step 4 – the lamp body is assembled from ready-made frames | If, as in our case, you have laminated material, it is advisable to use two or even three colors. When working with simple wooden slats, you will have to tint them manually. This must be done at the stage of manufacturing the frames, and only after that the lamp body can be assembled from them. They are simply glued together in a perpendicular position. |
| Step 5 - Install the Jumper | Transverse jumpers are installed at the bottom and top of the resulting structure, on which the electrical part of the lamp will rest. But we are not gluing the top frame with such a jumper yet. |
| Step 5 – Cut the pipe | The distance between the jumpers must be measured and the corresponding piece of pipe must be cut to fit between them. |
| Step 6 – Wrap the pipe with LED strip | We need part of the pipe along with the socket. It is from this that we begin winding the LED strip. |
| Having installed our improvised LED lamp on the lower support, we clamp it with the upper frame, which we only now place on glue. |
| Step 8 - Connect to the Network | This lamp can be tabletop or hung on a chain. For it to work, just connect the mounting end of the tape to the wire and plug it into the network. |
Plaster lampshade
We have already described above how to use a balloon to shape a lampshade made of threads. The same can be done when working with plaster. To do this, the ball is inflated, placed on the can and firmly fixed to it using masking tape.
The idea is to cover the ball with pieces of gauze soaked in a thin gypsum mixture - you can use ordinary putty. Before starting this work, you need to attach the lamp socket to the top of the ball and circle it with a marker - this circle should remain free.
The ball is attached to the jar with tape. The place for the cartridge is outlined with a marker. The first layer of gauze is applied.
1. Apply the first layer of gauze, trying to make the lower contour uneven - this will be the whole beauty of this lamp. Its surface, by the way, will not be smooth either.
2. After you finish laying the first layer, proceed to the second. Only now you lay out the gauze dry, after which you spread a layer of plaster on top of it with your hand and leave it to harden.
3. After the plaster has hardened, cut off the tape that secures the ball, remove it and begin decorating the lampshade.
Laying the second layer of gauze dry
Apply the layer by hand and leave to dry.
Removing the lampshade from the can
4. The front design of a lampshade is a creative and completely individual matter. In this case, two types of acrylic paint were used to paint it - mint and lemon. First, we walked over the protruding parts of the surface with a sponge, and then over the dimples with a brush.
Applying the first coat of paint with a sponge Drawing the recesses with a brush Installing the cartridge
5. When the lampshade is decorated, you need to install the socket into the hole left in the center, screw in the base and lamp. Note that the lamp here is installed with a large bulb and a mirror reflection.
Plaster lampshade as a table lamp
This version of the lamp is good because it can be either placed on a table or hung from the ceiling.
Pendant lamp with plaster lampshade
Concrete lamps
It’s not for nothing that concrete is called the most versatile material in the world. It can be sculpted into anything and gives the most design possibilities. This also applies to lamps - the main thing is to figure out what to make the formwork out of. And it can be a variety of objects, from Tetra Pak milk cartons to rubber balls and old plastic canisters. As a result, you can get the following products:
Concrete lampshades on a long suspension
Table lamp with a concrete base This night light can be made in ball formwork. Lamp in the form of a coil.
As already mentioned, the most important thing when working with concrete is the formwork. And if you do not find objects suitable in shape and size that could be used for this purpose, you will have to do it yourself.
Table 2. Step-by-step instructions for making a lamp from concrete
| Steps, photo | A comment |
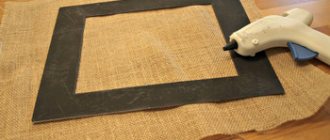
| Step 1 – sketch of the ceiling | You can make formwork from any moisture-proof material, but the easiest way to use ceiling tiles for this purpose. However, before you start cutting it, you need to sketch the lampshade on paper. In this case, it will be a triangular lampshade in the form of a truncated pyramid. |
| Step 2 - transferring the contour of the lampshade to plastic | Then place the paper template on the tile, follow its contours and draw bend lines. |
| Step 3 - assembling the layout | You will have to assemble two of these shapes - a larger and a smaller one. The difference between them will form the thickness of the walls of the ceiling. |
| Step 4 - tube installation | But first you need to figure out the layout. Roll it up as shown in the photo, place it on a backing made from a piece of tile and secure it to it with tape. Place the tube inside that will be needed for the wire and seal it with concrete, making a kind of bottom with a hole. |
| Step 5 - mixing concrete | Mix concrete with any light filler: expanded clay, polystyrene chips or polymer fiber. Finding a recipe is not a problem. You can also take a dry cement-based plaster mixture and add reinforcing filler to it. |
| Coat the outside of the model walls with machine oil so that the concrete does not adhere to it. The main form is put on the model, and the distance between them will be filled with concrete. To do this, you need to use a funnel and constantly shake the mold so that the concrete settles better and the air comes out of it. |
| Step 7 – removing the mold from the backing | After a couple of days, you can remove the product from the mold. You remove it from the backing... |
| Step 8 - removing the product from the mold | ... open the mold and take out the tube. Proceed with caution as the product has not yet gained strength. |
| Let the lampshade dry a little more and begin processing it. You can remove the sharpness of the edges and, if necessary, lightly sand the surface. |
| Step 10 – opening the surface with varnish | To prevent concrete from absorbing moisture and maintaining its beautiful appearance, its surface should be covered with acrylic varnish for stone. |
| Step 11 - Installing the Chuck | All that remains is to install the socket - and the lamp can be suspended from the ceiling. |
You can do it much simpler - use two flower pots of different sizes as formwork, placing one inside the other. In this case, you will get lampshades of the same shape as in the picture below, and you can come up with a decoration method yourself.
Design option for concrete lampshades
Of course, a concrete lamp will not look good in an ordinary room with floral wallpaper and textiles. Such things are used when decorating interiors in the loft style, which has been gaining popularity for a century now and is especially well suited for studio-type apartments. And since one light bulb cannot adequately illuminate a spacious room, such lamps are used in multiples, hung in groups or rows, and, if necessary, supplemented with spotlights.
Nowadays, few people use incandescent light bulbs; they have been replaced by energy-saving and LED analogues. But they are still on sale, and are very inexpensive. And many people have accumulated a lot of old, burnt-out lamps of various types and sizes. If you like to create new interesting things from unnecessary trash and scrap materials, we suggest you see what you can make from them in a special article.
General rules
There are a huge number of ideas for all kinds of lampshades, chandeliers made from branches, driftwood, and boards. In general, the process of making a chandelier comes down to making a frame, providing wire connections for sockets and elements for fixing the product to the ceiling.
To make the wires invisible, you can make grooves in the wood. Secure the wiring with special plastic ties or staples. If it is invisible from the outside, then there is no need to make grooves. Sometimes the wires are left completely visible - this is a design decision.
Wood must be used without rot or wormholes. If you find some branch or snag in the forest, then inspect it; perhaps it has begun to rot and collapse. This type of wood is completely unsuitable for a chandelier, unless it can be trimmed.
Some people are interested in how to make a beautiful chandelier from driftwood. One idea is this. The driftwood must first be cleaned, peel off the bark if there is any, cut off all excess, and sand the surface. It is best to use such a figured tree for a lamp stand. If you want to make a chandelier, you can hang a piece of driftwood on chains from the ceiling and run a wire to it, threading it through the links. In this design, hollow cylinders can be cut out of wood for cartridges.
You should not pile up a lot of branches, as this will make the chandelier heavier. In addition, such a product does not always look harmonious. A large volume chandelier is better suited for spacious rooms, while in a regular kitchen small lampshades will look more impressive.
Advantages of material selection
Plywood sheets are produced by pressing wood shavings. For this reason, like solid wood, plywood is a fairly durable and natural material.
Due to its natural origin, the structure does not emit toxins or allergens. Due to the small thickness of the sheets produced for wounds, the material is easy to work with (just use a jigsaw).
Crafts made from plywood with your own hands have an undoubted advantage:
- Stylish look.
- An excellent preparation for subsequent decoration.
- Particular strength.
- Safety for humans, in particular for children.
- An extensive collection of drawings for crafts made from plywood (for working with a jigsaw).
With optimal treatment with antiseptics, antipyretics and moisture-resistant compounds, the maximum possible service life of the product can be achieved.
Safety precautions
Basic safety precautions are required for all types of physical work.
- The workplace must be properly prepared. It should not be cluttered with unnecessary objects or tools.
- The work table or workbench must be well secured and set to the individually required height.
- The workplace should be well lit.
- When working, you should use personal protective equipment, such as gloves, safety glasses, etc.
- When using a power tool, make sure it is in good working order. For beginners, study the technical documentation of the tool they use.
—>
| Vases |
| Mirrors |
| Baskets |
| Lamps |
| Furniture |
| Ship models |
| New Year |
| Candlesticks |
| Stands and frames |
| Religion |
| Watch |
| Miscellaneous |
Read also: Apparatus for producing beer at home
—>
—>
| "August 2022" | ||||||
| Mon | W | Wed | Thu | Fri | Sat | Sun |
| 1 | 2 | 3 | 4 | |||
| 5 | 6 | 7 | 8 | 9 | 10 | 11 |
| 12 | 13 | 14 | 15 | 16 | 17 | 18 |
| 19 | 20 | 21 | 22 | 23 | 24 | 25 |
| 26 | 27 | 28 | 29 | 30 | 31 |
—>
DIY kitchen facades
The outer panels of kitchen cabinets and tables, the doors of cabinets and hanging racks - without exception, this is what is considered the facade of the kitchen, and can be assembled without the help of professionals. Of course, handmade furnishings are in some ways inferior to factory furnishings, but they always look extraordinary and are more economical in terms of money. Making your own kitchen fronts requires experienced handles, carpentry skills and the proper tools.
HOW TO CHOOSE AN EVENING DRESS
The main thing when choosing an evening outfit is to understand how much to wear it? TBEAUTY.RU will tell you how to choose the right combination.
Finding the perfect evening outfit of your dreams is not an easy goal! A selection constantly appears before you, what to choose: large or short, in sequins or rhinestones, with an open back or with a deep neckline? . Read more "
Wood carving with a jigsaw is rapidly gaining popularity: many people want to purchase an interesting decorative item to decorate their home, furniture, and even clothes! Carved objects made of plywood of various thicknesses fit organically into any interior style; people often purchase photo frames for photographs with ornaments, cut-out words and letters, or order intricate shelves and other interesting products. Few people know that artistic cutting out of plywood with a jigsaw is a task accessible to anyone, even the untrained and inexperienced. You just need to understand how to work with the tool.
Tool for making decorative and openwork crafts
Sawing with a jigsaw is a type of creative activity that most people are familiar with from childhood, from school. At least it wasn't that long ago. When labor lessons began at school and girls learned sewing and needlework, boys were introduced to such a tool as a jigsaw.
It is not difficult to use, and crafts made with a jigsaw from plywood carry not only artistic value, but also practical application. Manufactured products can act as souvenirs: various boxes and toys, and also have practical applications in everyday life. Decorated elements of the porch of a house, windows, stylish benches with carved legs, beautiful kitchen furniture and many other useful wood products can be made using this wonderful tool.
Ideal hobby tool
A hand jigsaw is a tool for cutting shapes out of plywood or some other material, for example, plastic. Its manual version is budget-friendly - its cost does not exceed several hundred rubles, and its scope is very wide. Figure cutting with a hand jigsaw is a very interesting activity. This is not only a pleasant pastime, but also practical benefits, not only financial, but also moral.
The design of this tool is very simple:
- U-shaped frame. It can be either tubular or lamellar.
- Saw handle.
- Two fastenings for a file. These mounts can rotate, thereby creating different planes, allowing you to perform cutting of varying complexity.
- Jigsaw blade. Sets of such files of 50 pieces are available for sale. The blades are distinguished by the thickness and size of the teeth. Thick blades are used for cutting out contours, and thin blades are used for openwork work with small elements of the workpiece.
Electromechanical jigsaws
The electric hand jigsaw has become an indispensable tool in the household. It can be used to cut various materials: plywood, wood, plastic, metal, ceramics, etc.
This tool operates from a 220 W electrical network and is a plastic case with working elements, equipped with a control handle. Its main component is the saw blade, which is mounted on a rod located in the front of the device.
The rod is driven by an electric motor. The movement of the cutting blade is reciprocating. To speed up the sawing process, some samples of this tool use the pendulum principle, that is, the file moves not only up and down, but also back and forth.
Cutting blades are consumables and need to be replaced from time to time. They are functionally different from each other - there are attachments for wood, metal, and ceramics. There are thicker blades, with more or less rigidity, with larger or finer teeth
An important characteristic of files is their shank. The most common ones nowadays are files with U-shaped and T-shaped shanks.
It is with such files that you need to purchase a jigsaw - then there will be no shortage of consumables.
Electric tools differ in many respects, but in this article we will pay attention to only one important factor - the backlash of the saw. This characteristic affects the pull towards the cutting blade during figure cutting
Many brands of jigsaws cannot cope with the task of perpendicular cutting, this is especially sensitive when cutting thick wood - the error can be up to 5 mm.
Experiments on cutting wood to shape showed that the best jigsaw was a tool from Festool. The popular company Makita did not show its best side in this competition - the error of the perpendicular-shaped cut turned out to be quite large (up to 5 mm), and the jigsaw of this brand entered the tree with large chips.
An electric stationary jigsaw is already professional equipment for cutting. Its design is more complex than the equipment discussed above. The principle of its operation can be compared to a sewing machine, which has a jigsaw blade instead of a needle. The quality of the products obtained using this unit is incomparably better. The error of a perpendicular cut with a large workpiece thickness is zero.
The only disadvantage of this electromechanical device is its high price. But this is compensated by the comfort of working on it and high productivity with the highest quality of the resulting products.