home feel cozy, sometimes it’s enough to add
some little thing.
This little thing can be anything - starting from some unusual handmade
and ending with furniture.
Alternatively, you can “dilute” your home decor by using decorative
lamps
.
For inspiration, we have collected for you 14 original
ideas on how to make your own
lamps from wood
-
antique
, classic, modern.
They can be divided into 4 groups:
- suspended (or those mounted on the ceiling
); - desktop;
- wall;
- floor
Before you start making wooden lamps
, you need to decide on the sizes, and also figure out where they will be located and how best to secure them.
For example, to make wooden chandeliers with your own hands
, you must take into account the size of the room and the height of the ceiling.
If you hang a large chandelier in a small room with a low ceiling, it will look too bulky. And a tall person may also have to bend down when passing under it.
To make a lamp or chandelier from wood with your own
You can use a variety of materials with your hands:
- boards, scraps of furniture panels;
- plywood;
- other sheet lumber (chipboard or OSB);
- wooden bars.
Make lamps
You can make
your own lamps or from logs
and
branches
.
In this case, you will get a truly unique and unrepeatable item that only you will have.
If you want to make a chandelier with your own hands from antique wood
, we recommend using noble
wood
- for example, oak or walnut.
Moreover, it is important that the wooden
was dry - otherwise, during operation of the finished product, the material may warp.
In general, do it yourself
Wooden lamps can be made by anyone who knows how to use hand and power tools for woodworking.
Pendant lamps
Suitable for lighting the dining area. They look appropriate in an outdoor gazebo and on the veranda of a house.
We tell you how to make a chandelier from wood with your own hands
, and also share interesting ideas for decorative pendant lamps.
To make a simple and inexpensive pendant ceiling light
, you will need
boards
and plywood.
In this case, LED
(base - GU 5.3).
Step-by-step work process:
- We make the base from plywood and wooden slats.
2. Cover the front surface with mineral oil and varnish.
3. Drill holes for LED lamps.
4. We install the lamps and connect them to each other with electrical wiring.
After this, all that remains is to attach homemade
wooden chandelier to the ceiling
. To do this, you can use hairpins or a metal chain.
The idea was shared by the author of the YouTube channel Elias Maximiliano. The assembly process is described in detail here.
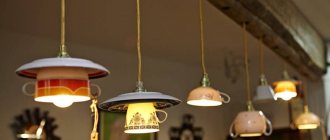
There is also a simplified version of the pendant lamp.
To do this, you will need part of a wooden pallet, lamp sockets, an electrical cord and, in fact, the lamps themselves.
The process of making a wooden chandelier with your own hands
very simple:
- We saw off part of the pallet;
- We sand and paint;
- Drill holes for cartridges;
- We install the cartridges and connect them in series with a wire.
- We screw in the light bulbs.
- We hang the lamp from the ceiling using a chain or thick rope.
If you like the idea, you can familiarize yourself with the process of assembling the lamp in this article.
Do you want something truly unusual? Then you can make a large lamp from plywood and boards.
A housing is made from lumber, into which LED lamps are built.
The structure is attached to four hangers made of steel chain. The step-by-step assembly process can be found in this article.
Hanging decorative
A lamp for a home can be made
from
rectangular (100x200 mm) or square (100x100 mm) timber.
LED panels are used as a lighting source.
You need to cut out four seats in the beam with a chisel (or less if you are using a short beam). Then we drill holes for the wire.
After this, all that remains is to burn the wood with a gas burner and varnish it, and then install LED panels in the seats. You can familiarize yourself with the step-by-step assembly process in this article.
To illuminate your workspace in a workshop or home office, you can use a more compact pendant lamp.
In this case, the body is first made from 18 mm thick plywood. Then a 5000 K LED lamp is installed in it.
You can hang the lamp above the table using a rope. You can find step-by-step instructions for making it here.
If you need to organize lighting in a summer gazebo, you can use one or more pendant lamps made of wooden blocks.
You can hang them either on metal chains or on studs (for example, so that they do not dangle in strong winds).
If you want to organize a creative
lighting in the kitchen in a small apartment, then the option with a wooden beam, of course, will not work.
Instead, we suggest making a pendant chandelier from a piece of wide board and LED lights.
Nothing complicated here - any master can do it. You need to cut holes (seats) for the lamps in the board. After that, we install the lighting fixtures ourselves.
The board can be varnished or painted. You can see the manufacturing process itself (if you need dimensions) in this article.
You can decorate your cottage or veranda of a country house with a hanging lamp made from boards. Outwardly, it is similar to the previous version of the lamps, but the manufacturing process is slightly different.
In this case, not a solid beam is used, but its imitation - a rectangular box made of boards
. For a greater decorative effect, you can burn the wood with a gas torch and then varnish it.
To hang the structure from the ceiling, you will need to purchase a metal chain and carabiners from a hardware or hardware store.
Manufacturing stages
First of all, you need to decide on the type and size of the product. You can think about the project yourself, you can use a ready-made one, or you can spy on an idea and take it as a basis, finishing and improving it. The step-by-step manufacturing steps are as follows:
- Templates of parts are drawn on a sheet of cardboard. They are made to full scale and cut out with a utility knife or scissors.
- Cardboard mock-ups of parts are placed on a sheet of plywood and outlined with a pencil. It is necessary to place them so as to use the material as economically as possible. If the patterns are large, then they can be fixed to the sheet with tape so that they do not move.
- Using a jigsaw, cut out parts from plywood along the contour. For ease of use, the sheet can be secured with clamps on the edge of the table. Small parts are cut out by hand. If you need to make holes in the middle, then first drill a hole large enough for the edge of the jigsaw to fit in, and then cut out the pattern.
- After the parts are cut, they are sanded with sandpaper until the surface is smooth. First you need to use coarse-grained paper, and finally sand with fine-grained paper.
- When all the elements are prepared, they are fastened together according to the project. You will need glue here.
- The finished product is varnished.
- A socket is installed inside the lampshade, connected to the electrical wire and the lamp is screwed in.
That's it, the lamp is ready! Since this is painstaking work and requires great precision and perseverance, you can first practice on small floor lamps, and only then start making ceiling chandeliers.
Plywood lamps can be an excellent interior decoration. If you gradually improve your skills and move from simple lampshades to more complex openwork lamps, you can hang them not only at home, but also delight your friends with an original element of interior decoration.
Table lamps
Quite easy to make and practical in everyday life. Lamps with lampshades
can be used for different purposes: for example, to illuminate a place on a desktop (in a workshop or at home).
They can also act as a decorative element on a coffee table or bedside table.
If the classic design doesn’t suit you, then you can do something original
. For example, a decorative DIY lamp in the shape of a dog with movable limbs and head.
In this case, the limbs act as supporting legs, and the dog’s head is a lampshade
, inside of which there is a light bulb.
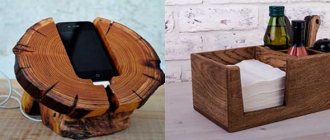
Here's a really interesting idea - a table lamp that not only illuminates the workspace on the table, but can also charge your smartphone!
The design is very simple: a stand and a housing, inside of which there is an LED lamp.
A wireless charging station is built into the stand. If you place your smartphone on the stand, it will automatically start charging.
You can read more about how to make such a multifunctional lamp here.
History of creation
Classic oil lamp The first chandeliers appeared long before man began to use electricity.
It is believed that the first such lamps appeared at the end of the 17th century. Initially, the light source in lighting fixtures was vegetable oil, fat, or crude oil, which was poured into oval bowls attached to the ceiling or ceiling beams. A wick was made from plant materials, which was immersed in the burning substance and during its combustion, artificial light was emitted.
The bowls into which the burned fuel was poured were combined into groups. To do this, they made a single body, for the manufacture of which they used materials popular in those days - copper, bronze, silver.
Later, people began to use wax candles, which were more convenient to maintain, emitted more light and did not smoke. In this regard, the body of chandeliers began to be decorated with pendants and lampshades of various types and shapes, for the manufacture of which glass, crystal and natural stones were used. Such lamps were bulky and heavy, since metal was used in the manufacture of the body, which was also processed and finished with stone and glass.
After kerosene appeared, which made it possible to illuminate rooms for a long time without additional refueling, it began to be used as a fuel, which, when burned, emitted light.
At the end of the 19th and beginning of the 20th centuries, with the advent of new materials and technologies, various materials that were easier to process and characterized by strength and light weight began to be used for the manufacture of chandelier bodies, and with the invention of electricity, incandescent lamps became the light source.
Currently, chandeliers are very widespread, the reason for their popularity is the ease of use, the possibility of using various light sources, as well as the variety of shapes, materials used and decorative elements.
Wood Wall Lamps
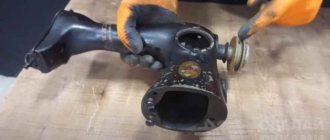
To make homemade lighting fixtures, it is not at all necessary to use lumber. You can, for example, use a tree cut - a very unusual, but original solution.
We tell you how to make a sconce from wood with your own hands
:
- We select a suitable cut of wood.
- We cut it into two parts.
- In one of the parts we cut out the middle.
- We connect both parts together.
- Drill a hole for the light bulb socket.
- We attach the lamp to the wall and screw the light bulb into the socket.
You can find step-by-step instructions for making a DIY lamp from cut wood here.
Remember the table lamp in the shape of a dog? You can do something similar in the case of a wall lamp. For example, you can make an original decorative lamp in the shape of a man who supports himself.
Pros: fast and practically free. To make such a wall lamp, you can use different cuttings of bars.
You will also need a socket with a light bulb and a piece of electrical cord with a plug. Details in this article.
The author of the YouTube channel My DIY life offers another interesting idea for home decoration - how to make a sconce with your own hands
in the form of a star.
It’s not at all difficult to make such beauty. To do this, you can use scrap boards or buy furniture boards at a hardware store.
Main stages of work:
- We cut out blanks of the required size from a board or furniture panel (alternatively, you can use plywood).
- We glue together a five-pointed star from the blanks.
- We make markings and drill holes for the light bulbs.
- We paint or varnish the wooden star.
- We install the sockets for the light bulbs, and lay the wires compactly on the back side. We screw in the light bulbs.
You can find step-by-step instructions for making an original star-shaped wall lamp here.
Outdoor materials
The choice depends on the owners, since different materials can be used for street lamps, the main thing is that they are not afraid of water. Popular plastic falls into this category, but it has one big drawback - fragility. For this reason, it is not the best solution, since sooner or later such a flashlight will definitely break.
Metal is the ideal material
The best option is to make a street lamp from metal. And here there are three worthy candidates: bronze, brass, copper. However, the first alloy will constantly darken, so the owners will have to sacrifice time cleaning the lantern. Copper will oxidize over time, and such a lamp will acquire an unsightly greenish tint.
Candidate materials at hand
It is not always possible (and passionate desire) to make something designed to last forever. For example, in summer cottages it is more logical to build a structure from a simple material that does not require serious processing. Therefore, the owners, whose “bins” are full of all sorts of goods that are a pity to throw away, make street lamps from any raw material. Suitable for this:
- jars: tin or glass;
- clay;
- wood (for example, twigs, wood chips);
- cardboard boxes (requiring good moisture protection);
- plastic containers;
- old dishes;
- building materials;
- PVC pipes.
Such street lamps have a great advantage: they almost always attract attention, as they turn out to be unusual and original. Another plus is the ease of their manufacture, because their creation does not require a welding machine or a lot of time
Yes, there is a minus - it is fragility, but to replace the old product, you can easily and quickly build a new one, but already having a completely different - “fresh” - look.
Wood floor lamp
This design combines two useful qualities: aesthetics and practicality.
The floor lamp looks stylish and modern, and at the same time does not take up much space, as it is made in the form of a corner cabinet.
How to make a lamp from wood with your own hands
, you can read in this article.
As the main material you can use boards, plywood, MDF. The lighting source in this case is an LED strip.
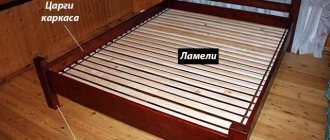
Star frame
Another option for successfully using LEDs, coupled with a plywood base, is frame “stars”. To do this, you will need thin strips of plywood (offcuts will also work). Below is the simplest assembly method that even a child can handle. Rewind the joints tightly with wire or strong thread - and the frame is ready. Wrap it with a Chinese garland and enjoy the result.
Frame with garland
If you are gluing a star from plywood blocks, the main task is to make an accurate cut at the desired angle. Here you will have to suffer a little, since each “beam” has 3 different connections. The cutting of the parts looks something like this.
Star made of bars
Thanks to this, the gap between the components of the structure will be minimal. The joints are secured either with adhesive or with short nails with an inconspicuous head. Then one of the edges of the frame is duplicated with an LED strip, or, again, braided with a regular Christmas tree garland. You can choose a ribbon of any color that will be more in harmony with the surrounding interior. In this sense, the scope for imagination is much wider than in the case of using bulb lamps, however, models with them look quite good.
Ready robot
To make the craft more authentic, you can decorate the plywood frame with textured threads, sprinkle it with “metallic” sprays, and wrap it with fiber optics to get the effect of a hypnotizing neon glow.
Advantages and disadvantages of wooden lamps
Firstly, wood is wood - it is an environmentally friendly material (except perhaps OSB boards).
Wood products, including lamps, are more pleasing to the human eye, so a room with a lot of wooden elements is always cozy and comfortable.
Of course, if you pick too hard, you can find shortcomings. For example, wood is a flammable material (just like plastic), and this material is also susceptible to the formation of fungus and mold.
However, all these shortcomings can be “cured” if you use special antiseptic impregnations and protective agents - against fungus and mold, for protection against moisture and for fire resistance.
Varnishing crafts
If desired, you can transform our craft by covering it with Wood Varnish, preferably colorless. Read how best to varnish a craft. Try to choose a quality varnish. Varnishing is carried out using a special brush “For glue”. Take your time. Try not to leave visible marks or scratches on the craft.
Important nuances of working with plywood
Plywood is a convenient material for carpentry, but certain rules must be followed. In particular, a special approach is needed when cutting sheets. To avoid defects, make an even cut with a jigsaw or circular saw, apply a ruler to the drawn line and follow the mark with a stationery knife. Another option is to place sticky tape on both sides of the pencil line.
The cutting technique is affected by the thickness of the plywood. When cutting, you must hold the saw so that the blade protrudes 5 mm beyond the sheet. That is, with a plate thickness of 15 mm, the immersion depth of the cutting tool is 20 mm. In this case, the sheet should lie face down on the support. The direction of the cut depends on the device used. A jigsaw allows you to cut material straight and curved. Use a circular saw to cut in a straight direction.
Independent production of curved glued forms also requires compliance with some nuances. The rounded product is tightened with rigging straps for 3–4 days until the shape is fixed. Pre-steaming the plywood sheets makes bending easier.
Due to the large number of advantages, this type of raw material is included in the group of popular modern materials. Making your own pieces of furniture from plywood is not difficult if the class and thickness of the slabs are selected correctly, the drawing is correctly executed, and all technological stages of assembly are followed. Finished interior items are practically not inferior in appearance and performance to their analogues made from natural wood.
Operating procedure
To obtain a high-quality product and minimize the formation of defects, you need to do the work slowly and focus on the process. Before starting work, it is recommended to make sure that the thickness of the plywood is equal to the height of the groove on the printed sketch.
Preparing the stencil
Schemes for sawing with a tool can be of different sizes. To create a drawing of an interior item, for example a shelf, you will need to use whatman paper in A1 or A0 format, and for toys you can use a standard sheet of cardboard.
The contour of the product is applied to the surface in compliance with the exact dimensions. Templates for cutting with a hand jigsaw can be found on special resources. But it’s easier to come up with your own compositions based on the type of workpiece. An individual approach to developing a product design will highlight the texture of the wood.
Transferring an image to the surface of plywood or boards
To accurately apply a contour to the surface of plywood or wood, print the template on thick paper. Transferring a drawing from an A4 drawing can cause a lot of trouble if you draw the ornament with a pencil.
The drawing can be glued to the plywood with 2-sided tape. When using glue, you need to clean the surface with sandpaper. An accessible method involves using a stencil made using nail scissors. After preparation, the template is applied to the surface and each fragment is outlined with a pencil.
For convenience, the sheet is secured with tape or insulating tape. The design can be applied thermally. For this, an inkjet printer is used, with which the diagram is printed. After this, the design is applied to the surface with the front side and processed with a heated iron.
Sawing process technology
Sawing from plywood is carried out after applying the drawing to the workpiece. Processing begins with the internal elements of the product, and then the outer contour is cut out. This order of work allows you to get a straight line and provides convenient fastening of the workpiece.
Holes for the blade must be drilled in sharp places on the internal contour. This requires attention as chips may form on the back side. To avoid this, it is recommended not to make the holes completely.
You can limit the depth using insulating tape that is wrapped around the drill. After this, turn the workpiece over and process the hole with an awl. After finishing the work, the product is polished using a file or needle file.
Sawing with hand tools requires the equipment of a special machine with a clamp. This device is used as a base. During processing, the workpiece is fixed at chest level, which provides convenience and allows you to closely monitor the process.
For beginners, it is important to be careful when using a jigsaw in order to practice smooth movements. The cutting blade for a jigsaw is fragile, so it is recommended to avoid distortions, sudden movements, and overheating
When processing a workpiece, the movements must be reciprocating, and the tool must be positioned vertically. Using an electric jigsaw requires securing the workpiece to a workbench. When using this equipment, workpieces up to 5 cm thick can be processed.
Defects in work
If the workpiece processing technology is violated, the tool may shift. A jigsaw may cut crookedly if the tool is tilted or improperly fastened. If the blade gets stuck at the stage of forming the figured elements, then you will need to carefully draw a new line located parallel to the fragment with the defect.
Author's handwriting
Nowadays, things made by hand are highly valued. Such unique decorative works are not in vain considered works of art.
Such projects are individual in nature and will require a fairly large amount of financial resources from a person.
As a rule, such orders are not limited to hanging wooden chandeliers. They include the entire range of original lighting fixtures that will be installed in a specific room.
These could be, for example, floor lamps, wall lighting, outdoor sconces that can create lighting effects, etc.
- How to choose office LED lamps - see the instructions here! Photos of ready-made solutions + electrician’s answers
- Choosing the best linear LED lamps: types, installation rules and tips for choosing LED lamps (130 photos)
- Vertical blinds: features of the mechanism, pros and cons, photos of beautiful design
The following ideas look quite interesting:
- Table lamp with stand in the form of a wooden stump;
- Stylish round chandelier;
- Cone-shaped chandeliers with wood inserts;
- Wooden table lamp in the shape of a man, etc.
The most optimal choice for installing such a product is the living room or bedroom. It is there that they will demonstrate all their decorative advantages.
Required Tools
Plywood is easy to saw and paint. It seems that working with it requires a couple of tools. However, the thematic list expands significantly when the craft is complex:
- Electric or manual jigsaw - for sawing;
- Screwdriver - for screwing in and out of screws;
- Electric drill or hammer drill - for drilling holes;
- Wood files – for initial smoothing of the surface;
- Grinding machine or sandpaper of different grain sizes - for final smoothing of the surface;
- Clamps - for clamping and fixing parts during their assembly and gluing;
- Vise - for clamping parts when sawing and drilling.
A pencil and measuring tools – a square and a ruler – will also come in handy. After all, crafts made from plywood, the drawings of which are themselves complex, have to be adjusted and aligned many times. If the workpiece has patterns, then you will need a stencil.
Casket
The box is a lightweight version of previous creations. However, it is not without patterns, and is sometimes even presented in an oval form. It is better to start with a rectangular model, because... its production does not require complex decisions:
- First, a drawing of the craft is drawn;
- Next, four walls, a bottom and a lid are cut out of a sheet of plywood;
- The next stage is to cut holes in the walls and lid (optional, but desirable)
- Next, the edges of all elements are smoothed using a grinding machine;
- The final step is to fasten the walls to each other, after which comes the fastening of the bottom and lid to the walls, respectively.
Moreover, to attach the lid you will have to purchase decorative canopies. The walls are fastened to each other and the lid to the walls using the tongue-and-groove method or using screws.
The finished box, like light crafts made from plywood, welcomes painting and other decorative designs, which will be discussed a little later.