The characteristics of wood allow it to be used not only during construction, but also for the manufacture of all kinds of useful little things. You can make everything from wood - from cabinet furniture to a children's toy or key ring. Among all kinds of crafts, wooden stands stand out. They are easy to make and functional. Made with high quality, they will decorate a stylish interior.
What is the name of the hot tray?
A hot stand, which has different names: mat, serving cloth, thermal cloth, mats made of synthetic materials, set, lunch mat, protects furniture from stains and scratches. Modern stands are mostly made of wood or fabric, and if desired, suitable protection for the table from hot utensils can be made with your own hands.
It’s not hard to guess why every kitchen needs a hot stand: so that the surface of the kitchen furniture does not deteriorate under the influence of moisture and high temperatures.
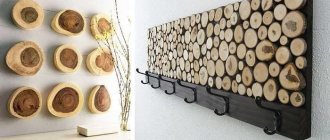
Stand made of discs and fabric
CDs fit perfectly in diameter with mug stands. Therefore, using them, a huge variety of ways have been invented to create stands for high-temperature cookware.
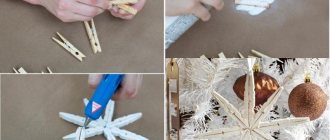
One of these methods is to cover and cover the disc with fabric. To improve the thermal insulation characteristics, it is important to use padding made of padding polyester.
The fabric is cut with a small margin, folded over the edge of the disk, stitched at the same distance and pulled together with thread on the other side.
Types of stands
Modern coasters can be made on wood, rubber, cork, cardboard, glass-ceramic, plastic, fabric and other bases. They can be produced in square, round or any other shape to choose from. There are the following types of hot pads:
- coasters for glasses and other kitchen utensils for tea and coffee;
- tight-fitting and non-slip plate stands;
- serving - for clay pots and portioned pans;
- kitchen - for frying pans, pots and kettles.
Thanks to the decorative design, various types of stands for hot dishes will decorate the kitchen.
How to make a hot stand
Despite all the variety of choices of napkins and mats on the market, choosing the right item for your existing kitchen interior style may not be so easy. You can make a hot stand made of wood with your own hands, which will serve no worse than one bought in a store.
To ensure protective functions, the stand can be made of any type of wood; fruit trees come in a wide variety of shades, which make beautiful mosaic stands. Among all the species, juniper stands out especially because it has healing properties. When wood is heated, essential oils are released that help calm the nervous system, relieve fatigue and restore strength.
A hot tray can be a wonderful gift for a loved one.
Important! Juniper has natural disinfectant properties, because even in the Middle Ages, healers treated wounds and inflammations with juniper juice. Juniper also serves as a talisman against the evil eye and damage; it was not for nothing that our ancestors brought juniper branches into the house to drive away evil spirits from the home.
This element attracts attention and will serve as a decorative element.
Drawing
You can first create a drawing of a hot stand - on paper or in one of the design programs (for example, AutoCAD) and print it on paper for further transfer of dimensions to the material. If the base for the stand is plywood or it consists of products cut from it, then the drawing shows the shape of the base and all the components of the kitchen interior item.
The limitless imagination of craftswomen finds more and more new solutions to a simple problem.
Creating a stand
Creating a stand with your own hands saves your home budget and allows you to implement sometimes non-standard design ideas, while it will be absolutely unique. It is enough to search in a search engine for options for making hot trays to be convinced of the wide variety of possible solutions.
You may first need a drawing that will indicate the sizes and shapes of cutouts and other elements of the future product.
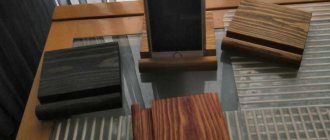
Made of wood
Being an environmentally friendly material, wood can protect furniture from hot pots and pans, releasing a pleasant aroma when heated. To create functional stands, hard woods, such as beech, are best suited. Oak, apple, plum, acacia, apricot and ash have beautiful patterns.
A stand made by yourself will be absolutely unique.
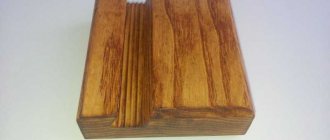
They can be made from cuts of fairly thick branches (3-6 cm), made with a miter saw or hacksaw. Saw cuts 5-7 mm thick are sanded with sandpaper from the front side; the tree bark can be left (especially if the wood is tightly adjacent to it), performing a decorative function. Using PVA glue, the component parts can be glued together in the form of a pyramid in a checkerboard pattern or in one plane on a plywood base. After gluing, the stand is sent to dry under pressure - the glue should dry in 5-6 hours.
Treated wooden cuts can be glued on both sides and onto a matting circle - the resulting product looks stylish and is easier to make.
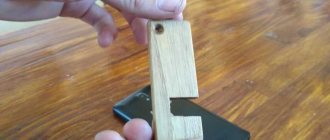
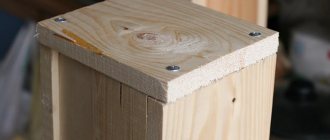
You can also create a stand from square cuts from a suitable wooden block; this must be done with a circular saw. You need to connect the pieces together using glued-in wooden dowels, having previously drilled holes in each of the squares.
Saving the family budget - beauty is created from scrap materials.
Important! Self-made wooden coasters absorb moisture from the air over time and tend to deform. To prevent this from happening, you can varnish their surface.
From fabric
If you plan to sew a hot stand with your own hands from fabric, then the easiest material to process is felt. It has sufficient thickness and density to provide thermal insulation, and does not require edge processing after cutting. You can glue the shapes onto a circle of a diameter suitable for the size of the dishes. Before cutting out figures from paper, a drawing is made showing the shape and position of the figures on a round base. You can fix the parts together using glue or stitches with a thread of a suitable color.
An original accessory for a country-style kitchen can be sewn from scraps of cotton or wool blend fabric.
It is better to sew fabrics with a sewing machine; you will also need the following tools:
- Pins;
- Scissors;
- Needle;
- Iron.
Fabric in the form of shreds sewn together can also be used - a layer of dense fabric is placed between the blanks, after which all 3 layers are stitched and trimmed with braid at the edges.
Sewing masters are trying a combination of materials of different structures.
Tip: If you used loose, voluminous fabric as a compacting layer, you can stitch along the stand in the form of parallel straight lines or diagonals.
From other materials
There are thousands of options for creating hot coasters from many types of materials - bamboo, wood, cork, felt. When making stands from other materials, you may also need a drawing - be it stainless steel, silicone, glass or ceramics. Stands made of heat-resistant glass with images printed on them are not suitable for placing under hot frying pans and pots, but they are useful for tea utensils and dishes that have had time to cool down.
Do-it-yourself hot coasters made from fabric can be additionally decorated with mosaics.
The original type of stands is obtained from CDs placed between blanks of thick fabric sewn along the edges. Original stands are also made from willow wicker, which can fit into interiors in country and retro styles.
The end result is a particularly uncomplicated stand that does not require additional decorative devices.
When creating stands from birch bark, you may need additional tools, for example, a hole punch or cutter. Those who know how to crochet can knit a stand that looks like a napkin, the main thing is to choose the right material (the yarn should not melt from the heat). Alternatively, you can use wool or textiles; it is quite possible to sew a rug from individual scraps using the patchwork technique - for this you will need a sewing machine and scissors.
Using different technologies, products that are different from each other are obtained.
Fabric use
Cotton and linen materials are suitable for making hot coasters . There is no need to buy new material, you can use old things.
2 pieces of beautiful fabric are sewn together. Patchwork or applique techniques are suitable for decoration.
Product made using patchwork technique
Flaps can be stitched in the form of several strips
Fabric coasters are often created using the patchwork technique. It is important to select the patches so that their colors are in harmony with each other. It is desirable that the fabrics match in thickness and texture.
Materials and tools that will be necessary to create such a product:
- scraps of fabric;
- sewing machine;
- pins;
- adhesive pad;
- threads;
- needle;
- scissors;
- iron.
During the work process, you need to use step-by-step instructions for making products using the patchwork technique.
- A template is made from cardboard corresponding to the size of the product. The location of the finishing pieces is drawn on it.
- Pieces of fabric are selected and cut to size. Seam allowances are taken into account.
- A single piece is cut out onto the back side of the stand.
- The finishing pieces are sewn together to form the front side of the product.
- Both parts of the lining are placed right sides on top of each other, and an adhesive spacer is placed between them.
- The parts are sewn together, leaving a small unsewn area.
- The craft is turned right side out.
- The hole is sewn up by hand.
Professionals advise to wet, starch and iron each flap before stitching. All seams are ironed from the wrong side.
Application application
There are several ways to decorate the front side using appliqués.
- Pieces of finishing fabric are cut out with seam allowances. The allowance material is turned to the wrong side, pinned to the front of the product and sewn. The seam is made by hand or sewn on a machine along the edge of the craft.
- When cutting an applique, no seam allowances are made. The finishing fabric is sewn on with a fine zigzag on a machine. This method is suitable for small parts.
There is another method.
- Two identical parts are cut out from the finishing material. They are folded with their front sides facing each other and attached.
- A small cut is made on the back of the applique and the piece is turned inside out.
- The trim is sewn to the front of the stand using any method.
- Both sides of the product are sewn from the inside out, leaving a small unstitched area.
- The craft is turned right side out.
- The remainder of the seam is sewn up by hand.
The product is decorated with a edging made of plain fabric or braid. Sometimes, to add volume and rigidity, an adhesive pad is placed inside.
Decorating the stand
A hot stand can not only serve the purpose of protecting the surface of furniture from damage, but also become an excellent gift and interior decoration. Fabric coasters can be additionally decorated with fabric appliqués. You can make a beautiful stand using the decoupage technique by gluing a paper napkin with a pattern to a piece of wood or ceramic tile.
After the glue has dried, the surface is coated with varnish in 2-3 layers.
Important! To prevent slipping on the table, felt is glued to the stand from below.
The surface of the wooden stand can be decorated by burning patterns on it or painting it with acrylic paints in suitable colors. Wood carving can also be done with preliminary markings with a pencil or chalk.
To make the accessory even more reliable, cover it with a layer of colorless varnish.
Knitted products can be decorated with patterns, a selection of different colors of thread or fabric. Knitted animals look very cute as coasters, for example, green crocodiles, pink and yellow elephants with muzzles filled with cotton wool or padding polyester. The choice of decoration options is limited only by the choice of materials and your imagination.
Sewn, knitted, braided
Yes Yes! If you have weaving or knitting/sewing skills, this will not only be not problematic for you, but also quite exciting!
The fabric version of the stand is made incredibly quickly, because it will require felt scraps, or new fabric. And the technique is very simple, the strips need to be intertwined. As a result, a checkerboard surface is formed. If you take scraps of fabric, you can even make a stand using Patchwork. True, this option takes longer to complete.
How to decorate windows for the New Year - useful tips and creative photo ideasHow to decorate the walls in an apartment for the New Year: 8 best ideas with photos on how to decorate a wall for the New Year with your own hands
DIY New Year's wreath. 12 master classes on making wreaths at home
The set of stands made of linen fabric also looks original. The main thing is that they are made in the same style.
Stylish and durable felt coasters. The felt itself can be processed in such a way that its seams do not have to be processed.
In fact, such things are not only useful in every home. The activity itself is very exciting! And your guests will be surprised when they come to you again and see something new!
Tips for choosing
There are no small details in the kitchen, and hot pads must be chosen as carefully as possible. In order not to get confused in the wide range and choose a high-quality and attractive piece of kitchen interior, you need to take into account the properties (pros and cons) of a particular material.
Thus, wood is environmentally friendly, does not melt under the influence of high temperatures and is inexpensive, and silicone does not absorb fats and odors and does not lose its appearance during long-term use, although it is afraid of fire and damage. And the stands, made of glass ceramics and heat-resistant plastic, can also serve as cutting boards.
Wooden and cork coasters are the most popular among our housewives, but despite their environmental friendliness, they quickly get dirty and bacteria begin to develop on them from dirt and grease.
Stand made of pebbles and shells
You will need the following materials:
- Pebbles and shells.
- Epoxy resin.
- Any silicone mold.
Creation instructions:
- Pebbles and shells are placed in a pre-cleaned and well-dried silicone mold; they can be laid out in a pattern.
- Epoxy resin is mixed with hardener in the required volume (read the manufacturer's instructions carefully).
- The resin is carefully poured into the mold, preferably in a thin stream, so that bubbles do not form and the resin flows into all the cracks.
- After hardening (24-36 hours), carefully remove from the mold.