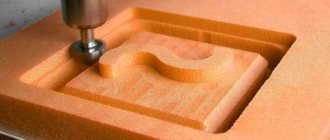
When working with wood, one of the most popular tools is a circular saw. This device, characterized by productivity and convenience, can significantly speed up the process of sawing moldings or sheet materials. When carrying out work in significant volumes, it makes sense to think about making a special stationary structure with a saw, which will improve the safety, speed and quality of the work.
DIY table for a circular saw - drawings
What is a circular saw?
In everyday life and in production, a circular saw is necessary for sawing various materials (wood, slate, plasterboard, soft metal, plywood, etc.). This hand-held electric tool (as standard) is designed to perform straight cuts with a depth of 40 to 140 mm (most models produced by manufacturers allow you to make right angle cuts up to 85 mm, but there is a line of more powerful equipment for construction sites). During the operation, the operator holds the device firmly in his hands and carries out sawing, moving along the workpiece. At the same time, there are no restrictions on the size of the workpieces in terms of length and width. It is possible to cut at an angle to the surface of the part.
Circular saw device
Saw models vary in power. The most budget devices have a power of up to 1.2 kW and are designed for sawing workpieces up to 4.5 cm thick. They are excellent for household needs, carrying out periodic work for short periods of time and are simple and unpretentious. If you need to make a cut up to 6.5 cm, and this needs to be done often and for a long time, you will need a semi-professional tool with a power of up to 1.8 kW . To carry out production tasks, professional equipment with a power of up to 2.2 kW , withstanding long-term loads and capable of cutting parts up to 8.5 cm thick. In addition, tools are produced intended for use in woodworking enterprises, capable of sawing workpieces up to 14 cm thick. 1 cm. Its power reaches 5.5 kW , and weight - up to 100 kg.
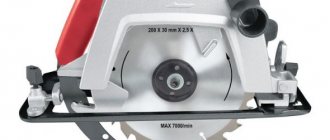
A circular saw
Important! For home workshops, devices with a power of about 1 kW are usually sufficient. Before purchasing a model, it is important to take this point into account, since overpaying for the saw itself and for the electricity it consumes, as a rule, is not justified by necessity.
Choosing a modification based on the purpose
When choosing disks for a tool, you need to pay attention to their technical parameters.
- Tooth sharpening angle . Soft materials are sawed with discs that have teeth inclined in the direction of rotation of the disc. To work with metal, models with a negative sharpening angle are required.
- Number of teeth . For sawing different materials, you should select discs with different numbers of teeth: for soft ones - models with a large number of teeth, for hard ones - with a small number. For example, for wood, the minimum number of teeth is 24.
The marking of the blades includes data on its diameter and the size of the seat.
To use a circular saw for a long period of time, it is important that it does not weigh too much, is ergonomic, and has well-sharpened blades. Holding the unit in your hand for a long time is not at all easy. Operator fatigue can lead to poor sawing quality. Therefore, many craftsmen who work with saws practice placing them on a table.
Circular saws are often mounted on a table
The point of such a device is to secure the saw body under the tabletop so that only one sawing disc is above the table. The workpiece moves along the tabletop and is sawed by a rotating disk. Such a stationary device greatly facilitates work and allows continuous work without loss of quality and quickly. Manufacturers offer a large number of models of saws placed on tables. The cost of structures varies from 8 (equipped with the most primitive saws) to 140 thousand rubles. Self-manufacturing of the structure allows you not only to save money, but also to have a unit at your disposal in accordance with your own requirements.
Making a table for a circular saw is easy
Electric drive of the jointer
And of course, don’t forget about the drive. All mechanisms must rotate. This means that the drive will be the “heart” of the machine. Here are some recommendations for this design element: - first of all, prepare the electric motor.
Electric motor for jointer
It is best to use a three-phase unit for these purposes. Of course, in this case you may have to redo the electrical network in your workshop, but it will be worth it. Three-phase electric motors operating at a voltage of 380 V are capable of developing greater power. In addition, the torque of such devices is suitable for our purposes. The minimum power value should be 3 kW, but the maximum is at your discretion;
- To transmit torque from the electric motor to the working shaft, it must be done using belts. A two-strand wedge-shaped shape is best suited for these purposes. Such belts are more reliable;
- the electric motor itself can be mounted cantilever, directly inside the machine frame. This method will help solve the problem associated with belt tension. If you want to strengthen the engine more firmly, then you need to add a slide to the design, with the help of which adjustments will be made;
- to increase the shaft rotation speed, it is worth using two pulleys. One, larger in diameter, is installed on the electric motor. A pulley with a smaller cross-section is mounted on the shaft.
Be very careful about providing power to the machine. Three-phase current is supplied through a four-core cable. In this case, reliable grounding must be organized. These requirements will help avoid accidents when working on the machine.
What should a saw table be like?
When setting up a stationary area for processing materials, several nuances must be taken into account.
- The structure must be stable and rigid.
- The material from which the table is made must be strong and durable.
- It is important that the table surface is perfectly flat.
- Grounding must be provided.
Circular saw table design - The table must be equipped with devices that ensure the safety of the operator.
- The saw start button should be located within easy reach.
- A place should be provided for collecting sawdust, which should be easily accessible.
- The work area around the table should not be cluttered, as this increases the risk of injury.
Taking into account the above, you can be confident in the reliability of the installed structure and the good quality of the workpieces being processed, regardless of the amount of work.
Table for circular saw - photo
The main components of the table: frame and smooth surface for placing workpieces.
The material from which structures are made varies depending on the purpose, installation location and frequency of use. For domestic needs, you can make a structure from boards and plywood and install it, for example, in a garage. Working with large volumes of materials implies increased requirements for the strength and reliability of the structure. The best solution in this case would be a frame made of a metal profile. To reduce vibrations and provide greater stability, many even concrete the legs into the floor.
Some tips for setting up a table:
- the saw blade must be positioned strictly perpendicular to the table surface;
The saw blade must be positioned strictly perpendicular to
- the standard and optimal size of the tabletop is 1.2 x 1.2 m, but it can vary depending on individual requirements (if the tabletop is long, additional support legs may be needed);
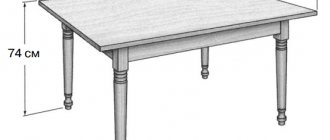
- the height of the table depends on the height of the master, usually it varies between 0.8...1.2 m;
- it is more convenient for the operator if the table is installed on legs rather than on solid sheets, for example, plywood;
- the width of the slot into which the disk attached to the bottom is inserted should not exceed the thickness of the disk by more than 2 mm, otherwise the tool may quickly fail due to clogging with chips;
DIY circular table from a hand-held circular saw
- the circular saw should be placed in the center of the table so that there is no strong shift in the center of gravity;
- It is recommended to place the saw control buttons on the table top or the top of the table leg.
Important! In many models of saws, holes for attaching the sole to the table are already provided by the manufacturers.
Example of a reinforced workbench for a circular saw
How to choose
When choosing a mass-produced elevator, you need to focus on the main technical characteristics:
- how the milling motor is raised and lowered;
- plate size;
- working stroke;
- lead screw
A good lifting device should have the following qualities:
- smooth movement during operation;
- reliability of the mechanism;
- ease of installation.
This design will really make work easier and increase production efficiency. If you can’t find a suitable model or it’s too expensive, then you can realistically make the design yourself.
Do-it-yourself design production
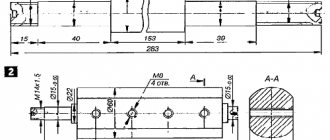
After preparing a sketch of the structure (with dimensions) and purchasing the required materials, you can begin work. You should start by making a frame for the table top. It can be made from a profile pipe. Having a welding machine and a grinder on the farm, this is not at all difficult to do.
- The required pipe sections are cut.
- The sides are welded.
- Four sections connecting the sidewalls are welded.
- All welding and sawing areas are processed with a grinding wheel.
- Adjustment screws are attached to the ends of the legs, allowing you to install the table on a not very flat surface.
Metal frame under the tabletop
The structure must be painted to give it an aesthetic appearance and protect it from corrosive processes. It remains to make holes in the frame for mounting the tabletop.
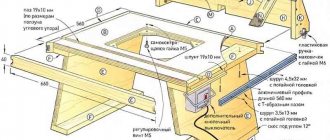
The table can also be made from timber or boards with a section of 10 x 5 cm. To assemble the frame you will need metal corners, dowels and screws.
Design example
Important! When using wood blanks, one should not forget about the mandatory treatment of them from exposure to moisture and temperature. For this purpose, special formulations are produced.
You can also use old furniture, such as an office table, as a base for a circular saw. It is only necessary that its base be strong. In most cases, the standard dimensions of such structures are quite suitable for cutting wood. But it is recommended to install a new countertop itself. An alternative is to glue two sheets of plywood 1.2 cm thick. This thickness will be quite enough to install a saw weighing about 5 kg.
You can glue 2 sheets of plywood
After making the base, you can proceed to the most important stage - preparing the surface and installing the saw.
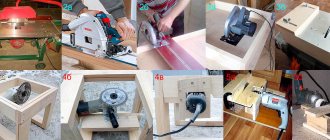
Table. What may be needed to carry out the work.
| Tool, device | Photo |
| Jigsaw | |
| Screwdriver | |
| Drill | |
| Sander | |
| Milling unit | |
| Roulette | |
| Square |
Step 1. You need to drill mounting holes in the platform of the purchased unit (if the holes were not provided for in the design). It should be remembered that after such modification, the manufacturer’s official warranty for the purchased tool will be lost.
MDF (board made from tiny wood chips)
Step 2. The tabletop is cut out according to the required dimensions. It can be made from 1.8 - 2 cm thick plywood, MDF, old furniture or sheet metal, but this option is rarely used. In this case, chipboard is not recommended, since these boards are not very durable. Plastic should also not be used as a countertop.
Important! The thickness of the cut directly depends on the thickness of the table. The larger this size, the shallower the depth the disc can cut through the workpiece, since the working surface of the disc is reduced.
It is advisable to mill the edges of the tabletop (no one has canceled the aesthetic appearance even for working devices), after which you should go over the workpiece with a grinding machine.
Step 3. A slot for the saw blade is made in the tabletop.
Step 4. Markings for hardware are applied. The saw is attached to the bottom of the tabletop. The fastener caps should not protrude beyond its plane.
The saw is fixed to the bottom of the table top
Many people do not drill the platform when installing the saw on the tabletop, but secure it with clamping blocks and self-tapping screws.
Step 5. The tabletop is turned over into the working position and secured to the frame. For fixation, it is recommended to use not only self-tapping screws, but also metal corners, which provide the required structural strength.
Fastening the table top
Many craftsmen do not limit themselves to simply installing factory tools under the table. To gain a few millimeters in the thickness of the cut, they completely remove the saw guard, sole, and saw blade tilt adjustment device (if it is not useful in the future). After this, a homemade platform is produced, on which the saw is attached.
Step 5: The tool's power management is displayed. For this you will need: a plug for the socket, a plug for turning on the saw, a standard light switch, a piece of cable, clamps for clamping the power button on the saw, self-tapping screws and minimal electrical installation skills.
Power management disabled
A socket is attached to the inside of the table; a cable for the switch is output from it, which is installed where it is convenient. The device is powered from the nearest power source in the room. The saw power button is fixed with clamps in a recessed position. The integrated saw start control allows you to quickly and easily control the operation of the tool.
Step 6. To work on the table, you need to make stops and a carriage.
Circular table guide carriage
A carriage for sawing small workpieces or cross-cutting lumber can be made from a plywood base and two wooden walls. It will move along two guides, which are made of sections of metal pipe with a cross-section of 2 x 1 cm and installed in grooves made using a router. The parts placed inside the carriage are very convenient and safe to saw.
Finished carriage
Guides for working with workpieces can be made of boards, plywood or metal.
Metal guides
They must be able to adjust their position depending on the width of the workpieces being cut. The stops can be not only longitudinal, but also transverse, and also help to make cuts at an angle.
Example of a stop
If you don’t want to make the guides yourself, you can install a ready-made device.
You can supply a ready-made device.
To cut workpieces, you cannot do without a marking ruler. To mount it in the tabletop, a shallow groove is selected using a router. It can be done with a chisel and a knife, but using a milling machine it is much faster, more accurate and easier. All areas where work was carried out are carefully sanded to eliminate the risk of splinters. Installation holes are drilled. The ruler is secured with self-tapping screws.
The ruler is attached with self-tapping screws
You can provide various devices to facilitate the operation of the tool: a bag under the table top to collect chips, a dust extractor for sawdust flying over the table, a mechanism for lifting the table top for servicing the tool. In small spaces, a folding tabletop is convenient.
Operating a circular saw is a traumatic operation, so you should push the workpiece toward the disk not with your hands, but with a pusher specially made from a block. The most common injuries that an operator can receive when working with a circular saw are injuries to the fingers and eyes when knots or chips bounce off. When working, be sure to wear safety glasses.
Sawing table made from a hand-held circular saw
A well-made frame, a securely fastened saw and prepared work equipment allow you to cut material quickly and safely.
Video - Do-it-yourself circular table from a hand-held circular saw
Why is such a device needed?
A lift for a router, which ensures precise movement of a hand-held power tool mounted on it in a vertical plane, is necessary in many situations. Situations in which the quality and precision of processing of wood products are of no small importance include decorative finishing of furniture panels, making technological grooves and lugs on elements of furniture structures. The quality of processing in such cases will not depend on the experience of the master performing it and the firmness of his hands, but only on the accuracy of the device settings and the degree of its stability.
Read also: Video intercoms for apartments connection diagram
Even a person with good physical fitness gets tired when working with a hand router, the weight of which can be 5 kg or even more. This directly affects the accuracy and quality of work. In addition, the precision of processing that a manual milling machine mounted on an elevator can provide cannot be achieved when manipulating a power tool manually.
For most routers, standard adjustment when installing the tool in the table becomes simply inconvenient
The need to invent such a useful device as a lift for a router was driven by the fact that the variety of types of decorative finishing of wood products has expanded significantly, the technological methods for processing this material have become more complex, and the requirements for the accuracy of its implementation have also increased. All of the above factors require that manual milling electrical equipment combine high mobility of its working body, as well as the accuracy of the movements it makes. It is these requirements that are fully met by a lift for a router, with the help of which the power tool used is quickly raised and lowered to the required height above the workbench, and also held at a given level for the required amount of time.
The convenience of using a milling elevator also lies in the fact that it is not necessary to install a power tool on such a device each time. This helps to both simplify the production process and increase its productivity.
Requirements for the sawing frame
Some models and brands include a factory-made frame for fixing the saw in a stationary version. These are devices with a small workbench area, on which it is difficult to evenly place and guide a workpiece longer than 1 m, especially a heavy one, along the parallel stop. Therefore, craftsmen often make such tables themselves for their small workshops.
The design requirements are simple.
- The entire structure must be strong enough, especially the corners or beams on which the circular itself and their fastening are attached.
- The height of the table should correspond to the height of the master. You need to work without bending down or reaching too high a platform. The average height is 65-75 cm. Sometimes low structures are made, which are then placed on a workbench of a suitable height.
- The work table (platform) must have a sufficient support area for the workpieces with which the work will mainly be done. For example, for cutting timber frame bindings or furniture legs, a table length of up to 70 cm -100 cm with a width of 50 cm to 100 cm is sufficient. The wider the table, the wider the workpieces (boards, sheets) on it can be unraveled without overhanging the edge of the table. An area is also provided for mounting a parallel stop (thrust bar) on the work table.
Manufacturing methods
In the factory, the fence for a circular saw is made mainly of metal. But there are also specimens made of wood. The main condition is that the material should not be deformable. Craftsmen use various raw materials for guides.
Materials for making a tire at home:
- plywood;
- wooden blocks;
- metal corner;
- U-shaped profile;
- rail;
- cross-cut pipe;
- laminate.
The easiest way to make a circular guide is from a pressed standard profile. A workpiece made of both aluminum and magnesium alloys is suitable for work. It is necessary to select a part with an unequal flange angular section. For example, one side will be 70 mm wide and 6 mm thick. The other side of the corner measures 41×10 mm.
Guide with grooves Source gama-alati.rs