A circular hand saw is a convenient and functional tool for cutting wood blanks. With its help you can cut sheets of plywood, saw boards, trim timber, baseboards, trim, etc.
d. But when there is a large volume of work, for example, when building a house, it is more convenient to use a stationary version of the device. How to make a circular saw with your own hands from a hand tool?
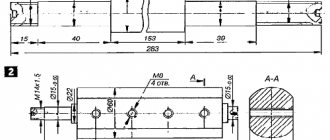
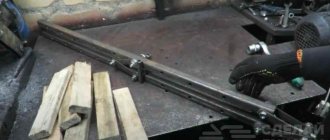
Diagram of a homemade circular saw.
Construction and materials for a stationary saw
A homemade DIY circular saw can be made by securing a hand tool to a stable base. In the simplest version, the device is installed on wooden trestles or on a table mounted from plywood and boards. The tool is secured to the bottom of the plywood sheet, and a cut is made in the tabletop for the toothed disk.
The design parameters of the machine depend on the size of the material being processed. In accordance with it, the power of the hand tool is selected (800-1200 W or more). To perform a clean cut, it is better to install a model with a rotation speed of 3000-4000 rpm.
To manufacture the machine, you will need wood materials, fasteners and tools:
Tools for making a homemade circular saw.
- plywood with a thickness of 20 mm; board for stiffeners and legs (50×100 mm); sandpaper, wood glue and varnish; bolts, screws, clamps; tape measure, pencil, ruler; jigsaw, drill, screwdriver.
The height of the table is selected according to the height of the master and is usually about 1 m; the length of the tabletop depends on the size of the materials that are planned to be processed.
Circular manufacturing process
In order to construct a circular saw from an angle grinder with your own hands, you need to think about the design of the machine
It is important to determine the tasks for which the homemade device will be used. After this you need to create a drawing
It indicates the main structural elements, their dimensions and performance characteristics.
After creating the drawing, the necessary materials and tools are purchased. The assembly of machine elements is carried out separately.
When making circulars, you must follow safety precautions:
- Installation work is carried out only in special clothing. Eyes should be protected with goggles, hands with gloves.
- All mechanisms of the device must be tightly secured. The angle grinder must not be allowed to move. The power tool must be secured to the base of a table or workbench.
- Only high-speed saw blades may be installed.
The process of making a manual circular saw requires skills in using machine tools
It is also important to know the specifics of the work and functionality of the grinder
Making a countertop
The working surface is cut out of plywood using a jigsaw according to the accepted dimensions. The workpiece is processed with sandpaper or a sander. The edges of the table top are milled.
On the bottom side of the sheet, markings are made for attaching a hand saw. A sector is outlined for the hole for the disk.
If you plan to cut workpieces at different angles, the slot should have a trapezoidal contour with a downward expansion. The groove is cut with a hand-held circular saw; holes ø10 mm are first drilled at the ends of the intended sector. Holes must also be made in the tool frame and tabletop for bolt-on mounting.
Next, the stiffening frame is marked for the horizontal surface of the table. The edges along the perimeter should deviate from the edge of the tabletop by 5-10 cm. The boards cut to size are applied end-to-end to the markings on the bottom surface of the sheet, and their contours are outlined with a pencil.
Tabletop diagram for a circular saw.
A center line is drawn in the middle of the marked outline of the frame.
It marks places for screws for attaching the ribs. Through holes are drilled for fasteners with a chamfer on top to recess the caps. Self-tapping screws should be screwed in every 10-20 cm, from the corners of the frame - at a distance of 5 cm.
The boards are placed on wood glue along the intended perimeter and clamped with clamps.
After the glue has dried, without removing the clamping devices, screw in the self-tapping screws and screw the heads into the countersunk hole. In the corners, 2 self-tapping screws are screwed into the end of the frame. Then you need to attach stable legs to the finished tabletop.
Miniature Dremel saw
What you need to prepare for work:
Figure 1. It is better to print templates on cardboard or thick Whatman paper.
- Dremel. A tool model 4000-5/36H or any other will do. Together with it, the kit usually includes 5 devices and 36 different accessories. The kit costs about $100.
- Board 2.5x20x120 cm.
- Board 2.5x5x120 cm.
- Plexiglas 20x25 cm, thickness 2 mm – 2 pieces.
- Clamp for fastening a pipe with a diameter of 2 cm – 4 pieces.
- 1/4″ bolts – 2 pieces.
- Wing nuts 1/4″ – 4 pieces.
- Insulation for pipes with a diameter of 2 cm - 1.8 m.
- Screws 6x25 mm – 20 pieces.
- Screws 4x16 mm – 12 pieces.
- Drills with a diameter from 2 to 6 mm.
- Screwdriver.
- Knife.
- Wood glue.
Work order:
- From a board 2.5x20x120 cm you need to cut 2 pieces 25 cm long and 2 pieces 10 cm long.
- From a board 2.5x5x120 cm, 4 pieces of 14 cm in length are sawn off.
- Using a template pre-cut from thick paper or cardboard, markings are made on a 2.5x20x25 cm board (Fig. 1). The template is cut according to a specific Dremel model.
- The board is sawn and drilled along the marking lines. The edges of the cutouts are machined so that the tool fits into the cutouts.
- All parts are fastened to each other with screws.
- The Dremel is inserted into place and secured with clamps. If necessary, some modification of the grooves and recesses is carried out.
- The covering on the working surface is made of plexiglass.
Assembling a table for a circular saw
The boards prepared for the legs are cut to length at a slight angle, tapering downward.
The upper ends are also beveled so that the structure stands with a slight expansion. The legs are attached to the tabletop frame with bolts through drilled holes. For better connection strength, you can include square bars glued into the inner corners of the frame into the screed.
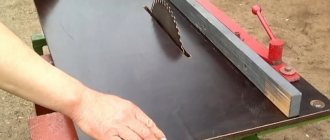
It remains to install the working mechanism in the circular saw. The hand-held circular saw is mounted to the machine tabletop from below. The disk is inserted into the cut-out slot, the device is secured with screws, the heads of which must be flush with the top of the plywood sheet.
As a protective layer for the material and to improve the sliding of workpieces, the tabletop and other wooden parts of the machine are coated with several layers of varnish. Markings can be applied to the surface of the tabletop to trim the ends of the baseboards or trim, which are prepared for miter jointing.
Assembly diagram for a table for a circular saw.
In another embodiment, the working plane of the machine is made of two metal plates.
They are attached to the frame with bolts leaving a gap for the disc. The holes for the bolts are countersunk from above to deepen the heads. The bar for controlling the size of the material being cut can be attached with clamps.
A more convenient stop for the part to be cut is made of a steel angle with shelves of 60 and 80 mm. Its length should be greater than the length of the table.
The ends of the narrow shelf are cut off, and the wide one is bent onto the tabletop. Holes are drilled in the ears and threads are cut for the clamping bolts. The guide strip from the corner is installed according to the workpiece template and fixed with bolts to the end of the tabletop.
If you constantly use the machine, it is better to make the table from steel corners by welding.
The power button can be mounted on the tabletop frame or mounted on the workshop wall using an extended cable to connect the machine. The power key on the saw body can be bypassed or simply secured with a clamp. Access to the machine shutdown device must be safe.
To cut small parts, you can make a mini-machine without a work table.
An old drill can serve as an electric drive for the sawing mechanism. A special shaft for insertion into the drill chuck will have to be ordered from a turner. The toothed disk and 2 bearings must fit firmly onto it.
The frame for installing the shaft is made of two parallel sections of hardwood boards with holes for pressing bearings. The working surface can be made of hardboard or plexiglass. The drill and frame of the device are attached to a board 30-40 mm thick.
The tool, mounted with the handle up, must be securely fastened with a clamp to the base in the cylindrical part of the body near the chuck. The board that serves as the base of the mini-circular is pulled to a regular table with clamps. The body of the inverted drill and the base plate should be at the same level.
The guide bar for a mini-circular saw can be made from a 50x50 mm block.
At one end of it, a stop cut from a board is rigidly fixed. It should be adjacent to the end of the work surface. A threaded pin is attached to the other end of the guide bar.
A second thrust element (bar) is put on it through a hole drilled in it. The stops are tightened by tightening the wing nut on the stud. The guide stop is installed at the required distance from the disk and secured like a clamp.
A homemade mini circular saw allows you to saw off parts of fairly small thickness.
At your discretion, you can improve a homemade circular saw in a simple design by installing additional elements and using other materials. The functionality of the machine can be improved by equipping it with a carriage for feeding material, changing the fastening of the working mechanism, and installing other additional devices for controlling the saw.
A circular hand saw is a convenient and functional tool for cutting wood blanks. With its help you can cut sheets of plywood, saw boards, trim timber, baseboards, trim, etc.
d. But when there is a large volume of work, for example, when building a house, it is more convenient to use a stationary version of the device. How to make a circular saw with your own hands from a hand tool?
Diagram of a homemade circular saw.
A simple circular saw from a grinder or circular saw
An angle grinder (grinder) is one of the most popular home craftsman tools; with its help it is easy to cut metal and clean welds. In addition, using a wood disc instead of a standard abrasive disc, the grinder can be turned into a hand-held circular saw (it is also called a parquet saw), and by making a frame with a table, it can be turned into a stationary circular saw.
Required accessories
To work you will need:
- multilayer plywood with a thickness of 10 mm or more;
- switch and wire;
- countersunk head bolts;
- screws;
- wooden block 40x40 mm.
You also need to prepare a drill or screwdriver, hammer, screwdriver, pliers, ruler and pencil. Using these tools you will have to make a circular saw with your own hands.
Of course, you must not forget the grinder itself or the hand-held circular saw. At the first stage, it will help to cut the material, and then it will take its place as the working body of the circular saw.
Sequencing
The first step is to make the body of the circular. Thick plywood is perfect for this; you can use any pressed wood boards. You will need to cut four rectangular sheets, size 40 x 80 cm. They are used to assemble a box with a square 80 x 80 cm at the base. For ease of assembly and reliability of the structure, four bars are installed in the corners.
The resulting box is closed on top with a table top. It can be made from the same plywood, but it is better to use some sheet material with a laminated coating. This guarantees the durability of the machine and ensures ease of use of the homemade circular saw.
A cut is made in the tabletop to allow the disk to come out, and holes are drilled on the sides for attaching the tool.
The grinder must be securely fixed under the tabletop. The design of the latch can be very diverse, it all depends on the configuration of the machine itself. The main requirement for fastening is that it must securely hold the angle grinder without allowing it to move.
The simplest fastening may look like this: two metal squares, a grinder is fixed between them with a steel clamp.
For additional strength, it is recommended to use the thread of the side handle; a bolt with a suitable thread is screwed into it.
Two holes are drilled in the upper shelves of the angles holding the angle grinder. The structure is secured from below to the tabletop using countersunk bolts. All that remains is to block the power button and connect the angle grinder via an external switch.
In the same way, you can make your own circular saw from a circular saw. In this case, the work is noticeably simplified due to the fact that there is no need to invent a fastening. It is enough to make a cutout for the disk, drill holes along the holes of the plate with a hand-held circular saw.
Construction and materials for a stationary saw
A homemade DIY circular saw can be made by securing a hand tool to a stable base. In the simplest version, the device is installed on wooden trestles or on a table mounted from plywood and boards. The tool is secured to the bottom of the plywood sheet, and a cut is made in the tabletop for the toothed disk.
The design parameters of the machine depend on the size of the material being processed. In accordance with it, the power of the hand tool is selected (800-1200 W or more). To perform a clean cut, it is better to install a model with a rotation speed of 3000-4000 rpm.
To manufacture the machine, you will need wood materials, fasteners and tools:
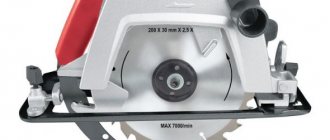
Tools for making a homemade circular saw.
- plywood with a thickness of 20 mm; board for stiffeners and legs (50×100 mm); sandpaper, wood glue and varnish; bolts, screws, clamps; tape measure, pencil, ruler; jigsaw, drill, screwdriver.
The height of the table is selected according to the height of the master and is usually about 1 m; the length of the tabletop depends on the size of the materials that are planned to be processed.
How to make a circular saw at home
The first thing you need to decide on is the dimensions of the future machine.
Dimensions of a stationary circular saw bed
They are selected based on the amount of work to be done. For sawing large workpieces and firewood, a fairly large table is required. To trim wane from an unedged board, a long table is required, etc. In this case, the optimal height of the machine is always approximately the same.
The most universal, suitable for most types of work and workpieces, are the following dimensions: height 650-750 mm, length 700-1000 mm, width depends on the shaft. But, the work table on one side of the saw blade must be at least 250-400 mm wide so that a wide workpiece can be marked so that it does not change when cutting.
Height is important. If the bed is too low, the master will have to bend his back when working, which is inconvenient and tiring. It is difficult to lift heavy workpieces onto a bed that is too high, and it is difficult to work with them. The average height is indicated above (650-750mm), but it can be adjusted depending on the height of the master and the size of the workpieces. For heavy slabs and boards, high beds are inconvenient.
Other options are possible - tabletop machines. They are small in height. For work, they are installed on separate workbenches or frames of suitable height.
Also, for sawing long workpieces, additional separate beds are sometimes used. Most often these are the simplest wooden supports.
You should immediately clearly determine the dimensions of the future machine, based on the above considerations.
Bed material
Then the material from which the frame and work table can be made is selected. There are options.
Metal
For the frame, any available rolled metal is used: angle, square or rectangular profile, pipes for legs, channels, purchased or from scrap metal.
Angles with dimensions from 40x40 with a thickness of at least 2 mm and above have a sufficient margin of safety for all elements of the frame. Thinner corners (25X25) can be used to tie the frame around the perimeter.
More powerful channels have a safety margin that is many times greater than required. They increase the weight of the structure, which is not a disadvantage if the machine does not have to be constantly dragged. A massive machine better dampens vibrations during operation. If you have to buy rolled metal, you should not overpay for clearly excessive power and weight.
For the desktop plane, metal sheets with a thickness of 5-10 mm (ferrous metals) or 10-20 mm (aluminum) are used.
Tree
Wood is prone to drying out and swelling with changes in size, warping and cracking. It has low specific strength compared to metals and requires treatment to prevent rot and mold in damp areas. Poorly suited for these purposes. But due to its availability, ease of processing and assembly, it is sometimes used here too. With conditions:
- straight-grained wood is selected, without knots or interlacing layers;
- the humidity should correspond to the humidity in the room where the machine will be located;
- Desirable aging of blanks for 3-4 years, at least 1 year;
- Hardwoods are used - oak, beech.
Another plus is that wood dampens vibrations well; such machines operate quieter even than on a cast frame made of porous cast iron.
At the same time, the machine is not made only from wood. The shaft must be mounted on a metal frame, which is attached to a wooden base.
Other materials
Plywood with a thickness of 10 mm and above is well suited for work tables. Plywood is a multilayer material made from thin sheets of wood and layers of glue. In this combination, the internal stresses of thin wood are insignificant and are compensated by layers of glue and adjacent sheets. Therefore, thick plywood warps much less than solid wood. It can last a long time on the table. In case of damage, such a table can be easily replaced with a new one.
Legs and framing elements can be made from thick plywood. At the same time, 2-3 blanks with a thickness of 10-20 mm are glued and screwed together with bolts or screws onto one leg.
Chipboard, laminated chipboard, and MDF are not suitable for these purposes , since they are fragile materials that are prone to chipping under loads and impacts. They can be used for temporary machines that are required, for example, only for the duration of one construction project.
Work tables made of this material are mounted flush with the frame of the bed, without overhangs. Protruding edges may break off due to minor loads. Additional transverse joists may be required, since voids under a chipboard table longer than 40 cm may break due to the throw of a heavy workpiece.
Engine
Efficient stationary circular saws have engine power ranging from a minimum limit of 500-700 W and higher, up to industrial options of 5-10 kW.
A low-power homemade circular saw with a motor (500-700 W) is capable of cutting workpieces up to 40-50 mm thick with a disk of small diameter (up to 180 mm) with low productivity. For this reason, motors from washing machines (180-350W) are not suitable, although they can be used on mini-machines for sawing miniature workpieces.
The optimal power for a homemade circular machine is 1.1-2.2 kW at high speeds; a “three-thousander” engine is better - 2800-2900 rpm, running on a 220V household network.
Three-phase asynchronous motors 380V, converted to 220V, were also often used. It must be remembered that after adaptation to 220V, the engine loses up to 2/3 of its power. That is, a three-phase motor with a power of 5.5 kW, after converting it to one phase using capacitors, will be able to operate with a power of about 2 kW.
Therefore, the best option is a factory engine. For example, single-phase AIRE (5AIE) 80s2 2.2 kW/3000 rpm. 220V produced by the plant in Mogilev, Belarus. The cost by mid-2022 is about 8-9 thousand rubles.
Gasoline engines
This option has its advantages and disadvantages.
- well suited for working at remote sites. Indispensable for work in the absence of power supply;
- have great power. Depending on the selected engine model, from 3-6hp. up to 15-20 hp
A number of disadvantages
- big noise;
- difficulties in maintenance, in the device itself, the possibility of breakdowns;
- starting difficulties;
- exhaust gases, inability to work indoors;
- high operating costs due to fuel prices.
In Soviet times, a variety of internal combustion engines were installed on circular cars. From air-cooled tractor launchers (PD-8), internal combustion engines of the UD group, to decommissioned engines from GAZ-51 type trucks.
Today, a good option is an engine from a walk-behind tractor, which is sold separately.
Gasoline engine 6.5 hp.
(4.78 kW). The cost at different sites is from 5 to 7 thousand rubles.
What disk size to choose for homemade products
If the entire shaft is ordered from a turner, or a suitable shaft with carriages and bearings is being finalized, for example, from agricultural machinery, the diameter of the seat for the disks should be taken into account.
Old landing standards: 56 mm and 32 mm. If there are disks with a seat of this size, the seat is bored to fit them. Old Soviet wheels, both carbide and monolithic (backed) can last a very long time.
If we focus on modern discs, for a circular disc of medium power, a 30 mm fit should be provided - the most popular international standard today .
It’s also a good idea to immediately order different seating washers. For example, with a fit for 30, 32 and 56 mm discs. You can order a shaft with a fit of 20 mm (there are such discs) or 30 mm and a set of adapter rings instead of whole washers for 30, 32 and 56 mm. That is, the internal diameter of the adapter washer is strictly along the diameter of the shaft, the outer diameter is according to the mounting diameter of the disk.
The dimensions of the disk are selected in accordance with the engine power. A 600-800 W motor is not able to work effectively with a large disk; it will not have enough power. Maximum – disk 180-200 mm.
The more powerful the engine, the larger the disk can be used.
In this case, you should provide for the size of the slot in the desktop for the disk.
Most often, they use different disks on the same circular saw. For thin workpieces use a small disk, and vice versa.
Making a countertop
The working surface is cut out of plywood using a jigsaw according to the accepted dimensions. The workpiece is processed with sandpaper or a sander. The edges of the table top are milled.
On the bottom side of the sheet, markings are made for attaching a hand saw. A sector is outlined for the hole for the disk.
If you plan to cut workpieces at different angles, the slot should have a trapezoidal contour with a downward expansion. The groove is cut with a hand-held circular saw; holes ø10 mm are first drilled at the ends of the intended sector. Holes must also be made in the tool frame and tabletop for bolt-on mounting.
Next, the stiffening frame is marked for the horizontal surface of the table. The edges along the perimeter should deviate from the edge of the tabletop by 5-10 cm. The boards cut to size are applied end-to-end to the markings on the bottom surface of the sheet, and their contours are outlined with a pencil.
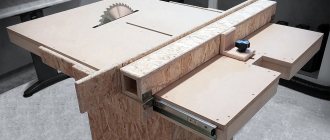
Tabletop diagram for a circular saw.
A center line is drawn in the middle of the marked outline of the frame.
It marks places for screws for attaching the ribs. Through holes are drilled for fasteners with a chamfer on top to recess the caps. Self-tapping screws should be screwed in every 10-20 cm, from the corners of the frame - at a distance of 5 cm.
The boards are placed on wood glue along the intended perimeter and clamped with clamps.
After the glue has dried, without removing the clamping devices, screw in the self-tapping screws and screw the heads into the countersunk hole. In the corners, 2 self-tapping screws are screwed into the end of the frame. Then you need to attach stable legs to the finished tabletop.
Design of a stationary circular saw
A stationary circular saw is designed to perform fairly large volumes of work.
The design of the implemented option in two forms is presented in the diagram below. It also shows the main dimensions of the installation, which are recommended to be used as a starting point for self-assembly. In the drawing, the numbers correspond to the following structural elements of homemade equipment:
- 1 – frame (bed);
- 2 – side panel;
- 3 – starting device;
- 4 – mechanism for adjusting the height of the table, 13 – its stops;
- 5, 6 and 7 – two halves of the sawing table with a base;
- 8 – electric motor;
- 9 – platform for installing the motor;
- 10 – studs (M10);
- 11 – saw;
- 12 – shaft;
- 14 and 16 – driven and driven pulleys, respectively;
- 15 – belt;
- 17 – switch.
Advice! To improve personal safety when operating a homemade mechanism, its rotating parts located under the table should be covered with lids. A protective cover must be installed over the disk during equipment downtime.
It is better to place the starting device in a visible place on the panel (made of dielectric material) so that access to it is free. It is also recommended to equip the machine with an emergency switch. It is convenient when it is large in size.
Focusing on your own needs, you can improve the unit by making it with a jointer or planer. To do this, it is enough to secure a drum with knives on the existing shaft, and make a slot of the appropriate size in the table for it. This will allow you to expand the functionality of the created installation: plan lumber on it, chamfer and select a quarter from wooden blanks.
If you plan to regularly perform carpentry operations using homemade equipment, it is recommended to equip it with a coordinate table with several guides. They need to be fixed at different angles. To organize productive work, it should also be possible to regulate the speed of the electric motor and quickly replace disks if necessary.
Assembling a table for a circular saw
The boards prepared for the legs are cut to length at a slight angle, tapering downward.
The upper ends are also beveled so that the structure stands with a slight expansion. The legs are attached to the tabletop frame with bolts through drilled holes. For better connection strength, you can include square bars glued into the inner corners of the frame into the screed.
It remains to install the working mechanism in the circular saw. The hand-held circular saw is mounted to the machine tabletop from below. The disk is inserted into the cut-out slot, the device is secured with screws, the heads of which must be flush with the top of the plywood sheet.
As a protective layer for the material and to improve the sliding of workpieces, the tabletop and other wooden parts of the machine are coated with several layers of varnish. Markings can be applied to the surface of the tabletop to trim the ends of the baseboards or trim, which are prepared for miter jointing.
Assembly diagram for a table for a circular saw.
In another embodiment, the working plane of the machine is made of two metal plates.
They are attached to the frame with bolts leaving a gap for the disc. The holes for the bolts are countersunk from above to deepen the heads. The bar for controlling the size of the material being cut can be attached with clamps.
A more convenient stop for the part to be cut is made of a steel angle with shelves of 60 and 80 mm. Its length should be greater than the length of the table.
The ends of the narrow shelf are cut off, and the wide one is bent onto the tabletop. Holes are drilled in the ears and threads are cut for the clamping bolts. The guide strip from the corner is installed according to the workpiece template and fixed with bolts to the end of the tabletop.
If you constantly use the machine, it is better to make the table from steel corners by welding.
The power button can be mounted on the tabletop frame or mounted on the workshop wall using an extended cable to connect the machine. The power key on the saw body can be bypassed or simply secured with a clamp. Access to the machine shutdown device must be safe.
Step-by-step instructions for making the machine
The technology we offer does not involve the use of complex woodworking machines and equipment; this makes the process much easier for beginners. Before starting, it is recommended to make a simple device in the form of a large wooden square. It is made from a 10×30 mm block and a 10×50 mm strip of plywood. It will greatly simplify the process of marking and checking the correct dimensions of individual machine parts.
The table is made from old laminated chipboard, but special moisture-resistant plywood for concrete work is excellent. If you have the opportunity, buy this material, you won’t regret it. It is better to choose foreign manufacturers, but it will cost more.
Step 1. Cut out the material for the tabletop.
Cutting the material for the tabletop
The specific dimensions do not matter much; proceed from the size of the shield and the free space in the workshop. You need to understand that workpieces are better held on a long table, which makes cutting long boards easier.
To ensure an even and perpendicular cut, use the prepared device, the rail should rest against the edge of the chipboard, and the saw should slide along a strip of plywood secured with a clamp.
Fixed strip Sawing chipboard
Our central part of the machine table is 36 cm wide, two side parts are 18 cm wide. Between them, wooden slats made of hardwood will be installed for attaching the cross-cut carriage. This carriage makes trimming and cutting parts much easier.
Measuring the distance for sawing chipboard The sawing process Three parts of the table top, between which there will be loose slats that move along with the carriage while cutting materials
Step 2. Place the saw on the center of the table and use an awl to trace the outline of the metal pad.
Marking
Step 3. Drill holes in the corners of the table; this can be done with an ordinary drill or on a drilling machine.
Drilling holes
Step 4: Using an electric jigsaw, carefully cut out the opening for the saw.
Cutting an opening for a saw with a jigsaw
Using this as a template, draw the liner and use a jigsaw to cut it out.
Liner markings
Cutting out the liner
There are options not to make an insert; in this case, the maximum cutting depth is reduced. Make a specific decision depending on the planned use of the saw, but practitioners always advise relying on maximum parameters. The fact is that no one can foresee the requirements for a machine in the long term.
Step 5. Attach the saw to the table. Adapt various available materials for this, select them according to length and thickness.
The saw needs to be secured. Photo of the saw on the tabletop.
Important. Never screw screws into chipboard without first drilling a hole. The slab is not designed to withstand such loads and may crack.
Secure the saw to the back of the table.
The saw is secured with a block and a metal plate. View from below.
Step 6: Reinstall the liner. It is made from durable material, preferably steel or aluminum, but plastic will also work. The liner must withstand strong shock loads that occur during sawing; chipboard cannot cope with such tasks.
Marking of the liner Hardware used for fastening
The part is fixed to the saw blade, you need to prepare holes and use various hardware.
Fixed liner
Step 7. Make markings for the sides of the tabletop; they will be fixed using self-tapping screws. Attach all parts of the table to the cross rods with glue. On the front side, they are additionally screwed with self-tapping screws with countersunk heads; the holes for them must be countersunk.
Step 8: Check the movement of the wooden slats. If they jam in some places, then you need to find the cause and eliminate it. The slats should slide freely, but without wobbling.
Checking the travel of the racks
Practical advice. It is much easier to install metal profiles instead of slats. This requires less time, and the quality of the machine’s work increases significantly.
Example of a table for a circular saw, metal profiles installed.
You can buy profiles at any hardware store; if possible, purchase aluminum elements. They have a low coefficient of friction, which is very important for the smooth movement of the cross-cut carriage.
Step 9. Attach chipboard or plastic boards to the bottom of the table; they prevent the slats from falling out.
Test the operation of the machine. Temporarily place it on a flat surface, plug it in and cut a few boards.
Switch for easy switching on of the saw
Immediately pay attention to uncharacteristic sounds and vibrations. It is necessary to find out the reason for their appearance and eliminate them immediately. At this stage of manufacturing a stationary circular saw, adjustments are much easier to make than on a fully assembled mechanism. Everything is normal - continue assembling the equipment.
Video - Simple sawing machine
Video - Circular saw table
Manufacturing of table side supports and sawing devices
Once you have corrected any problems found during testing, use your saw to make blanks for the sides of the table. The sizes are arbitrary, you can link them to your actual needs and the parameters of available materials.
Step 1. Prepare blanks for the sidewalls.
Practical advice. To speed up the trimming process, attach a temporary device to the saw - attach a small piece of flat board under the square to the rail with self-tapping screws.
After trimming the workpieces, the temporary device is removed and the machine returns to its previous state.
Step 2. Place the table on permanent legs, drill holes and countersink them for countersunk screw heads.
Step 3. Attach boards of the appropriate length to the bottom of the sides. They strengthen the structure and increase the support area. This increases the stability of the structure, which is very important for a compass machine.
Interesting fact. Have you ever wondered why all the old machines have a heavy cast frame? In those days, the domestic industry could not produce precise parts for high-speed mechanisms, because of this, beats inevitably appeared during their operation. The heavy bed dampened vibrations and improved the quality of processing. This is to point out how important the quality of all circular elements is.
Step 4. Test the structure again, this time applying maximum loads.
Device for feeding sawn materials Side support of the table
Video - Homemade stop for a circular saw
Making the carriage
Diagram of the carriage
It is made from a chipboard shelf 16 mm thick.
Step 1. Drill holes for the runners along the edges and countersink them. The distance between fasteners is approximately 10 cm.
Step 2. Screw the base of the carriage to the wooden slats installed on the tabletop. Check its progress; if there are problems, the sliding wooden surfaces can be smeared with soap or paraffin. Large jams will have to be sanded with fine sandpaper. Work very carefully, check the progress, do not remove excess material.
Step 3. Screw the two backs, constantly measure the corners, they should all be straight.
Step 4: Cut the hole for the saw. This is done in several stages.
- Place the carriage in the grooves, lift it up, the plane should not touch the saw teeth.
- Turn on the saw and slowly lower the carriage. The hole is sawed until the carriage is lowered to a horizontal position.
- Carefully make a hole along the entire length of the carriage.
- Check the angle, achieve the correct position. If everything is normal, then you need to additionally secure the carriage backs.
Step 5. Install a stop parallel to the saw and make sure it works.
Carriage for table circular saw
Front view. For ease of movement, the carriage is equipped with a handle
The stationary circular saw is ready for use; you can make various wood products with your own hands. This is a very exciting and rewarding process.
How to saw a board evenly lengthwise and crosswise
Video - Carriage for circular saw
A stationary circular saw greatly increases productivity and improves safety. Every novice craftsman should have such a machine; it can be made using a minimal set of tools. We talked about only one option for making a saw, but there are many other equally interesting solutions. How to make different types of tables for a circular saw can be read on the pages of our website.
DIY mini circular saw
To cut small parts, you can make a mini-machine without a work table.
An old drill can serve as an electric drive for the sawing mechanism. A special shaft for insertion into the drill chuck will have to be ordered from a turner. The toothed disk and 2 bearings must fit firmly onto it.
The frame for installing the shaft is made of two parallel sections of hardwood boards with holes for pressing bearings. The working surface can be made of hardboard or plexiglass. The drill and frame of the device are attached to a board 30-40 mm thick.
The tool, mounted with the handle up, must be securely fastened with a clamp to the base in the cylindrical part of the body near the chuck. The board that serves as the base of the mini-circular is pulled to a regular table with clamps. The body of the inverted drill and the base plate should be at the same level.
The guide bar for a mini-circular saw can be made from a 50x50 mm block.
At one end of it, a stop cut from a board is rigidly fixed. It should be adjacent to the end of the work surface. A threaded pin is attached to the other end of the guide bar.
A second thrust element (bar) is put on it through a hole drilled in it. The stops are tightened by tightening the wing nut on the stud. The guide stop is installed at the required distance from the disk and secured like a clamp.
A homemade mini circular saw allows you to saw off parts of fairly small thickness.
At your discretion, you can improve a homemade circular saw in a simple design by installing additional elements and using other materials. The functionality of the machine can be improved by equipping it with a carriage for feeding material, changing the fastening of the working mechanism, and installing other additional devices for controlling the saw.
The presence in the household of the necessary minimum tools for simple work fully justifies the need to have a small box with the simplest tools in everyday use.
But when the need arises to carry out simple repairs or realize a long-standing dream of a small hobby, then the need arises to purchase or independently manufacture a simple but very necessary carpentry tool - a stationary circular saw.
The practical use of this kind of tools varies from one craftsman to another, but one thing everyone agrees on is that such a machine is simply necessary in a household tool park.
In practical terms, a stationary circular saw is needed:
- for longitudinal dissection of wood; for trimming the edges of unedged boards to obtain smooth sides; for obtaining planks, slats, boards of the same size; for removing part of a board (quarter) to create a tight connection of boards in a panel. In purely economic terms, a circular saw is simply necessary for cutting firewood from wood processing waste.
At the same time, if you approach the issue of machine equipment creatively and put in a little more effort, the result can be a machine with a whole set of universal functions:
- sawing; grinding; planing; drilling; tool sharpening.
Original devices
The list of homemade products can be continued endlessly, but we’d rather talk in more detail about some homemade machines that can be made from any model of drill.
Drill
A drill made from a drill is not a fantasy, but a real and fairly universal machine, assembled independently. The main thing is that you need to order from Chinese engineers (if you couldn’t find it in your city) a flexible shaft from a standard medical unit. As a result, a drill appears in your arsenal, which can be used for engraving work or drill holes using special burs in small parts or structures that cannot be reached with a standard drill.
Lathe
A woodworking or lathe for home can easily be made using a drill. The tool must be secured with special clamps quite firmly, and a specially designed holder with several sharp pins must be inserted into the chuck to keep the workpiece from turning. The center of the rear holder (headstock) and the clamp at the front of a homemade lathe should be located on the same axis. Precision is necessary to prevent runout as the workpiece rotates. After installing the part, the tailstock is firmly fixed with a special clamp.
The third element of the machine is a tool rest in the form of a wooden block on which a chisel or other tool for processing the workpiece will rest.
A lathe for processing wooden workpieces will work properly if the drill has a built-in electronic speed controller. Using the trial method, you establish the optimal rotation mode for effective wood processing. Using such a woodworking device, you can make unique products for household needs: for example, a rolling pin or pestle with a mortar, a candlestick or a prefabricated candelabra.
Winch
An original winch based on an old but powerful drill will become an indispensable assistant in the household, especially for those users who live in their own home and have a personal plot. A simple situation: you decided to install a larger container in your summer shower, but raising it to such a height alone is problematic. Using a winch, this can be done in a few minutes. You just need to first calculate the weight of the container and the spindle speed.
According to garage craftsmen, a homemade winch can easily lift the engine from a passenger car. Watch the video if you don't take my word for it:
Experts advise using a homemade device, setting the drill at the lowest speed. This design can move objects with different masses, because craftsmen even make winches based on an ordinary car starter.
How can you make a circular?
As with reinventing the wheel, there is no definite answer; each individual case has its own path of search and discovery.
But, basically, when asked how to make a circular saw, craftsmen make attempts in several directions:
- improvement of existing hand tools, adapting them as main parts - an electric motor and a circular saw; improvement of an industrially manufactured tool for the specific application; assembly of a machine from individual elements - shaft, motor, bed; independent production of all parts of the structure, well, except for the electric motor .
Features of assembling a circular saw with your own hands from a grinder
Before building a machine, it is important to determine its purpose. To prepare firewood and perform simple cutting, a securely fixed table with a slot for saws is sufficient.
But such a machine can hardly be called safe or functional.
To perform more work, it is worth making a circular saw equipped with a coordinate table. It must have guides. This will help change the degree. In this case, it is worth considering the possibility of switching speeds and replacing disks.
You can make a circular saw from different tools. Almost every man has a grinder in his assortment of tools. It is often used at home. To make a stationary installation, you must use a workbench or a special table. The tool must be fixed from below.
So, how to make a circular? To do this you need to do the following:
- Pull the metal band clamp onto the tool. Its screed must be placed at the bottom.
- Fold the metal strip in half and secure it in the area of the holes.
- Make holes in the grinder gearbox.
- Attach the axle handle.
You can make a tool from a grinder
Manual circular design
The simplest and relatively inexpensive way to make a stationary machine for cutting wood using a circular saw is to convert a manual mounting circular saw into a stationary one. The essence of the modification is to create a standard model of a stationary bed and work table for an industrially manufactured sample.
This modification will allow you to attach the saw upwards with the tool frame, secure it to the work table, and thus use it as a small circular saw. The guide for cutting planks is made from a steel angle 25x25 mm, it is attached to the work table.
The frame itself is welded from 25x25 mm corners, taking into account that the largest standard size of a circular saw is 230 mm, then such a frame is sufficient to create a lightweight, portable but stationary saw, the main use of which is small work that does not require long-term electric motor voltage.
This use case is implemented in some models of domestic and foreign manufacturers of power tools, in which any hard surface is used as the base of the machine, and the mounting saw itself is attached to the base using clamps.
Design elements of a self-made wood sawing machine
To make a stationary machine for sawing materials at home, you first need to know what structural elements it consists of. Whether it’s a homemade machine made from a manual circular saw, a grinder, or a tool assembled from disparate elements, the set of basic parts is the same.
The surface of the table must be made smooth for a higher quality product at the output.
The main elements of stationary circular installations are:
- Table for connecting and securing mechanisms. If the circular saw is powerful and massive, it is better to use a metal table. Options made from chipboard, wood, plywood are suitable, the main thing is that the surface is smooth.
- Shaft. The most important detail. When making it, a lathe is used separately. The dimensions should be calculated accurately to avoid runouts.
- Casing. This element ensures safe use of the circular saw.
- Engine. When using a grinder or circular saw, it is part of the power tool.
On a note! If the design is supposed to be prefabricated, then when creating a circular machine with your own hands, the engine from a washing machine will be the most successful option.
The design of the circular must necessarily have moving parts of the drives, and a button must be built into the power supply circuit to stop the engine in emergency situations.
Circulars of any fixed type consist of main parts.
Tabletop small circular
This option involves making the machine body from wood or an iron angle or profile pipe, taking into account the fact that the placement of the tool will be in a desktop version.
Since the base will be small, the use of such a tool opens up new possibilities. Such a woodworking machine allows you to carry out work in any convenient place. The principle of creating such a machine is similar to how a hand-held circular saw is created - a body, a top plate, a device for fixing a mounting saw or an angle grinder, in the case of using an angle grinder as an engine, are made for the base. Separately, To maintain maximum safety, you need to provide a button to turn the power supply on and off for the tool, and a mechanism for locking the power buttons on the saw or grinder itself. For ease of operation, it is recommended to make the guide bar with guides for fixing the stop into the base body, thereby increasing the reliability of fastening. For clamping here, it is recommended to use bolts with wing nuts, thus further creating ease of operation.
Selection of materials and parts
When creating a homemade circular saw, it is necessary to maintain an optimal balance between its functionality, safety during operation and manufacturing costs. To achieve this, you should select materials and parts with the desired characteristics. To reduce costs, you need to start from old or unused equipment that is available.
Materials for making a bed with a table
To make a bed (frame), you can use a channel or metal corners (sizes from 25×25 mm to 50×50 mm are sufficient). If these materials are not available, then the most economical option is to purchase them at a scrap metal collection point. The legs of the machine will use water pipes or profile metal pipes.
Advice! Frame elements must be connected to each other using electric welding, because bolted connections unwind under the influence of vibrations.
When assembling the frame, it is also necessary to weld spacers at the corners to impart rigidity to the structure. To make it easier to move the machine, you can equip it with durable wheels (with a metal rim) equipped with locks. It should be borne in mind that the more massive the unit being created, the more stable it must be in order to avoid injury.
Metal pipe frame
The main requirements for a table for a circular saw: resistance to mechanical influences (vibration, shock), the ability to withstand workpieces weighing more than 50 kg without deflection, and surface smoothness . These properties characterize sheets of the following materials:
- become;
- duralumin;
- silumin;
- PCB;
- moisture-resistant plywood;
- organic glass.
If you use moisture-resistant plywood, then it should first be covered with zinc-coated sheet metal. The use of chipboard or OSB is not recommended due to the instability of these sheet materials to vibration influences.
Important! The strength of the table is of great practical importance. If it cracks or becomes distorted due to deflection, the disk may jam. This can lead not only to damage to the workpiece, but also to injury.
To carry out various work (for example, cutting logs into boards), you need to equip the table with a side support. It performs the same function as a guide bar for a hand-held circular saw: it ensures even sawing of lumber. Moreover, its use makes it possible to obtain workpieces of different sizes.
The guide stop must be strictly parallel to the disk to avoid jamming of the latter. It can be made from a wooden block or a metal corner. In the first case, only hardwood should be used. To be able to adjust the working gap, the stop must be removable. It can be fixed using clamps or in special grooves (bolts) made parallel to each other on the working surface of the tabletop.
Selection of engine and starting equipment
It is easiest to use a single-phase electric motor as a drive for the considered version of a homemade circular machine. Its power must be selected taking into account the upcoming load. Indirectly, you can navigate by the diameter of the installed disk:
- if it is 350 mm, then for normal operation of the unit you need an electric motor with a power of 1000 W;
- for a disk with a diameter of 170 mm, a 500 W motor is sufficient.
In the latter case, you can make a drive mechanism from an engine from an automatic washing machine. It is able to work for a long time at an average load level. For disks with a diameter of 350 mm, an electric motor from an industrial ventilation unit is suitable. It should be secured firmly to ensure proper engagement of the belt drive. For this reason, it will not be possible to reduce the level of vibration by installing the motor on shock absorbers: it will constantly oscillate.
You can also equip homemade equipment with a three-phase electric motor (380 V) of suitable power. To start it from a 220 V network, you will need to additionally install working (phase-shifting) and starting capacitors into the electrical circuit. It should also be taken into account that the engine power will be less than the nominal value indicated on its plate or in the passport.
Starting equipment should be selected based on the power of the motor, on which the maximum current in the circuit will depend. A good option is to use a start button in conjunction with thermal protection - this will protect the electric motor from burning out the windings if the current increases when the disk jams . It is better to install the protection in a separate electrical panel attached to the side panel of the machine on the convenient side.
All connections must be well insulated so that the wires do not short-circuit to the frame of a homemade circular electric saw. The on and off buttons should be pressed without any effort. Due to the frequent storage of equipment outdoors, it is necessary to protect the electrical part well from getting wet. The simplest thing is to cover the installation with oilcloth or similar waterproof material.
Gear, shaft and disc
To transmit rotation from the electric motor to the disk, the best option is to use a V-belt in conjunction with pulleys from the car engine. The use of gears is not recommended for safety reasons. This is due to the fact that if the disk jams, the belt will simply slip, and the gear drive, due to its rigidity, can cause failure of the entire drive unit.
Advice! If you use pulleys of different diameters, you can change the speed of the disk and install different types on the machine. This is true if there is no motor speed controller.
It is better to entrust the manufacture of the shaft to a specialist by ordering it from a professional turner. Moreover, when you plan to make a circular electric saw more functional by equipping it, for example, with a plane. But the simplest option is to buy a ready-made factory-produced part. A sample of it is shown in the photo below.
It is recommended to use self-aligning ball-type bearings together with the shaft. The mounts for them will fit from the car hub kit. In this case, the bearings should be well protected from dust.
It is easier to buy a disk for a circular machine ready-made than to make it from a sheet of tool steel. The problem is one of balancing. An imbalance of the saw during operation of the equipment leads to its rapid failure and reduces the level of safety of the work process. If you have a circular saw for wood, you can remove the saw blade from it.
It is necessary that the diameter of the disk corresponds to the corresponding parameter of the sawn timber: for example, for 100 mm logs you will need to use a saw measuring approximately 350 mm. This is due to the fact that the disk should not protrude more than a third of its diameter above the working surface of the table.
Ignoring this requirement not only leads to a deterioration in the quality of sawing workpieces, but also increases the possibility of injury.
Making the stop and preparing the necessary holes
For a stationary saw intended for longer operating hours, the presence of a reliable stop for fixing the thickness of standard opening boards is an important and necessary condition.
The emphasis itself is made of metal or using a metal base and individual wooden parts.
The most acceptable option is to create a stop from a 100x100 mm corner, with metal plates of at least 5 mm thick welded to it with slots along the length. The length of the stop must be no less than the length of the working plate of the circular saw. The length of the plates must correspond to the width of the working surface of the stove.
Holes are drilled in the body through the work plate:
- on the edge through the machine frame; in the middle of the work plate.
The holes should form a regular rectangle with the vertices in the center of the holes.
The holes are necessary so that on the inside of the machine in these places, on strips reinforced with a strip of metal 5-6 mm thick, nuts are welded to fix the clamping bolts of the stop.
When making a stop and drilling holes, you need to take into account that the stop must be parallel to the plane of the saw.
What discs should you use for circular saws?
The productivity and quality of work largely depends on the correctly selected disk for a hand-made circular saw made from an angle grinder, a hand saw, or one assembled from separate mechanisms. It should be remembered that there are differences between discs for wood and metal. Even if thin, soft aluminum will be sawed, the appropriate blade must be installed. Metal cutting wheels have finer teeth. There are universal disc options that are suitable for working with both wood and metal.
There are also differences between the discs intended for longitudinal and transverse sawing of wood. Longitudinal sawing is carried out with a cutting attachment with sparse large teeth. But cross-cutting will be of better quality if discs with fine, frequent teeth are used.
As for the material and method of manufacturing disks, they can be monolithic or carbide. Monolithic ones are made from a single piece of high-carbon steel. Such bits are inexpensive, but have a significant drawback: they quickly become dull and require sharpening and re-wiring.
Circular discs can be made for wood or metal.
Carbide discs are made of tool steel with cobalt and tungsten brazing. They are more wear-resistant, but the price of such products is much higher.
The outer diameter of the disks for a homemade circular saw is limited by the dimensions of the protective casing. The standard disc thickness is 3.2 mm. There are thinner and thicker saw wheels. Thin ones are used when working with wood of valuable tree species to make a clean cut. For rougher work, thick discs are recommended.
Making the adjustment rod handle
Adjustment of the cutting depth or the height of the saw exit above the working plate is adjusted on the frame in two ways:
- creating a lifting mechanism for the working plate; creating an adjusting mechanism for raising and lowering the axis of the circular saw and the motor with a belt drive.
The plate lifting mechanism can be constructed by fixing the metal plate to the machine frame using long bolts. Lifting will be carried out by tightening the locking and fixing nuts on each bolt.
The second type of lifting mechanism can be represented as:
- guides along which the carriage with the shaft and motor moves; an adjusting rod with fixing nuts; handles with an applied adjustment scale.
The adjustment rod itself can be replaced with a standard metal threaded stud. This option is even more profitable than inventing new methods.
The adjustment handle can be made by welding a metal plate to the end of the stud. At a distance of 4-5 mm from the center of the plate, aligned with the center of the stud, holes are drilled for self-tapping screws.
For ease of operation, a rod is welded to the end of the plate in such a way that the entire structure can be rotated using it.
As a scale, you can use a round washer made of multilayer plywood or plastic - it is put on a pin and fixed, on the one hand, with self-tapping screws, on the other hand, it is pressed with a nut.
Having assembled the entire lifting mechanism, a scale corresponding to a certain lifting height of the working plate is applied experimentally to the plywood.
Now the guides
There is no point in specifically describing the limit bar. The design is clear from the photographs. To prevent the bar from moving after adjustment, two side screws are used. The front guide (slider) has a rather complex design. This is due to the fact that it has been redone and refined many times. If I did it again, I would do it differently. In addition to the usual requirements - rotation at an arbitrary angle with position fixation, easy movement, there were also special requirements. I wanted it to be non-removable, and at the same time not to interfere when there is no need for it. As a result, it is made reclining. The slider itself moves along a guide and with the help of a bearing along the surface of the table. The bearing was not chosen immediately. From the beginning there were experiments with plates from wood to fluoroplastic. But all this created scratches on the aluminum table. If you make a table out of steel, then there will be no such problem. Thus, the slider moves along the guide. It can be folded back by rotating around this guide. To do this, pull the spring-loaded handle. She pulls back the plastic cracker preventing the slider from reclining spontaneously. Clamps were made as additional bells and whistles. They will, of course, not be secured with clamps. But, so far, we haven’t gotten around to fastening it. So that the circular saw could be stored in a closet without any damage to it, a plywood casing was made. In this case, it can be safely removed.
Making a benchtop tool
For comfortable work with machines, it is necessary to provide, in addition to the elements already mentioned, other tools and devices necessary for normal operation:
- on the working plate, for convenience, it is recommended to apply a centimeter jackal, “0” of which corresponds to the side of the saw blade; to protect against accidental chips and splinters, it is recommended to install a protective screen made of transparent plastic above the disk; to facilitate cutting, when additional force is needed to press the board, it is recommended to consider installation of a pressure roller or wooden pressure plates; to facilitate the work and prevent the board from falling back, it is necessary to install thrust plates.
Homemade devices
Making a circular saw from a drill is not difficult, but problems may arise when fitting the components. Selecting all the elements correctly so that they all work perfectly is a very important task. The shaft should be equipped with self-adjusting bearings if you will use the unit every day. The bearings themselves should be chosen with two rows of balls, which will be adjusted using a clamping nut.
The working surface must have a grid marking. Without such a coordinate system, precise work on wood is impossible. The protective casing should not be neglected - during work it will reliably protect the device from mechanical damage. Circular saws operate in different modes when working with different materials, and therefore it is worth having a device that will control such a process. You need to make a couple of grooves on the shaft so that you can rearrange the pulleys to change the speed.
Interestingly, the rip fence is an important tool for working with large workpieces. You can make them yourself from chipboard, plywood or boards. The size of the stop is no more than 2.5 cm. The pores need to be secured with bolts or self-tapping screws.
When you need to saw bars or make several cuts from different directions, you will need a stop that has a U-shaped configuration. At its base there will be a board, the thickness of which is 3 cm. Sidewalls with a thickness of 1.2 cm should be screwed to the base. So the emphasis will be installed on a beam, the size of which will correspond to the size from the cutting point to the sawing disc.
On both sides it will be pressed with clamps to the beam, and if the beam is very large, then it needs to be rearranged and another cut made. There is also an edge stop, which is very popular. To make it, you need a lot of time and excellent qualifications of the master. Be sure to make a drawing diagram before starting work. Make a stop from plywood with a thickness of a couple of cm, and also a stop bar.
The manufacturing steps are as follows:
- Cut longitudinal grooves for the keys.
- Install the keys on the stop bar.
- Between the grooves made, make another one to attach the stop strip.
- At the base you need another hole, the size of which will correspond to the circular saw cutter.
Install stoppers on the sides, and there should also be clamps to secure everything securely. To install the stop on the workpiece, the bar will move in the grooves and is fixed through the slot with clamps. It is best to attach a tape measure or ruler to the bed because this will make the work easier. The pusher is convenient for working with small workpieces - it helps to secure the part on both sides, and this ensures the accuracy of the work. If the machine is equipped with a three-phase motor (that is, 380 V), then capacitors are needed that can withstand a minimum voltage of 620 V. These can even be paper devices.
It is also important to calculate the capacitors for the device - for 1 kW, 100 µF is required for the working capacitor. The capacity of the starting element should be taken 2 times larger
Remember that the starting block is a device that automatically returns to the starting position, and this is convenient because within a few seconds after the start you can start working.
Required tools and materials
To correctly and reliably connect parts and create a rigid structure capable of withstanding heavy loads, you will need:
- tools: grinder with cutting wheels; welding machine; hammer; drill with a set of drills; marking tools - tape measure, meter, square, scriber, core; consumables - electrodes, metal brushes; clamps, vice materials: metal corners or profile pipe; metal sheet for the work plate; bolts, washers, nuts, studs; metal strip; hardwood boards;
Bottom of the saw
The lower part of the sawing mechanism must be made massive, this will increase its stability and reduce vibrations that occur during operation. For these purposes, corners with a cross-section of 40x40 mm or 50x50 mm are best suited. To mount the electric motor, you need to install 2 transverse angles.
Related article: Tire crafts for the garden
Diagram of a table for a circular saw with a lifting-lowering mechanism.
It is better to use a three-phase asynchronous motor itself, the power of which will be 1.5-2 kW, and the maximum speed will be 2000 rpm. A pulley with a groove of 80-100 mm should be mounted on the motor shaft; it will allow the use of a wide and reliable belt.
A small steel plate should be welded on the vertical stand of the frame. The trigger mechanism will be attached to it. Its wires must be laid carefully so that they do not get caught on the motor shaft.
Then the lower and upper parts of the saw must be connected to each other; this can be done using pipe sections of the appropriate diameter. They need to be pre-drilled on both sides. Bolts are inserted into these holes, which will allow you to tighten the entire mechanism of the circular saw.
After both parts are connected, you need to tighten the belt. Its tension should not be very strong, otherwise it will lead to its rapid rupture. The starting mechanism must be equipped with capacitors that will help smooth out increased starting currents. To increase torque and output currents, you can use a 500-600 W transformer.
Design requirements
The duration and safety of working with homemade equipment depends on the types of loads, operating modes and strength of the unit. Knowledge of the features of woodworking devices will make it possible to produce a mechanism that is reliable, but simple and durable.
High disk speeds. Without this condition, high-quality cutting of wood is impossible, but for the master it is more important to guarantee the safety of a homemade circular saw, so the protective devices that are usually equipped with purchased models are a role model
If the future author believes that it is quite possible to do without some of them, then this opinion is erroneous, since one careless movement often leads to injury. Strength of absolutely all components. Not only the ability to withstand large static loads is important, since the table may begin to vibrate due to multidirectional dynamic influences
They are not dangerous for the master, but they affect the quality of the cut: marks from the teeth remain on the surface of the lumber, and difficulties arise in maintaining linear dimensions. Fire safety is the main requirement when working with wood, so compliance with the rules when installing all electrical appliances is a must.
Features of hand and table saws
The second type of tool is a mini table saw. It has smaller dimensions than the previous version. This type of device is characterized by its mobility and the ability to process workpieces up to 60 cm wide. The cutting depth of such a tool is 4-7 cm. The disadvantage of such a tool is the increased level of vibration during operation of the device, which negatively affects the quality of sawing.
A mini-circular machine is a hand-held tool that is characterized by mobility and the ability to process workpieces in different planes. This saw has low power and requires periodic rest. Hand tools have a limited range of work.
The tabletop circular mini saw has smaller dimensions than the stationary version
In addition, the device is characterized by a low level of safety, which is manifested in the proximity of hands to the working surface, incomplete protection of the saw blade, and the need to monitor not only the cutting process, but also the position of the electric motor in order to reduce the likelihood of cut distortion and tool kickback.
More expensive equipment of this type is a hand-held circular saw with the possibility of permanent installation. The body of the unit is massive, but safe. The tool has a special platform with which the saw is mounted on the machine.
Types of tools depending on the cutting depth and workpiece material
Depending on the intensity of use, circular saws are classified into subtypes. The tool can be household or professional. The first version of the device performs an expanded range of work, but it can operate continuously for no more than 15 minutes, after which it is necessary to ensure a break in the operation of the tool for the same period.
Household appliances are divided into small, medium and large machines. The first type of circular saw makes cuts with a depth of 4-4.6 cm, the second - 5-5.5 cm, the third - 6.5-7 cm.
Circular machines are divided into small, medium and large machines
Professional circular saws can work continuously throughout the working day. They are capable of processing materials of varying hardness and any size. The cutting depth performed by such a tool is 6.5-14 cm.
Depending on the nature of the work and the material of the surface being processed, there are stationary circular saws for wood, tools for metal and a submersible type of device. Wood saws cut wooden elements at different angles.
A metal circular saw is a universal tool that has increased power and is designed to work with a variety of cutting discs. These can be standard abrasive options and high-strength products. Such a universal tool can process pipes, profiles, metal sheets, wood, plywood and plastic.
A plunge-cut circular saw has a movable saw blade. The cutting edge of the tool is lowered to the center of the workpiece, starting the cut from this place, making through holes.
The plunge-cut saw has a movable saw blade
Important! Thanks to the ability to adjust the cutting depth with high precision, you can not only make through cuts, but also make straight or shaped gutters, grooves and slots
Assembling the frame with legs
The base or frame of the table is assembled from a set of transverse and longitudinal wooden beams, which are attached to the bottom of its lid, increasing the rigidity of the entire structure as a whole. For this, four bars with a cross-section of 50x50 mm, placed at a distance of about 7-9 cm from the edge of the table, are sufficient. They are fixed on the bottom of the lid with self-tapping screws of suitable size in increments of approximately 23-25 cm. On its front side, the fastening elements are recessed into the material, completely hiding their hats. The frame can be made stronger by pre-treating the mating surface of the bars with a layer of wood glue, carried out immediately before attaching them. After joining the glue-coated workpieces, the latter are securely fixed with clamps, which are removed immediately after the adhesive has dried. The legs of the structure can be made from bars of the same cross-section as the blanks for the frame (50x50 mm).
The structure of the table must be strong and rigid
The shape of the legs is chosen so that they provide maximum support area for the frame part of the base and have a shape that tapers towards the flooring. On one of these legs, controls for turning the circular saw on and off are subsequently placed, duplicating the buttons located on its body.
You will be able to further increase the rigidity and stability of the entire structure with the help of a set of steel angles mounted in the area of its butt joints. To secure them, it is recommended to use standard bolts with washers, which should preferably be installed with their heads facing outward.
Rules for working with a mini hand saw
Even despite its small dimensions, a mini-saw can cause serious injuries if the rules for working with it are not followed. Therefore, be careful and careful while cutting.
- Be sure to wear gloves and safety glasses before working.
- When the saw is under load, do not turn it on or off. First you need to remove the disc from the material.
- Considering that the disk rotates in the direction from below, it is always necessary to observe the cutting process only from above.
- For more precise positioning of the saw blade, it is necessary to use a special slot in the platform, which is intended just for this.
- If you need to set the target, then first make a couple of test cuts in an unnecessary piece of material.
- Do not operate the saw for too long without a break. Turn it off every 15 minutes to allow the engine to cool down.
Despite the fact that mini circular saws are inferior in certain parameters to stationary models, they are more convenient and easier to use. Therefore, this is the most suitable tool option for home craftsmen. Although we must not forget that you need to choose this device very carefully.
In addition to looking at the performance characteristics of a particular model, it is important to follow the rules for using a mini circular saw. After all, it is a cutting tool that, if handled incorrectly, can cause serious injury.
Therefore, before first use, we recommend that you carefully read the manufacturer’s instructions for working with this tool.
How to make a mini lathe with your own hands
In general, today consider how to make a mini lathe with your own hands. Using this machine you can process small wooden blanks, but it is made very simply and from readily available materials. Well, I think that's enough of the long prefaces, let's go.
And so, for this mini machine we need:
- wooden slats - a large wooden board - a powerful electric motor - large bolts and nuts for them (with washers, of course) - one ball bearing - three nails
Let's get started. First of all, we need to take a large wooden board (the entire lathe will be located on it, so it’s better to take the size you need), two wooden slats and four squares, also made of wood.
For the base of the structure, you should cut a blank from the board with dimensions of 25 by 45 cm. On the larger side of the board, you need to glue one of the wooden slats; as you probably already understood, it should also be 45 cm in length. The author of the homemade product glued it using paint glue.