Using putty, you can significantly improve the aesthetic and technical characteristics of the surface of a wooden or concrete floor, increase its resistance to external influences and, in the case of a wooden floor, maintain a unique wooden texture for a long time. Floor putty is used to eliminate defects that appear during the operation of the floor, as well as for high-quality preparation of the base for decorative finishing. How to choose the composition and do the job correctly? We'll tell you in this article.
Floor putty
Purpose of floor putty
Due to putty, the floor acquires greater strength and a long service life. You should not think that putty is used only on wooden surfaces - this type of work is also done to increase the strength of concrete bases, when, due to minor defects and cracks, the screed is in danger of rapid destruction.
Wood floor putty
Note! Puttying a concrete floor is a mandatory step if low-quality components are used or the screed manufacturing technology is violated.
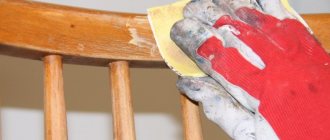
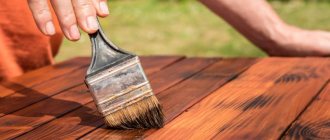
When working with wooden floors, putty is used not only in the process of creating a new coating, but also to correct the condition and update the old floor. The use of putty in this case is the key to high-quality cosmetic repairs of the coating.
Concrete base putty
Putty is also used for new coatings to give them smoothness and emphasize the aesthetics of wood texture.
The advantages of treated surfaces include the following:
- High wear resistance.
- Ability to resist erosion.
- Resistance to abrasion and mechanical loads.
- Surface resistance to chemical agents.
- Surface moisture resistance.
- Increased service life of the coating.
The process of applying the putty composition itself does not cause difficulties and does not require special skills. It is important to choose the right putty, taking into account not only the characteristics of the surface you are working with, but also the basic requirements for the mixture.
Types of putty
The putty must have:
- High elasticity, allowing for uniform distribution of the composition over the floor surface.
- The absence of large particles in the composition that can scratch the base during work.
- High adhesion.
- Environmental cleanliness and safety.
- Fire resistance.
The putty acquires all these qualities through the introduction of special additives into it. It is worth remembering that the floor surface is subject to various loads and influences during operation, so you should carefully consider the choice of putty and the method of its application. It is recommended to choose high-quality compounds from trusted manufacturers.
Recipes for making putty at home
Before filling a wooden floor, many people prefer to prepare their own finishing product.
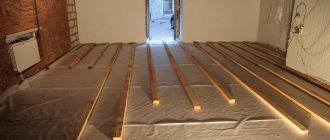
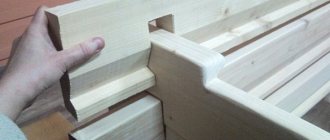
If there are small defects in the form of wobbly boards, then first the floor is strengthened, and then a frame is made of thin beams, and the holes between the boards are filled with PVA glue.
This way you can level the coating before installing the laminate or linoleum.
Recipe No. 1
To do this, a large amount of finely ground sawdust from wood and PVA are used.
The thick solution is poured between the boards, spread with a rule or a wide spatula, and the surfaces are left to cool. Upon completion of drying, the coating will be strong, reliable and free of defects.
In addition, a new coating can be laid on such a floor.
Recipe No. 2
To do this, you will need animal-based glue (ten percent of the total mass), a liquid drier (two and a half percent), turpentine or kerosene from glue (twelve and a half percent).
The proportions of these components are as follows: for one kilogram you need 200 grams, fifty grams and two hundred and fifty grams, respectively.
This composition is cooked in the following sequence:
- Animal glue is heated and soap is added to it.
- While stirring the mixture, add drying oil, turpentine and drier in the proportions described above.
- After the mass thickens, it becomes homogeneous, and chalk is poured into it in a small amount.
The mixture must be stirred until the consistency of thick sour cream is obtained. You should work until the putty material has completely cooled. A water bath is suitable for heating, with the help of which the heating will be gradual and uniform.
The main thing is that “homemade” putty has the same properties as store-bought putty.
It should be characterized by elasticity, strength and good adhesion.
This ensures the durability of the floor covering without deformation. In addition, the homemade putty solution must be homogeneous.
Recipe No. 3
The main component of this type of putty is PVA glue.
To prepare such a mass, use PVA glue, water and a powder composition for the “finish”.
The order is:
- Glue is poured into the container in the amount of one third of the total product.
- Two-thirds of the water is added, and the finishing putty is poured in (while stirring the mixture). Remember that you need to add the powder in small portions and mix well until a homogeneous elastic solution is formed.
- The mass is applied to a previously prepared surface and left to dry.
- After twelve to fifteen hours, go over with a fine-grained sanding sheet.
After these steps, the original base will be renewed, and it will be easy to apply paint and varnish material to it.
Types of compositions and their properties
A wide range of putty mixtures on the modern construction market allows you to choose the composition for a specific case. The following types of putty are distinguished.
Table 1. Types of compositions
| Image | Type of composition | Description |
| Acrylic | Contains solvents. Supplied as a thick paste. It has low elasticity at low air temperatures. The advantages include excellent adhesion, effective processing of seams, the absence of harmful substances in the composition, and resistance to high temperatures. | |
| Polymeric | Has a polymer base. It is used as a leveling compound before laying a finishing coating based on natural wood. Does not shrink. | |
| Latex | It has high adhesive strength, so it requires some skill in performing such work. The advantages include excellent adhesion and elasticity. Allows high-quality sealing of very small joints. Disadvantages include high cost and the need to operate only at positive ambient temperatures. | |
| Quick-drying (nitro putty) | Contains plasticizers and solvents. It has a pungent odor. The advantages include a wide range of colors, high adhesion to wood, and quick drying. | |
| Oil | It has water-repellent properties and makes the treated surface durable. Can be used for both interior and exterior work. Contains water, oil and chalk. | |
| Plaster | Used for interior work in dry rooms. Environmentally friendly and safe product. Vulnerable to moisture. | |
| Epoxy (two-component) | Requires experience and high speed of high-quality application, as it hardens quickly. It has strong adhesion to concrete surfaces and creates a very durable coating. | |
| Cement | It is characterized by low cost and long drying time (at least 6 hours). | |
| Waterproofing | For work in rooms with high humidity - in bathrooms, saunas, baths, swimming pools. |
All of these varieties are characterized by two forms of release - dry and ready-made. In the first case, you will need to prepare it yourself, taking into account the manufacturer’s recommendations indicated on the package.
Dry formulations have the following advantages:
- Long shelf life.
- Convenient for storage and transportation in bags.
- Affordable price.
- Versatility of use.
Preparation of a solution from dry ingredients
Ready-made compositions include options based on acrylic, polymer, latex. They go on sale in buckets or iron cans. The main advantage of this putty is that the manufacturer cannot make mistakes during its manufacture - all components are mixed in the required proportions, which means you don’t have to worry about the quality of the mixture. Disadvantages include high cost and demanding storage conditions.
Separately, it is worth noting water-based putties:
- This mixture contains a minimal amount of additives.
- It has no smell.
- Easy to use.
- Perfectly seals any defects.
- It is characterized by high elasticity.
Note! Another criterion for choosing a putty is the use of the mixture for a certain stage of work. In this regard, putty can be initial (to prepare the surface) and finishing.
Causes of cracks between floorboards
First you need to understand the reasons for the occurrence of such defects.
The following factors influence cracks:
- natural drying of wood;
- too dry air, in which the wood quickly gives up moisture;
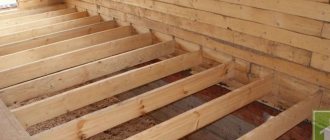
- violation of the technological process, incorrect fastening, unaligned logs - all this will lead to deformation;
- the presence of rodents that wear down their incisors on wood;
- the natural material is incorrectly chosen: coniferous wood and oak are best suited for the floor;
- high load during operation.
Many cracks and crevices can be repaired on your own; serious damage will require replacement of individual sections or the entire floor covering.
PHOTO: zaggo.ru Cracks may appear due to high load during operation PHOTO: kak-sdelano.ru Laying raw material will lead to deformation over time
Choice depending on the type of base
One of the main criteria for choosing a putty is the type of surface you will be working with. This can be wood (boards, plywood, parquet, fiberboard or chipboard), gypsum fiber sheets or concrete. To work with the latter, cement putty with a waterproof effect is used. With its help it is possible to produce a very durable surface.
Parquet putty
Each type of base requires special qualities from the putty. So, for working with wood, the composition should be:
- Plastic throughout the entire stage of work.
- Do not form cracks on its surface after drying.
- Create an organic combination with paintwork finishes.
When working with chipboard, the working composition should not shrink. This quality is typical for acrylic, latex and silicone putties. Oil and adhesive compositions successfully cope with large cracks.
Video description
Seal gaps between floorboards using wood sealant.
We have discussed in detail what means can be used to seal cracks in a wooden floor so that after restoration the paint lays evenly and former defects remain invisible. How long the repaired flooring area will last depends on the correct use of the material.
Varieties of putties for different types of base
| Photo | Name | Rating | Price | |||
| Putty for working with concrete | ||||||
| #1 | Gypsum mortar | ⭐ 98 / 100 | More details | |||
| #2 | Cement mortar | ⭐ 96 / 100 | More details | |||
| #3 | Acrylic mixture | ⭐ 95 / 100 | More details | |||
| #4 | Epoxy composition | ⭐ 95 / 100 | More details | |||
| #5 | Waterproofing solution | ⭐ 92 / 100 | More details | |||
| Types of putty for working with wood | ||||||
| #1 | Water-based putty | ⭐ 91 / 100 | More details | |||
| #2 | Solvent putty | ⭐ 90 / 100 | More details | |||
| #3 | Oil solution | ⭐ 93 / 100 | More details | |||
| #4 | Polymer-based composition | ⭐ 96 / 100 | More details | |||
Preparation for repair
Regardless of what material is used to seal cracks, it will only hold if preparatory procedures are carried out, namely:
- Removing dirt from crevices - you need to take a stiff brush with long bristles and walk along the crevice several times. This will help remove the damaged layer of wood, dust, dirt and bacteria that are present there. A vacuum cleaner, which is convenient for handling even the smallest cracks, will help remove fine dust.
- Disinfection - it is important that bacteria do not grow in the crevice, which will subsequently cause rotting of the wood. For this purpose, the floor at the site where the material is applied is treated with any antiseptic. Chlorhexidine and copper sulfate have proven themselves well. After treatment, you need to allow several hours to dry completely.
- Expanding the gap - if, when removing dirt, the wood begins to crumble, it is necessary to remove the entire loose layer until strong and durable fibers appear. Otherwise, the material will not have the necessary adhesion to the wood, and cracks will appear again.
During work, it is recommended to ensure that the floor has a minimum load and maximum evenness of the surface being treated. All heavy furnishings should be removed from the room during the renovation.
Expert opinion
Levin Dmitry Konstantinovich
If the cracks are large and holes are formed during their processing, the option of replacing individual boards with new ones is considered. Worn wood not only fails to perform its basic functions, but is also difficult to repair.
Concrete floor
The most important stage of repair work is the creation of a flat, durable concrete surface. If there is a base with defects, putty is successfully used to eliminate them.
Concrete floors initially have high strength, but their top layer can begin to collapse in the presence of various kinds of defects that are insignificant at first glance - chips, crevices, cracks. Subsequently, expensive repairs will be required, especially if this is an industrial or public premises.
Recommended putties for working with concrete surfaces
With the help of putty, the surface of the concrete floor becomes more even and prepared for laying the finishing coating.
Putty for working with concrete
To putty a concrete floor, you can choose a base and finishing mixture. But according to experts, a more economical option would be to use universal compositions that work equally at both the preparatory and final stages. At the same time, the consumption of the mixture is significantly reduced.
Self-leveling mortar
Concrete putty is dry and paste-like - ready for use. The mixtures also differ in the method of application - a more liquid composition has self-leveling properties and is applied over the entire surface of the floor. Thicker compositions are suitable for local repairs of individual damaged areas.
A rough screed does not require special qualifications of the builder, but, nevertheless, involves a large number of works associated with its creation. You will find the features of the device and a calculator for calculating the amount of ingredients for a floor screed solution in our article.
Gypsum mortar
Gypsum-based putty is one of the common types of solutions for leveling concrete bases.
Preparation of gypsum solution
pros
The advantages of this composition include the following:
- Gypsum plaster does not shrink.
- The solution has a high drying rate.
- The material is available and has a low cost.
- A smooth surface is created by applying one layer.
- Suitable for tinting in any shade.
Minuses
The only, but significant, disadvantage is
vulnerability to moisture. Therefore, the composition is not suitable for leveling concrete floors in rooms with high humidity.
gypsum putty
Cement mortar
Cement putty is an example of a combination of reasonable cost of material, high quality repair layer and moisture resistance.
Working with cement mortar
pros
The advantages of finishing concrete with cement plaster include the following:
- The concrete surface acquires excellent resistance to high temperatures.
- The floor becomes moisture resistant .
- The coating becomes strong and durable.
Minuses
The disadvantages include noticeable shrinkage when the solution dries completely and the need for skill in working with cement composition.
cement putty
Acrylic mixture
One of the easy-to-use varieties for working with concrete is a ready-made paste putty based on acrylic copolymer and reinforcing fibers. Its purpose is to repair deformed foundations, seal joints, cracks and seams. The main advantages of the multicomponent composition are moisture resistance and the absence of shrinkage of the created layer.
Restoration acrylic putty
pros
The advantages of the material include:
- Elasticity and strength.
- Easy to apply.
- High adhesion.
- Can be used for interior and exterior work.
Minuses
Not detected.
acrylic putty
Epoxy composition
If it is necessary to carry out work to level and strengthen concrete foundations that have noticeable damage in the form of large cracks, embroidered seams, traces of removed reinforcement, it is better to use epoxy putty, which effectively tightens the concrete and increases its strength and service life.
Epoxy two-component composition for concrete
The advantages of this composition include the following:
- The composition qualitatively fills cracks, crevices and joints. Eliminates voids formed after replacing pipes and other communications.
- Epoxy mortar can be used to securely bond difficult areas and repair structural damage.
- The coating is durable, wear-resistant and monolithic , not requiring additional processing.
- The composition has excellent adhesion to any surface.
- The composition forms a coating that is resistant to moisture, chemicals, microorganisms, fungus and mold.
epoxy putty
Waterproofing solution
Waterproofing putty has increased moisture resistance due to its special composition - urethane components, a dry mixture of base, hardener, targeted additives and dispersion emulsion, and can be used as an independent coating, which allows you to save money when performing repair work.
Putty with increased moisture resistance
This putty is used for the restoration of concrete bases in rooms with high humidity - bathrooms, steam rooms, showers. The main advantage of this composition is that it is not necessary to wait for it to dry completely - further work can be done on the wet layer.
waterproofing putty for floors
Selection of putty - criteria
When choosing a putty, you must first take into account the purpose of the room, the type and properties of the base to be treated and the technical parameters of the solution itself. The main criteria that will need to be taken into account are the following:
- Adhesion level. For surfaces with a smooth texture, special mixtures are chosen.
- Base material.
- The degree of moisture resistance of the composition.
- The level of vapor permeability of the resulting coating.
Characteristics of the compositions and their purpose
Note! Putty designed for working with concrete is not suitable for aerated concrete, since the mixtures contain different components and additives selected taking into account the structure of the material.
Application
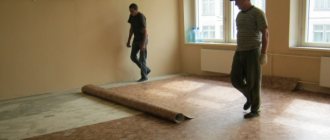
At the first stage, it is necessary to carry out a number of preparatory activities. First, dismantle the old coating.
After removing the old coating, you may notice signs of damage to the base
If signs of concrete destruction are detected, it will be necessary to joint and clean deep cracks and crevices using a drill and a construction vacuum cleaner to remove the weak surface layer.
Cleaning the base
Deep cracks are sealed using cement mortar with bitumen or PVA glue as a binder.
Using special products or soapy water, remove grease and rust stains, dirt, mildew and mold from the surface of the base.
Base primer
An intermediate and very important stage is priming the concrete base. The primer composition has a liquid consistency and is designed to strengthen the surface of the concrete base, as well as increase the adhesive properties of the surface.
Expert opinion
Afanasyev E.V.
Chief editor of the pol-exp.com project Engineer.
The concrete surface tends to generate dust from the porous structure of the coating, which, as a result of the formation of microcracks, becomes increasingly prone to destruction. Primers for concrete are most often made on the basis of polymers and contain quartz sand, which allows you to obtain a rough surface with excellent adhesion. For rooms with high mechanical loads, use a polyurethane or epoxy primer.
Betonkontakt is the best choice for concrete foundations
You can apply the primer to the surface using a spray gun, roller or brush.
Primer Tools
Table 2. Applying a primer to a concrete base
| Illustration | Description |
| Immediately before applying the primer, the base must be thoroughly vacuumed. | |
| If the primer is two-component, then its preparation must be carried out in strict accordance with the manufacturer’s recommendations indicated on the packaging. | |
| The primer is applied using a roller, first parallel to one of the walls, then perpendicular. | |
| Particular attention should be paid to the joint between the wall and the floor; you can use a brush to treat hard-to-reach places. | |
| After applying the primer evenly over the entire surface of the floor, it is left to dry. Then the processing is done again. |
At the next stage, a solution is prepared if it is purchased in dry form and requires mixing with solvents or water. It is important to follow all manufacturer's recommendations regarding the proportion of components to be mixed. At the same time, according to experts, water can be added 15% more than the value specified in the instructions.
Preparation of the solution using a special mixer tool
Additionally, additives are added to the solution in the form of PVA glue, chalk, crushed sawdust, pre-soaked in water for 12 hours. To make the coating resistant to temperature changes, drying oil can be added to the solution.
Note! Each package of putty indicates the pot life of the solution - this is the time interval during which the entire diluted composition must be used. After this time, the solution begins to harden. Therefore, it is not recommended to immediately perform a large batch, especially if there is no experience in such work.
The putty is applied in several steps - each layer should have a thickness of no more than 5 mm. At the same time, you should not get hung up on removing all the irregularities.
The putty is distributed evenly over the entire surface
Depending on the consistency of the solution, the putty is thrown onto the floor surface in small portions or poured and spread with quick movements using a spatula. To prevent cracks from appearing on the coating after drying, the first layer should not be made too thick.
Each layer must dry within 12 hours. After this, you can begin applying the next layer. The putty dries completely within a day. If there are deep cracks, drying will take a couple of days.
Important! While the putty is drying, there should be no drafts or sudden temperature changes in the room.
Recommendations for repairing seams
When the putty has completely dried, it is necessary to eliminate large irregularities. To do this, you can use sandpaper with a grit of P120-150.
Video - Floor putty
Video - Technology of puttying a concrete base
Factors influencing the appearance of cracks
And finally, to prevent cracks from appearing, you need to know the reasons for their formation. Such knowledge will also help eliminate their consequences. So, the appearance of cracks can occur due to:
- low-quality raw materials (for example, if the boards are damp and laid on the floor, over time they will begin to dry out, forming spaces);
- increased dryness in the room and the prevalence of high temperatures. Optimal indicators: humidity 45-65%, and temperature - no higher than 25 degrees;
- unsuitable material that was used for laying the floor. Ideal raw materials are species of coniferous and tropical trees, as well as oak boards;
- rodent settlements. Only in this case the cracks will be equal and uneven. The best way to eliminate such problems is to completely replace them with a new board.
There are many other reasons why cracks may appear in boards. In any case, it is better to eliminate them while they are small in size.
Wooden floor
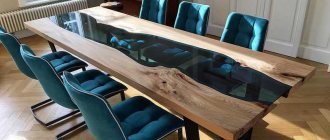
Wood putty is used not only when installing a new wooden floor, but also for restoring existing flooring. With its help, you can effectively eliminate defects and qualitatively prepare the flooring for final finishing. Putty is used when laying parquet - this is one of the important stages that improves the aesthetic and technical qualities of the coating and increases its resistance to various influences.
Parquet laying
When working with old floors that are to be painted, putty is applied at the preparatory stage in order to level the flooring and remove cracks, irregularities and other defects.
Modern manufacturers offer a wide range of putties for working with wood. Their main qualities include the following:
- Homogeneous texture and absence of foreign inclusions.
- High adhesion, ensuring reliable adhesion of the putty to the wood.
- Elasticity is an important factor given the tendency of wood to expand due to temperature.
- Availability of antiseptic additives.
- Quick drying and easy interaction with wood.
- No cracks after drying.
- Easy sanding.
Note! One of the important requirements for wood putty is that it shrinks minimally, so that you can get by with just one coat.
Types of putty for working with wood
On sale you can find a large selection of putties for wooden floors, the difference between which lies in the type of base - oil, water, polymer, solvents. In addition, manufacturers offer a wide range of composition shades, which allows you to choose the material for any type of wood - birch, oak, walnut, wenge and others.
Applying putty with a spatula when laying parquet
Water-based putty
The water-based putty is environmentally friendly and safe to use, easy to use, flexible and does not emit a strong odor during application. The viability of such a solution is much longer than that of solvent-based analogues. Excellent adhesive properties allow this type of putty to be used even on polished substrates.
Water-dispersed acrylic putty for wood
The advantages of water-based putty include the following:
- Allows you to effectively remove defects in wood flooring.
- Aligns joints.
- Does not contain chemicals.
- It is moisture resistant .
- Creates a durable coating .
- Resistant to temperature changes.
- Has an elastic structure .
water-based floor putty
Solvent putty
pros
- Solvent-based putty is characterized by high strength , which has made it especially in demand for woodworking enterprises.
- A plus is its compatibility with any type of wood , even exotic ones.
- Another advantage is the quick drying of the composition.
Minuses
The disadvantage is the strong odor, which requires the use of a respirator when applying the composition and gloves.
Solvent based putty
solvent putty
Oil solution
Oil-based putty has excellent water-repellent properties and makes the wooden coating resistant to mechanical stress. Thanks to a wide range of shades, you can choose a composition for any type of wood.
Oil-adhesive putty
pros
Oil putty for wood has the following advantages:
- High ductility .
- Long service life.
- Affordable price .
- High adhesion to wood.
- Moderate consumption not exceeding 1 kg per m².
- Convenient use of the finished composition.
- Quick drying .
- Convenient packaging in buckets of different sizes.
- Environmentally friendly.
Minuses
- The disadvantage of the composition is its long drying time.
- Vulnerability to moisture
- Doubtful adhesion with any paint and varnish compositions except oil-based ones. Therefore, when working with old coatings, it is necessary to completely remove the old coating from their surface.
oil putty
Staining wood floors is one of the most common ways to finish them. But even with all its simplicity, it requires a competent approach, if only because the paint for the floor must meet certain criteria. How to choose a good floor paint yourself? Read in the special article.
Polymer-based composition
Polymer acrylic or latex putty is most often used to treat wooden floors or parquet.
Recommendations for the use of acrylic putty
pros
The advantages of acrylic composition include the following:
- The material is resistant to temperature changes.
- Has water-repellent properties.
- Resistant to significant loads.
- It has the necessary elasticity and effectively fills small cracks , voids and joints.
- Does not shrink.
- Durable and environmentally friendly.
- Available in a wide range of shades.
- Dries quickly.
Minuses
The disadvantage is
the high cost, but it pays off with the long service life of the coating.
Wood floor putty technology
Table3. The process of puttying wood flooring
| Illustration | Description |
| The preparatory stage involves cleaning the floor from dirt and dust. The base for putty must be dry and clean. | |
| The solution is prepared in strict order according to the instructions indicated on the package. | |
| A small amount of solution is poured onto the floor and spread over the floor surface using a spatula. | |
| After the composition has dried, the floor is sanded several times, increasing the grain size of the sanding element. |
Note! You can get a strong and durable coating by applying several thin layers instead of one thick one.
Application
Puttying parquet is the cheapest way to repair the floor yourself. Using this process, you can completely recreate the original appearance of the floor. If necessary, you need to remove the old coating layer or perform sanding. Once dry, the putty will become completely invisible and will evenly cover the wooden floor. The mixture is mostly colorless, but is quite effective against any chips.
The product is used for parquet flooring to eliminate cracks that appear due to poor installation of flooring material or due to changes in humidity and temperature in the room. The reconstruction process can be carried out simultaneously with sanding: while the varnish layer is being applied. The main purpose of putty is to reduce surface defects: various cracks and other flaws. At the beginning of work, the parquet is coated with a special compound to protect it, and after that a mixture is applied that matches the shade of the floor.
Making your own putty
You can make putty yourself. Craftsmen offer several recipes:
- Sifted chalk is mixed with gypsum in a 2:1 ratio with the addition of PVA glue. The mixture acquires a viscous, thick consistency and is used to level concrete bases. When working with large surfaces, sawdust is added to the composition. This putty dries in no less than 2 days.
- Sifted chalk is mixed with acrylic varnish. In this case, the putty acquires a paste-like consistency.
- Floors in rooms with high humidity are leveled with oil-based compounds. To do this, chalk is mixed with drying oil in a 2:1 ratio and additives are added to accelerate the hardening of the putty.
- When working with wooden surfaces, a composition of wood dust and varnish with an oil base is used.
- The original moisture-resistant composition can be obtained from old linoleum. To do this, the material must be finely chopped and poured with acetone until the linoleum dissolves.
- A durable composition can be obtained by mixing cement and varnish.
- An analogue of acrylic putty is made by mixing the following substances in a metal container set on fire: rosin (200 g), ozokerite (400 g), yellow ocher (400 g). The latter is added when the first two components are melted. This composition is used exclusively hot. Purpose – putty on chipboard and wooden surfaces.
Ozokerite
Note! All work on preparing putty yourself must be carried out using personal protective equipment. It is advisable that the room is well ventilated.
Individual protection means
Expert advice
Restoring flooring is a complex and labor-intensive process that has a number of nuances. When repairing, take into account the type of wood from which the flooring is made. Cedar, beech or chestnut cannot be combined with acrylic putty. When interacting with varnish, nitro solvents can form blue spots on the surface of the boards. In this case, it is better not to varnish the floors.
For general work, colored sealant is recommended. It will help make simple repairs of small cracks in almost any type of wood. If the floors are very rotten, but there is no way to change them, you can use a covering made of sheets of plywood or OSB. To prevent wind, deep cracks should be filled before installing the decking.
Any method of solving the problem of eliminating defects in wooden flooring in a private house or apartment is effective if you choose the right consumables and follow the rules of the technological process. The restored floor covering will acquire an attractive appearance, maintain the microclimate in the room, and dirt will not accumulate in the cracks.
Peculiarities
Floor puttying is carried out to give it greater strength and increase service life.
The work of applying the leveling mixture is not difficult; it is only important to know some of the characteristics that the putty should have, including:
- increased elasticity. This property of the product helps the solution to be evenly distributed over the floor;
- absence of large parts. The presence of such elements can lead to scratches on the base during the coating process;
- adhesion ability;
- environmental friendliness;
- fire resistance.
Compliance with all requirements is ensured by adding various chemical elements to the putty.
The peculiarity of leveling mixtures is that different products are selected for different coatings. You can achieve a perfectly even floor if you carry out the puttying process correctly. Before laying linoleum, the surface must be leveled especially carefully, otherwise all defects will be noticeable. After all finishing work is completed, the floor may be constantly exposed to various temperatures, moisture, and the weight of furniture. To ensure the durability of the coating, you need to use only reliable types of products and methods of applying putty.
Application rules
To make the coating look more natural after treatment, you need to follow certain conditions when working:
- It is necessary to cover all the cracks in the wood outdoors at a temperature of at least five degrees Celsius, otherwise the composition will turn out to be too viscous and will not be able to fill the cracks and crevices well. Air humidity at this moment should exceed 75 percent.
- The surface to be treated must be well prepared in advance - clean all the voids that will be filled with the mixture, wipe off the dust with a damp cloth, remove the old varnish coating if necessary and clean the surface with sandpaper.
- The putty should be applied with a stainless steel spatula or a simple plastic spatula.
- If you need to fill a large crack with a diameter of one centimeter with the mixture, then it is better to putty it in several layers at once, allowing each previous layer to dry well. The thickness of each layer should not be more than 2-3 millimeters. Drying time directly depends on the composition of the putty (it is best to study the instructions on the package).
Application technology
The main task of the puttying process is to prepare the floor surface for covering the base material. Preparation is aimed at eliminating irregularities, processing seams and crevices.
To seal the holes, several layers are applied. If the depression is deep, then after each layer you need to wait for it to dry completely. The final application must be done carefully, since as a result the coating and the putty layer must be at the same level. When all the irregularities have been repaired and the composition has dried, the base is cleaned with sandpaper. Applying a thick layer of leveling mixture affects the appearance of the finishing coat: the putty may bleed through the varnish or paint.
It is not difficult to completely level the floor with your own hands if you do it in stages.
Leveling steps:
preparatory work. They consist of cleaning the base from dirt and dust. Before directly applying the first layer, the floor surface must be perfectly dry; puttying process
The composition is applied with a special spatula; it is important that the layer stands out slightly on the surface. This is done to avoid rapid shrinkage of the material; grinding can be done by using a special machine
This option will greatly simplify and speed up the work; if some unevenness remains in the form of pits, then they are treated with another layer of putty. The steps are repeated until the floor is perfectly level.
Modern craftsmen use putty based on tile adhesive to level the floor. The technology of work is as follows: first, the mixture is poured into large recesses, small ones are sealed with a trowel, after which the process of stretching the solution is carried out in the direction from the thickest layer to the thinnest one. To eliminate possible defects, it is necessary to repeat the movement several times. This method of applying putty is effective before tiling the floor surface.
The process of puttying the seams of gypsum fiber sheets has its own characteristics:
- The compound is applied to the joint between the laid materials with a spatula. At this stage, the places where the screws are fixed are treated with the composition. Before drying, the remaining solution is removed;
- the protrusions will be grouted;
- puttying the external corners of gypsum plasterboard is combined with laying a special metal profile;
- After all stages of applying putty, the surface of the sheets is primed.