The floor in a log house is as important a structural element of a house as, for example, the walls. We bring to your attention an analysis of the most popular variations in laying floors in wooden houses, their features, and material characteristics. You will also learn how to make log floors with your own hands. We will tell you about the commonly used types of floor heating in log houses, their pros and cons.
Subfloor installation
The subfloor provides a secure base and protection for the finishing floor.
The top flooring is always referred to as the finishing floor. Bottoms and intermediates can be considered a draft or treated as separate items.
Most often, roughing means some kind of rigid base that ensures the evenness of all subsequent layers. Its functions are as follows:
- Underlying - the base absorbs the load from the flooring and distributes it evenly from wall to wall. This role is played by the slab, floor, and soil.
- Leveling - the subfloor forms a surface, flat or inclined.
- Intermediate - plays the role of a layer or binder between the top and bottom layers.
- Insulating – insulation and waterproofing of the base ensure the functionality of the entire structure. The “correct” floor does not creak underfoot, does not amplify the sound of footsteps, does not conduct noise from the lower or upper floor and retains heat in the room.
The subfloor in a wooden house is made from the most waste materials: slabs, picket fences, unplaned boards. This layer serves as a kind of buffer and absorbs all the loads that arise from displacement, temperature and humidity fluctuations so that the top layer is not subject to deformation.
General requirements
Any construction of objects made of wood implies, first of all, the construction of floors in a log house made of a similar material. This solution will create harmony between the walls and flooring. The technology for laying wooden flooring has been known for a long time, but the improvement of technological procedures continues to this day. The structural scheme for arranging a wooden covering consists of :
- preparatory (rough) layer;
- finishing flooring.
Regardless of the design, the flooring must meet the following requirements :
- water resistance;
- aesthetics;
- abrasion resistance;
- hygiene;
- durability;
- installation manufacturability.
In addition, the coating must be warm, easy to clean, have high sound insulation properties and match the interior of the building.
Types of rough coating in wooden houses
There are 3 main designs:
- on joists;
- on beams;
- on the ground.
The last option is carried out if the house does not have a subfloor or basement.
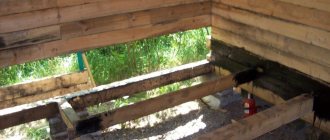
On the logs
The subfloor in a house made of logs or timber is most often installed on joists. Mandatory condition: the height of the underground should be no more than 25 cm. They are secured to wooden pads treated with antiseptics.
Installation is simple, even beginners can handle it.
- The timber is cut to size. Treated with an antiseptic.
- Place at a distance of 40–50 cm.
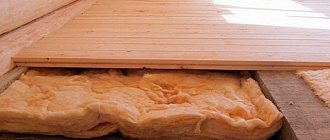
- A gap of 20–30 mm is left between the wall and the edge of the beam. Mineral wool is placed here, which is subsequently hidden by the baseboard. Insulation can be installed in the cavities formed between the slats.
- When installing, check the horizontal positioning using a level.
- Sheets of plywood and boards are attached to the joists as finishing flooring.
If the floor height is low, you can do without insulation.
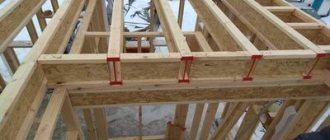
On beams
In terms of design, this option is not much different from a floor on joists. But since in addition to wooden beams, you can use concrete or reinforced concrete ones, such a foundation turns out to be stronger and more durable.
Beams can be laid directly on the foundation.
On the ground
If the house does not have a basement or underground space, build a foundation on the ground. This design is no less warm and durable. The construction scheme is similar, but differs in the first stages.
- The soil is removed to the required depth and compacted. A bedding of river or ravine sand is compacted at the bottom of the resulting trench.
- Then a layer of crushed stone or expanded clay is poured. The bedding prevents capillary rise of water and dampness.
- A layer of stone and sand is poured with concrete. For rough screed, use material of a lower grade.
- Lay waterproofing, preferably film.
- Lay thermal insulation. The choice depends on the area and design of the building itself. Under the finishing concrete screed, slab material is used: polystyrene foam, penoplex. For the option on logs, you need mineral or basalt wool. In some cases, expanded clay is simply poured.
- Cover the “pie” with a vapor barrier and lay the finished floor.
When laid on the ground, you can install a “warm floor”. When planning the base, an additional height of 10–20 mm is laid. Electric mats or water heating are laid in a concrete screed. In this case, the design of the subfloor will be slightly different.
To increase heating efficiency, a foil layer is placed under the screed, reflecting heat into the room.
Floating floors
In a wooden house you can also install floating floors. Their peculiarity is the lack of connection between the coating and the basic structure - floor slab, wall. This feature will make the floor independent of wall shrinkage or soil movement, which significantly improves durability.
A floating subfloor guarantees long service life and stability for any floor covering, such as laminate or parquet. They set it up on an old floor on joists, on a concrete slab, on the ground.
Most often, a floating floor is constructed on the basis of a concrete screed. The rough material can be dry or wet. Despite the heavy weight and long life of the structure, wet floors are installed more often.
- The foundation is being prepared. If the floor is laid on the ground, compact a mixture of sand and crushed stone onto the bottom of the site. If on a reinforced concrete slab, the latter is cleaned and treated with an antiseptic primer. Repair any cracks or cracks found.
- The subfloor in a wooden or light frame house does not need to be reinforced. In heavy three-story cottages this is necessary. For reinforcement, use a metal mesh or tie the rods together yourself.
- A damper tape is laid along the perimeter of the room to the entire height of the structure. The concrete screed should not come into contact with the walls.
- The structure is poured with concrete grade B7.5–B10. The thickness of the layer is 7–10 cm. The reinforcement must be buried in the layer by at least 3 cm.
- Level the layer according to pre-arranged beacons using a rule or laser level. After the initial setting of the material, the beacons are removed and the holes are filled with fresh concrete of the same brand.
- After drying, the surface is insulated with polyurethane film.
Any finishing flooring can be laid on the resulting screed.
If a dry floor is being installed, instead of pouring it, dry slab materials, such as plywood, chipboards, and asbestos-cement sheets, are laid on a backfill of expanded clay, perlite and sand. This option is attractive due to the speed of installation: you do not need to wait for the concrete to dry to continue work.
A floating floor on a dry or wet screed can be additionally insulated.
Log house made of rounded logs
Living in a beautiful log home, where every log is the same diameter and the gorgeous look of peeled, smooth wood, is the dream of many a country vacationer or lifestyle enthusiast.
In an era of prefabricated furniture and modular concrete homes, a log home can have individual character, rustic charm and a closeness to nature.
Building a rounded house is not difficult, but very exciting. It resembles a construction set that has already been prepared, assembled, numbered, disassembled at the manufacturer and delivered to you.
Constructing round houses does not require much experience, skill or talent, but it will require hard work in planning, and choosing the right builders.
To compare the construction of a classic log house and a house made of rounded logs, let's look at the stages of building a log house. There are many of them:
- Making a decision on construction;
- Selection of project and layout;
- Study of laws and building codes;
- Selection of land;
- Estimation of the cost of a log house;
- Tree felling;
- Wood debarking;
- Drying logs;
- Construction of the foundation;
- Laying the lower crown;
- Floor laying;
- Construction of walls;
- Cutouts for windows and doors;
- Okosyachka;
- Roof installation;
- Installation of doors and windows;
- Decorating the house outside and inside.
If you choose to build a house from rounded logs, then you do not need to do such work as felling, debarking, drying, finishing, cutting out windows and doors. The rounded log house kit is numbered and ready for assembly.
Material selection
Materials for floor insulation
The design includes several layers. For each of them, a material is selected that is compatible with the others and meets the general requirements.
- For backfilling, take crushed stone of small and medium fractions - 5-10 mm in diameter, sand - river or ravine. Instead of crushed stone, you can use expanded clay: it also prevents the absorption of moisture by the screed, but at the same time it will also help retain heat.
- If the subfloor is a bedding, only river sand and fine crushed stone are used for it.
- For wet rough screed, concrete, cement-sand, gypsum and foam concrete mixtures are used. Bulk compositions are also used, where the binder is polyurethane or polyester resins. Such mixtures harden faster and require a thinner layer for installation.
- For waterproofing, you can use regular roofing felt in 2-3 layers. Concrete is treated with liquid bitumen mastics.
- The structure is insulated with slabs of penoplex or polystyrene foam, mineral or basalt wool. Here the choice depends on climatic conditions and the depth of the foundation. The heat-saving coefficient of mineral wool or expanded clay is less than that of a foam board, so a thicker layer of thermal insulation is required. This is not always possible.
The finishing flooring material also influences the choice of rough screed material.
Necessary tools and building materials
Tools for screeding
There are several different technologies for laying subfloors. This requires different materials, but the same tools. The main list includes:
- devices for removing the old floor if repairs are being made;
- construction or laser level, tape measure, corner;
- shovels, trowels, wood hacksaws, jigsaws;
- screwdriver, drill, grinder;
- beacons and rules for leveling the screed;
- concrete mixer for preparing concrete;
- thermal insulation materials – the latter are recommended to be kept indoors for about a day before installation;
- waterproofing – roofing felt, films, membranes, coating compounds;
- vapor barrier - not always required;
- materials for dry screed - chipboard, waterproof plywood, GPV sheet.
Other tools may be required to install the subfloor.
Laying features
The type of subfloor and installation method are determined not so much by the material of the walls as by the material of the floors or foundation, as well as the presence or absence of a basement.
- In a log house without an underground space, the easiest way is to install a floor on the ground. Dry screed, wet screed, bedding are used.
- If a wooden house stands on a slab foundation, a screed is made directly onto the foundation.
- If you have an existing subfloor, the best option would be a floor on joists or beams. If the subfloor is ventilated, this option guarantees the durability of the floors and good insulation.
A reliable and level subfloor is the basis for the durability and reliability of the coating in the house. There are several design options. Choose the appropriate one, taking into account the characteristics of the wooden building, foundation, and subfloor.
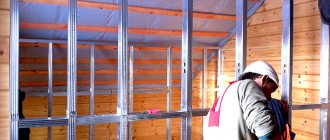
Basic rules for installing joists
When installing logs yourself, you should strictly follow the following rules:
- Before installing the log, the surface must be cleaned and primed;
- all wooden elements of the pie structure are thoroughly dried and treated with antiseptic antifungal drugs;
- sand or fiberboard can be used as a soundproofing material;
- adjustable floors with your own hands must be fixed well, and then use a long construction level to make sure that the logs are installed straight horizontally;
To control the horizontality of the structure, you must use a level - Under no circumstances should you begin installing the floor without checking the horizontalness and evenness of the joists;
- floor boards are attached to each and every joist;
- In order not to spoil the board, the slots for fastenings must be made in advance; when using self-tapping screws, the holes are made with a thin drill.