The masterpieces of wooden architecture that have survived to this day delight the eye with expertly crafted carved details. In the old days, ornaments on the walls were the norm, but after the revolution such decorations were considered unnecessary.
Nowadays, original window frames in a wooden house are experiencing a rebirth, which is not surprising, because it is not just decor, but also a functional detail of the facade.
Window trim options
The basic rule when choosing platbands is that their material matches the material of the window. If you have a wooden window, then the frame should be wooden; if it is plastic, then plastic.
Although there are exceptions, in the form of a successful combination of platbands and windows made from different materials.
Wooden trims
Wooden trims are made from planks at least 30 centimeters thick. The width of wooden platbands can be different, depending on the profile pattern and design. The profile pattern of simple wooden trims is made using a milling machine.
Advantages: affordable price, easy installation.
Disadvantages: poor design, poor resistance to moisture and temperature changes, the need for regular painting or varnishing.
Release form: rounded or beveled planks with a convex pattern, or smooth, 1.5-2 meters long.
Area of application: hiding installation seams on wooden windows. Additional protection of seams from environmental factors.
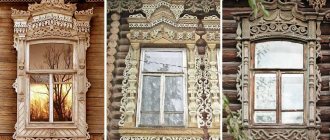
Carved platbands
Carved wooden trims are made manually or using a jigsaw. There are many options for the pattern of platbands: from simple ornaments to sacred symbols that protect the house from evil spirits.
Making carved frames yourself is a job that requires carpentry skills. If you want to make platbands with your own hands, but do not have experience, choose a pattern without complex elements.
Advantages: very beautiful appearance, the ability to improve the facade of the house without significant financial investments.
Disadvantages: high price, difficulty in manufacturing, fragility, need for regular painting.
Release form: depending on individual order or design developed by the manufacturer.
Scope of application: decorating windows and the facade of the house, hiding installation seams.
Plastic trims
Plastic trim is the general name for planks made of plastic, polyvinyl chloride and foam. Plastic trims are often included with the installed plastic window. Due to the specific nature of the production of this type of platbands, they cannot be made at home.
Plastic platbands can have a regular or carved pattern. The planks are installed using special fasteners, liquid nails, glue or double-sided tape.
Advantages: moisture resistance, long-term operation, easy installation.
Disadvantages: fragility of some products, small choice of design when simulating carved frames.
Release form: smooth, carved or with a profile pattern, 1.5-2.5 meters long.
Scope of application: hiding installation seams on plastic, sometimes wooden windows. Additional protection of assembly seams from environmental factors.
MDF platbands
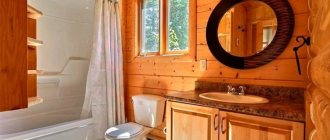
Due to poor resistance to moisture, it is recommended to use medium-density fiberboard trims only for interior window decoration. MDF slats are great for wooden windows, especially if they match the color and texture of the wood.
The platbands are fastened with nails, screws or glue.
Advantages: low price, good appearance.
Disadvantages: poor resistance to moisture, inability to use for exterior decoration.
Release form: smooth, rounded or with a profile pattern, 1-3 meters long.
Scope of application: interior decoration of wooden or plastic windows.
Aluminum trims
Aluminum trims are mainly designed to hide assembly seams when installing windows and stained-glass windows made from the same material. In appearance and design, aluminum trims strongly resemble plastic strips.
Aluminum trims are fastened using a special profile or latches.
Advantages: durability, long service life.
Disadvantages: poor combination with windows made of other materials.
Release form: aluminum strips with various types of patterns except carved ones, 1.5-2.5 meters long.
Scope of application: external and internal finishing of windows and stained glass windows made of aluminum.
Average prices in the Russian Federation
Considering that products for framing window openings in wooden houses are supplied to the market by hundreds of manufacturing enterprises, each of them guarantees consistent quality, and competition equalizes average prices :
- Direct, wooden cashing from pine - from 500 rubles. for 1 p.m.
- Direct, wooden cashing from larch - from 850 rubles. for 1 p.m.
- Direct, wooden cashing made of oak - from 900 rubles. for 1 p.m.
- Profiled wood products – from 700 rubles. for 1 p.m.
- Carved wooden cash - from 1000 rubles. for 1 p.m.
- PVC elements for framing - from 450 rubles. for 1 p.m.
- Cash-in steel parts, painted in RAL - from 900 rubles. for 1 p.m.
The above prices may vary slightly depending on the volume of the order, the complexity of the design, the remoteness of the facility and the internal policy of the production company.
Functions of platbands, their pros and cons
There is an opinion that the platband is an exclusively decorative element. Indeed, skillfully made, it decorates the house, but its role is not limited to this.
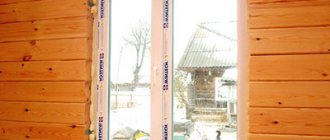
The casing protects the building. There is always a gap between the window frame and the wall. This is especially true in the case of a wooden structure, wood breathes. The gap can become a channel through which moisture and dust enter the wall.
In modern construction, the problem is solved with the help of mounting mass. Foam is an excellent insulator, but it breaks down when exposed to sunlight and must also be protected. Even when using foam, installing platbands on windows in a wooden house is mandatory.
Window trims are:
- original appearance of the building;
- noise protection;
- additional thermal insulation;
- an excellent opportunity to visually adjust the shape of the building;
- ease of updating the exterior (it is enough to change a few finishing details).
Platbands have very few disadvantages. These are high demands on the quality of work and the need to provide protection from atmospheric influences, which is especially important in the case of using boards and wood-based materials.
Photos of platbands for windows of different types
Carved platbands of the slotted type are very delicate Simple platbands with only small elements of carving - these are often seen on a Scandinavian-style house Carved overlay platbands - delicate carvings on a dark background Platbands with visors were made by our ancestors
Shutters and trim - this can often be found on old houses
Sometimes the carving amazes with its complexity. Carved platbands can be very diverse.
Like from a fairy tale Several traditional patterns for decorating platbands
Wooden frames of simple shape look great on houses in a modern or Scandinavian style.
Installation features
The finished casing is mounted to the window opening in the following ways:
installation on a blind tenon. Such parts are installed on the inside. Special holes are created in the frame for them. Glue is applied to the tenon and it is inserted into the groove. Such fasteners protect the platbands from dust and moisture;
Installation of complex multi-component elements will require some skill
a through tenon is used. In this case, the joint must be carefully treated with varnish. Similar techniques are used if the window is wooden. For installation on metal-plastic, special liquid glue is used.
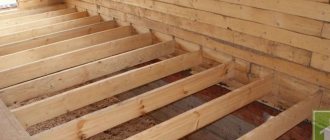
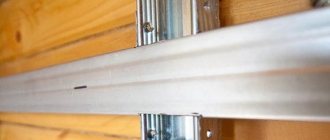
Fastening slopes to polyurethane foam
The installation procedure is as follows:
- measure the dimensions of the slope;
- cut out the sandwich panel in accordance with these dimensions with a margin of 0.5 cm;
- excess foam is cut off after installing the window unit;
- Make a furrow 0.5 cm deep along the window in the foam;
- try on the panel, insert it into the groove, align the edges;
- remove the sandwich panel, and apply polyurethane foam to the wall, having previously moistened it with water;
- apply foam from bottom to top, departing from the corner 1 cm. You do not need to foam the entire surface, but only part of it: along the edges and in the middle. The fact is that the foam expands, taking up free space. If you do not leave room for its expansion, the foam will squeeze out the slope;
- moisten the foam with water from a spray bottle and lay the panel on it; attaching to the wall with masking tape;
- other slopes are mounted in the same way;
- The cracks are filled with sealant.
What kind of care is needed?
Installed platbands require regular maintenance.
Wood should be treated with special compounds that provide certain impregnations against wood parasites, cracking and unexpected fire.
The original structure of wood requires care and precision when working with the material.
Carved products are primed, varnished or painted. Such treatments are carried out every few years. This will extend the life of the products and also maintain their attractive appearance. If products made of plastic or metal are installed, they do not require special care.
It is important to protect products from corrosion and sometimes renew the paint.
Making beautiful frames with thematic patterns with your own hands will allow you to decorate window openings in an original and unusual way and add a special twist to the intended architectural style.
Varieties of platbands by shape and material of manufacture
Platbands for plastic windows can be of various types and profiles, made using a variety of materials:
- Flat strips made of plastic, aluminum, polyurethane and wood.
The simplest ones are platbands in the form of flat plastic strips
Most often, flat-shaped platbands are used to frame plastic windows, since they are easy to install, create a neat appearance, are easy to maintain and have the most affordable price of all existing configurations.
- Carved platbands, which are made of plastic or natural wood.
Carved platbands can give any home a completely unique look
This version of the parts is made mainly to order from wood, and therefore is quite expensive. Plastic versions of carved window frames are not easy to find in construction stores, since their mass production is not organized everywhere and is not large enough.
- Shaped-type platbands can have a smooth semicircular shape or almost flat, but with a relief pattern in the form of stripes of different depths. This type is made from almost all of the listed materials.
Shaped-type platbands usually have one or another textured surface
- Profile trims are made of plastic, wood, polyurethane or aluminum. They have a certain cross-sectional shape, sometimes made in a rather intricate configuration.
The peculiarity of profile platbands is their complex cross-sectional shape
Installation of platbands
Installation of wooden platbands
You can install wooden trim on the window using nails, screws or glue. The strips are attached to the sides and top of the frame. In some cases, the casing is also installed on the lower part of the window, if this is provided for by the design.
For beautiful joining of simple platbands, their edges are cut at an angle of 45 degrees. This can be done using a hacksaw and a miter box.
If the window is located deep in the opening, the platbands can be placed on the wall using extensions.
Attaching the platband to the wall depends on the material from which it is made. For a wooden wall, it will be enough to use nails or screws; for a concrete or brick wall, dowel screws.
Installation of carved platbands mainly depends on their design and composition. The carved platbands are joined in such a way as not to disturb the overall pattern.
After installation, the platbands are treated with wood impregnation, then painted or varnished.
Installation of plastic and aluminum trims
Correct installation of plastic and aluminum trims requires the presence of a special installation profile that is attached to the frame. Platbands are installed in a groove located on the profile. In the absence of a profile, the platbands are installed on snap fastenings attached to the frame or wall.
In rare cases, plastic trims can be secured with glue, but this type of fastening is unreliable.
When using telescopic platbands, fastening is carried out by inserting the edge of the strip into the groove, which is located on the frame.
It is not recommended to install plastic and aluminum trims with screws and dowels, unless this is provided for by the design, since this leads to a deterioration in their appearance.
Foam plastic trims are attached only with glue.
Installation of all types of platbands is recommended only after finishing the walls and façade.
Preparation and installation process
Before starting the installation, markings are made on the wall and the main mounting points of the platband are marked. This will help you navigate and correctly install each of its elements.
You definitely won't be able to do the job alone. You will need at least one assistant who will visually monitor the correct placement of the platband. If we are talking about a heavy, three-dimensional structure, you cannot do without a whole team, and for safe installation you will need scaffolding or a simple block lifting device.
The method of fastening the finished casing depends on many factors and is selected individually. The simplest of them seems to be the use of self-tapping screws, anchor bolts or nails with decorative heads. The hidden fastener looks impressive. To do this, dowels are used - wooden cylinders that are glued into the wall in advance. To install them, holes are drilled in the platband frame.
Basic Rules. What not to do
Below is a list of rules that will help you avoid the most common problems.
- It is recommended to use a board 3-4 cm thick as the starting material.
- Don't jump into complex patterns right away. First, it is better to practice on ordinary round parts that are easy to make with a drill.
- The width of the workpiece should be such that it is enough to cover the ends of the walls and protect it from moisture.
- Carved elements should be placed along the grain of the wood - this will prevent cracking.
When choosing a stencil, it is better to pay attention to patterns with large elements, since small ones will look crumpled, as a result of which the finish will not have the desired decorative effect.
Important! Before starting work, you should calculate the future costs of time and money, as well as the feasibility of the idea itself. In the absence of high skills in working with wood and interest in the process itself, it is easier to buy ready-made platbands.
Moreover, it is advisable to first familiarize yourself with photographs of different products. This way you can find a suitable option or get inspiration for creating something yourself.
Recommendations
Boards for carved platbands should have a thickness of no more than 30 - 40 mm. Thicker boards are difficult to process during artistic cutting.
If you have no experience in wood carving, you should start with the simplest options and, after gaining experience, move on to more complex ones.
When determining the required width of the platbands, one should not forget about their protective function. The platband must cover all the gaps between the window and the wall of the house.
When placing stencils on the workpiece before cutting, you should take into account the direction of the wood grain.
In the process of learning wood carving, large ornaments should be used. In small work, imperfections will be more noticeable.
Working with platbands requires patience and thoughtfulness. Having finished the carving, you should not lose attention, but carefully process the platbands and prepare them for long-term use.
Finally, the platbands are installed in their intended place. After this, you can evaluate the work done.
DIY making
Among all the existing varieties, wooden overhead trims are most suitable for self-production. You can limit yourself to a simple model made of smooth boards. Having basic carver skills, it is not difficult to make carved wood frames with your own hands.
Of course, their manufacture will require a lot of effort and skill from the home craftsman, but the result is worth it.
Important! The quality and durability of a wood product directly depends on the type of wood used. Oak and ash are the most durable, but this material is extremely difficult to process.
Beginning craftsmen should start with soft woods: alder, linden, aspen.
Possible difficulties and errors
When making and installing cash with their own hands, beginners often make gross mistakes that lead to negative results. To prevent this from happening, professional craftsmen often recommend paying attention to the following nuances :
- The product does not fit the dimensions of the opening - before making a flat frame, it is necessary to take measurements of the outer edge of the opening. Manufacturing the structure according to the working design is not allowed.
- After fixing, the cash staggers or peels off from the contact surface - when choosing the type of fastener, you should purchase high-quality adhesive compounds. The best solution would be to use a combined technology of fastening with glue and self-tapping screws.
- When checking the diagonals of the finished cashing frame, deviations are revealed - when making a structural element yourself, it is recommended to make a slipway and carry out all work according to the template.
- Over time, the wooden surface is subject to rotting and cracking - immediately after installation, the structure must be treated with an antiseptic composition, a primer and several layers of weather-resistant paint and varnish.
Note. Subject to the above recommendations, the frame of the window opening will be used no less than the window structure itself, according to the manufacturer’s warranty.
Selection of drawing
With all the abundance of options, wooden platbands can be divided into three large groups:
- slotted;
- with an applied pattern;
- carved.
The peculiarity of slotted platbands is that the pattern is formed by through cuts in the board. In overlays, the pattern is cut out separately and attached to the platband using glue or nails.
The last type is the most complex, but it also looks more impressive, since the relief is cut directly onto the surface of the part.
Whatever option is chosen before starting work, it is worth making a simple drawing of the future product. You can sketch a drawing on it, this will allow you to evaluate the attractiveness of the platband and avoid mistakes during its manufacture.
The choice of drawing directly depends on the wishes of the master and his qualifications. A beginning carver should choose a simple geometric or floral design. It is better if it contains only large elements.
You can make a sketch yourself or choose a ready-made one and print it.
To transfer the image onto the tree, just cut out the outlines with scissors, resulting in a practical template, or use carbon paper.
Characteristics
The main dimensions of the platbands are established for PVC windows in accordance with GOST 30674, published in 1999, and for wooden and metal windows, respectively, No. 11214-03 and 21519-03. These documents allow a range of protective slats in length from 150 to 250 cm, in width from 3.8 to 9.8 cm, and in thickness from 1 to 1.3 cm.
Technical characteristics of wooden platbands:
- Density at a humidity of 12%, depending on the type of wood: spruce - 450 kg/m3, pine - 650 kg/m3, and cedar -580 kg/m3.
- Specific gravity changes significantly when products are saturated with moisture, so the material should be stored in a dry place.
- Thermal conductivity: coniferous species - 150 mW/(m K), and for deciduous species - 200 mW/(m K) and higher.
- The strength of larch is the highest, almost 1.5 times greater than that of pine.
- Environmental friendliness is high.
- Biological and fire safety is low.
Important! Before installing wooden casings, they must be treated with antiseptic and fire-retardant impregnations.
Technical characteristics of PVC trims:
- Waterproof material.
- The coefficient of thermal expansion is high, so such casing must have stiffening ribs, which simultaneously impart strength to the entire structure.
- Light stabilizers are added to the PVC of this type of platbands to prevent the destruction of the surface layer under the influence of UV rays.
- High resistance under the influence of natural factors.
- Durability is at least 20 years and will depend on operating conditions.
- Thermal conductivity coefficient is 0.19 W/m x °C.
- PVC cash does not support combustion; in the presence of fire, it chars, but does not burn.
Specific characteristics for heat and noise protection will depend on the quality of the source material and the accuracy of the installation work on the window block and slopes.
MDF cashing is divided into two groups depending on density: low density LDF from 600 to 720 kg/m3 and high density HDF from 800 to 920 kg/m3. When purchasing these products, it is important to know the emission class, which is responsible for the evaporation of formaldehyde into the room: E1 is allowed for children's rooms and E2 for all others.
Technical characteristics of MDF trim:
- Product grade: I - homogeneous smooth surfaces without defects.
- II - with small scratches 0.03 mm deep and minor chips on the edge.
- III - pronounced defects, can be used for rough construction work.
- For this type of product, it is very important to have a mounting lock with a depth of at least 5 mm, otherwise it may break off.
- Thermal conductivity: 200 mW/(m K) and above.
- Strength is low.
- Environmental friendliness, biological and fire safety are low.
Manufacturing of frame and carved elements
For simplicity and reliability of fastening the platbands, a frame is made. This is a rectangle, the internal dimensions of which correspond to the dimensions of the window, and the width is selected in such a way as to ensure reliable fastening of the component parts of the product.
The configuration of the frame for carved window frames in a wooden house is selected individually.
The frame can be cut from a single sheet of OSB or other moisture-resistant wood-based board. A more reliable and durable model is assembled from boards. Corner joints are made using tongue-and-groove joints or overlapped.
Only a master with the appropriate skills can make a platband with a large area of relief carving. It’s better to start by making slotted parts. With the right design, such a product will be no worse than a carved one, and its production will not take much time.
Advice! The best tool for creating an incised pattern is a jigsaw. To get a good result, it is worth combining an electric tool and a manual one. Electric ones are easier to work with, but they are inconvenient for making thin cuts and cutting out small parts.
Final processing
It is important to protect wooden parts from moisture. To do this, the wood is impregnated with an antiseptic. If work is carried out on a recently assembled log house, you can use the same composition for impregnation that was used to protect the logs.
Otherwise, it’s easy to buy an antiseptic in a specialty store.
After the impregnation has completely dried, they move on to decorative finishing. Paint or varnish is used as decoration. The choice directly depends on the wishes of the owner and his vision of the finished facade.
Paint or varnish is applied with a brush; no preliminary primer is required; modern antiseptics, in addition to protection, perform other functions.
Assembly
The platband, especially if it is a complex product with a cornice and a canopy, is assembled on a flat horizontal surface. First, the frame parts are connected. It is recommended to use adhesives as fasteners and reinforce joints with wooden dowels.
Sometimes it is not possible to use wooden fasteners. Then you need to pay maximum attention to protecting nail heads and screw heads from moisture. Otherwise, rust will spoil the appearance of the platband and contribute to its rapid destruction.
To hide the fasteners and protect them from water, it is recommended to use a “camouflage” mixture of sawdust and wood glue.
Step-by-step installation instructions
To install ready-made cash on windows, it is not at all necessary to turn to professionals for help. Each property owner can perform this work independently. Below is a detailed algorithm for installing platbands on window openings.
Outside
To install cashing from the side of the facade of a wooden house, you need to sequentially follow the following points of the technological map :
- Taking measurements from the opening on the front side of the building.
- Applying markings according to the intended installation location of the finished casing structure.
- Trying on the structure, identifying defects, adjusting elements before installation.
- Preparation of the mounting surface - degreasing, treatment with adhesive compounds.
- Fixing the framing element on the front side of the window opening.
- Temporarily securing the structure with clamps.
- Waiting for polymerization of adhesive based on epoxy resin with hardeners.
- Marking the mounting plane for installing self-tapping screws.
- Drilling holes for hardware.
- Fixing the structure with mechanical fasteners.
- Grinding the plane of the platbands, degreasing the surface.
- Application of antiseptic, primer and protective paint coating.
Important. Immediately after installation, it is necessary to coat the structure with a paint and varnish composition for external use, in order to avoid premature physical wear of the material.
For more information on how to do window cashing yourself:
Inside
The design and method of installation of window frame elements from the interior of the building are determined by the project, the implementation of which involves a number of steps :
- Marking the opening.
- Selection of materials
- Determining the size of the gap between the framing elements and the finishing plane of the interior elements of the room.
- Fixing the structure with mechanical fasteners.
- Painting the wooden product in the color of the interior, according to the design project.
Installation should be carried out exclusively with hypoallergenic, non-toxic consumables that do not release harmful substances into the room when heated.
Methods to prevent moisture from seeping under cashing
Even a skillfully made high-quality platband will not fit perfectly tightly to the wall. A gap is formed into which moisture will inevitably enter. Over time, it can destroy the material and, through the gap between the frame and the wall, reach the internal trim on the windows in a wooden house.
This cannot be allowed.
There are several ways to prevent wicking:
Finnish platband.
Its main feature is a wooden canopy over the window. The base of the canopy is recessed into the wall. The gap is sealed with frost-resistant sealant. The design has an attractive appearance and provides maximum protection from precipitation.
Metal visor.
This option is similar to the previous one, but a piece of standard ebb is used to make the visor. It cuts into the wall, the joint is also sealed.
Bottom harness.
Additional visor, only at the bottom of the window. It protects the opening from moisture and adds individuality to the building as a whole.
Platbands for windows in a wooden house, both on the inside and outside of the wall, are an important component of the interior and exterior.
Kinds
You can make window trims yourself or buy ready-made ones, choosing them according to the size of the window. It is easier to work with purchased products; most of them are sold with a mounting kit. This is really convenient, but the property owner is faced with a difficult choice.
Peculiarities
The first thing you should pay attention to when purchasing ready-made window frames is the material. In the old days, the range was limited only to wood; today you can buy several varieties with different consumer characteristics.
Most often used to make platbands:
- plastic;
- metal;
- MDF boards;
- natural wood.
Of course, wood was and remains the best material. It will fit perfectly into the exterior of a classic house or into any modern project. With proper care, wood will last for decades, pleasing the eye, decorating and protecting the facade of the building.
The basis of modern budget repairs is plastic. The advantages are obvious - low price and practicality. Plastic is durable, but susceptible to physical stress. Metal does not have the disadvantages of plastic, but there is no aesthetic component in the metal casing; it is an exclusively functional element of the exterior.
Another popular material for framing windows in wooden houses is MDF. The characteristics of the parts directly follow from the characteristics of the material. MDF is distinguished by its relatively low price, environmental friendliness, and attractive appearance. At the same time, the platband is not durable and is susceptible to high humidity.
Each of the listed varieties will find its application in a modern home. Metal and plastic linings will advantageously complement metal-plastic windows, especially in the case of walls covered with siding. It is rational to install MDF indoors; wood is universal, it can be used both inside and outside the building.
Overhead and telescopic
Another important characteristic is the type of fastening. Overlays are attached to the frame using glue, nails or tenon joints. Such models are easy to install, and in most cases they are the best choice for a wooden house.
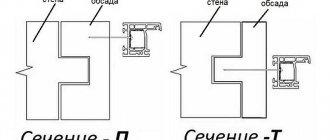
The telescopic frame is mounted in the space between the window and the wall, for which a special protrusion is provided in its design. This solution ensures maximum tightness of the joint, but can only be used in buildings in which the frame is not tightly inserted into the window opening.
How to choose the right wood?
Wooden frames are popular. At the same time, the performance of the product depends on the type of wood chosen.
The following options are worth considering:
- Ash, beech and oak are hardwood varieties. They are durable, but difficult to cut patterns on;
- It is much easier to process soft hardwoods - linden, aspen and alder. You can even carve patterns on their surface by hand. Such surfaces must be carefully treated with special compounds;
- It is recommended to create small elements from cherry and apple trees that can be attached to the base;
- Pine and birch are characterized by ease of processing and good performance properties.
Helpful information! Different combinations of wood types can be used. In this case, special protective impregnations should be used.
The nuances of choosing the right wood
To create truly durable and beautiful structures, it is important to pay careful attention to the choice of wood and its varieties:
- hard (oak, beech, ash): they are durable, but making cuts on them is not very easy;
- soft (alder, linden, aspen): perfectly amenable to processing, but require pre-treatment with special compounds;
- apple and cherry branches: perfectly convey the smallest patterns, attached by attaching to the base;
- birch, pine: easy to process;
- combinations of different species: require mandatory processing, allow you to create an original window frame.
Cost indicators
The cost of accessories for decorative window decoration and sealing cracks depends on the following factors:
- Manufacturing material.
- Trade brand.
- Plate sizes.
- Functional purpose.
- Decorative design (color, texture, presence of artistic carvings and similar artistic excesses).
The cost can be determined by the price per 1 linear meter or per measured product (for example, 2.2 meters) as a whole.
Let's compare the prices of several products:
- Vinyl trim "Holzplast Premium" (Germany) 3.66 meters long, golden oak color, semicircular section costs 605 rubles.
- A similar product made of polyvinyl chloride, 2.2 meters long, produced in Moscow Region, will cost the buyer 150 rubles.
In order not to get confused by prices, which today are sometimes simply logically inexplicable, you can adhere to the following guidelines:
- Russian parts made of polyvinyl chloride, 2.2 meters long, plain or “wood” colored, cost about 60, 0-140 rubles.
- Functionally similar products with a cable channel will cost the buyer at least 140 rubles.
- If the plastic profile is made in Germany, then the minimum price is 220-250 rubles per 3.66 meters.
- A semicircular flat strip for sealing cracks and without any decorative frills costs 55-70 rubles per linear meter.
- A self-adhesive polyurethane casing in a single color will cost at least 75 rubles.
A separate category of products intended for decorative external cladding of window openings consists of sets that include two horizontal and two vertical strips of various artistic designs and 4 corner overlays for masking the joints of these strips.
Their sizes are standard and correspond to the size of a plastic window. The minimum price for a set is 450 rubles. The advantage of these kits (despite the relatively high price) is that there is no need for preparatory work (sawing planks, adjusting sizes) - the individual parts of the kit are simply assembled onto the window opening
The nuances of creating templates on your own
To prepare the platband, you need to develop a design and implement it using a stencil. The latter allows you to transfer the picture to wood.
Not every person has drawing skills. You can simply find and print the pattern you like, the main thing is to maintain a consistent style. Patterns of strict geometry and vegetation should not be combined.
Subtleties of creating a template:
- Harmony of the color palette of external walls and decorative elements.
- Selection of the optimal size.
- Choosing the best type of coating.
- Details are written along the direction of the wood grain.
Decoration of a skate or phantomas raging
Having entered into a decorating rage, I decided to make a decorative “cobweb” in the ridge, which I saw on some houses of the Omatalo company.
Through several iterations, a more or less suitable size was selected, but I hope the implementation is clear from the photo. I’ll say right away that the element did not take root immediately and caused controversy both in the family and in “society”. In the end, we decided to let it hang on a temporary fastener, then we’ll remove it and see how it feels. When they removed it, there was a feeling that something was missing. Therefore, they returned it to its place forever.
Purpose of framing
The purpose of window casings, first of all, includes framing the facade of the building, creating its unique style, a kind of “face”.
In addition, they protect the space between the frame and the window opening, preventing dust, dirt, precipitation, and sounds from the street from entering the house.
Previously, platbands were considered a kind of protection, a talisman for the home against the penetration of evil spirits.
This was evident even from the patterns that depicted plants and mysterious figures, which necessarily carried a special meaning.
Today, such a design, provided that it was chosen correctly, can modify the geometry of the structure: expand or extend.
The meaning of carved elements
When planning to decorate window openings with such structures, it is important to first study their meaning:
- the sun and kokoshnik are symbols of energy and life;
- the snake personifies wisdom, fertility;
- the cross represents the harmony of the spiritual and material worlds;
- vegetation gives a feeling of unity with nature;
- earrings are a sign of the hospitality of the owners of the house;
- the silhouette of a bird is a traditional connecting element.
Owners of wooden houses should spend a little time and add elegance to their home. This is not only beautiful and stylish, but also good protection for the home from adverse factors.
Details about the purpose of platbands
We have already mentioned the decorative function of the platbands in the preface, but it is necessary to separately note that the originality and identity of a wooden house is 80% created precisely through the artistic framing of window and door openings.
Moreover, thanks to platbands, the same project can be completed in completely different styles.
What should platbands hide?
The range of design solutions in this case is limitless: from simple houses made of timber, decorated in the spirit of modern minimalism, to luxurious fairy-tale castles, decorated with wooden carvings and amulets.
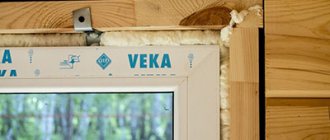
The second and no less important function of casings is the insulation of polymer materials used to seal installation gaps from exposure to ultraviolet radiation and moisture. No matter how manufacturers talk about the exceptional durability of polyurethane foam covered with a waterproofing film, it still remains a polymer composition, and even with a porous structure.
It is important to take into account that the destruction or even partial deformation of such sealant immediately affects the thermal insulation properties of the house, therefore, from this point of view, cashing out windows is not only technologically justified, but also necessary.
Expansion gap
Let us separately note one more specific point, characteristic only for wooden houses, and which makes the installation of external frames for windows mandatory. We are talking about a compensation gap between the casing and the upper edge of the window opening. The task of the platband is not only to cover the “unpresentable” appearance of a 7-centimeter bag made of jute stuffing, but also to isolate this area from dripping moisture.
Are platbands always needed? No not always. In cases where the window is mounted in a finished casing, theoretically there is no need to install an external frame, with the exception of the top strip and visor covering the compensation gap. However, due to the total use of PVC windows, this option is extremely rare today.
How to prevent water from leaking under trims
The easiest way to protect the fastening points of the platbands is to cover all joints with sealant. But this can only be done in houses with smooth walls and the gap is only a few millimeters.
The platband must cover the opening between the wall and the window frame.
Additional methods:
- Finnish defense. Installation of the platband using the tongue-and-groove method; an inclined wooden canopy with cantilever spacers is installed on top of the casing. It must be recessed 2 cm deep into the wall. The angle of the canopy coincides with the angle of the roof.
- Metal visor. It is carried out in the same way as the Finnish visor, but is “recessed” into the wall of the house only 1 cm. Installation is carried out using galvanized self-tapping screws.
- Installing the bottom trim. The lower base is mounted at an angle identical to the visor. The harness is recessed 2 cm deep into the wall.
Each stage has its own specific rules, and the outcome of the entire work depends on their compliance.
IMPORTANT! When using sealant to protect joints, its condition is checked annually. Once every 2–3 years, the protective layer should be renewed, even if there is no visible damage.