Articles
All photos from the article
In the process of building a log house, the key operation is the connection of logs or beams with each other, so it is simply necessary to know all the nuances of this operation. They are performed when cutting corners, and also if you need to build up elements when their dimensions are insufficient. In both cases, different approaches are used.
Below, in a concise form, we will tell you how to correctly connect long logs and how to cut the corners of a wooden structure.
Logs can be connected to each other for reliable construction in different ways with your own hands
Rules for laying out logs in a log house
- The layout of the log in the crown should be carried out in such a way that the thinner and denser annual rings of the tree look outward, and the wider side from the core faces inside the structure. The dense side of the log is less susceptible to shrinkage cracks, and the wide part of the sapwood creates some thermal insulation effect and is warmer.
log cut
The northern part of the log should be laid outwards. On the server side, the core of the tree trunk has denser annual rings. Due to the difference in the density of the rings, the southern side of the log retains heat better and should be facing inside the house, while the northern side is more resistant to environmental changes and is located outward. Of course, it is rare that a mass log house developer will pay attention to such a feature; this recommendation can be useful to owners who are meticulous and serious about the construction of their log house.
- A curved log with its convex side is laid either up or down. The bulge should not point inward or outward. After the final assembly of the frame, the curvature will not be noticeable.
- Between the logs, to prevent blowing and heat loss, a layer of sealant made of flax (tow), natural moss, jute and other special materials is laid. The thickness of the moss or other sealant between the logs should be approximately 2 cm. The sealant should be laid out in an even layer, extending 10 cm from the longitudinal groove and 5 cm from the bowl of the log.
You should not allow the frame to be assembled without a sealant for subsequent caulking. This way, you won’t fill up all the voids between the logs, which will be blown out and in which fungus will form and insects can infest.
- Laying the top crown
Logs with varying diameters from butt to top can be laid out in two ways:
The first method is when the butt of one log intersects with the top of a perpendicular log in the corner of the crown.
Komel - peak
The second method is when two tops and two butts of a log intersect in two opposite corners. At the same time, in each subsequent crown the intersections of the peaks and butt alternate. That is, if two vertices intersected in the corner of the lower crown, then two butt parts should intersect in the same corner of the upper crown.
The listed methods are suitable for any method of cutting the bowl.
It will be more convenient and practical for two people to lay the top log, so as not to move the unfolded compactor. It is also possible, but more difficult, to place the log in the bowl while maintaining the seal on the log. After laying, to make the log more dense, its surface is tapped with a wooden sledgehammer, popularly called a “baba”.
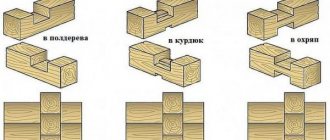
Basic methods of dressing corners
Corner dressings are divided into two types:
- With the remainder (the logs protrude beyond the formed corner).
- Without a trace.
The functional difference is minimal and the decision is made based on aesthetic considerations .
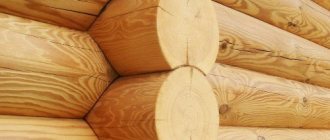
The first method is also called “ in oblo ”. It is presented more clearly in the picture:
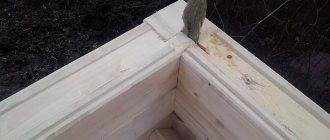
The second type of dressing is called “ in the paw ”:
Fastening log logs with dowels
Every two or three crowns are fastened together with wooden dowels.
The dowel is a flat, cylindrical wooden stick, approximately 40-43 cm long, with a diameter of 2-2.5 cm. A quadrangular block with a suitable diagonal can also be used as a dowel. Any dry type of wood can be used for the dowel.
Such unification is necessary in order to:
- maintain the rigidity and strength of the log wall
- to minimize the possible formation of gaps between the crowns during shrinkage and shrinkage of the log house.
- restrain and keep logs in one plane during shrinkage
dowels for factory-produced log houses
Holes for bonding with dowels are drilled every 3 logs in height, using a drill with a diameter of 20 mm and a length of 45 mm. The distances between holes on the surface of one log should be from 1 to 1.5 meters and 20 cm from the bowl, window or doorway. Using a construction pencil or marker, mark the location of the dowel on the log. To ensure that the holes do not coincide with those below.
approximate arrangement of dowels in the crowns
If jute or tow was used as a sealant, they must be removed from the drilling areas and returned to their place after drilling. This precaution is necessary to ensure that the drill does not jam in the log due to the sealant wound around it.
If the drill jams, then when working at height, this can be traumatic and create great difficulties in removing it from the log. When using moss as a sealant, such problems do not arise.
The diameter of the dowel should be such that when driven into a log, it will hardly fit into the hole. The length of the dowel should be 5 cm less than the length of the hole itself. After driving in, the dowel should be slightly deeper into the log.
A big mistake and a complete violation of technology is the use of metal products (rebar, rods, etc.) as dowels.
In the cold season, when the dew point is inside the log and on the metal, moisture will concentrate, which will inevitably lead to wood rotting processes. In addition, when a log house shrinks, the rigidity of the metal does not allow the logs to shrink evenly in their plane, which leads to the formation of large gaps between the crowns.
The durability of a log house with metal dowels is several times less than that of a log house fastened with wooden dowels, in compliance with the technology.
Types of corner joints
The methods of connecting beams during the construction of a log house are significantly different from the joints of logs. Since ancient Rus', wooden construction has been done from logs; since then, centuries-old experience in connecting corners and joints has been accumulated. But this is the 21st century and ancient techniques are gradually acquiring their modified analogues, so first of all I want to introduce you to the technique of laying beams, and we will disassemble the log later.
Types of beam corner connections
Nowadays, two connection methods are practiced in wooden construction:
- With the remainder (“to the oblo”, “to the bowl”)
- Without a trace (“in the paw”, “in the tooth”).
The corner connection of a log, as well as with a beam, is made in two types, as “into the paw” or “into the bowl”, that is, without a remainder or with a remainder.
Connecting the corners of the timber with the remainder “into the bowl”
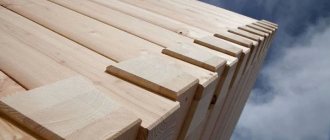
The bars are connected into the bowl using four locking grooves, which can be of several types:
- One-liners
- Bilateral
- Quadrilateral.
With this type of connection, a perpendicular groove in the form of a notch is made in each beam on one side - usually the top. The notch must match the width of the beam perpendicular to the cross-section. Most house-building companies use this technology to connect profiled timber, because fastening in this way requires a minimum of effort and time.
The double-sided groove lock technology means cuts on both sides of the beam, i.e. up and down. The depth of the perpendicular cut is approximately 1/4 of the height of the beam. A high-quality connection, but it requires a lot of experience from carpenters in order to prevent cracks or chips when cutting the groove and installing the beam.
When making a four-sided locking groove, a groove is cut out on all sides of the profiled beam. This fastening option will allow you to achieve greater strength of the log house. The cuts on all sides simplify the construction of the log house - the crowns fit like a construction set. Connecting corners in this way greatly increases reliability. Requires high skill of carpenters.
Beam connections are made in the following options:
- Butt-butt
- On dowels
- On the root spines.
- Wood floor
- Dovetail
The simplest and fastest type of timber connection is the butt connection. We simply connect them to each other and secure them with studded steel plates, which are driven in with nails or staples. The tightness of the corner connection and strength is highly dependent on the level of experience of the carpenter. It is necessary to perfectly fit the ends of the joined beams - A very flat surface is needed. But, alas, even experienced people like me don’t always cope. The corner turns out to be poorly sealed and subject to periodic perpendicular loads.
This type of connection is the fastest in construction, but the worst in quality. I advise you better not to use such technology, you won’t end up with problems. Heat loss through such a butt angle is too great to save time and effort on more complex types of connections.
When connecting beams using dowels, a wedge made of hardwood is used to strengthen the corner. Installing a key in the grooves of the beams helps prevent movement of the joints of the connected beams. It is also worth noting that the strength depends on the type of key: transverse, longitudinal or oblique - an oblique one is difficult to create, but in return an excellent result, a strong corner with low thermal conductivity.
[ads1]
Connecting timber into a root tenon (“Warm corner”) - this type of joining the corner of beams is effective, heat-intensive and very common in the construction of houses made of profiled timber. The trick lies in the following: a groove is cut out in one of the connecting beams, and a tenon of a size suitable for the groove is cut out on the other beam. During construction, inter-crown insulation is placed in the groove, which can be flax-jute fabric or vegetable felt. It is important that the joint between the tongue and groove is tight to minimize heat loss. And also for the strength of the structure, the rows of beams alternate with tenons and grooves, and a round wooden dowel (dowel) is driven into place.
You can see the connection of the timber into a warm corner in detail in the video below:
See the diagram for preliminary calculations for marking cuts for corner joints
When using dowels (dowels), fat tails, undercuts and other tenon-to-groove joints in corner joints, it is very important to provide mandatory vertical gaps between the groove and the tenon. This is necessary to compensate for the inevitable shrinkage of the log house.
Another type of corner cutting that I want to consider is the “half-tree” connection - a type of fastening whose name has stuck among carpenters thanks to cutting half the width of the beam. Just like the previous options, the assembly of a timber frame begins with drilling holes for dowels (dowels) in places near the corner joints; the length of the dowel must be calculated so that it is enough for several beams. There is also a more modified version of this connection - adding a key to the joints of the beams to increase the strength of the corner connection, as well as for greater heat capacity
And finally, the most durable and reliable and with minimal heat losses is the dovetail beam connection. Almost the same as the “root tenon”, but here the tenon is sawed into a trapezoidal shape. The connections with this groove are given a similar shape.
It has a type of horizontal dovetail-to-foot connection - in which horizontal trapezoidal notches are sawn through the timber, which should fit perfectly with each other - it is quite rare in the construction of houses or bathhouses from timber due to the complexity of sawing and for most clients this type of fastening is not I like it purely from an aesthetic point of view. In my construction practice, clients have only asked for such an angle a couple of times. By the way it turned out well. T-shaped types of beam connections for creating the internal walls of a house are implemented using the following connections:
- Key groove on a tenon
- Symmetrical trapezoidal tenon - frying pan
- Rectangular trapezoidal tenon - half frying pan
- Symmetrical trapezoidal tenon - blind frying pan
- Straight groove on the main tenon.
You can clearly see in the figure what the T-shaped connections of the internal walls look like:
Click to enlarge
Longitudinal connection techniques
During the construction of a large house, usually if the length exceeds 6 m (the standard length of profiled timber) it is necessary to longitudinally connect two beams to increase the length.
In this case, I advise you to use one of the following types of beam connections.
- Oblique castle.
- Longitudinal tenon on dowels
- Half a tree
- Longitudinal root tenon
Fastening the beams together along the length using a tenon on dowels is quite strong. The use of this type of connection involves cutting identical grooves at the ends of the connecting beams. The sawn beams are installed back to back, and a hardwood key is driven into the groove, which firmly holds both joining beams together.
A key is an insert (wedge) that secures two elements of the structure being connected. Dowels are made of metal or hardwood and come in rectangular, prismatic, and dovetail, smooth and serrated.
The longitudinal fastening in a half-tree is similar to the connection of corners in a “half-tree” - the ends of the connecting beams are sawn to a width equal to half the thickness of the beam. The strength of the fastening is increased by fastening with a dowel (you can also fasten with a staple, nails, or fastening plate). Of course, this is a simple and quick type of fastening, but its strength is insufficient for load-bearing walls of a house made of timber. I don't recommend it.
“Longitudinal root tenon” connection - a groove is made at one end of the beam and a tenon at the other. The fastening is similar to connecting the corners to the main tenon. For greater strength, I advise sawing the groove and tenon in a trapezoidal shape - dovetail. This will eliminate horizontal vibrations of the fixed beams.
Increasing a long beam using a “bias lock” connection is one of the most difficult techniques for carpenters, but in terms of strength and stability it is far ahead of the beam connections described above. Typically, construction companies are silent about such fastenings so as not to bother their teams of carpenters. The figure below shows the implementation diagram:
When to cut out log windows and doors
Openings in a log house can be constructed at three stages of work:
I cut out the openings in the solid frame after shrinkage.
With this option, the most even shrinkage geometry is maintained and it becomes possible to precisely cut an opening to the dimensions of a specific door or window.
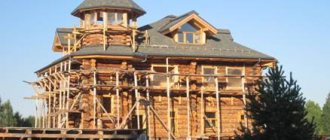
However, cutting openings in a blind log house is accompanied by a large consumption of building material. During shrinkage inside the well of a log house, due to poor ventilation, there is a risk of mold and mildew formation, and the shrinkage period of the structure also increases. Therefore, it is additionally necessary to arrange ventilation. Artificial ventilation is created either by partially cutting out small openings in the places where doors and windows are supposed to be, or the log house should stand on a ventilated base, for example, on stilts without flooring and with the roof sheathing open for ventilation.
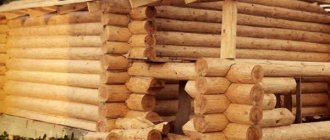
blind log house
stuck the door in a blind log house
Arrangement of openings during the assembly of the log house
This method saves building material and money, since there is no need to pay for cubes of wood that will be cut in the openings. The ventilation of such a log house is better and shrinkage occurs faster. A temporary casing is installed in the openings for the period of shrinkage, which is a guide bar spliced with the casing board. The casing structure is inserted with a block into the groove cut out at the ends of the openings and secured. This ensures that the geometry of the openings is maintained during drying. At the same time, there is no obstacle to vertical shrinkage (up and down) and practically reduces the movement of logs in the horizon to zero.
If doors and windows are installed in the openings immediately after assembling the frame, before it shrinks, then they will definitely be damaged during shrinkage, and you will additionally have to bear the cost of new materials.
Where to start?
When the project is selected, the assembly of the log house begins. The foundation of the house is being prepared - the foundation. Since the material is light, any type of foundation is suitable:
- Columnar;
- Tape-grillage;
- Tape.
We do not recommend monolithic, as this is the most expensive option, which will only be profitable if the soil is moving and very crumbling. For loose soil with high groundwater levels, a pile or columnar foundation is suitable. How to build a house if the soil is swampy and mobile? It is wise to use screw piles. They are easy to install with your own hands, and the log house will be less likely to “walk” in the future. But when choosing a columnar or pile foundation, you should understand that in the future the base of the house will have to be additionally surrounded by a frame and insulated. Otherwise, there will be no basement or cellar in the house, and heat loss after insulating the basement will be reduced by 15%.
One of the most popular types of foundation for a wooden frame is strip foundation. It got its name from its resemblance to a concrete strip rolled out on the ground. The height of the foundation is selected individually and is related to the characteristics of groundwater.
If the level of groundwater is high and freezing in winter is more than 1.2 m, the tape-grillage option can be used. The design combines a concrete strip, but on piles every 1.5 - 2 m. Moreover, the piles are poured first, then the formwork is made for the strip. Before pouring, it is recommended to calculate the cubic capacity of the foundation; this will reduce the cost of concrete.
The detailed technology for assembling a strip-grillage foundation is disclosed in one of the previous articles.
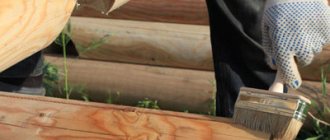
Trimming the ends of the log house
After assembling the log house, the ends of the logs facing outwards are usually cut with a saw to give an aesthetic appearance. It should be taken into account that the protrusion of the log must remain at least 20 cm from the corner. Using a plumb line, mark a straight vertical line along all the protrusions of the logs and cut them to size. Immediately after trimming, the ends of the logs must be soaked and coated with acrylic paint and PVA-based compounds or pure PVA glue. This measure is necessary so that the ends of the logs dry evenly with the entire body of the log and crack less.
Log caulking
Caulking a log house is the process of filling the inter-crown openings with a sealant on which the logs were laid during felling. It is a long and labor-intensive process, which is mandatory, since its heat capacity and draftability depend on the quality of the caulking of a log house. Caulking of a log house is carried out in two stages: immediately after installing the log well and after its shrinkage. During further operation, non-through cracks may also arise which are recommended to be caulked.
For caulking, a metal caulk is used, a tool similar to a chisel, but with a longer pointed part. It is recommended to have several caulks in stock at once. The caulk is tapped with a wooden mallet; using a hammer for this purpose can be dangerous for the brushes and will be a more labor-intensive process. For caulking, dried and then moistened moss is used.
log caulk
Caulking of one crown is carried out from two sides at once: from the outside and from the inside. You cannot move from one crown to another without caulking it completely, as this can lead to distortions in the horizon of the crowns. Caulking begins by spreading dry caulk along the selected area between the logs. Next, the seal is tapped with caulking to secure it, folded in from below and tapped inward again. It is recommended to slightly moisten the last fibers of the sealant by spraying to give strength to the moss or tow. When you begin to feel that the seal is springing, this is a sign that the gap is completely clogged and there is no need to work harder.
The second caulking after planting is performed in the same way, but this process takes less time and takes place with less effort.
Video description
What it is and how this spring unit works is described in the video:
When building a wooden house, the question always arises of how to connect two beams lengthwise or fasten a corner. Each master has his own preferences in this matter: one adheres to methods that have been proven over centuries, the other trusts more modern methods using special fasteners. And this issue needs to be discussed in advance, after independently studying all the possible options and deciding what is your priority: speed and reasonable cost of installation or quality and reliability.