- Advantages and disadvantages
- What types of beams are there?
- Square
- Rectangular
- I-beam
- Round or oval
- Permissible load
- How to calculate permissible load
- How to properly strengthen wooden beams - tips and tricks
Wooden floor beams provide load-bearing structures in a building.
They distribute the load from the elements located above - the roof, attic, upper floors, while not only acting as a support, but also giving rigidity to the entire building, acting as a kind of frame for the building. The reliability of the building directly depends on the strength, correct choice of cross-section and type of products. When building a private house or cottage, it is important to correctly calculate the load on the floors, maintaining a balance between the size of the beams, their number and location.
Types and types of wooden floors
According to their purpose, wooden floor beams are divided into the following types:
- basement;
- attic;
- interfloor.
You should familiarize yourself with each of the subspecies in more detail.
Basement
The structure must have high strength indicators and withstand significant forces, because the beams will serve as the basis for the floor. If the design of a residential building includes a basement or a garage for a car, then the wooden blocks are replaced with metal supporting structures. This is due to the rapid destruction of wood from exposure to high humidity. An alternative option is to reduce the distance between the floor beams and treat the wooden elements with an antiseptic.
Attic
The ceiling is installed independently or is a continuation of the roof rafter system. The first option has the best technical characteristics. It is more rational to arrange an independent ceiling; such a design improves the sound insulation performance of the entire house and is considered repairable.
Interfloor
The design of floor beams in a frame house has its own characteristics. One side of the wooden beam is used as support elements for fastening the ceiling, the second (upper part) is used as a joist for installing the floor covering. The space between the interfloor beams is filled with mineral wool or other heat-insulating material; a vapor barrier membrane is mandatory. Plasterboard sheets are fixed at the bottom of the pie, and a plank wooden floor is laid on top.
Optimal wood species
Some craftsmen claim that different types of wood are suitable for floors, such as oak, alder or maple, but the document GOST 4981-87 Wooden floor beams clearly states that softwood lumber, or more precisely pine or Siberian larch, should be used for beams. For cranial bars, you can use hardwood alder and aspen.
Coniferous species were not chosen by chance:
- They have the most durable structure.
- Resistance to deflection, as well as the least vulnerability to moisture.
They are even used for construction in baths and saunas.
Especially if the house is located in northern latitudes, where temperature fluctuations inside and outside the house are significant, the tree must be resistant to condensation. And the presence of resins in the needles prevents the occurrence of various bacteria and fungi in the lumber.
Advantages and disadvantages
The wooden blocks that are used for flooring have their strengths and weaknesses.
The main advantages of beams made from boards are:
- minimal weight of structural elements, which reduces the load on the load-bearing walls and foundation of the building;
- beautiful appearance;
- the possibility of installing a plank floor without additional preparation;
- high speed of installation work without the help of lifting mechanisms;
- It is possible to repair the ceiling during the operation of a residential building.
The disadvantages of wooden structural elements include:
- the need to impregnate wood with antiseptics and fire retardants; such solutions prevent rotting and combustion of the material;
- lower strength indicators compared to metal or reinforced concrete products;
- deformation and shrinkage of the structure as a result of sudden temperature changes or under the influence of high humidity.
Note! The installation of a wooden floor is possible on enclosing structures made of aerated concrete, brick or on walls made of any other material.
Characteristics
Construction documentation imposes 5 basic requirements for floors:
- seismic resistance;
- fire resistance;
- strength;
- soundproofing;
- thermal insulation.
Seismic resistance is achieved by strengthening the structure in various ways, which will be discussed later in the article. Fire resistance of beams and other wooden elements is ensured by treatment with fire retardants, as well as non-combustible materials for insulating floors.
Strength depends on the calculations that are carried out at the stage of determining the step between the beams , as well as their cross-section. They must withstand the load from their own weight and from furniture and people who will walk on them every day.
Sound and thermal insulation is provided by a cake consisting of insulation based on various materials and chemical compounds. What is used to insulate the ceiling must also have noise-absorbing properties.
Even more information about the characteristics of wooden floors is here.
Using boards and solid timber
In the case of using solid wooden beams or boards for flooring, the span length is chosen within 4–6 m, which is half the maximum distance when using building structures made of laminated veneer lumber. Parts made from bonded boards are often manufactured directly on the construction site.
The strength of the structure is superior to solid beams. The main advantage of the products is the possibility of constructing a composite part from several boards. Builders can independently regulate the thickness of the beam by fastening the required number of elements. The boards are connected to each other using threaded elements. Rubber or plastic washers are installed under the bolts and nuts. The elements prevent the effects of corrosion on metal embedded parts and protect the wood from cutting into the nut when tightening.
Budgeting
Depending on the labor involved, special equipment, loading, unloading and the material for installation, the estimate may vary. Mandatory items in the estimate should be :
- construction bolts, nuts, washers;
- edged timber length/width/grade;
- edged boards length/width/grade;
- covering material name;
- mineral wool slabs (or other insulation);
- hot bitumen mastic;
- roofing felt;
- waterproofing;
- vapor barrier.
In addition to the materials themselves, the cost of services is calculated :
- installation of frame elements;
- lining ceilings and floors with boards;
- internal and external cladding;
- insulation of coatings in one layer;
- vapor barrier devices in one layer;
- unloading lumber.
Approximate prices for materials
- basalt wool in slabs 800-950 rub./pack of 12 pcs.;
- polystyrene foam – 300-350 rub./m2;
- roll of vapor barrier – 700-3500 rubles;
- roll of waterproofing – 700-2000 rubles;
- self-adhesive tape for vapor barrier – 50-150 rub./meter;
- timber 6 m 50x100 – 450 rub./piece;
- timber 6 m 100x150 – 1440 rub./piece;
- timber 6 m 100x200 – 1800 rub./piece;
- edged board 6 m 150x25 – 248 RUR/piece;
- floor board 6 m 135x28 – 900 rub./m3;
- OSB board 9 mm – 550 RUR/piece;
- OSB board 12 mm – 800 RUR/piece.
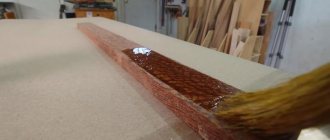
Glued laminated timber
To increase the strength or size of solid beams, they are fastened together manually during installation of the floors. For the same purposes, laminated veneer lumber manufactured at enterprises is used. It consists of several bars connected to each other. The thickness of an individual element is regulated by the number of products glued together. Glued laminated timber is produced at the factory by pressing, its length reaches 12 m.
Finished products retain the characteristics of solid lumber and can be nailed without loss of strength or cut into pieces of the required size. The only drawback of such structures is their high cost. It is necessary to carefully calculate everything before installing the first floor ceiling on wooden beams.
Note! Glued laminated timber is often used in construction for the installation of arched ceilings.
Ceiling height in a private house
The height determines the convenience of the room in a private home and the method of its operation. The volume of circulating air depends on it.
Minimum height
Safety standards require a minimum ceiling height of 2.4 m for a private home. In this case, it is allowed to install gas appliances: stove, boiler and water heater
This is also important from a practical point of view. Chandeliers are installed on the ceiling, and at a lower height it is uncomfortable for a person taller than 1.7 m to move around
The psychological factor is taken into account: low altitude is depressing, and causes panic in people with a fear of enclosed spaces. It introduces restrictions on the use of suspended structures and finishing
Optimal ceiling height in a private house
The optimal height for a ceiling in a private house is considered to be 2.5–2.7 m with finishing decorative finishing. There are no restrictions on choosing a larger indicator, since a small area in this case looks more profitable. This takes into account:
- service method;
- space heating;
- harmony.
Cleaning the floor will require a stable ladder. Replacing lamps in spotlights will be difficult. Great height negatively affects the comfort of the room, which is taken into account when choosing the finish and method of using the room. Heating costs will increase. To maintain a comfortable temperature of 22° under the ceiling, the air will have to be heated to 30° and higher. Heat loss through the ceiling increases, which leads to icing of the roof, the appearance of rot and fungus on the rafter system.
If a ceiling of 3 m or higher is required, the heating issue can be resolved by installing a warm water or electric floor. In this case, the surface is heated evenly and the air, rising, warms the entire volume of the room. In private houses with second light, where the ceiling is at roof level, convection heaters are not used. They are replaced with infrared ones or the above option with a floor.
Important! For private houses with convection water or electric heating, ceilings are not made higher than 2.7 m
Self-production of glued elements
There are several options for making laminated veneer lumber yourself:
- combination of three elements into one structure;
- gluing two parts in the shape of a Z symbol;
- connection of lamellas using special elements, metal inserts.
The first method is considered the most practical; it is much simpler than the other two. At the initial stage of work, boards for timber are selected and laid on the central element so that the annual rings of the wood face in opposite directions. Marks are made on the surface of the boards with a black marker or a simple pencil, which will indicate the sequence of their laying.
The central element is cleaned on both sides with sandpaper, which will create a rough surface and improve glue adhesion. Side boards are processed only at the point of contact with the main beam. At the next stage of work, the surfaces are degreased with a solvent, an antiseptic and fire retardants are applied. These liquids and protective compositions are applied alternately: first the solvent, then other impregnations after the base composition has dried. Not only the sides of the lumber are processed, but also the ends.
Now you need to apply a thin layer of glue (1-2 mm) to the cleaned and pre-treated surfaces. The top and bottom boards are laid on the central beam so that they are in the same plane. To fasten the elements, clamps are used, which are installed on the beam every 40–50 cm. The curing time of the glue is indicated by the manufacturer (usually does not exceed 2 days).
Connection of rafters at the roof ridge
Currently, in the construction industry, when creating a rafter system, 3 methods are used to connect rafters at the ridge:
- butt connection;
- installation on a ridge run;
- overlapping fastening to the ridge girder.
To understand which option is preferable, you need to understand how they are performed.
Butt connection
. The upper part of the rafter leg is cut at an angle that is equal to the angle of inclination of the roof and rests it against another rafter leg, which is also trimmed only in the opposite direction. This work is carried out according to a pre-made template. In some cases, to ensure greater tension in the stop, trimming is performed during installation, with the cut being made through both bars, as a result of which the two planes fit tightly against one another. Then the rafters are connected to each other using long nails.
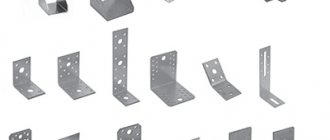
When this method is used, a metal or wooden plate is used for additional fastening - it is installed with bolts or nails are driven into the joint.
Installation on a ridge run
. This method is in many ways similar to the previous method. The difference lies in the installation of the ridge beam. Such a wooden roof structure is reliable, but it cannot always be used, since it requires additional installation of support beams and then the attic is not very convenient to use.
This option allows you to carry out the installation of each pair of rafter legs directly on site without preliminary work or the use of templates. The upper edge of the leg in this case rests on the ridge beam, and the lower edge rests on the mauerlat.
Overlap fastening to ridge purlin
. The work is carried out similarly to the previous option, only the upper joint of the rafters is overlapped. They touch at the top not with their ends, but with their sides. Fastening elements are bolts or studs.
Calculation procedure
A preliminary calculation helps determine the pitch of wooden floor beams, their sizes and quantity. Before carrying out such operations you must:
- carry out measurements of the span between the load-bearing walls of a residential building;
- calculate the load that the ceiling will experience after installation;
- carry out calculations of the section and pitch of beams using special tables.
The length of the base beams for the roof consists of the span size and the required margin of 10–15 cm for a reliable ceiling when supported on the wall. Span length is the distance between the internal parts of opposite walls in a residential building or any other building. The most popular option in private construction is considered to be a distance from 2.5 to 4 m. For spans greater than 6 m, wooden trusses are used to install the floor.
Important! The load on a wooden beam includes forces from the structures above, the internal filling of the floor, as well as temporary elements (people, household appliances and furniture).
Accurate calculations can only be performed by a construction organization specializing in this. For independent calculations, use the following values:
- the total standard load per square meter of flooring when using insulation (mineral wool) is 130 kg/m2;
- when using thick boards and heavy thermal insulation material, the standard load increases to 150 kg/m2, the total, taking into account the safety factor of 1.3 - up to 245 kg/m2;
- in the attic room, the ceiling is subject to temporary loads from the installation of furniture or the movement of people - the total load will be 350 kg/m2;
- the total load for interfloor spans is at least 400 kg/m2.
All specified values are considered the base value for further calculations.
Installation sequence
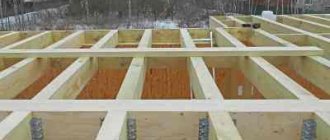
Since the floor pie can be created on the basis of beams of different configurations and have a different structure, the procedure in a given case may be slightly different. For clarity, we offer two options.
Option 1 – plank flooring
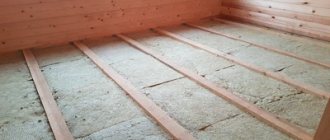
Let's see how a wooden floor is structured, assembled from a board installed on an edge:
| Photo for clarity | A comment |
| Step 1 - installing boards | Laying begins according to preliminary markings with lighthouse beams along the edges and in the gaps, their position is verified, and everyone else is already oriented towards them. The step between them is often 60 cm - the most popular size of slab and roll insulation. |
| A diffusion membrane is mounted below so that steam does not accumulate on the insulation, but can freely escape outside. The canvas is rolled out perpendicular to the beams, without sagging, and secured with a stapler. Overlapping joints are glued with connecting tapes. |
| Since in this case there are no cranial bars on the beams, a supporting sheathing made of slats or 100*25 mm edged boards is mounted below. They are placed across the beams, with a step of 50 cm, and due to them the insulation will be held. Each board is fastened with two self-tapping screws. |
| Step 4 – laying insulation | Mineral wool is usually laid inside interfloor ceilings, since it, unlike expanded polystyrene, is a breathable material. The slabs are laid without the formation of voids, sometimes in two layers, with the obligatory spacing of the seams. |
| After the mineral wool, a vapor barrier is installed on top of the beams. Unlike the bottom film, it must be completely impenetrable - regardless of what room (heated or unheated) will be on the upper level. The walls must be covered with tape or special paste. |
| Since in this case the insulation is laid flush with the upper edges of the beams, there is no room left for a ventilation gap, which is simply necessary for such a design. Here it is formed due to the thickness of the counter-batten, which is mounted along the edges of the beams. |
| Step 7 - Assembling the Wooden Flooring | Finally, a rough flooring is installed, which can be assembled from boards or panel material (preferably plywood or fiberboard). The elements of the rough coating are not mounted close to each other, but small gaps are left for ventilation. |
Note: In a floor structure subject to regular loads, OSB does not work very well, since this material is heterogeneous in its structure, and the polymer base does not have high strength properties. If this is a floor under an unheated attic, then an OSB board, on the contrary, is an excellent option.
Attic floor structure
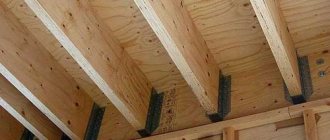
Option 2 - flooring made of I-beams
Many manufacturers offer developers beam floor systems, which come with a full set of necessary fasteners. One of them is the Polish company STEICO, which specializes in the production of fiberboards and works using German and American technologies.
In particular, on our market you can see their I-beams, manufactured according to the European standard CSA O437 (there is no Russian GOST for these products), the installation of which we suggest you familiarize yourself with:
| Photo for clarity | A comment |
| Step 1 - installation of the clamp for the lighthouse beam | I-beams are supported on one side by clamps and embedded in the masonry on the other. Therefore, on the side where there will be a blind seal, the masonry is carried out only to the row that will be below the ceiling. To lay the beams in the design position, hinged clamps are mounted on one side. |
| The first beam is not mounted close to the wall, although the distance should be less than the main step. The calculation is made based on the length of the room being covered. |
| The beam is attached to the clamp with a galvanized nail through a special mounting hole. |
| Since the cross-sectional height of I-beams is small, the step between them is smaller than if they were thick beams. |
| For reliability, the ends of the beams, supported by clamps, are additionally secured to the wall with an L-shaped steel strip. |
| To impart rigidity to the structure, cross members are installed between the two outer purlins, and they are also fixed to the masonry using plates. |
| Step 7 - put shock-absorbing pads on the ends | For now, the opposite ends of the beams simply rest on the edge of the wall, but later they will be embedded in the masonry. To do this, special shock-absorbing attachments are put on the ends, which will protect the wood material from interacting with concrete. |
| Next, a number of blocks are mounted with preliminary selection of grooves for the beams in them. |
| What you can’t do with a beam, you can do with an I-beam. We are talking about openings for passing communications. They are made in already mounted beams and framed with special overlays. |
| Cable channels are laid in the holes. |
| If the house has a second floor, an attic or just an attic, then there must be a staircase. Usually it is placed along the outer wall, and the opening under it is formed by installing a cross beam. |
| Reinforced beams are placed around the perimeter of the opening - they are highlighted in green in the picture. The remaining, shorter I-beams are mounted to them, also on clamps. |
| After all the load-bearing beams are installed, they need to be tied into a single frame. This is done by installing crossbars along the perimeter between all the beams, and in the center, every two or three rows. |
The frame of the ceiling is ready - then everything is done according to the same principle as described earlier. The only thing is that the supporting sheathing for the insulation here is mounted not on the lower surface of the beams, but with support on the shelf.
Floor pie made from I-beams
A counter-lattice on top is also not required, since the ventilation gap is provided by the thickness of the transverse flange of the I-beam.
Some useful tips for installing wooden I-beams
When installing a wooden floor, you come across a variety of situations, and some useful tips on this topic will definitely come in handy.
- The beams are laid across the short side of the span, and their position is leveled with antiseptic scraps of planks of different thicknesses. Unstable and soft materials, as well as metal or stone, cannot be used for this purpose;
- For a small house with spans less than 6 m, the most optimal beam height is 300 mm;
- When structuring the floor, two types of I-beams are usually used - thin (mounted along the outer perimeter) and with wide flanges (main);
- The pitch is selected not only depending on the width of the insulation, but the dimensions of the subfloor material are also taken into account. The calculation should be such that the edge of the plywood or gypsum fiber board does not sag, but rests on the beam. For example, with a sheet length of 2440 mm, the distance between the beams can be a maximum of 610 mm;
- A template made from a board will help ensure that the beams have the same spacing;
Finally, we note that the entire floor must be assembled from beams of the same type. That is, you cannot combine a solid wood board with I-beams made from OSB, since they have different linear expansion coefficients.
Attic device
An attic is a room limited by the roof slopes and the ceiling of the residential floor. This room can be used as a seasonal storage place or for the purpose of organizing additional living space. Depending on the nature of use, attics of residential buildings are divided into the following types:
- Residential. The livable attic of a home is called a loft and can serve as an additional bedroom, living room, bedroom or office. To use the attic as a living space, it must have a ceiling height of at least 2.2 meters, natural lighting, ventilation, and thermal insulation of the slopes.
- Non-residential. A non-residential attic can be used to install any technical equipment or organize storage of things. In this case, the height of the attic space may be less than 2 meters, there may be no natural light, and the thermal insulation of the slope is replaced by insulation of the attic floor.
Important! When carrying out repairs or reconstruction of a house, it is important to immediately decide how the attic will be used in order to correctly calculate and design the attic floors. The type, material, distance between the beams will depend on this, which will ensure sufficient strength and load-bearing capacity of the structure
The design of the attic floor depends on the size of the house and the nature of the use of the under-roof space. The attic is a kind of air gap that separates the heated space of the first floor and the roof and thermally insulates it. Its floor performs the following functions:
- Carrier. The floors between the upper floor and the attic perform a load-bearing function, so they must be strong enough and reliable, because people move around it, equipment and storage areas are installed.
- Isolating. The room in an unheated attic has a temperature not much higher than the outside temperature. Therefore, the ceilings perform a thermal insulating function, preventing the heated residential floor from cooling down. To retain heat, they include a layer of insulation.
Remember that the temperature, comfort, and safety of living in the house depend on the correctness and quality of the work on arranging the attic. Therefore, it is better to entrust the design, installation or repair of floors to professional craftsmen.
Lighting
In order for natural light to freely enter the rooms under the roof, translucent structures are needed. In this case, the only correct solution would be to install skylights. An important point in the process of preparing to install a window into the roof slopes is the manufacture of a strong wooden frame on the inside, which will help hold the window frames and prevent possible deformation. The frame is installed between the rafter legs, so the width is ordered taking into account this distance and the thickness of the beams. Windows can be installed on gables or directly in the roof of the house. What are the advantages of roof windows?
- Saving on energy costs. Such windows allow you to increase the transmission of natural light by 40%.
- Exquisite design. Windows help create a unique atmosphere in the room under the roof; they organically complement the design, creating spaciousness in the room.
- Functionality. Manufacturers offer various configurations and functional loads of windows for attic spaces.
Dormer windows are an excellent source of daylight
As for wiring into the attic to create high-quality artificial lighting, there are several proven methods:
- laying wires over the walls, hiding them in special plastic boxes;
- arrangement of hidden electrical wiring by laying the wires under the inner lining.
The first method is the simplest; you can do it quickly and easily with your own hands. The second method is more technically complex, since the fire safety standards and requirements for a private home must be taken into account. Hidden electrical wiring is installed during the installation of the frame, wall and ceiling cladding.
When the electrical wiring is installed in the attic, all sockets and switches are placed in their places, you can begin the most exciting stage - interior planning. Flights of imagination are welcome here! You can choose classic style solutions, cozy Country or gentle Provence. For young people you can create an urban room under a roof in the Loft style, and for children - a fabulous dream island.
The easiest way to highlight the beauty of your attic interior is through thoughtful lighting.
Transforming a dusty and dark attic into a cozy and spacious room under the roof itself is a labor-intensive process and requires financial costs. Knowing the secrets and tricks, following the rules and advice of experts, you can quickly transform an uninhabited cold attic under the roof into additional living space.
Transforming an Abandoned Attic
Average cost of work in the Russian Federation
The cost of installing an attic floor is calculated per 1 m². The price depends on the included work. As a rule, complex installation consists of :
Sometimes the work includes sealing seams, sometimes not. The price may vary depending on the thickness of the insulation. For cold regions, more of it is needed, so workers install it in 2 layers, hence the cost of work increases.
On average, installation of floors in Moscow and the region costs 500-850 rubles . In St. Petersburg, maintenance crews perform complex installations for 400-800 rubles. excluding materials.
Materials
Regardless of the chosen design, it is preferable to use coniferous wood for the main block, which is most resistant to high humidity, fungus and rot. Sufficient thermal insulation is provided by beams measuring 15x20 cm, but thinner ones (5x10 cm) are completely impractical. In the interval between the rolls, layers of waterproofing, vapor barrier and insulation are placed. It is better to attach not boards to the supports, but plywood 1.5-2 cm thick.
To secure the lower flooring, wooden blocks of 5x5 cm are stuffed, the protrusion from which allows you to place boards or sheets. The roll is attached to the bars using self-tapping screws. For the thermal insulation itself in a brick building, a variety of materials can be used. When the beam is inserted into the wall, it is filled with cement mortar (if the masonry is two bricks thick) or left free if the wall is laid with 2.5 bricks.
Most private houses are equipped with wooden beams. This is a fairly durable material, and also has an affordable price. However, an attic with wooden beams can only be made when the width and length of the house are no more than 10 meters, since longer lumber is not produced anywhere.
A metal beam (I-beam) is stronger than a wooden structure - it can withstand significant loads without damage. The downside of such advantages is the heavy weight of the structure, which does not allow its use in a wooden dwelling. Reinforced concrete beams, obtained from carefully molded reinforced concrete, are only applicable in apartment buildings.
How to create a reliable foundation for rafters?
The first step you need to take is to build a solid foundation for these rafters. For example, if the floor beams do not have any support (at least in the form of an intermediate wall of the house), then the trusses on it need to be organized only according to the hanging principle. If there is support, the rafters can be safely supported directly on the beam without any auxiliary elements.
In simple terms, if the beam in the attic floor is installed securely and has its own supports, then rafters can be installed on it, and if all this is missing, then it makes sense to firmly connect the rafters to the beams themselves and hang them as a single system. Otherwise, before building the roof, you need to support the beams from inside the room, for which there are three different construction methods:
- The simplest classic support consists of a tie, one support beam and struts. The puff is suspended in the middle. Such suspension systems are used today most often for large spans.
- A double support consists of a tie, hangers, two struts and a crossbar, which serves as a spacer between the boards.
- There is even a triple post, which is a separate three hanging system, or one double hanging system and one single hanging system. This is already a complex rafter system.
Ideally, you can also calculate such beams for deflection and tension, to what extent they are ready to support the entire roof. There are special online calculators and formulas for this, although it will also be enough to invite an experienced carpenter for your own peace of mind.
Ventilation of a cold attic
Since it is very important that the ventilation of a cold attic is regulated, there is no need to cover the sheathing and rafters. This can be ensured, for example, if sewing is done with gaps. If ondulin or slate were used as roofing material, and films for vapor and wind insulation are not used, then nothing additional needs to be done for ventilation, since air will pass between the waves of the roof
If ondulin or slate were used as roofing material, and films for vapor and wind insulation are not used, then nothing additional needs to be done for ventilation, since air will pass between the waves of the roof.
Air movement diagram of an unheated attic
If the roof is gable, then ventilation holes are made in the gables. Here you can make a loose fit between the lining of the wooden overhangs, while the holes need to be made evenly. If the linings fit tightly or the fronts are stone, then in this case holes are made in the wall. The total area of the ventilation ducts should be equal to 0.2% of the floor area.
There is another, more economical way - to install regular ventilation grilles. One grate is turned down with holes, and the other is made adjustable.
The ventilation arrangement of the hip roof is different. Here they make an inlet hole at the bottom in the hem, and an outlet hole at the top at the ridge. If the overhangs are wooden. It is enough to place the bars loosely with a gap of a few millimeters. Holes must be provided in the plastic lining.
Attic ventilation can be arranged differently depending on the type of roof. So, if slate and euro-slate are used, a classic ridge is installed, with a flexible roof - a turtle (valve). A special valve is also needed when using a ceramic roof. The use of metal tiles involves the use of a regular ridge, which will save on the valve.