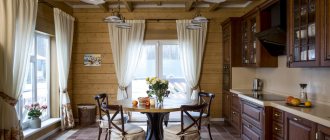
An interesting and rather unusual trend - the use of tree stumps in interior design - appeared just a couple of years ago. It was rapidly gaining momentum, and today tree stumps are no longer just a current trend, but a sign of style and taste.
Today, stumps are an incredibly popular, and at the same time inexpensive and environmentally friendly material.
How to make a chair, stool or armchair from a stump, hemp or log with your own hands
There are an endless number of options for chairs made of stumps and logs, as well as tables. There are two main technologies for creating a chair or stool from hemp:
- by firing method,
- chainsaw.
Using the firing method to make a chair or stool is quite simple. First, the log is sawn crosswise lengthwise to the required length of the legs. The cracks are wedged with wooden chips. Small chips and branches are poured into the wedged cracks, a little gasoline is added and set on fire, fuel is added little by little to maintain combustion and ignite the bulk of the log. This burns out the center of the log. After the necessary firing with an angle grinder with a brush, the excess coals are removed and a do-it-yourself stool made of logs or hemp on 4 legs is obtained. It is further processed.
The required workpiece is cut out with a chainsaw and then ground with an angle grinder, or fired, painted, etc. You can also place the stool on furniture wheels, screwing them from below, the lower surface should be perfectly flat. You can attach a pillow to the hemp on top, so you get homemade upholstered furniture. By placing a cut of wood on the legs, you will also get a wonderful stool.
Do-it-yourself hemp stool using the firing method.
Chair-stool made of hemp (logs) with a chainsaw.
Do-it-yourself garden chair made from logs (video)
A simple chair from a log is made in almost the same way as a stool, but the back is cut out with a chainsaw, as in the video below.
https://youtube.com/watch?v=_zXwsd0Aci0
Garden chair made of logs in the shape of a hand (video)
Chairs or armchairs from logs can be made of any shape and size, for example in the shape of a hand. To do this, you need to work well with a gas or electric chain saw.
Gallery of photographs of chairs, armchairs and stools made of logs and stumps
Finally, options for creating armchairs, chairs, stools from logs and stumps.
As you can see, there is nothing particularly difficult in making a chair or stool from a log, the main thing is to approach the matter with soul and hard work.
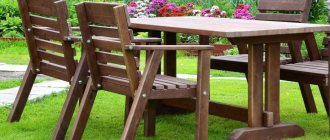
Advantages of log furniture
At the dacha they often use old furniture that used to be in a city apartment, or they buy lightweight plastic, folding chairs made of wooden slats, metal pipes and thick fabric. Their main advantage is mobility, but at the same time they are not very stable, and budget models are also quite inconvenient. A durable, comfortable, reliable chair for a summer house or picnic will not be cheap. Chairs made from logs have a number of advantages:
- cheapness, availability of material. If an old, large tree has recently been cut down or uprooted on the site, the material for making a chair is already at hand, and you don’t even have to worry about transporting the log. You can find a log of suitable size in the forest. As a rule, you can make a chair from it without a single nail (screw), and no glue is needed;
- strength. Furniture made from logs is solid and much more reliable than factory chairs made of plastic or small-section timber and plywood. Such a chair will not loosen or break even under a massive rider;
- ease of manufacture. A wooden chair with a back, drawers, and legs is a rather complex design; you need to make calculations, draw a drawing, select grooves and cut tenons to connect the parts. A simple chair can be made from a log in just a couple of minutes, and this task can be done even by those who have no carpentry skills at all;
- appearance. If you give free rein to your imagination, you can make original furniture that no one else will have exactly the same.
The wood for making furniture should be selected dry, but not rotten, without traces of fungus or mold.
Driftwood and branches in the garden
Any wood is a material for creativity. A board with a greeting is laid out from thin branches.
The decor on the welcome board is attached with glue
Thick ones are used to make unique garden furniture.
A stylish chair will last longer if you remove the bark from the branches
Interestingly shaped driftwood will give your garden a picturesque look if you simply place it among the plants.
Don't pass by beautiful driftwood - it's very rare
And with the help of glue and screws, various animal figures are made from pieces of wood. But first, the bark is removed from the branches and they are lightened.
Step-by-step instruction:
- Soak the material in a solution of soda ash: 2 cups per 7 liters of hot water. Place a weight on top.
- After 3 days, remove the bark using a wire brush.
- Then immerse the branches in a bleach solution for 2 days: 1 glass per 7 liters of water.
- Dry in the sun for 3 days.
- Sand with fine-grit sandpaper.
Selecting material for drawing up figures is a long but exciting task.
Gallery: crafts from driftwood and branches
A wreath of bleached branches will decorate a door or gate. Place a strange mushroom made of driftwood and branches under a tree.
To create a Christmas tree, branches drilled in the middle are placed on an iron pin. It is better to make large figures from driftwood. From curved branches and driftwood, fancy stands for pots are created. Before installing the seat on the bench, it is carefully sanded
You can make any door decoration from small twigs. A funny pig made from driftwood looks great on a green lawn.
A lamp made from branches is an exquisite decoration for a gazebo or veranda
Tables and chairs
Untreated wood is an almost ready-made form for creating creative furniture. At the beginning of work, it is advisable to thoroughly dry the wood and carefully process it. Then the products will last you much longer
The simplest option for such fittings is stumps and decks of different sizes. Cut down the stump with an even cut - and the table and chairs are completely ready to perform their direct functions!
The excessive asceticism of hemp stools and benches can be smoothed out by backrests, comfortable seats or soft pillows
In the following photos we will admire the designer handmade collection
Attach the tabletop to a piece of large driftwood and your rustic design will be flawless
For stability, make neat, even cuts on the original stand
If you manage to get a wide log, make a tabletop for a summer kitchen or a surface for a bar counter
Small branches are perfect as components for chairs. Use larger ones for the legs, connecting them into one
Pots made of rotten stumps
Nature itself will give you interesting ideas. Moss and vegetation on the stumps refresh the old tree. Its rotten center inside is an excellent option for a flowerpot. All that remains is to plant your favorite plants, but only in a pot to avoid destruction of the wood
Massive branches with graceful curves give us an idea for fencing. Strength and reliability, together with natural beauty, make wood an ideal environmentally friendly base for paving. The cuts should be smooth, and it is not at all necessary to process them, then the rough surface will not be slippery during rain
Non-standard spruce
Impressive arch
Choosing a stump
The most important point in this master class, of course, will be the process of finding the right stump. In our case, a part of a 100-year-old tree was selected, which its owners were planning to cut down any day.
Avoid soft woods such as pine to avoid rotting and choose the piece that is straightest at the top and bottom. Although, if you have a crooked stump, but you just fell in love with it, then you can fix it all and just trim the crooked parts.
The longer your stump takes to dry, the better, especially if you decide to use soft wood. But even hardwood stumps need to be thoroughly dried before you begin. Let the hemp sit indoors for several weeks.
Stump - teremok
You will need: a stump, a log, a hammer, a saw, a chainsaw, a chisel, a hacksaw, tall grass for a broom, an elastic band or rope, for the path - pieces of roofing felt, fine gravel, a watering can with water, a regular broom, a fence, a brush, paint, toys.
Master Class
- Remove the core from the stump for doors and windows.
- Mow the tall grass and make a broom.
- Place a grass broom as a roof.
- Line the path to the tower with pieces of roofing felt.
- Cut the log into circles using a chainsaw, then lay them out on the roofing felt.
- Fill with fine gravel and sweep the gravel from the wooden circles with a broom.
- Fill with water and leave to dry.
- Put up a fence, paint the tower and place toys as residents.
The tree stump is ready!
Eco-style seats
Wood can be heavy, so we had to put the ottomans on wheels.
You can make high bar stools.
If you add a little imagination...
And this is the designer’s job.
Interior items made from branches
Before you start work, select the appropriate material. The main condition is the absence of rot and mold on the branches. In turn, the cracks will add decorativeness to the branches.
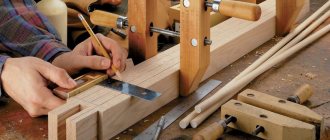
- Clean the natural material from excess dust and dirt, and then dry thoroughly. It is best to dry the wood in the shade in a well-ventilated area or even under a canopy, if possible.
- Next, you will need to process the branches with carving. Work in the direction of the fibers, first with a coarse and then with a fine nozzle. Don't forget about the end cuts.
- As already noted, parts can be connected to each other using glue, screws, a wedge, etc.
- After the blanks for the final product are ready and sized for joining, they must be processed. Large cracks that are very embarrassing can be eliminated using epoxy resin in several stages. Once the resin has dried, sand down any exposed areas.
- The next stage is assembling the product.
- The finished piece of furniture must be decorated. To do this, you can use stain, with which you can radically change the color of the wood, without losing all the charm of the texture of the material.
- Finally, it is advisable to use varnish applied in at least two layers.
Your wild imagination, as well as our photos, will help you adapt the branches! Be bold and don’t stop in the face of difficulties!
How to treat a stump for the interior
To create a table or cabinet, you need to find a suitable stump and process it correctly. The bark can be removed with a chisel, or you can leave it on.
Cut to the required size
Removing bark from a stump
The sections of the stump should be sanded using sandpaper and then the stump should be cleaned of dust. Treat with a layer of primer and open the stump with several layers of wood varnish.
Sand the stump using sandpaper
Apply water-repellent impregnation
If the future table is intended for the bathroom, you need to apply a water-repellent impregnation.
Types of tables
There are several popular types of hemp tables. Here are the main types of structures in terms of material processing features:
- Natural looking product. This is the easiest design to manufacture; it involves the use of a stump in its original form. The only processing that needs to be done is sanding. It is necessary to ensure that table users do not get splinters.
- Painted furniture. If desired, the stump can be painted in any color or patterns can be applied to it using a stencil or brush. Painting the product allows you to adapt it to the interior, made in a certain color scheme.
From the point of view of the design features of the finished product, the following types of tables can be distinguished:
- Furniture with glass. If the master plans to make a coffee or coffee table, then he can use a stump as a stand to which a glass table top is attached. The parts of the structure are connected to each other using screws or special glue.
- Product with legs. The table can be equipped with legs of any length. New wooden or chrome-plated legs, as well as legs from old furniture, are suitable for work. Forged racks of openwork shapes allow you to make the table more elegant and unusual. Legs not only improve the appearance of the furniture, but also reduce the likelihood of scratches on the floor when moving the product from place to place. In addition, the legs raise the stump above the floor and allow air to circulate underneath it. All this allows you to extend the life of the structure.
- Table on wheels. Instead of legs, you can attach wheels to the bottom of the furniture. This will significantly increase the mobility of the structure.
- A product made from bars connected to each other. If the master has several thin wooden blocks instead of one large stump, then they can be connected to each other using glue or fasteners. The result is a table with an unusual shape. It can be equipped with a glass or wooden tabletop.
- A “one on top of the other” type structure. There is an easy way to make an original coffee table. To do this, you need to take several slices of wood of different thicknesses and place them one on top of the other with a slight offset.
- A table made from a cut trunk. If the furniture maker has a whole tree trunk at his disposal, then it can be cut into two halves or carved into a rectangle and used as furniture for the home or garden.
Other design options are possible, it all depends on the imagination of the master.
Making a chair
First you need to decide on the height of the finished product and select or saw off a block of suitable length from a long log. The diameter should be large enough to make it comfortable to sit on. So it’s better to first put the log on its end and try to squat. The simplest option:
- Measure the height of the future seat from the bottom end and make a transverse cut in this place with a chainsaw to the middle or deeper.
- Make a longitudinal cut from the top end to the line of the first cut.
- Remove the cut quarter and sand all the cuts.
If you are making a chair to sit in the forest for a few hours, this design is suitable. But for constant use in the countryside, it is not very convenient: if you make a longitudinal cut exactly in the middle, the seat will turn out to be small, short, and you will have to sit on the edge. If you increase the depth of the seat, you will get a narrow backrest.
And leaning on the flat back is not very comfortable. So it’s better to spend more time and effort to select part of the backrest, making it concave, and making the seat deeper.
If the diameter of the log allows, you can make a chair with a back and armrests, more like an armchair. Various options are possible:
- the top line of the armrests and the side line of the back form an almost right angle, the back is high;
- the armrests smoothly merge into the backrest;
- instead of armrests, a circular back is made, occupying more than half the length of the circumference, its height is the same everywhere.
You can also round the top of the back or give it a more fancy, asymmetrical shape. An irregularly shaped back with uneven edges will look organic if the chair is made not from a smooth log, but from a stump, and its base is not perfectly round, since the trunk branches into roots. In some designs, not only the upper, but also the lower part of the chair is modified. For example, they cut out a part of the log under the seat in an L-shape or U-shape to form 2 supports. Or they choose wood between the seat and the base so that the lower part resembles an hourglass.
The log can be subjected to more thorough transformations:
- make a concave back;
- cut down the front part of the log below the seat and the back part of the back;
- make cross cuts above the base and under the seat and select a piece of wood between them.
Such a chair will be stable and durable, but lighter than products with a monolithic lower part; it can be moved from place to place and put away for the winter. The photo below shows a chair made using this principle by Slovak designer Peter Jakubik. The author worked exclusively with a chainsaw and used a log of considerable size. If you are inspired by this idea, you can try to create something similar using an axe, chisel, or chisel.
Often the bases of chairs are dug into the ground and compacted well, and the area around is covered with gravel. If you plan to make a stationary, sunken chair, when cutting you need to take into account that the height of the finished product will be less than the height of the log placed on the end.
The chairs are made from logs with bark and peeled, and decorated with carvings. To make a chair, you can use not only a large diameter log, but also many small, thin ones. The principle of operation is approximately the same as when making a chair from timber; the seat can be a cut of a thick log, several logs sawn lengthwise and laid with the cut up.
Design selection
The design of the entire table can be divided into two components: the choice of tabletop and legs.
When choosing a countertop design, it is important to consider some features of your room and your imagination:
- If you want a round or oval shape, then you should have enough space, because... it has impressive dimensions. Ideal for a large living room or hall, and also harmonizes with the gazebo;
- A small tabletop is a beautiful addition to a small living room;
- The rectangle shape is suitable for all occasions.
When choosing legs, rely solely on your taste. You can make a table with one, two, three or traditionally four legs.
What do you want the final version to look like? This is a purely personal question and depends on your taste and preferences. If you want something unusual, but nothing comes to mind, you can look at photographs of tables made from cut wood and make everything according to the sample.
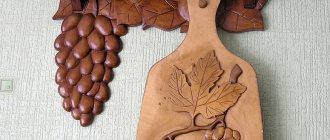
Snag - an idea for a sculpture
Branched bends of roots, gnarled stems, powerful stumps - the best material for creating the image of realistic and fictional figures
For some, the curves are wings, while others recognize the silhouette of an animal in them. Do not limit your imagination, use wood in its natural beauty
Have you collected a collection of various branches and twigs? Try creating something more complex like this beautiful stallion creation. Thanks to movement, precise proportions and shapes, the sculpture seems to come to life before your eyes!
Notice the exotic image in the driftwood? Finalize the form, show its character to the maximum, making the figure noticeable to everyone
Old driftwood is an unusual and valuable material for impressive decorative items, furniture, and expressive figures. Most likely, we have not mentioned all the options for their use. Now you!
What other uses for driftwood can you imagine? Or maybe you already have a piece of art made from this original material at home?
Furniture made from stumps and snags
In addition to plants and a garden path, the garden plot has a place to relax. Garden furniture must be durable, stable and withstand aggressive environmental influences. Wooden garden furniture is quite expensive, so it is best to make it yourself.
If you have a large stump in your garden, try cutting it into a comfortable chair. Depending on the size of the hemp, the chair will be either for an adult or for a child. Using a chainsaw it is easy to cut out the seat, backrest and even armrests. You can also use the stumps themselves as a place to rest. If necessary, they should be treated with sealants and painted.
logs and hemp in furniture making
A driftwood from an ugly and curved piece of wood will turn into an original decor. A large piece of driftwood can be used as a table leg and to decorate chairs.
Driftwood and stumps can decorate country furniture in an original way
Sanded and varnished driftwood will add zest to any room.
Here is another photo of original furniture made from driftwood and stumps:
Hemp furniture for friendly gatherings
This set of stump furniture will decorate any terrace.
No one put much effort into this “work of art,” but it turned out to be functional.
Here they approached the matter with all seriousness. They made high backs, making the chairs more like thrones. We decorated the side surfaces with false bark and added forest inhabitants.
You can build a wooden tabletop on the table.
Stumps instead of chairs look good even at a dinner party.
We added a glass tabletop and soft seat covers.
Hemp flowerbed
You will need: a dry stump, a chainsaw, an axe, a piece of polystyrene foam, a ruler, an antiseptic, paint, soil, sand, flowers (which ones are best to use are described in the master class in paragraph 7).
Master Class
- Trim the bottom edge with a chainsaw to create a level base.
- Draw contours on the surface of the stump, retreating at least 5 cm.
- Make 10-20 cm indentations in the stump using a chainsaw and an axe.
- Treat the inner walls of the stump with an antiseptic or paint it. This way the stump will last longer.
- Using a chainsaw, drill a hole for drainage to prevent moisture from accumulating, then insert a piece of foam.
- Mix store-bought soil with garden soil and add sand, then pour it into the stump.
- Plant flowers. Flowers with a small root system are best suited, such as: tulips, begonia, petunia, geranium, daffodils, oxalis, purslane, pansies, primroses, marigolds...
- Water your flowers regularly and take care of your flower bed.
The hemp flower bed is ready! I recommend watching this video!
I recommend viewing a photo gallery of ideas for creating flower beds on a stump!
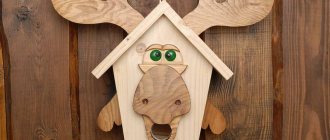
Idea #5 – garden sculptures
Anyone can create garden figurines from stumps, but real artists end up with wonderful works of art that amaze with their realism. If you are driven by the desire to simply decorate your area, then you can create a simple image that does not require special skills.
Of course, this magnificent deer calling out in the spring forest was skillfully carved from an ordinary stump by a high-level professional
Making a simple figurine from a stump is not at all difficult. Those who made snowmen in childhood can apply their accumulated experience in this case. The role of hands will be played by twigs, instead of the nose and mouth we will attach twigs, Eyes can be made from brown bottoms from plastic bottles. The role of the pupil will be played by the cork from the same bottles.
All this is attached to the stump with self-tapping screws. On the horizontal surface of the cut, you can simply lay out pine cones, which will imitate hair. This garden guard, which we whipped up, is ready.
But any schoolchild can make such a funny guard for a dacha, and this is precisely why such a garden sculpture is valued
If it happened that you had to cut down a whole row of country trees, do not be sad. This situation also has its positive side. But you now have a large number of stumps located close to each other. And this is not bad at all. Make them into a fairyland for your children, putting into practice all the information that you have already received in this article.
It will be just a wonderful place to play. First you have to clear each stump of bark. For this you will need a chisel and a hammer. The chisel must be inserted between the bark and the tree trunk, then gently tap it with a hammer. The bark will move away from the trunk and soon the stump will completely lose it. Now it can be thoroughly sanded using medium-grit sandpaper for this purpose.
Such an owl could easily become the companion of Baba Yaga herself and settle in her hut, flying out from time to time to hunt
Be sure to remove wood dust formed during work with a damp cloth. The wood prepared in this way should be treated with an antiseptic, which will protect it from rotting.
Now you can start decorating the stump. Let's choose a large stump to turn it into Baba Yaga's real house. Let's take chalk and outline the location of the future windows and doors of the grandmother's hut. Recesses in wood for doors and windows can be made using a chisel and hammer.
We will need pieces of boards from which we will make doors and window shutters. These parts of the future structure can be painted right now, while they are not yet nailed into place. Doors and shutters should be nailed to the places marked on the stump using nails whose heads have been bitten off. When finishing decorating the hut, you can collect branches and driftwood of unusual shapes from the area to stick them around Baba Yaga’s house. Let them portray dense years.
On smaller stumps you can depict heroes of a variety of folk tales or funny cartoon characters. You can decorate these stumps and draw your intended characters on them using paints for outdoor work. The images outside will wonderfully complement the flowers planted directly inside the stumps. How to do this was described in detail at the beginning of the article. You can limit yourself to pots with plants.
Another wonderful composition, made by a professional artist and sculptor, creates a great mood inherent in a small fairy-tale corner of your garden
We'll turn a couple more stumps into children's chairs. To do this, we won’t even cut out the massive back. If you have old chairs, use their backs for this job. They should be carefully freed from varnish, and then, using ordinary nails, nailed to the stump seats. All that remains is to paint the finished chairs in bright colors that children will definitely like.
Simply turn the small remaining stumps into a flock of fly agarics, using bowls or basins of the appropriate size as their caps. Now you know exactly how such fly agarics can be made. That's it, the improvisation on the theme of the fairy tale is ready.
LiveInternetLiveInternet
Furniture made from natural wood has a special charm. It's always nice to buy a couple of these things for your own home. But what can truly please you is the prospect of making something with your own hands. And it’s always doubly pleasant when recyclable materials are used, because partly it significantly reduces purchase prices for materials, and partly it saves the environment for us and our descendants.
The author of this master class will tell you how to turn firewood into an original chair, and this is no joke. He himself made a chair from a tree stump. This time it is not too large, so the new interior element will not only decorate the space of the house, but will also be great for a nursery. Make the top of the mono chair soft by thoughtfully choosing the color scheme of the fabric used, but this way, without frills, it looks as natural as possible. A white oak stump cost our craftsman $2, which is very, very economical for a US resident. The remaining costs were spent on finishing oil, but overall it turned out inexpensively. In a store, despite the amazing simplicity of the design, such a chair would have commanded an exorbitant price. In order to make this wonderful chair from a stump you will need: 1. Materials: - the highlight of the program itself - a stump of the required diameter, well dried; - wood putty; — BIOSHIELD protective oil based on natural oils and wax; - polyurethane varnish if desired, preferably matte or semi-matte. 2. Tools: - chainsaw; - sander; - axe; - sandpaper with coarse and fine grains; - spatula for applying putty; - a soft, lint-free cloth for soaking wood with oil.
Yandex.Direct
Car refrigeratorholodilnik.ru Every traveler should have it! At reasonable prices for Refrigerator.RuExetilIndel BKoolatronSawafujiAddress and telephone [/td]
Step One: Selecting the Material In fact, you can use any type of wood. The firewood seller, according to the author, sold him a cut of white oak. Oak will undoubtedly last a long time and it will be possible to avoid the appearance of dents during operation. However, dry oak is quite difficult to process properly. If your choice also fell on oak or any other hard wood, be prepared for the fact that you will need strong and reliable tools. It is better not to use soft woods like linden, as they are highly susceptible to damage. Wood must be well dried for work. If you receive a raw stump, it will take a long time before it is ready to use. The tree must be dried in the bark. This will avoid express drying and characteristic deep cracks. Saw off the workpieces with a considerable margin in length, so that before use you have the opportunity to saw off the grayed, cracked ends. Step Two: Pre-Treatment Once the piece is properly dried, remove the bark. An ax will do an excellent job with this task. To avoid damaging the wood again, remove the bark in layers. The author is sure that this is one of the simplest tasks today. Using a chainsaw, trim the ends of the stump to get as flat a surface as possible on both sides. A chainsaw, of course, is not the most precise tool, but later in the processing process you can correct all the flaws thanks to a grinder. Trim the base. If you have already decided where the top and where the bottom of your future chair is, proceed to the base. Everything is simple here: for a chair to be stable, its base must be flat. A chainsaw will help you cut the bend. Don't remove too much, because the end result is that the chair's profile should resemble a rounded section of wood.
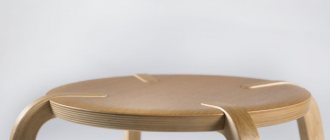
Step three: making the seat The width of the seat directly depends on the length of the bar of your chainsaw. The author settled on 22 cm. You need to cut a slightly rounded recess for the seat. To make work convenient, temporarily fix the stump with screws on a wooden work surface. This way the workpiece will remain in place, and you can work as accurately as possible. The author did not immediately figure out how to cope with the task and came to the conclusion that it would not be possible to cut out the seat in one step. Then he decided to use the wedge method. He sawed two wedges down the sides until he achieved the desired shape. Then he sawed out the remains of the tree with wedges. Thus, he received a conditionally rounded seat, ready for further processing. Remove the screws and proceed to the next step.
Step Four: Shape the Chair In order to shape the chair, the author used a sander with a coarse-grained attachment. Your task at this stage is to smooth the sides and round off the sharp edges. Once the shape seems satisfactory to you, change the wheel to a fine one and sand the chair until a perfectly smooth, pleasant-to-touch surface is formed. Clean the workpiece from dust.
Step five: eliminating defects Carefully inspect the workpiece. If you find cracks, and this is most likely, they need to be eliminated. For this we need wood putty. Before filling the gap, clean it of sawdust, dust and sand it as shown in the photo. Fill the gaps with putty using a putty knife. Make sure that the putty fills the entire volume. Smooth the surface and leave the chair to dry completely. If the quality of the putty leaves much to be desired, you can replace it with epoxy sealant. It is more resistant to various types of influences. The author completely missed this step. He just wanted to make sure that the cracks wouldn't cause any harm during use. He used a knife and sandpaper to smooth out the cracks.
Step six: finishing Since the chair was originally intended as a children's chair, the author decided to use an exclusively safe composition for its processing. He chose BIOSHIELD protective oil based on linseed oil and wax. Apply a layer of oil using a soft, lint-free cloth, rubbing it thoroughly into the surface of the wood. Wait until the oil is absorbed and repeat the whole process again. This is quite sufficient for indoor use. Your chair will be protected from ultraviolet rays, moisture and dust. However, the author believes that if you are not a stranger to more synthetic materials, you can use polyurethane varnish as a final treatment. It is better to apply it in a couple or more layers, waiting until each of them is completely dry. It would be a good idea to sand the first layer of varnish and all subsequent ones, except the finishing one, with fine sandpaper. This promotes good adhesion of the layers to each other. If you want to tint wood, use stain, or even better, protective and decorative toner oils, which perfectly protect wood from harmful influences. Many of these compositions do not require a finishing coat of varnish, but work well on their own. And finally, the chair can simply be varnished, but also in several layers. It all depends on your personal preferences.
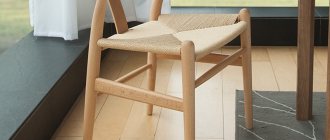
The original stump chair is ready for use!
Source
What can be made from old stumps?
Human fantasy is truly endless! Sometimes you surprise yourself - where do ideas come from? Moreover, even the most ancient thing can be used if desired. So it is with an old stump or snag, which not very enterprising people will most likely throw out or burn. But don’t rush, because you can give it a second life. You ask how? And we will answer - very simply!
An old stump can become furniture, which is so necessary in the garden, or part of it, for example, a chair for children and adults, which depends on the size of the stump. If it is tall, then you can use a chainsaw to cut out a part so that you get a back, and if the stump is also very large in girth, then you can make armrests and you will have a large chair.
Small, low stumps are perfect for the playground. The upper cut needs to be cleaned and sanded; a colored design can be applied on top with paints.
The chair immediately suggests making a table, where it is so pleasant to drink a cup of tea under a spreading apple tree in the shade. Our stump can become both a support for the tabletop and the table itself, if the size allows. In the first case, you must first level the surface of the stump and treat it with special impregnations that will prevent it from rotting.
Then on the sides, parallel to each other, we nail two planks, and on them we nail two more perpendicularly. After that, we knock the boards into a tabletop of any shape you like, and fasten it with nails to the planks below. This is one of many options. To ensure that the product serves you for a long time, coat it with varnish.
You can also make other DIY tree stump crafts that can be used as garden sculptures. For example, a bright fly agaric will become an accent on a green lawn or under a spreading bush.
The stump will be the foot of the mushroom, and make the cap from an old bowl, which must be covered with red spray paint, and when it dries, paint white spots. You can also paint the leg and even draw a face on it and thereby revive the fly agaric. Thus, you can make not only fly agaric, but also other mushrooms.
With a little imagination, you will have a one-of-a-kind stump sculpture.
Also, a stump can become a pedestal for any sculpture, a plant in a tub, and even a barrel of water for watering the garden.
And what beautiful containers for plants can be made from stumps! To get a flower pot, you just need to remove part of the core, add drainage (expanded clay) and fertile soil and plant the plants. The young will look very beautiful, for which about 4 cm of soil is enough.
And if the stump is large, then it can be used as a flowerpot and a pot of flowers can be inserted into it. Or cut out the middle to a depth of 25-30 cm and arrange a real mini-flower bed.
To do this, again make a drainage layer of 5-10 cm and pour about 20 cm of fertile soil. And then you plant various plants.
Climbing species (ornamental strawberries, petunia, nasturtium, etc.) will look beautiful in combination with low-growing annuals and annuals. Such a decorative element will be an excellent addition to larger landscape compositions.
Stumps as chairs
Stumps make excellent stools. You can put small pillows on top of them to make it softer to sit on. Hemp can also be used as decorative chairs, which will be an excellent addition to the interior. The presence of a back will make the stump chair even more comfortable.
If you go to a workshop, you can make an original designer chair or bench.