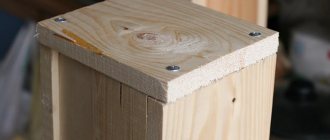
To make three-dimensional letters from textiles with your own hands, you need:
- choose a fabric that matches the overall style of the room;
- make a stencil of the required letters;
- transfer the stencil onto the fabric using cardboard;
- cut out two blanks (note that on one side the stencil should be applied directly, and on the other - in a mirror image, i.e. upside down);
- sew them together in the most primitive way.
This can be done by hand or by machine, depending on your sewing skills. As the letter is stitched, the free space in it is filled with scraps of fabric, foam rubber, padding polyester or cotton wool. It is worth choosing fabric and threads that are strong enough so that such a letter does not need to be repaired frequently.
Soft letters can be complemented with various accessories: bows, butterflies, hearts, buttons, etc.
Expert opinion
Strebizh Viktor Fedorovich, leading construction foreman
First of all, you need to decide on a template, print it on a printer, transfer it with a simple pencil to a sheet of thick paper in two copies and cut it out. If you want to clarify something, please contact me!
DIY capital letters
These festive bright letters are perfect for a glamorous party or art deco style interior.
To make them, you will need a thin sheet of plywood from which you need to cut letters. Give the letters the desired shade with paint, and then, using glue, sprinkle with any sparkles or beads.
You can cover the letter with one color, or you can experiment with two or even three colors.
Expert opinion
Strebizh Viktor Fedorovich, leading construction foreman
For illumination, you can use a New Year's garland or make individual light bulbs yourself and connect them using a wire. If you want to clarify something, please contact me!
Equipment
Each craftsman cuts out letters from plywood with the tool he likes best. Or he uses the tool for which he has enough money. Let's start with something simple.
Jigsaw
With its help you can cut out fancy winding shapes. It is inexpensive, highly accurate, and easy to use if you have some experience with it.
Disadvantages of using this tool: it can only produce small-sized inscriptions. With a large piece of plywood more than 12 mm thick, additional difficulties will arise. Still, a jigsaw is a completely manual tool that requires a lot of time and accuracy. Price is about 1000 rubles (the most “advanced” model of the instrument).
Files: you will need several types, each costs from 200 rubles.
Electric jigsaw: using such a tool will significantly speed up the production process. Allows the use of 40 mm thick plywood sheets. A branded instrument will cost 4-6 thousand rubles.
Jigsaw machine. There are two types - a home mini-version that can be mounted on a table (price is about 3,000 rubles, the dimensions are similar to a sewing machine) and a machine that requires much more space and is better placed in a garage or other separate room. The price of such a tool starts from 15,000 rubles.
Automated milling machine . Suitable for professionals and those who cut glass, wood, metal and other materials. The tool is very expensive and provides a guaranteed flawless result. It costs about 150,000 rubles and is not suitable for home business due to its size and noise.
How to make letters with your own hands? Large beautiful letters for interior decoration
- A letter is drawn on a large piece, and then cut out along the contours.
- There is no need to cut two identical templates, because it will still be covered with jute twine.
- However, a full letter like this (with cardboard on each side) will be a little easier to glue.
- Then longitudinal strips of the same width are cut out to make the letter three-dimensional.
- The letters are folded - the strips are glued to the template with hot glue.
- For round letter elements, simply fold the cardboard and glue it well with glue.
- Now the hardest and rather tedious job is to wrap the letter with rope.
- It is better not to use hot glue here, it will be inconvenient.
- Double-sided tape is much better suited for these purposes.
- Scotch tape is glued to the walls of the letter and gradually wrapped with twine.
- The twines are laid as close to each other as possible so that the cardboard does not show through the holes.
- Actually, that's all that's required. In this simple way we made a DIY letter craft from cardboard.
Wood carving tools
Sawing with a jigsaw is a creative process, but it requires preparation and additional equipment. What you will need for work:
Preparing the stencil
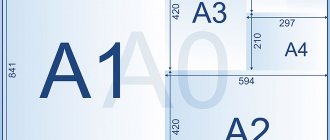
Drawings for cutting with a jigsaw can be of different sizes, depending on the scale of the product being manufactured. To create a diagram of a shelf, a piece of furniture or a composite three-dimensional toy, you can take a large sheet of whatman paper A1 or A0; wallpaper left over after renovation will also work; for small figures, use regular A4 paper or another suitable format.
Using a bright pencil or marker, draw the outline of the future product on the surface, following the dimensions. This could be an element for assembling furniture, a shelf or another large product.
There are such a wide variety of templates for cutting with a jigsaw that it can be difficult to choose the right one. It is much easier to come up with your own cutting patterns and transfer them to paper.
Transferring an image to the surface of plywood or boards
Before you start cutting with a jigsaw, you need to transfer the image from the stencil to a piece of wood or plywood. To do this, cut out a shape from a sheet, apply it to the surface of the plywood and carefully trace it. It is desirable that the line be smooth and accurate. We use a simple pencil so that, if necessary, we can correct the line by erasing it with an eraser.
We apply the outline from the back side so that no remaining lines are visible on the finished product. The internal area can be shaded so as not to cut off excess and to mark untouchable areas.
It is important to transfer the design in such a way as to minimize cutting along the grain with a jigsaw - it is so difficult to get an even line.
Sawing process technology
Many people have probably heard how to use a jigsaw. Working with the tool will not cause difficulties if you prepare for it correctly.
Plywood carving begins with the inner contours of the design
. To do this, you need to make slots for inserting the tool blade:
- The plywood is often taken thin, and when cutting a large contour there will be no problems, but tension may arise in a small remainder. Sawing with a jigsaw inside can damage the product - chips, burrs, cuts;
- It’s easier to work this way: you always have something to hold the workpiece by. A large sheet is much easier to handle than trying to hold a small sawn piece while shaping its interior.
How to saw with a jigsaw
:
Working with a jigsaw is much easier than using a hand tool; there is no need for physical effort and the process goes faster.
How to saw with a jigsaw
:
As you can see, there is nothing complicated in this process.
Defects in work
If you did not follow the technology or hold the tool incorrectly, the saw may simply move off the line. Why does a jigsaw cut crookedly:
- tilted the tool while working;
- the tension of the file has weakened;
- With an electric saw, the fastening of the saw may become loose.
To avoid such problems, before starting sawing, be sure to check the tension of the saw and the fastening of all working elements. If the blade is beveled and stuck, it is better to start over and make a line parallel to the defective one.
A little about safety
Safety precautions when working with a jigsaw for cutting plywood and wood are simple:
- Use protective equipment - glasses, gloves, gown. These things will protect you from dust and small chips.
- Sawing with a hand jigsaw should be done carefully so as not to damage your fingers with the saw. Maintain a distance between your body and the tool.
- If you are a beginner, carefully read the instructions on how to use a jigsaw and the main characteristics of the tool. This information will help avoid accidental injury and unit breakdown.
Wood carving with a jigsaw requires care and attention. Both your health and the integrity of the finished product depend on these qualities.
Protection of wood from external factors
Such a wooden sign, if it will stand/hang outside, must be properly impregnated to protect it from environmental influences.
The homemade design must be resistant to moisture, wind, sunlight and fading.
- A protective wood varnish is suitable for this.
- It is better to use one that protects the wood outdoors from high temperatures (this can also be a yacht varnish).
- You can use matte varnish and paint everything - the background, letters, edges and back.
- This procedure is repeated three times.
- Afterwards you need to wait a few days until everything dries.
- It is also worth remembering that even colorless varnish darkens the color of the wood.
This gives it a warmer, more expressive tone. This is clearly visible in the photo of the wooden letter craft.
Business promotion
Take photos of the inscriptions that worked best for you. Create a portfolio of completed work. Create groups on social networks, participate in handmade fairs and offer your services to photographers and studios.
Scope of application of carved wooden letters
| Interior decor | Photoshoot | Needlework | Glowing letters | |
| Shop window | Wall inscriptions | Inscriptions | Decoupage | Signs |
| Decoration of the sales area | Figures on shelves | Newlyweds' names | Scrapbooking | Showcases |
| Boutique signs in shopping centers | Floor decorations | Individual initials | Soap making (stamps) | Advertising signs |
| Baby names | Huge letters (2-10 meters) | Creation of jewelry and decorative items | Wall panels |
How to make three-dimensional letters from foam plastic
Polystyrene foam is a material often used for a variety of crafts. Low cost, good strength and versatility made it so popular. You can find it in any store, and it is also often placed in boxes when packaging various goods.
The technology for creating products is no different from the one we used for wooden structures. The design is applied to the surface of the foam, the letters are cut out using a sharp tool, and then sanded so that there are no irregularities left and the surface is smooth.
If you want to paint three-dimensional foam letters, it is better to apply 2 layers of paint, which will make the structure a little stronger. Lace, threads, tulle, beads, and dry plants can be used as decoration.
Important: if you want to glue something, do not use instant glue, as it destroys the material, it is better to opt for rubber glue.
Expert opinion
Strebizh Viktor Fedorovich, leading construction foreman
After the glue has completely dried, all defects and irregularities on the product must be eliminated using scissors or a stationery knife. If you want to clarify something, please contact me!
Equipment and raw materials
You will need plywood sheets of different thicknesses. If the client desires an individual approach, it is possible to order logs of natural wood of a certain thickness and width from a sawmill or special departments of hardware stores. Sheets that are too thin can be quickly deformed, so workpieces with a thickness of less than 6 mm. It's better not to use it at all. Most often, craftsmen use acrylic as a coloring material. It dries quickly, is non-toxic and lays beautifully on the surface, while looking very presentable.
Do-it-yourself volumetric letters for the interior
Tools and materials
- thick cardboard;
- thin cardboard;
- stationery knife;
- ruler;
- a simple pencil;
- hole puncher;
- glue;
- glue brush;
- spray paint;
- narrow tape;
- box for painting letters;
- electric garland.
- First of all, you need to select a letter template and calculate the size of the future figure.
- Transfer the template onto a sheet of thick cardboard with a simple pencil and cut out blanks for the future letter with a stationery knife or a sharp scalpel. This will make the edges of the parts smoother.
- Holes for light bulbs should be made along the perimeter of all blanks using a hole punch. Their number should be sufficient to understand which letter glows in the dark.
- Thin cardboard should be cut into strips about 5 cm wide and pasted over the outer surface of the product. This technique will give the figure additional volume.
- The completed letters should be placed in a prepared box and painted on all sides with spray paint of the selected color.
- Using the described method, you need to make several letters necessary to form an inscription or phrase.
- After the paint has completely dried, the produced liters must be laid out on a flat surface according to the inscription and the garland bulbs must be inserted into the holes on the back side. The wire should be secured with narrow tape.
Before installing the garland, you must make sure that it is in full working order.
For greater convenience, it is possible to create letter templates on a computer and then print the image on a printer.
Having mastered the basics of creating three-dimensional figures, you can make any inscription to decorate the interior or any holiday.
Expert opinion
Strebizh Viktor Fedorovich, leading construction foreman
You can also make a base from wood on which a letter or letters will be attached if you plan to compose a whole word or sentence. If you want to clarify something, please contact me!
Manufacturing process
Install any graphics program on your computer; Photoshop is a good place to start. As your business develops, you will be able to upgrade and use paid versions of the program. Download a variety of fonts - you can use paid and free versions.
The program creates a sketch of the desired inscription, size, and selects the appropriate font. You can add elements that will later become part of the composition. If the workpiece will be in the form of a phrase or a whole word, make sure that there are points of contact between the elements, otherwise the work will turn out to be of poor quality.
The template can be printed on several sheets if the phrase is long. Using transfer paper, transfer the template onto the plywood. We cut along the contour, sand, paint and decorate with decorative elements.
Ways to create volumetric letters with your own hands
- Using pre-selected stencils, you need to cut out two identical parts from cardboard.
- To form the edge of the future figure, you need to cut a strip 3–4 cm wide greater than the thickness of the product.
- Using a non-writing rod, you need to draw fold lines through which the workpieces will be held together into a single whole.
- All parts must be bent along the formed fold lines.
- One of the blanks should be glued to the edge of the product. For greater convenience, in areas of the figure with smooth lines, the fold of the rib should be cut with scissors.
- In a similar way, it is necessary to glue the second blank to the rib.
- The finished letter should be placed under a press for several hours.
- After the glue has completely dried, the three-dimensional letter can be covered with white paper, sprinkled with glitter, decorated with beads, shells, bows, satin ribbons, etc.
How to treat the surface → Room decoration → How to choose the right paint → Surface treatment technologies → Leveling and finishing the walls → Selecting and applying a primer → Removal from the surface → Stretch ceilings and technologies → Reviews and testimonials