At the stage of drawing a drawing, it is necessary to communicate with the child: how he wants his house to look, in what shape, what color. This moment is important both for education and for the construction itself. This could be the house of a fairy-tale hero, a princess’s tower, or a cartoon garage.
We offer several drawings that will help you decide on a house or serve as the basis for creating your unique structure.
Externally, the house should be designed in accordance with the style of the residential building and the entire landscape. At the same time, the structure should be attractive to the child, so it can be decorated in bright colors and fit, for example, into the concept of a playground.
Do-it-yourself children's cottage for a summer residence: photos, drawings, step-by-step instructions
The basis for making crafts is an environmentally friendly material, which makes it possible to use wood for assembling children's furniture and other household items.
Expert opinion
Strebizh Viktor Fedorovich, leading construction foreman
A variety of crafts for home and garden can not only decorate the interior profitably, but will also become reliable helpers in everyday life with the right approach to work. If you want to clarify something, please contact me!
How to make a cardboard tree so that it stands: step by step photos
- what type will it be - closed or open;
- what size, on what area it will be located, its height;
- where it will be installed - on the ground or on a tree;
- what material do you plan to use;
- will there be windows, doors, if so, then from what material;
- the presence of extensions: a fence or other fence, terrace, sandbox, stairs, maybe a slide or swing;
- interior decoration - what, from what.
Plastic
Plastic structures are simple and easy to assemble and very compact . They are easy to transport from place to place and disassemble if necessary. When choosing materials for building a house at home, you will be able to choose environmentally friendly plastic and be confident in the reliability of the new toy. Polycarbonate is best suited for this purpose.
Even more affordable than plywood is cardboard. Sheets of dense material can probably be found in any home. The advantage of such a house is that you can make different design options without fear of spoiling or destroying it. In addition, if the child decorates the house himself, it will become even more near and dear to him.
Expert opinion
Strebizh Viktor Fedorovich, leading construction foreman
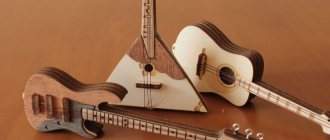
Using the same principle, you can make themed plywood structures, for example, a miniature fairy-tale forest with fancy trees lost in a flower garden or a pretty clearing by a pond filled with funny figures of animals. If you want to clarify something, please contact me!
Sawing process technology
After applying the drawing to a piece of plywood or wood, the sawing process occurs.
The first step is to process and cut out the internal elements of the future product, after which they begin cutting along the outer contour.
This procedure allows you to get straight lines, neat cutting and provides convenient fastening of the material.
Holes for the blade for the internal contour should be drilled in sharp places. This process requires careful actions and attention, since chips may form on the back side of the workpiece.
To avoid this, it is recommended to make the holes incompletely. And you can limit the depth of the hole using electrical tape, wrapping it around the drill.
After drilling, the workpiece must be turned over and the holes processed using an awl. The last step is to polish the product with a file or needle file, and small elements are delicately processed so as not to break them.
For example, cut a thin strip from sandpaper, and then insert it into a jigsaw file instead of the blade itself.
During work, the workpiece should be secured at chest level - this will provide convenience during the process, and will also allow you to closely monitor it.
When using a jigsaw, be careful and practice smooth reciprocating movements, because the jigsaw blade is very fragile. It is recommended to avoid sudden movements, distortions and overheating of the canvas during the process.
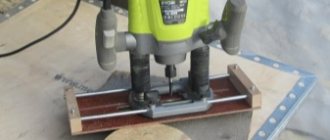
If you use an electric jigsaw, then to work you need to securely fasten the workpiece to the workbench. When working with this tool, you can process material up to 5 centimeters thick.
Source stroy-podskazka.ru
I recommend the following video, in which the author talks about a trick for cutting out a product yourself with a hand jigsaw:
DIY plywood crafts using a jigsaw – 2 master classes
- Inspect the selected material for defects and cracks.
- After removing the bark, the saw cut is cut with a jigsaw into thin circles, which can have different diameters.
- Each wooden piece is treated with moisture-resistant oil and then covered with stain and acrylic varnish.
- The next task of the master is to attach the decorative parts to the mirror frame, the wall of the organizer on the sink, and to the outer walls of the washbasin. You can also use other materials in your work, for example, river pebbles and shells.
Expert opinion
Strebizh Viktor Fedorovich, leading construction foreman
When choosing materials for making jewelry, it is important not only to pay careful attention to the quality characteristics of plywood. If you want to clarify something, please contact me!
Complex flat crafts
More complex flat-type crafts involve internal sawing. The manufacturing process differs from the previous one in that patterns are transferred from the stencil and are to be cut out inside the contour.
To insert the jigsaw blade into such areas, a hole is first made with a drill or awl. Then, the pattern is carefully cut out along the marked contour.
You can suggest the following ideas:
- Frames for paintings and photos. A drawing of such a craft is shown in Fig. 4. Here the middle part is cut out to accommodate the painting canvas. It is important to carefully carry out external and internal cutting.
- Animal figurines. This technology eliminates the need for complex coloring. All details of the figure are cut out, and the color is provided by the background. Figure 5 shows a stencil for making the “Owl” craft.
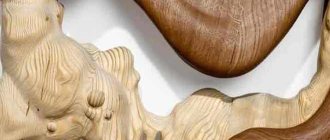
- Figures included in the composition, i.e. painting. Figure 6 shows an example of making a moose head in a frame. First, the workpiece will have an oval shape using a jigsaw. Then, the outline of the animal’s head is cut out and an even oval frame of the picture is formed. Eyes and other details are cut out inside the outline. The desired color background is created at the back of the painting, and the figure itself is varnished. Another option (also shown in Fig. 6 provides a light background and darkening of the head).
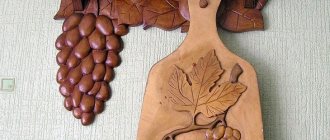
- Decorating elements. Plywood decor is used to frame the interior, platbands, roof edges, etc. Figure 7 shows an example of the execution of such elements. The shape and design of the patterns can be very different, and is set by a stencil (template).
- Panels, paintings. Figure 8 shows a beautiful idyll from the life of animals. When making it, great artistic abilities are not required. The picture can be taken from a magazine or poster, and then transferred through carbon paper to a stencil. The images from it are already transferred to plywood. The workpiece is given an attractive, rounded shape by external sawing. A plywood panel can be made up of several separate, flat figures, combined into a common plot.
Plywood crafts: simple, complex ideas for creating unique DIY crafts
- Moisture resistance . To decorate outdoor spaces and decorate your backyard, you can use plywood sheets marked FKM and FSF. In their production, melamine and phenolic resins are used, which have a moisture-repellent effect.
- Sanded finish . On sale you can find sheets that are sanded on one side (Sh1), processed on both sides (Sh2) and not sanded at all (NS). This point is very important only when you do not have time for additional processing.
Various ideas for an apartment
There are many options for how to use wood inside a living space: in an apartment or in a private house. And the first thing that comes to mind is the manufacture of furniture.
Tables, chairs, beds, folding sofas, shelves and racks can be made from boards, bars, plywood and other lumber.
A lot of useful things can be added to children’s rooms: cabinets, desks, so-called “attic” beds. Wood is also used to make safe furniture for small children.
Wooden structures are reliable, and also, since wood is a natural material, they do not contain various harmful “additives”. You can add hangers and shelves for shoes in the hallway. As you can see, there are a lot of options.
Expert opinion
Strebizh Viktor Fedorovich, leading construction foreman
These can be both original and interesting crafts for children, and more serious things, including various devices for the workshop and garage. If you want to clarify something, please contact me!
Classic and improvised materials for the house
Wooden children's beds
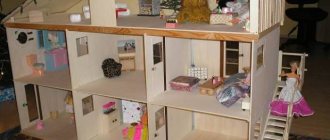
Do you want to give a pleasant surprise to your baby? Then make an attic-type bed-house for him. Believe me, a child will be more happy with such a gift than with any toys.
What is so special about this design? Well, first of all, it is a spacious and comfortable bed. Secondly, under the bed there is additional space for children's games. Essentially, this is a small house.
There are also simpler “attic” structures made of wood - for example, a loft bed with a ladder. To assemble such a bed you will need wooden blocks and plywood.
This loft-type bed will fit perfectly into the interior of a small room. The space under the bed can be used to install cabinets, chests of drawers or other furniture.
Crafts for the cottage and garden
Plywood, as a consumable material, has found its application in a summer cottage. You can make several interesting ideas from plywood sheets:
- Tool box with comfortable handles. The material is very light, but at the same time, has sufficient strength.
- Racks for garden tools.
- Coasters for hot cups and bowls on the table.
- Decorative borders for flower beds.
- Hanging flower pots.
For all country crafts, you should carefully follow the principle of pre-treatment of surfaces with solutions of an antiseptic and a moisture-resistant composition. This approach can significantly extend the service life of finished products.
Expert opinion
Strebizh Viktor Fedorovich, leading construction foreman
A distinctive feature of this kitchen accessory is the favorable color of the material, which does not require additional decor. If you want to clarify something, please contact me!
Tool preparation
The canvas is fixed in the device strictly along a vertical line and is well stretched. The blade teeth should point down.
To cut out a small part, select small blades, and for larger elements, choose a blade with large teeth. This way the cut will be neat and thin.
Work always begins with drawing up a drawing for a craft using a jigsaw. When working with a hand tool, the cut is made not along the drawing line, but along the inside of the contour. Fakes made with a hand jigsaw are more accurate.
DIY holiday crafts
- A Christmas tree craft made from plywood that can be installed on a table, mantelpiece, or window sill. To create a festive tree you will need one template, two blanks of the same size. The parts are attached using dowels or strong glue, and then painted green (you can use acrylic paint and transparent glue).
- An original souvenir in the shape of a boot.
- Snowflakes made of plywood will decorate the front door.
How to treat the surface → Room decoration → How to choose the right paint → Surface treatment technologies → Leveling and finishing the walls → Selecting and applying a primer → Removal from the surface → Stretch ceilings and technologies → Reviews and testimonials
Simple flat crafts
Simple flat plywood figures can be easily made using a jigsaw. They are manufactured in the following order:
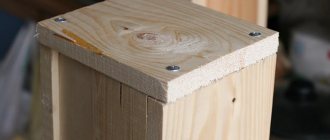
- A rectangular blank of the required size is formed from a plywood sheet using a hacksaw.
- A stencil (template) of the figure is prepared according to the size of the workpiece. It is made of cardboard or thick paper (Whatman paper). You can draw the figure yourself if you have artistic abilities, transfer it from a picture using carbon paper, or print it on a printer from the Internet. Then it is cut along the contour.
- The stencil is placed on a piece of plywood and outlined with a pencil or marker (felt-tip pen). All internal parts are transferred onto plywood using carbon paper.
- A figure is cut out using a jigsaw according to the markings.
- The edge is processed with files and all sawing errors are corrected. The surface is sanded with sandpaper.
- The figurine is given the desired appearance. You can apply all the necessary elements using a burning device. Another option is to paint with acrylic paint using a brush along the markings made from a stencil.
- Final finishing - Most often, varnishing.
The main criteria for choosing a varnish material can be found in our article Which wood varnish to choose for interior and exterior work.
Using this method you can make the following crafts:
- Figures of animals, birds, fish. Figure 1 shows a stencil for making a swan figurine. It can be enlarged to the desired size and printed on a printer.
- Figures of funny people, cartoon and fairy tale characters.
- Composition crafts. Figure 2 shows a dolphin on a sea wave.
A cute “Dog” craft can be made using a burning device. For it, you can cut a blank along the contour of the head or burn a design directly onto a plywood blank. You can offer a huge number of different ideas. Fantasy is not limited by anything.