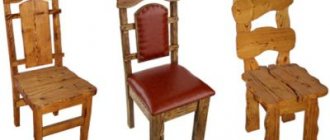
For humanity, since ancient times, wood has been the main building material. It was widely used for the construction of buildings, the manufacture of various household items, decorative items, toys, etc...
In the process of developing modern woodworking production, humanity has invented such new lumber as plywood and chipboard.
The improvement of woodworking tools and devices has expanded human capabilities to use these materials. Making objects from plywood is one of the common uses of this material.
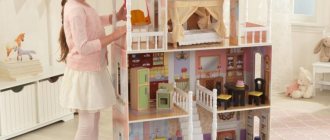
In modern photographs of private farmsteads, apartment decor, household utensils and toys, you can see a diverse range of plywood crafts.
About making crafts from wood and plywood
Such building materials of wood origin have many advantages that make them one of the most important in construction.
Positive aspects of use:
- ease of obtaining or purchasing. You don't have to buy the material. In a home closet or in the backyard of a farmstead, or other places, you can always find an old wardrobe, chair, bedside table, and other items made from this material;
- saving financial resources due to the use of your own or abandoned things, making things yourself;
- production of various household items, decoration of buildings, elements of personal buildings, suburban areas;
- ease of processing. To work with wood structure material there is no need to purchase expensive tools. It lends itself well to processing with paints and paints.
- has a pleasant aesthetic appearance.
The main disadvantage of these materials is their poor resistance to environmental influences. From dampness and water, the material swells and rots; from the hot sun it can warp. To compensate for these shortcomings, the chemical industry has produced a lot of protective lumber processing products.
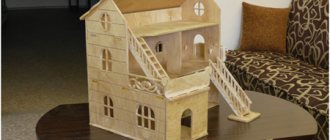
Making crafts with your own hands from plywood is accessible to everyone. Products made from plywood will not only improve the site and its buildings, diversify leisure time, but can also become an easy, pleasant means of introducing children to work.
Garland
Christmas tree beads are an element as important as the toys themselves. This also includes elegant garlands for a tree or room. They can also be made from plywood using the same principle as described above.
Some tips:
- The garland for the Christmas tree should be made in a simple form so that the decoration fits organically into the overall composition. Choose flags, circles and other simple shapes. This will help save time - there will be a lot of elements for cutting and decorating.
- Use satin ribbons and decorative ropes to connect the elements so that the appearance of the product remains solemn.
- To fix the fragments on the rope, tie knots at the location of the element. This way it will maintain its position no matter how inclined the thread is.
- Make loops at the ends of the rope to make it easy to hang the garland.
Structure of making crafts
Theoretically, manufacturing is divided into several stages.
- choice and design;
- determination of dimensions, design features;
- preparation of material, development and assembly of the device;
- decoration and protection.
Choice and Design
This is the primary stage of any business. At this stage, it is important to decide what needs to be produced, the needs for the product, the completion time, and the materials used.
Determine the installation location of the structure, the possible impact on it by humans and external natural factors.
Assess the possibilities based on the availability of materials, time and tools.
Consider the stages of production, the sequence of processing of parts and the design itself.
Concrete drilling tool
In the processing of concrete and brick walls, equipment is used in the form of electric, hydraulic and other drilling rigs with an impact effect. As already noted, the entry level of this group is a hammer drill. But also modern electric drills in some modifications have the option of connecting impact. Another thing is that the power of such models will be enough only for one-time operations with thin walls. Diamond drilling of holes in concrete is most in demand. The tool for performing such activities is, in essence, a machine to which an electric motor is connected.
The features of such units include three points. Firstly, it is a highly durable design with a housing that ensures reliable installation of the equipment where work is performed. Secondly, there is a power drive, which determines the ability of rather large cutting elements to perform complex drilling operations. Thirdly, these are crowns and drills, which themselves are high-strength diamond parts that require cooling during operation.
Determination of dimensions and design features
Having made a choice of a craft and developed a manufacturing plan, it is important to think through the design features of its assembly and further installation.
If the design is simple, consists of one or several elements located in the same plane, then there is no great need for accurate calculations. Here, small errors will not affect the overall condition of the product.
Volumetric or mechanical objects consisting of several elements interacting or fastened together will require more attention and thought.
- Liquid wallpaper. What do they need?
- Nickel-cadmium batteries. What do you need to know about them?
- Bathroom tiles. What is it like?
It is necessary to clarify the dimensions of the structure itself, each of its parts, methods of their interaction, the order of connection, and installation at the place of accessory.
In this case, it is necessary to make at least a sketch, and preferably a drawing. It is advisable to make drawings of crafts made from plywood on a sheet of finely-checked paper, and if the structure being manufactured requires great precision, on graph paper. The scale is chosen arbitrarily depending on the size of the object and the accuracy of the elements being fastened.
Business board in a suitcase
0
Source:
This busy board perfectly develops the baby’s fine motor skills. Dozens and hundreds of signals enter the brain through the fingertips, and for a young researcher this experience will be indispensable!
A single-sided board is inconvenient to install because it will constantly fall. And sometimes you want to diversify the classic “books” with something. Make a business board in the form of a small wooden suitcase with a handle - it’s both stable and convenient! This suitcase is assembled using self-tapping screws, just like a regular box. Although you can make one wall open and hide the backlight and batteries from all interactive elements inside. You can also cut real windows into it with a surprise - almost like a small house! Use a measuring tape, plastic jars with twists and rattles. Screw on a couple of handles or loops so that the child can hang toys on them independently. Cut a round hole in the side of the suitcase and cover it with a computer cooler grill.
Preparation of material, development and assembly of the device
When producing a solid product, a sheet of plywood corresponding to its size is selected. To manufacture a three-dimensional structure consisting of several elements, sheets of appropriate sizes are selected.
Required tools and accessories:
- hacksaw or jigsaw;
- plane and chisel;
- vice;
- awl or drills of various diameters;
- drill and screwdriver;
- pliers;
- files and needle files;
- gloves;
- sandpaper.
A sketch of the craft or its elements is applied to the selected sheet. Depending on the required accuracy, it is cut, which is carried out with a hacksaw or jigsaw. The most precise elements and crafts from plywood are made with a jigsaw.
Attention. When installing the saw blade into the jigsaw, its teeth should be directed towards the tool handle.
- Angorka. What it is?
- Flowers as gifts.
Dream Island - a place for a family holiday
After sawing the sheet into elements, they are cleaned with sandpaper, files and needle files. The degree of cleaning is determined independently, the main thing is that the surface is smooth, without splinters, and the joints ensure a reliable connection.
At this stage, it is important to remember the joints of the parts. Before assembling the product, it is necessary to carry out anti-corrosion treatment of parts and fastening areas, and paint if necessary. The most complex connection is the connection of parts with grooves, but such a product is easy to install, disassemble, and transport.
Virgin Mary toy
Wood craftsmen in Rus' did not limit themselves to wooden horses and clay whistles. In the museum called “Virgin Toy” today you can look at movable toys whose age has exceeded a hundred years.
Without knowledge of the laws of mechanics, but solely on inspiration and with the help of their ingenuity, the craftsmen created various chickens that pecked grain, or hares playing the accordion, as well as blacksmith bears.
For carving crafts, they usually used linden, which was sawed several years before. The craftsmen used special knives for their work. Modern development of technology makes it possible for everyone to make similar toys that can become an original New Year's gift for children.
To make such toys you will need drawings. You can simplify the design if you deprive it of bulk and replace the linden with plywood. The most difficult stage of the work is determining the place for attaching the paws and legs, so that when moving the slats, the figures perform an accurate movement (for example, a blacksmith and a bear clearly hit the anvil with their hammers. This can be done experimentally and you should cope with it.
Decoration and protection
When the structural elements are made, you can begin to paint them in parts or assembled. It all depends on the product itself, whether it needs further painting or not.
Paint or varnish is selected depending on the type, purpose of the product, room or area of the yard or house being decorated.
After the paint and varnish have completely dried. It is advisable to treat crafts displayed outdoors with anti-corrosion or waterproof compounds.
- Gas burners for heating metal: where to buy on the most favorable terms?
- Gazelle. Why is she so popular?
Elbrus - a history of conquest.
Twitch bear toy
To create a moving three-dimensional bear, just follow the step-by-step guide, which will help you avoid making mistakes during the work. The created mechanism will allow you to raise all the paws every time you pull the string.
Before the master starts creating a simple toy, he will need to take care of purchasing:
- cardboard in the desired shades;
- colored paper;
- scissors;
- adhesive base;
- a small amount of soft wire, which will help fix the paws movably.
Step by step process
- The bear template can be printed for convenience. According to this sketch, you will need to outline the torso along with the upper and lower limbs on cardboard.
- The eyes, nose and ears of the animal are cut out and drawn on with a felt-tip pen. The apron area is glued to the central part of the bear's belly.
- The animal's limbs are fixed to the body with wire.
- The paws are tied with threads on the reverse side.
- Now you should test how well the toy moves after the child pulls the string. In a similar way, you can create an owl-shaped twitch.
A moving bear will give kids a lot of pleasant emotions. Making moving toys is a great way to spend time with your child. The product manufacturing schemes presented above will help both adults and children cope with this task.
Crafts for a summer cottage
Crafts made can be divided into two categories:
- to improve living conditions;
- for decoration.
No one cares about the appearance of their summer cottage. It's always nice to relax in a beautiful, well-kept place. To create a relaxation zone in the country house, in certain places of the garden and vegetable garden, it is enough to install several sculptural figures or decorative items. This will be pleasing to the eye, however, not everyone can afford it.
It is much easier to create beautiful crafts from plywood yourself. Their production does not require high artistic abilities or practical skills. It is enough to be able to transfer the image you like onto plywood, cut it out and decorate it according to the original. It is necessary to think over the artistic motive and style of execution of crafts.
Options for plywood products:
- cartoon or fairy-tale characters;
- flower pots;
- houses, sandboxes;
- feeders;
- flowers, plants;
- insects or animals, etc...
It all depends on the imagination of the household, desire, perseverance, and creative inspiration. The financial component only complements initiative and diligence.
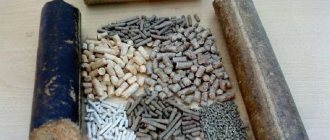
A little about plywood
Plywood is thin sheets of wood material joined together with an adhesive base. ITS thickness can range from three to thirty millimeters.
You need to know that there are types of it that can only be used for outdoor work. The adhesive base of such plywood is very toxic and can harm the health of residents.
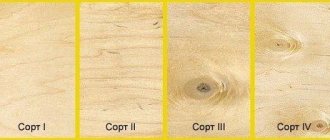
To make crafts used inside the house, it is necessary to use FK grade plywood. It is advisable to make crafts made for installation in the yard from FSK brand plywood, this is a more moisture-resistant type.
When making crafts with an electric jigsaw, it is allowed to use sheets of maximum thickness. When using a manual jigsaw, as a rule, they use three-layer plywood, up to nine millimeters thick.
You can buy plywood for crafts at any hardware store. The main thing before purchasing is to decide on the type, purpose and location of its installation.
Handmade items will decorate your home, yard, garden, or park area. They will give them a special charm and uniqueness. They will not only improve living conditions, but also create a wonderful atmosphere of comfort and well-being.
Simple double-sided busy board
0
Source:
The good thing about a double-sided business board is that it can be easily installed on the floor and then folded into a book. One side of this busy board is with various household appliances, and the other is with clothes. This is exactly what the child will use in the future!
Choose a thicker tree for the base and make additional fasteners so that the child does not get hurt. On one side, attach switches, a socket with a plug, locks and a latch, a key holder with small keys, a flashlight and door handles. On the other - zippers, laces, carabiners, a piece of a sweater with large buttons and small sewn toys. The more items you collect for the busy board, the more interesting it will be for your boy. Therefore, use everything you find in the house: from household items to fragments of toys. Puzzle pieces, large letters on magnets, small multi-colored clothespins, stickers, a xylophone and other little things will come in handy.