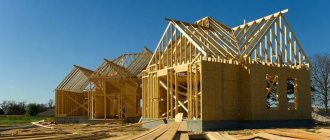
Over the past few years, the construction market has been flooded with so-called frame houses, which are erected weekly in huge numbers both by companies and with their own hands.
The reason for such love for “frameworks” lies in the ease of construction and the pace of construction.
The phased construction of a frame house allows you to assemble a full-fledged residential building in one season, which will look quite presentable, and have an attractive price and cost-effectiveness in maintenance. The technology is easy to understand and implement with your own hands.
DIY frame house
What is the essence of building a frame house?
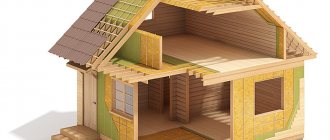
As the name implies, the technology consists of forming a kind of frame made of wood (boards or timber) or metal, with gradual, step-by-step covering of it with layers of films, membranes, insulation, etc.
This multi-layer wall design makes it possible to achieve good thermal characteristics with fairly thin walls.
Sectional view of a house wall without additional foam insulation
What materials form the wall?
- mineral wool insulation
- insulation foam sheets
- waterproofing in the form of a film or membrane
- vapor barrier in the form of a diffusion membrane
- OSB sheets
- external and internal finishing
Insulation of a frame house, as we wrote above, is best done in two types. We insulate the house from the inside with mineral wool, and from the outside with sheets of foam plastic.
Foam sheets will improve sound insulation, they are excellent wind protection and, if the properties of mineral wool decrease over time (this can happen when moisture or dew gets inside the walls), they will preserve the thermal characteristics of the house.
Do-it-yourself home insulation using mats
Waterproofing is necessary to protect the insulation from moisture that comes from outside in the form of precipitation.
It must be overlapped, secured with a special adhesive tape for insulation. This allows for 100% protection against water.
Waterproofing walls with isospan in a frame house
The vapor barrier is fixed on the inside of the wall and allows the walls to “breathe”.
Droplets of moisture that can condense in the wall are quietly discharged into the rooms, making the insulation last much longer.
When using high-quality membranes, the risk of mold formation on the walls, black mold spots and other side effects of sealed walls is reduced to a minimum.
And the installation of proper ventilation of a frame house completely eliminates these risks.
Vapor barrier of walls from inside the house using a do-it-yourself membrane
OSB sheets are nailed over the entire structure, and are the basis to which finishing materials will be attached.
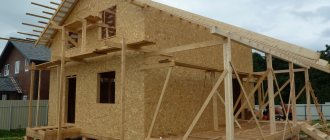
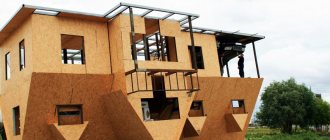
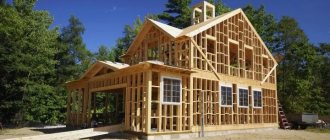
Each stage of the work can be done with your own hands due to the lightness of the building material. The technology is quite simple, and it needs to start with the construction of the frame.
Sheathing a house with OSB boards
Advantages
Wooden frame housing is not inferior in quality to brick houses or concrete houses, and in some respects it surpasses them:
- Pre-fabricated. This is achieved thanks not only to the low weight of all the parts of the future building, but also to their design features. The absence of so-called wet operations allows finishing to be carried out at any time of the year.
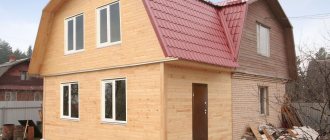
Design option for a two-story frame house
- The light weight of the house using rigid materials significantly reduces the likelihood of damage from design errors and exposure to external adverse factors. The building is less at risk of uneven settlement as a result of heaving or soil shifting.
- Saving on laying the foundation. The weight of the structure is such that it does not require the installation of a powerful, and therefore expensive, foundation.
- The possibility of implementing a variety of solutions, and the redistribution of weight does not lead to a violation of the integrity or a decrease in the strength of the frame dwelling.
- Rapid heating of all rooms of the house, ensured by high thermal protection of the entire building.
- The vapor permeability of the walls is almost at the level of classic wooden houses. It creates the effect of a “breathing home”, which is very important for a comfortable stay.
Scheme of the vapor permeability structure of a frame house
- Maintainability. All elements of the building can be repaired, including the foundation. A lightweight hull (usually less than 20 tons) can be jacked up and repairs made to the foundation.
- Thanks to the small thickness of the walls, an optimal ratio of the total space occupied by the building and useful living space has been achieved.
- Relatively low cost of construction, attractive appearance.
The disadvantage of frame housing, like all wooden buildings, is the fire hazard. And if you use cheap materials containing phenol-formaldehyde resins for finishing, then there is no need to talk about environmental safety. Therefore, when building a house, you should select building materials very carefully.
First stage of construction: foundation
Like any other construction, a frame house begins with the construction of a foundation.
The foundation can be:
- tape
- columnar
- pile
We will not consider the remaining types, since they are used extremely rarely.
What is the essence of these foundations?
A strip foundation is a monolithic foundation made of concrete, which is poured in a liquid state under load-bearing external and internal walls.
To do this, you need to apply markings using stakes and rope, mark the locations of future walls, dig trenches with your own hands or with an excavator (mini tractor).
Install formwork in the trench, which can be removable, permanent, purchased in a store, rented, or made from boards or plywood with your own hands.
We waterproof the finished formwork with ordinary film from the inside and fill it with cement mixture for the strip foundation.
When it hardens, it is necessary to remove the formwork and check the geometry. If there are differences in height, apply an additional layer of cement for leveling.
DIY strip foundation
A columnar foundation consists of pillars that are installed in certain places: in corners, in areas of overlap, at a distance from each other of no more than 2-2.5 meters.
The pillars can be cast in cement or prefabricated from blocks. Filled ones are made in the same way as with a strip foundation, but not trenches are dug, but holes into which square or rectangular formwork is installed. The formwork is also waterproofed.
Columnar foundation for a house
When using poured foundations, do not forget to use jibs, since liquid cement is often so heavy that it pushes apart the formwork that you put together with your own hands.
Important: do not forget to recess the reinforcement in the poured foundations or the mesh to make it stronger. It is also necessary to install anchor bolts at this stage.
Pile foundation for a frame house
A pile foundation resembles a columnar one, but the role of pillars is played by piles. They are driven into the ground in the same places where the pillars would be. And they have the same supporting function.
Piles can be used on difficult soils - clayey, for example. After installing the piles, the geometry must be carefully checked. Screw piles can be adjusted in height.
Options for layouts and projects
The layout of the frame depends on the construction company that offers its construction, as well as on the customer, who, if desired, can make adjustments to the project. The most common options:
2 bedrooms, living room, kitchen, vestibule, hall, bathroom and terrace;- 3 bedrooms, kitchen-living room, boiler room, vestibule, hall, porch;
- living room, office, bathroom, kitchen on the ground floor and several bedrooms and a bathroom on the attic floor, terrace;
- two-story with terraces: living room, bedroom, kitchen, hall and bathroom on the 1st floor and 3 bedrooms, hall, bathroom on the 2nd floor.
Note! The larger the building area, the more living rooms it can accommodate. If the house is one-story, then the rooms will be smaller in area, and the kitchen will be combined with the living room.
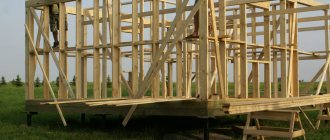
Second stage of construction: walls
At the second stage of construction, we build the frame of the future house.
To do this, we take timber 150, since it is best to use 150 mm insulation, and it fits perfectly between timber of this size.
Wall of a frame house in section
Before installing the frame, it is necessary to complete the strapping device. In total, each house has 2 types of piping - upper and lower.
Banding boards or beams fasten the entire wall structure together. We begin the installation of the lower piping with waterproofing the foundation.
That is, we put a film on the foundation, and we place strapping boards on top of it. We fasten them using anchor bolts, pre-recessed into the unfrozen foundation.
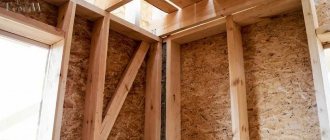
Timber frame
We start the frame by installing corner posts. Their role is played by timber 100x100 mm or 150x150mm or board 150x50 mm.
Corner posts must be rigidly fixed using metal corners, and always struts.
Between the corner posts, simple vertical posts should be located at a distance of a meter and a half.
All vertical posts are fastened to each other by horizontal beams made of timber. More information about the structure of the frame here.
Wall with a window in a frame house
When constructing the building frame, do not forget to make openings for windows.
They must be strengthened with crossbars that take the load and distribute it evenly to the foundation. Read more about inserting windows here.
After erecting the walls, it is necessary to proceed to the next stage.
What types of wood are they used to build from?
All materials can be divided according to their purpose - which are used for the construction of the base, frame, for roofing work, insulation, finishing raw materials, as well as for laying communications.
For foundations use:
- sand;
- crushed stone;
- cement;
- knitting wire;
- construction fittings;
- foundation blocks.
All this is necessary for the design of a shallow foundation.
For frames use:
- unprofiled planed timber;
- profiled timber;
- laminated timber.
Let's take a closer look:
- Non-profiled planed timber is used most often. This is a material that undergoes forced drying. The material used is 100x100 mm in size, and the bundle is made with boards.
- Profiled timber has grooves and tenons, due to which the connection occurs. The advantage of this material is that it allows you to save on fasteners.
- Glued laminated timber differs in the direction of the fibers, so the construction speed increases.
Coniferous wood species are often used: pine, spruce, fir, cedar and larch. These rocks do not rot, do not conduct heat, have a high degree of strength, are permeable to air and have antiseptic properties.
On a note. In regions where there are no needles, aspen, poplar, birch and oak can be used. But such materials do not have the necessary properties.
For cladding use:
- Waterproof plywood, which is made from pine or birch veneer.
- OSB boards are also used - the material is moisture resistant and can be used for both internal and external walls.
- Often, SIP panels are used for cladding, which are already equipped with insulation inside.
Ceramic or bitumen tiles and metal tiles are used for roofing. Mineral wool material is used as insulation.
Third stage of construction: roofing
Even while designing your house, you should have decided what type of roof will crown your building.
Most often, a gable roof is chosen for frame houses, however, single-pitch roofs are also in demand due to the ease of do-it-yourself installation, simplicity of design and lower price.
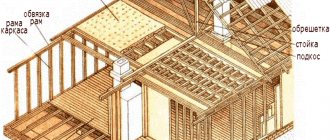
Rafter system diagram
The construction of the roof begins with the rafter system. The rafter system is the main frame of the roof.
The rafter system consists of the following elements:
- Mauerlat
- rafter legs
- racks
- runs
- puff
- sill
- struts
- sheathing
When the roof frame is completed, it is necessary to insulate it. The roof filling consists of almost the same layers as the wall.
From the outside, we insulate the roof with sheets of foam plastic or mineral wool, lay down waterproofing, which we fix with lathing.
Roof and its layers
On the inside we put a layer of mineral wool or polystyrene foam if the attic space is not intended to be residential. We fix the vapor barrier layer and cover everything with OSB boards.
We cover the roof with roofing materials depending on the slope of the slope and our own preferences.
Remember that soft roofing, which has become very popular recently, is laid only on a plane, so the sheathing must be supplemented with OSB boards. In this case, the angle of inclination can be small - from 5 degrees.
Requirements
To study the requirements for frame houses, you can refer to SP 352.1325800.2017, which specifies the rules for the construction and design of such structures. It is worth highlighting the basic requirements for buildings of this type:
when designing houses, they provide protection from moisture, corrosion and biological damage;- the wooden frame must meet the requirements for load-bearing capacity calculations;
- Frames are recommended for use where the ambient temperature does not exceed 50 degrees;
- Coniferous wood is used to make frames;
- the moisture content of wood for dowels, liners and other parts should not exceed 12%;
- all frame parts must be treated with antiseptics;
- wall materials must ensure the durability of the structure and its strength.
Important! All materials must comply with GOSTs, and also have the standards specified in the project for the house.
Fourth stage of construction: floors
On the ground floor, floors are most often installed on the ground. What does it mean?
The technology is as follows. We remove the initially fertile layer of soil and fill it with a layer of gravel.
It is necessary for drainage, since moisture will seep inside and have less contact with the cement screed.
On the ground we make a layer of sand of 30-50 cm, depending on the height of your foundation. Carry out compaction with your own hands or using equipment.
As a result, the sand layer should be located 5 cm below the foundation level to avoid cold bridges and freezing in the corners.
Scheme of rough screed on the ground in a frame house
Next, we perform a rough screed using liquid cement. If you take cement that is a little more liquid than for constructing a foundation, you will not have to level it with tools, since under the influence of gravity the cement itself will be evenly distributed over the ground. The most important thing is that the ground is level, otherwise the liquid cement will flow into one place.
When the rough screed is dry, you can continue installing the floor. To do this, we waterproof it with a film, on top of which we lay out the floor insulation.
Using a mesh, you can attach underfloor heating pipes (liquid or electric) on top of the insulation. And fill in the finishing screed.
The final part of floor construction is the floor covering. These can be wooden floors, tiles, laminate, etc.
If you do not want to use cement in the construction of the floor (for example, if construction takes place in winter), the technology of constructing wooden frame floors based on logs will help you. How to arrange such a floor, see the diagram:
Floor installation using logs
To set it up you need:
- board 25x100
- timber 200x200
- timber 70x195
- board 50x150
- wind protection
- insulation
- osb
- underlay and laminate or tile
You will find more information about flooring in a frame house here.
Correct Scandinavian frame
Unlike America, where frames are practically standardized and there are very few differences, there are more variations in Scandinavia. Here you can find both the classic American frame and hybrid versions. The Scandinavian frame, in essence, is the development and modernization of the American one. However, basically, when they talk about a Scandinavian frame, we are talking about such a design.
Typical Scandinavian house kit
Scandinavian frame
Corners, jibs - everything here is like the Americans. What should you pay attention to?
- Single strapping along the top of the wall.
- Power crossbar embedded in the racks along the entire wall.
- Single posts on window and door openings.
In fact, the main difference is this very “Scandinavian” crossbar - it replaces both the American headers and the double harness, being a powerful power element.
What, in my opinion, is the advantage of the Scandinavian frame over the American one? The fact is that it places a much greater emphasis on minimizing all kinds of cold bridges, which are almost all solid boards (double strapping, racks of openings). After all, between each solid board, a gap could potentially form over time, which you may never know about. Well, it’s one thing when the cold bridge is the width of one board, and another question is when there are already two or three of them.
Of course, you shouldn’t focus on cold bridges. There’s still no escape from them, and in fact, their importance is often exaggerated. But, nevertheless, they exist and, if it is possible to minimize them relatively painlessly, why not do it?
Scandinavians in general, unlike Americans, are very concerned about energy saving. The colder, northern climate and expensive energy resources also have an impact. But in terms of climate, Scandinavia is much closer to us (I’m talking primarily about the North-West region) than most American states.
The disadvantage of the Scandinavian frame is that it is slightly more complex, at least in the fact that in all racks you need to make cuts for the crossbar. And the fact is that, unlike the American one, it does require some kind of mental effort. For example: large openings may require double racks to support horizontal elements, and additional crossbars and headers. And somewhere, for example, on the gable walls of one-story buildings, where there is no load from the joists or roof, perhaps a transom is not even needed.
In general, the Scandinavian frame has certain advantages, but requires a little more effort and intelligence than the American one. If the American frame can be assembled with the brains completely turned off, then in the Scandinavian one it is better to turn them on, at least in the minimum mode.
Fifth stage of construction: finishing
At the fifth stage of construction, the external and internal finishing of the house, installation of plumbing, connection of lamps, sockets, heating of the frame house and other work are carried out, which will make a real home for living or recreation from a simple box with walls and a roof.
Since the walls of the frame house are covered with OSB boards, it will not be difficult to carry out external and internal decoration even with your own hands.
You can read about how to do external finishing and choose the right materials in our article here.
External finishing with plaster
Interior decoration depends primarily on the preferences of the home owners, and can be done using tiles, wallpaper, liquid wallpaper, plaster, in particular decorative.
The walls can be painted, covered with clapboard, siding, the ceilings can be whitewashed, or suspended ceiling technology can be used.
The floor can be covered with tiles, parquet, laminate. In general, there is room for your imagination to run wild.
Interior decoration with block house
By this time, you should already have all the pipes for installing plumbing installed (they are removed during the construction of the floors, during the rough screed), and the electrical wires should be laid out.
Construction of a frame house from the first to the fifth stage takes about 3 months.
General information
Wood frame construction is very popular. Moreover, the need for it often arises not only for professional builders, but also for home craftsmen. For example, structures such as gazebos, verandas, canopies and even fences in most cases have a wooden frame.
In addition, wooden frames are used in the furniture industry. For example, if you know how to handle wood, you can make a wooden frame for a bed or table yourself.
Below, as an example, we will consider how to assemble frames for small structures, such as gazebos, greenhouses, change houses, all kinds of cabins, etc.
Greenhouse frame
Frame roof
Installing a roof for a frame building is less labor-intensive than for a block or brick house. Fastening the roof to the walls is easier.
Rafter structure and roofing
The rafter structure of a frame house is installed in stages:
- The extreme supports are installed under the rafters and the ridge. The grooves for resting on the frontal board are selected in advance.
- Install the middle ridge posts along a cord stretched between the outer supports. They are fastened with jibs, which are then removed.
- A 5x20 cm ridge beam is placed on the posts. To prevent the section from feeling bending loads, the beam is joined above the supports.
- The places where the rafter legs will be attached are marked.
- The rafters are cut according to the template. They are mounted, resting on a wooden beam on the inner surface of the outer wall and on a ridge beam.
- The structure is strengthened by constructing a support under each inclined beam, as well as wind struts for the rafters to increase the strength of the rafter structure along the axis of the ridge under two adjacent rafter legs.
- At the bottom of the rafters, cornice strips are screwed.
- The waterproofing film is spread parallel to the overhang, and installation begins from the bottom up. An overlap joint is required, no less than 8-10 cm. The waterproofing is secured with a stapler, the film between the rafters sagging up to 2 cm.
Install counter lathing. The bars for it have a cross-section of 4x5 cm; they will provide ventilation to the roofing “pie”. Counter slats between the roof and waterproofing will create a space where air will “walk.” 2.5x10 cm sheathing boards are laid on top of the counter lathing in increments of 25-30 cm. The spacing is selected in accordance with the wavelength of the metal tile profile. Wooden elements are nailed.
Next is the installation of drainage and roofing material, usually metal tiles:
- For gutters of the drainage system, hooks are attached to the eaves board, making a slope towards the drainpipes.
- The first 4 sheets of metal tiles are laid out without fastening. The sheets are aligned along the end and edges of the cornice and screwed with self-tapping screws. Using rubber gaskets, hardware is attached to the lower part of the wave.
- Mount ridge and wind strips.