The comfort and safety of your family will depend on how you make the floors in your house made of wood. Therefore, before starting this stage of work on building a house, it is necessary to carefully study all the existing nuances and features. And the information below on how to make a floor will help you with this.
If the house does not have a concrete foundation, then the floor for the log house is built on joists or pillars.
So, what is a log floor? This is the overlap, or more precisely, its top layer. It is this that divides the house into premises for different purposes, residential and domestic. This is the basement, rooms, attic. Even if there are several floors in the house, the functions and essence of the floors remain unchanged. Installing a log floor on the ceiling is considered the optimal, logical and correct solution.
But despite all its advantages, there are other ways to arrange the floor in a log house. For example, floors made using beams located on supporting pillars, or a floor built on the ground. The question of how to make floors in a log house is relevant for many inexperienced builders. But let's talk about everything in order.
Brief characteristics of a wooden floor for a log house
Wooden floors can be divided into 2 types: single-layer and double-layer.
The best way to lay a single-layer floor in a log house is to use joists.
The installation of a single-layer floor, in turn, is divided into methods using logs or without their participation. The choice will depend on the thickness of the board you will use. And in this case, the step between the beams is important. When building a house whose floors are built on joists, the boards are laid directly on the beams. And the interbeam step in this case should not exceed 0.6 m.
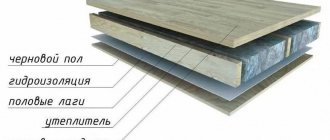
The two-layer version of the floor in a log house implies the presence of a subfloor in its design. It is carried out simultaneously with the fastening of beams on rough boards. A layer of thermal insulation is laid on top of the rough boards. You can use any sheet heat-insulating material or expanded clay as it. Professionals recommend not to exceed the thickness of this layer; the maximum possible option is 80 mm.
Wooden floor insulation scheme.
It is necessary to insulate the floors of a log house regardless of what it is made of. Both wooden and concrete options require this procedure. Various types of modern insulation materials can be used as thermal insulation. These include: mineral wool, polyurethane material.
And some builders also use methods that are considered outdated today. This is the use of shavings or sawdust as a heat-insulating material; there are even options with dry leaves.
Technology for laying single wood flooring
In rooms with a small area, beams are mounted and attached directly to the wall. If laying logs on support posts is considered, then it is necessary to take into account the requirements that will ensure the reliability of the overall structure. Let's say the gap between the pillars is 0.8 m - the load-bearing beams must have a cross-section of at least 100X100 mm. If the parameters between the supports are increased to 1 meter, beams of 120X120 mm will be required. The logs are mounted across the room at intervals corresponding to the thickness of the boards. For example, a distance of 0.5 m will be enough to install a 28 mm coating. For high-quality flooring in a wooden log house, tongue-and-groove lumber from coniferous or hardwood with a thickness of 28-40 mm is used. The traditional location of the flooring is perpendicular to the wall with windows. The material is fixed with nails, their length is taken at the rate of 2.5 times the thickness of the lumber. Two fastening methods are possible :
- ordinary;
- parquet.
The essence of the usual method is that the nail is driven into the front of the board. The second option is to drive a nail at a 45° angle into the corner of the ridge.
Important! The very first plank is laid at a distance of 10-15 mm from the wall. It is recommended to initially carry out the flooring using the parquet method, i.e. Only every sixth board is fixed. As the material dries, the floor can be re-laid with less labor. Wedges are used to compact the rows; the gap should not exceed 1 mm.
In order to ventilate the underground space, it is necessary to arrange openings in the corners of the floor that are covered with decorative grilles. Its design should prevent the entry of foreign objects and water during cleaning. It should be remembered that there are not enough vents in the flooring, and provide windows for ventilation in the basement of the building in advance.
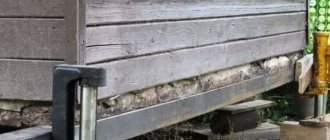
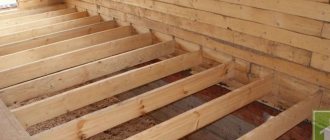
Log floors on floor beams
When building a wooden house, the most logical and optimal option for the floor is its construction along the floor beams. This is the most common option and professionals don’t see the point in looking for a replacement. This method will help raise the floor to the desired height and allow you to leave room for a basement, as well as eliminate possible contact between the floor and groundwater.
The construction of the floor along the floor beams raises the flooring to the required height, completely eliminating its contact with groundwater.
Depending on the specifics of the construction of the house, the beams are placed either in the frame of the house behind the ground floor, made of brick (concrete), or at the level of the 3rd or 4th crown, counting from the ground, in the case of using only wooden building materials.
The placement of beams, or rather their end parts, can be in the bulk of the log house or through. The through arrangement is more reliable, since the resulting condensate will be able to escape through the end of the beam. Please note that the ends of the beams must be treated with an antiseptic composition, which will protect them from exposure to moisture and various types of bacterial infections.
If the beams in the structure of your house are more than 3 m long, then they need additional support. These can be beams placed on the end, or brick columns, or wooden ridges. Just like the ends of the beams, all wooden parts in contact with the soil must be treated with an antiseptic composition without fail.
It is recommended to use timber with flat end sides as floor beams.
If you choose pillars made of brick as support, then you need to build them on a fairly solid foundation. It would be better if it were concrete slabs. You can fill these with your own hands or purchase ready-made factory-made ones. Under the base of these slabs it is necessary to lay roofing material, which will serve as a waterproofing layer.
Experts recommend using building materials that have flat end sides as floor beams: beams, half-beams, and so on. Its cross-section must fully correspond to the cross-section of the material from which the permanent walls are made.
Self-installation
Next, it’s worth describing the process in detail - how to install logs in a log house. This is important information for beginners. So, let's start with the floors; the actual installation of the ceilings is no different from this:
- Having chosen the option, you need to start inserting from the second crown of the log house, already laid and secured with dowels.
- The insertion of lags is carried out using the dovetail method. That is, the gash represents a carved void in the crown, and the log is a figure. By inserting one into the other, fastening is performed. The crown should not be cut down before it comes out. It is enough if the “tail” is equal to half of the log or timber.
- The elements need to be secured using reliable material - one notch will not be enough. The longitudinal logs are always placed first, then the transverse ones. The pitch of one from the other is calculated from the material - the log can be laid at a distance of 1300 mm, and the boards will require no more than 700 mm.
- After installation, the question of how to embed logs into a log house is no longer of interest; you need to give the house time to shrink and look at the behavior of the newborn elements. It is quite possible that after some time there will be a need to correct them.
Causes and possible solutions to lag-related problems:
Falling out of cutting or cutting areas due to inappropriate size. This may indicate a low qualification of the hewer. Deflection indicates poor drying of the material. This is especially noticeable when installing log joists. Protruding - the same thing. Also, ceilings may generally fall out of the grooves if the deformation of the log house is severe. Therefore, to avoid this, there is no need to mount the ceiling elements at once and make them exactly along the length
It's better to cut it off later. When it comes to fasteners, it is important to remember that they must fit snugly into the wood and even be recessed into it. If, after a period of time, damage is noticed on the material, then ignoring it risks the whole house. It’s better to replace such a lag or try to fix it by chipping
But if there is no effect, you need to buy a new one.
Selecting the material for load-bearing structures, which are logs, requires great care. The stability of the structure as a whole depends on this. One should not neglect the method of cutting and chopping - they were not invented in vain, and have been tested for centuries.
Design, nuances, features
Once the base is ready and meets all the requirements for reliability and strength, you can proceed directly to installing the floor in the log house. Professionals advise making a horizontal level formed with the help of floor beams immediately after placing them in the walls of the log house. The floor covering, located along the beams, is performed either in 1 layer or with a rough floor. A two-layer version of the floor in a log house will be much warmer than a single-layer one.
Finished floor plan.
To ensure high-quality floors, it is best to use boards that are completely dry and rest in a sparse stack. This procedure takes at least 6 months. This method will help you prevent the process of warping of the floorboards.
If there is such a need and it is necessary to lay raw building materials (boards), then they cannot be nailed to the surface of the beams immediately.
- First, they are simply pressed against the beams using boards secured in several places (3-4).
- The boards are laid in the direction from the edge to the center. Please note that you need to leave a gap of about 5 cm in the center and drive the wedges into it. As the boards dry, you will need to tap the wedges several times. Typically, this procedure lasts approximately 3 months.
- And only after this time can the floorboards be finally fixed. And also, regarding the thickness of the subfloor boards, this value should be no less than 40 mm.
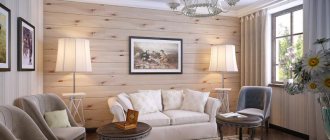
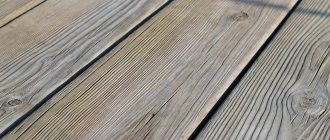
A tongue and groove board is the optimal choice of material for a finished floor.
The finished floor is laid in a direction perpendicular to the subfloor. For these purposes, a tongue and groove board is usually used. It is important that it is dry. Kitchen floors need an additional layer of insulation between the subfloor and the finished floor. Roofing material is well suited for these purposes.
Using a tongue and groove board to construct a finished floor is the best option. Its appearance is aesthetically pleasing, and high-quality painting will help to significantly extend its service life.
Please note that this building material, recommended for installing a finished floor, is also suitable as a base for other floor coverings. If desired, you can lay laminate, linoleum, and carpet on it. The choice is practically unlimited.
Finish lining
Finish lining
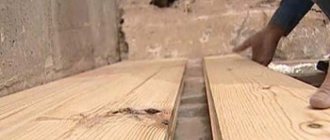
A floor made of wooden planks is laid from the corner of the room. The first row should be adjacent to the wall with a gap of 1 cm. This distance is necessary to level out possible deformations of the wood under the influence of loads or temperature fluctuations.
The next row is shifted by 2 positions compared to the previous one. In order for the boards to fit as tightly as possible, you need to tap with a small hammer, which is applied to the side of the installed log.
When boards are fixed on the walls, the fastenings must be placed on top. This will not affect the appearance, because their heads will be covered by the baseboard. In other cases, the boards are attached only to the bottom of the grooves. The screws along with their heads are placed behind the board, so they are successfully hidden.
Upon completion of the installation of the boards, you need to install the skirting boards.
Why install a subfloor?
The main requirements for the quality of a log floor are: strength, reliability and good ventilation. It is for their implementation that subfloors are installed. In addition to the properties listed above, they perform a number of significant functions:
Subfloor installation diagram.
- play the role of a stiffening frame;
- serve as a base for placing thermal insulation and waterproofing;
- provide the opportunity to provide high-quality ventilation, since with their help an air layer is formed, which, in turn, maintains heat in the room, prevents rotting processes and possible distortions of the structure.
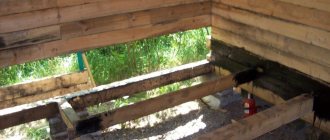
In order to make rough floors, you will need unedged boards with a width of 15-50 cm. All of them must be carefully treated with an antiseptic composition.
Construction of a rough insulated floor in a log house
First you need to think about ventilation. This is a mandatory condition, since only in this case will you avoid possible exposure to moisture and rotting processes. The simplest way to install it involves drilling holes in the corner joints of the house (log house). The size of such holes corresponds to a value of 50 mm. Subsequently, they must be disguised using decorative elements (grids).
At the next stage, you need to take care of waterproofing the foundation. This can be either a blind area, or the use of roofing material, or the use of coating-type waterproofing materials.
Next, the lower crowns and joists are treated with a high-quality antiseptic composition in order to prevent the occurrence of a fungal infection and its subsequent destruction.
Installation of the floor in a log house can be done in several ways. This:
- a method that uses beam shoulders (their appearance resembles an inverted “T”);
- a method that involves the use of cranial beams (note that they must be pre-attached to the beams);
- a method that involves preliminary preparation of grooves in beams (the appearance of which resembles “H”).
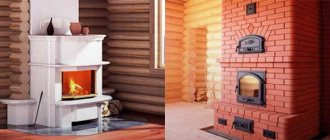
Advantages of timber houses
Timber house
- Environmental friendliness. Wood is completely safe for everything and everyone around it.
- Low thermal conductivity. A well-equipped log house will always have optimal temperature and humidity levels.
- High noise insulation properties. This point is especially relevant for owners of plots located near highways, railways, industrial facilities, etc.
- Relatively low construction cost. Firstly, a log house does not require a buried foundation, which already allows for significant savings. Secondly, you can handle all the activities associated with the construction of such a house yourself.
- High speed of construction work.
- Attractive appearance. Wood has excellent aesthetic properties.
Concrete floor option in a log house
As for the installation of a concrete floor in a log house, it has a number of undeniable advantages, which include:
- long service life;
- reliability and guarantees of strength;
- the possibility of covering a concrete floor with any type of floor covering (tiles, linoleum, laminate, and so on).
If you're looking to tile your floor, check out the new tile collection.
Concrete floors in a log house can be installed using 2 methods. The first of them is placing concrete on the joists, the second is laying it on the ground.
Basically, it doesn't matter which option you choose. The main thing is to follow the sequence of your actions and adhere to the rules of the technological process. Good luck!