Wood inlay is a special type of decorative and applied art, which in appearance is very similar to a mosaic or ornament, made from particles of different materials. The idea is to embed an already prepared figurine from another material into the surface of the object that we are decorating. The elements do not protrude; they represent a single integral structure.
Development of marquetry
According to historical sources, the marquetry technique was known back in the times of Ancient Greece and Egypt. However, these were isolated attempts; The greatest expansion from a historical point of view was recorded only during the heyday of the Baroque and Rococo styles.
At that time, marquetry was one of the most common techniques for decorating wood and wooden furniture. Gradually, proven methods and techniques for marquetry production began to develop, the greatest advantage of which was the invention of the veneer cutting machine.
With the use of plywood for insertion, there has been a gradual transition from hardwood to softwood, especially spruce or other softwoods.
- Initially, carpenters were engaged in the production of marquetry; later a separate craft was created.
- Today, carpenters-artists, together with carvers, are again working in this area. Over the centuries, the use of woody plants has also changed.
- At first, fewer types of wood were used, which gradually increased.
In addition to commonly available woody plants, exotic species and combinations with other types of materials such as metal, pewter, mother-of-pearl or brass also began to be used.
Zebrano
Growing in Africa, the wood is valued for its decorative properties. It alternates soft and hard layers, so the structure is very heterogeneous: a golden-brown background with narrow dark veins (can even be black). But this also makes it difficult to process, so only experienced craftsmen work with zebrawood.
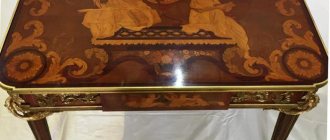
Kitchen Francesco Molon Alycia
Basic Marquetry Making Process
The starting material for making marquetry is veneer. Today, peeled and planed veneers with a thickness of 0.6 and 0.8 mm are most often used.
However, in the past, technology did not allow this method of producing wood mosaic fragments, so pieces of veneer cut to a thickness of 3 to 8 mm were used.
To achieve the final effect, veneers of different types of wood are used, due to which they differ in color. Color changes can also be achieved by etching.
The making of marquetry is preceded by careful design, assembly of the model and, possibly, the production of cardboard templates for easy transfer to the veneer layers. The decisive step is to cut out the individual parts into the desired shape.
Various carving techniques are used for this:
- Knife cutting - sharp carving knives of various shapes are used to make marquetry. You can also use a classic knife or scalpel. When cutting, do not press too hard on the cutting tool, as the veneer may break. To break the fibers, finer and more repeated cutting is recommended;
- Hand sawing - Power saws can also be used to cut veneer. A favorite is the so-called lumberjack - a saw with fine teeth in the shape of an egg. A high-quality clean cut can also be achieved using a plywood saw, thanks to which you can cut even small curved decorations;
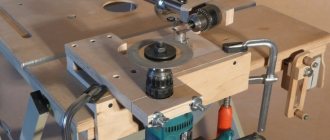
- Electric Butchering - Nowadays, marquetry production also uses power tools. An example is electrical decoupling, which can be used to cut quickly, accurately and evenly;
- Laser cutting - Professional modern marquetry companies use laser for cutting. Thanks to this, individual veneer pieces are cut with maximum precision and ensure a perfect result.
The most famous marquetry artists
The names of the most famous marketers were well known to their contemporaries. The fates of these artists developed differently, but each of them made a huge contribution to the development of ancient decoration techniques and deserves special mention:
- André-Charles Boulle is the most famous master of wood inlay of all time. The lush and elegant style of marquetry is named after him, and the artist’s work was continued by four sons and numerous students. The King of France allocated the genius a studio space in the Louvre and provided patronage until his death.
- Jean-François Oeben was a French marketer of German origin, a student of Charles-Joseph Boulle and the grandfather of the famous painter Eugène Delacroix. Eben has gained immense popularity among customers thanks to his unique talent for creating ingenious mechanisms in the manufacture of exquisite furniture.
- Jean- Henri Riesener is also a German by birth who lived most of his life in France. Riesener was the court furniture maker of King Louis XVI until the French Revolution, creating in the Rococo and Neoclassical styles.
- David Roentgen is a German artist whose works were happily bought by the monarchs of Germany, Russia and France. Röntgen was an unsurpassed master of sophisticated Rococo design and worked with the most expensive types of wood.
On the Very Important Lot website, everyone has the opportunity to take part in art auctions and purchase antiques. On the site you can also buy exquisite furniture directly from contemporary artists.
Wood used
For the needs of marquetry, it is necessary to use high-quality fragments of the highest quality, without defects, conspicuous inclusions and color differences. Currently, both natural and exotic veneers are available on the market.
Traditional ones include, for example, oak, maple, birch, beech, cherry, etc. Mahogany, Macassar, holly, bamboo and meranti are classified as exotic wood species for veneer production.
A separate category includes decorative veneer, which is used as a background ornament and glued to plywood or other substrate. Decorative elements are divided into several categories depending on use (for interior and exterior surfaces) and type (radial and angular shapes).
Where do masterpieces come from?
Marquetry as a decorative technique for making household items and souvenirs originated in the Ancient East . At first it served to highlight individual details of figurines (for example, eyes); wood inlay was also used in architecture to decorate buildings.
Later, in Ancient Rome and Greece , when products were made from a single-color material, they were decorated with wooden or stone details using the marquetry technique.
In the 9th-13th centuries, the beginnings of marquetry made themselves felt in the majestic architecture of Italy . The masters of the Renaissance invented and created the richest patterns from jewelry and marble, and actively decorated church utensils.
In the 2nd half of the 16th century, the prerequisites already appeared for the separation of this applied art into a separate channel.
The technique of making marquetry is very popular. The exquisite furniture features the famous Florentine mosaic. In addition to the wooden background, it is based on plates of multi-colored precious and semi-precious stones.
Transferring marquetry to the surface
After the individual parts of several types of veneer have been precisely cut, it is necessary to assemble them into the desired motif. The pieces must be cut out with maximum precision so that after folding the pattern there are no large gaps left between them.
The assembled pattern is temporarily glued together with paper adhesive tape, which allows you to process the entire part.
- The resulting trim must be transferred to the required substrate - plywood or the piece of furniture itself. You can use glue or epoxy glue for gluing.
- Only apply the required amount of glue, otherwise it will begin to seep through the motif and cleaning it will be difficult.
- After gluing to the base, the tape needs to be pressed. To protect the veneer, the pattern is covered with newspaper on top and properly tightened with pullers. The ideal time to press the binding is several hours.
- After the glue has dried and pressed down, the paper adhesive tape is removed from the marquetry and surface treatment begins. Small gaps between the individual parts are filled with glue mixed with fine sawdust.
- The grinding phase continues until the entire surface is uniform, smooth and without noticeable differences in height. The last stage of marquetry production is surface treatment with paint.
Nitrocellulose varnish is applied with brush strokes in one direction. After applying and drying several layers, the finished work is sanded again with fine sandpaper.
Marquetry making is an impressive craft that is practiced not only by professional carpenters and carvers, but also by amateurs. Interest in marquetry is also manifested in the organization of courses and handicraft clubs for children and adults
. You can also try making your own marquetry at home, other than veneer and basic carpentry tools, you don't need many tools.
Practical tips for proper technique
- Look at the marquetry designs and choose a design.
- Secure the tracing paper with buttons and carefully redraw the image onto it.
- Using carbon paper, transfer the image onto the veneer.
- You won’t be able to cut through a sheet of veneer in one go, so run the knife along the same line several times and be careful!
- Trim the drawing with a pencil if necessary.
- Take the veneer and cut out fragments of the design.
- Manufacturing technique: leave small gaps as thick as the tip of a knife between the fragments, as the veneer will be leveled under the press. Different pieces of wood will have different areas when leveled.
- Apply glue to the base, leave for 40 minutes and apply glue again - this way the material will stick better. We do not smear the veneer with glue, otherwise it will curl into a tube and become unsuitable for work.
- We put chipboard on top and bottom and put the product under a press for a day.
Sources:
- https://FB.ru/article/295653/marketri—chto-eto-takoe-marketri-po-derevu-dlya-nachinayuschih-opisanie-tehnologii-rekomendatsii
- https://chenyna.ru/origammi/mozaika-po-derevu-svoimi-rukami-chto-takoe-marketri-i-drugie-sekrety.html
- https://otdayu-darom.ru/podelki/intarsiya-po-derevu-chertezhi.html
- https://vseogarage.ru/poleznye-sovety/inkrustatsiya-po-derevu.html
- https://lesoteka.com/obrabotka/marketri-po-derevu
- https://hobbirukodelie.ru/zhivopis/derevyannaya-mozaika-marketri-ispolzuem-dary-prirody-dlya-sozdaniya-unikalnyh-veshhej/
- https://moisovety.com/priobshhaemsya-k-tehnike-marketri-prosto-o-slozhnom/
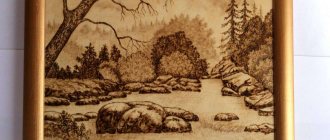
Photo of marquetry on wood
In the Middle Ages
In the XI-XIII centuries. The Italian Renaissance breathed new life into the ancient traditions of art, including the design of finished products. The craftsmen performed the most complex work on the production of intricate patterns and panels, which were applied to architectural structures made of white stone. Precious stones and also marble were mainly used as materials for inlay.
At this time, the famous and unusually complex Florentine mosaic appeared, in which the effect of a real painting is achieved using a special combination of colors and shades of ornamental stones.
basic information
Inlay is one of the types of mosaics, when patterns from plates of another material, mainly precious metals, are applied to a wooden base using the cutting method.
The name comes from the old word "incrustatio", which means "covering". During this work, the inserts should be flush with the entire surface of the object. A variety of materials are used for coating : metals, expensive stones, marble products, ceramics, wood and mother-of-pearl. Inlaying is an art that has been popular since ancient times and is still developing beautifully.
Environmental assessment of wooden mosaic products
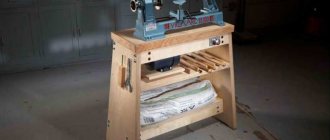
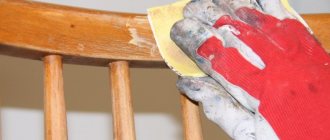
To make my product, I used wood and plywood, which are considered environmentally friendly materials, since the production of plywood uses technologies that do not harm the environment and do not pollute its atmosphere, unlike plastics, etc. In the manufacture of this product a minimal amount of material was required.
To manufacture the product, plywood is processed entirely by hand - sawed by hand or with a jigsaw, and does not require various machines that could pollute the environment. Only when varnishing a product does the specific smell of varnish slightly release, which also does not harm people or the environment. Varnishing is carried out using a hood and in a ventilated area. Remaining waste in the form of shavings and sawdust will be disposed of in special containers (chip collectors) with subsequent removal by agreement with specialized housing and communal services.
Self-esteem
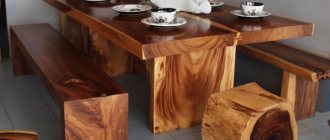
When making the product, I achieved my goal, namely, I created a mosaic in the intarsia style, which successfully fit into the interior of my room and is a decoration.
Product advertising
Attention! offers you gifts, souvenirs, wood paintings. Cool original gifts that bring joy. The opinion that it is not originality that is important in a gift, but its price, is wrong. A trinket, even a very expensive one, will not bring joy. You should not give preference to useless things and tasteless souvenirs.
The problem of choosing a present will be solved by our cool handmade gifts. By choosing unusual gifts, you are making the right choice; such a gift will be appropriate for any occasion. Our selection of unusual gifts is so extensive that every buyer will find something here for themselves. A wide range of products made from natural, environmentally friendly materials can satisfy even the most demanding tastes.
Contact the address: Republic of Sakha (Yakutia), city of Neryungri, secondary school No. 2, school workshops.
Conclusion
In completing this project, I completed the tasks assigned to me.
In the process of work, I solved the problem with the size of the product, selected the right wood, taking into account the wishes of the teacher, I found the optimal shape of the product, chose an interesting subject for the work and completed it.
I used all my skills and abilities and put my soul into this work.
Metal nails in inlay
Small, less than three millimeters, metal “nails” are made like this: the holes are again drilled with a drill, glue is dripped onto the edge of the vice, into which the tip of the wire is dipped, and then the wire is inserted into the hole, pressing it into it with hand pressure along the axis. The excess is cut off with double-jointed pliers (21). Having inserted several pieces of wire, hammer them all the way in with a hammer and cut off the excess with side cutters.
To get a chain of touching circles, the wires are first inserted through one, and after they are glued and sanded, holes are drilled in the gaps and the rest are inserted.
It is better to take thinner wires from a different alloy - after final finishing this will provide a difference in shades. Konstantin believes that in one work at least three shades of metal, that is, three alloys, should be used so that the design looks harmonious.
The eroded metal is ground (22).
Strokes and patterns
Lastly, strokes and patterns are applied to the mother-of-pearl to complete the image.
First, they are simply drawn with a pencil, and then cut with a spitztikheel sharpened in the form of a triangle with the top down (23). The sharpening angle of the gravel is approximately 45 degrees, which is due to the high hardness of mother-of-pearl.
The working methods of this tool differ from engraving with a drill, which draws lines in any direction. Using a graver, they cut approximately along the axis of the hand, and the workpiece, together with the vice, is turned on the table so that the cut goes in the direction most convenient for the master. In this case, the thumb of the working hand (by the way, the master is left-handed) rests on the finger of the right hand, which allows you to control the tool: it cannot fall forward and cause an irreparable scratch.
The gravel is sharpened on a diamond disk inserted into a drill, and then the agate is edited by hand.
The larger lines that form the main pattern are cut first. Then thin lines are marked with a pencil and cut through them with a thinner pencil. Lastly, the dots are made with a power tool called a mat (it looks most like a tiny jackhammer and strikes with the tip). When all the lines and dots have been applied, the mother-of-pearl is painted over with a black alcohol-based dye, which penetrates and is absorbed into the surfaces of the sections. Excess dye is erased from the mother-of-pearl planes with a hard drawing eraser.
Round mother-of-pearl details
Round inserts (“buttons”, “plugs”) are made a little differently - by drilling the mother-of-pearl with a diamond tubular drill. It is clamped into the chuck of a miniature machine with a man-made water cooling system, and the shell is placed on a wooden stand and drilled with a slight feed (18). Moreover, having passed right through the mother of pearl, they press the feed lever, causing the resulting “button” to be pressed further into the drill tube from where it is then pushed out (simply with a wire).
The holes in the handle are made with a drill using a drill, the rotation speed is approximately the first thousand revolutions (19). Cyanoacrylate is dripped into the holes, and with curved tweezers (so you can see what you are doing), the mother-of-pearl circle is placed in place (20) and hammered flush with a small hammer.
Project stages
| No. P/P | Name of the project stage | Deadline for completing the stage |
| 1 | Introduction | 27.09.17 |
| 2 | Problem Design | 04.10.17 |
| 3 | Product design development | 11.10.17 |
| 4 | Application sheet | 12.10.17 |
| 5 | Technical drawings of parts | 19.10.17 |
| 6 | Manufacturing technological map | 02.11.17 |
| 7 | Assembly procedure, control, testing | 14.12.17 |
| 8 | Economic assessment | 27.12.17 |
| 9 | Environmental assessment | 18.01.18 |
| 10 | Project protection | 22.02.18 |
Knife-cutter: how to make it yourself
The master's main tool is a special steel knife with a flat, beveled blade. If you don’t find one ready for sale, you can easily make it yourself from a medical scalpel. Part of it needs to be blunted along the entire length with a sharpener and a handle attached. Or you can just wrap the bottom of it with duct tape. Alternatively, you can improve your straight razor by dulling the bottom to avoid cutting your fingers and wrapping it with duct tape or duct tape. There should be several such tools: for small and large parts. Whatever the cutter knife is made of, the main parameters include the following: blade thickness - from 1 to 1.5 mm, width - from 10 to 15 mm, length - from 15 to 20 mm, bevel angle - 30-45 degrees.
What is mosaic?
A mosaic is a plot or ornamental image that is made up of one or more materials. It is used not only to decorate the interiors of premises, for example, monumental structures or public buildings, but also furniture, musical instruments and even weapons. In other words, mosaic is one of many types of monumental and decorative art. It is classified according to the technique of execution, the material used and artistic features.
- Intarsia;
- Inlay;
- Marquetry is a French style of mosaic on wood.
- Block mosaic.