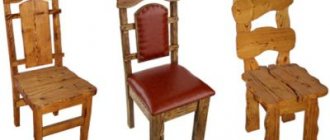
Furniture made from natural wood is valued for its environmental friendliness, durability and exclusivity. You can make any interior items from solid wood of various species - from a hanger for the hallway to a double bed.
DIY natural wood furniture
The main thing when working with wood is accuracy and patience. What tools to use, how to choose the material for work, as well as the order of work will be discussed in this article.
Solid wood furniture design
What can be used for crafts
For beginners you can use:
- branches of different diameters, lengths and smoothness;
- hemp - they can also be different in shape, height and diameter;
- cutting trees in different directions, both along the grain and across.
For beginners, making crafts from tree branches is suitable; this will greatly simplify the making of any item with your own hands, since it does not require any special skills in craftsmanship.
For those who have already gained experience constructing various things from wood, you can choose both materials found in natural conditions and purchased wood.
For experienced craftsmen, you can use both cheaper and more valuable types of wood. Purchased wood, especially expensive species such as oak, hornbeam, ash, etc., will require certain financial costs.
What can be made from wood for a summer house
Do-it-yourself wooden crafts for a summer residence are an excellent option to decorate your garden plot and add variety to the interior design of premises without any special material costs.
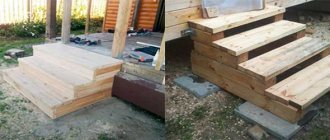
Before starting work, it is advisable to draw the structure in order to imagine what parts it will consist of and how they should be placed in relation to each other.
From the rest of the boards you can make a beautiful birdhouse. If you spare no time and effort, you can design it in a completely unusual way, avoiding standard designs. This will immediately attract people's attention.
Interchangeability of parts and assembly units
Interchangeability is a property of parts in which each part can fit into a mating part without any additional processing or fitting, provided that the quality of the mating during operation will satisfy the specified standards.
Interchangeability is ensured by two factors: technological, which determines the methods of processing and assembling the part, and operational, which ensures that the part or product meets certain technical conditions during operation.
The quality of products is determined by the accuracy of processing and assembly in terms of geometric parameters, mechanical and physical properties of materials.
The principle of interchangeability must be observed, starting with blanks and semi-finished products, in relation to which interchangeability means accuracy of size and shape, as well as uniformity of the mechanical and physical properties of the material. In a broader sense, interchangeability is a complex concept that characterizes the direction in the development of modern technology, that is, it includes issues of design, technology and operation.
Interchangeability can be complete when parts are connected without adjustment, and limited when parts are partially adjusted to each other during the assembly process.
The level of production interchangeability is characterized by the interchangeability coefficient Kv, equal to the ratio of the labor intensity of manufacturing interchangeable parts to the total labor intensity of manufacturing the product.
Interchangeability is also divided into internal and external. Internal refers to the interchangeability of individual parts of any assembly. On the external side – interchangeability of components and products.
The necessary conditions for interchangeability are:
- system of tolerances and fits, precision of product manufacturing,
- use of modern and creation of new control and measuring equipment,
- rational design, stability of the starting material, etc.
The precision of product manufacturing is one of the main factors of interchangeability. The accuracy of product manufacturing is understood as the property of the technological process to ensure that the dispersion field of the values of the product quality indicator corresponds to the specified tolerance field and its location.
In general terms, the accuracy of product manufacturing is mainly determined by two factors: the technological accuracy of the machine and the accuracy of its settings.
The accuracy or error of machine operation is determined by the dispersion field of the size values of a batch of parts processed on the machine under its given state and setting. The accuracy of the machine is influenced by a number of errors. All of them are divided into 2 groups: systematic and random.
A systematic error is an error that, under the same conditions, takes on the same value in magnitude and sign.
A random error is an error that, under the same conditions, takes on different values in magnitude and sign.
These errors can be caused by instability in the values of processing allowances, internal stresses in the material, errors in the location of parts, etc. They can be identified by a system of rules that determine them.
The accuracy of the machine is determined experimentally. To do this, it is adjusted to a given size, a batch of parts in the amount of 100...150 pieces is processed, each part is measured, the results obtained are processed by the methods of variation statistics and a distribution curve is built. The accuracy of the machine is judged by the size dispersion. The accuracy of machine settings is an important factor affecting the accuracy of processing.
Craft options for beginners
For wood crafts for beginners, it is better to choose the simplest designs so that doing them with your own hands is not difficult.
You can make a horse out of wood with your own hands. To do this, you need to select a small cut tree and make a body from its thickest part. The legs for the horse are made from thinner branches.
The head can also be cut from a medium-thick branch. You can fasten everything together either with glue or by fixing it with nails. You can also decorate the face, thereby giving it a certain expression.
Surface roughness
Surface roughness is characterized by the presence of irregularities on the treated surface. There may be macro-irregularities - single irregularities of a large extent, caused by geometric inaccuracy of machines, incorrect alignment and warping of the part.
Micro-irregularities are small protrusions and depressions: anatomical, structural irregularities in wood, irregularities in destruction and elastic recovery during processing with a cutting tool.
Surface roughness is characterized by numerical values of roughness parameters and the presence or absence of hairiness.
To assess the roughness of wood materials,
Rmmax is the arithmetic mean of the heights of the individual largest irregularities, calculated by the formula:
(1)
where Hmaxi is the distance from the highest to the lowest point of the greatest unevenness.
Rm – the greatest height of profile irregularities, calculated by the formula:
(2)
where Уpmax is the distance from the profile center line to the highest point within the base length, Уvmax is the distance from the profile center line to the lowest point within the base length.
The normalized roughness value is indicated in the drawing on all surfaces of the part.
To control the rough surfaces of frame-cut lumber, simple indicator depth gauges are used; for semi-clean lumber, TSP-4 optical devices are used, based on the “shadow section” principle; for clean surfaces, the MIS-11 device is used, based on the “light section” principle.
Surface roughness has a great influence on the quality of the product; it is also of fundamental importance in regulating the consumption of adhesive and finishing materials.
Surface roughness is indicated in the drawing for all product surfaces made according to this drawing, regardless of the methods of their formation, except for surfaces whose roughness is not determined by the design requirements.
Numerical values of roughness parameters are indicated after the corresponding symbol, except for the values of the Ra parameter, which is indicated without a symbol (Table 1).
Table 1. Designation of roughness in the drawing
| The most preferred sign. The height h is equal to the height of the dimensional numbers H = (1.5...3.0) h. The R parameter should not exceed 0.4 µm. | |
| A sign showing that the surface formed by removing a layer of metal. The R parameter should be within 0.8...0.32 µm. | |
| A sign showing that the surface formed without removing the metal layer. The R parameter should not exceed 1.6 µm. | |
| A sign indicating that the surface is not processed according to this drawing. |
For children
The easiest way to make wooden crafts for children with your own hands is a hot stand.
It is made from circles of tree cuts of different diameters. They just need to be glued onto some kind of dense base, including thick canvas fabric.
Garden furniture in the form of stools
Small chairs that can be made from wood of the appropriate diameter and height, if you hollow out a large saw cut for seating. For convenience, they can be decorated with soft poufs.
You can also make a table from horizontally sawn boards with uneven edges.
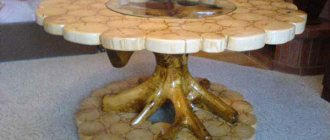
The design will look especially impressive if you combine wood with epoxy resin. The design options in this case are not limited, and the appearance is attractive and stylish.
You can also make a coffee table for the interior. It can be made from cuts, both longitudinal and transverse.
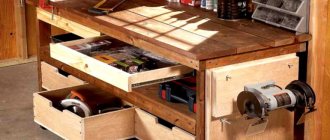
Materials
Materials for the preparation of wood products can be divided into structural, facing and materials typical for the production of furniture for sitting and lying down: as well as adhesives, fittings, glass, mirrors, elements of decorative design of products, finishing materials.
Structural materials are the materials from which parts of structures that bear loads are made. These include wood, particle boards and fibreboards, plywood, plastic materials, and metal.
Wood. Its advantages were discussed in the introduction, but it also has disadvantages: anisotropy (different mechanical characteristics depending on the direction of the fibers), the presence of various defects (knots, cracks, core, fiber inclination, camber, curvature, etc.), size and changeability (shrinkage, swelling, warping), hygroscopicity, flammability.
Particle boards. Positive properties: relatively large sizes, well processed and finished, have almost identical physical and mechanical properties in length, width and thickness, hygroscopicity is lower than that of natural wood. Disadvantages: change in shape (warping), significant variation in thickness, low screw-holding ability of edges, toxicity.
Wood panels are used when high strength and lightness of elements are required. Disadvantages: complexity and labor-intensive manufacturing, significant consumption of solid wood.
Fiberboards. They have almost the same physical and mechanical properties as natural wood (solid fiber boards), are characterized by the same strength in all directions, and are amenable to all types of mechanical processing.
The bottoms of boxes and other containers, back walls, and facing materials are made from them.
Plywood. Used for the manufacture of wood panels, hollow panels, back walls and drawers of cabinet furniture.
Facing materials
Wood – sliced veneer.
Decorative films based on impregnated papers. In films with partial polycondensation of the resin, the latter has good fluidity. Therefore, the film is glued without the use of additional glue using its own resin. Such films allow you to combine two operations - veneering with the simultaneous production of a finishing coating. These films are produced using melamine-formaldehyde resins. They are used in the manufacture of laminated boards. Films with full resin polycondensation are called synthetic veneer sheets.
Decorative laminated paper plastic (DBSP). It contains up to 65% paper, which performs two functions: a reinforcing filler, which gives the plastic increased mechanical properties and compensates for the fragility of the resin, and a carrier of decorative properties. Its thickness is 1.0...1.6 mm and can be smooth or imitate wood texture. For the manufacture of DBSP, paper with a density of 150 g/m2 is used.
Construction materials made of plastics. The technological process for manufacturing parts from plastic allows you to create products of any architectural shape, fully using the raw materials used (without waste). In addition, the use of plastics makes it possible to save wood materials, reduce labor costs, and increase productivity.
Disadvantages: limited polymer resources and their high cost.
Crafts for the interior
Any decorative panels, hangers, or umbrella stands can be made from wood. Such things can add not only color to a home environment, but also comfort and exclusivity.
Pictures made from different-sized tree cuts can be left in a natural shade, or you can use acrylic paints, thereby giving the picture saturation and the desired tone.
The most important thing is that almost any thing can be made from wood, there are no restrictions here - everything from the house to the smallest interior elements can be made from wood.
The exception perhaps concerns only household appliances and electronic devices.
In order to be convinced of the diversity of such things, it is worth considering photos of handmade wooden crafts. Starting from beginner craftsmen to ace carpenters.
In order to make something out of wood, you don’t need to be afraid to start working. This material is very malleable and is difficult to spoil, and even if this happens, even the damaged parts can be used to make another craft.
Carpentry lessons
Part connections
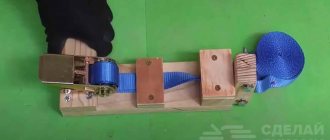
All structural parts are connected using glue with additional fixation with dowels. Such a connection is not much inferior in strength to self-tapping screws and differs favorably from them in that it does not force the caps to be masked.
Connecting wooden parts with dowels.
The assembly technology is not complicated:
- Glue is diluted in warm water. Before use, it is aged for 40-60 minutes;
Please note: casein glue must be used within three to four hours. After this period, it loses its stickiness, gradually thickening.
- Holes for dowels are marked and drilled in both parts. The total depth of the paired holes should be slightly greater than the length of the dowel;
- The dowels are lubricated with glue and placed in the holes on one of the parts;
- Both surfaces to be glued and the free parts of the dowels are coated with the thinnest possible layer of glue, after which the parts are connected and placed under pressure.
Attention: squeezed out glue must be removed from the surface of the product immediately. Once it sets, it will be almost impossible to clean it without scratching the surface.
Planing
There are a couple of subtleties when working with an electric planer.
- The knives should protrude beyond the ski by no more than 0.5 millimeters. It’s better to make a couple of extra passes than to ruin the part with a deep groove;
The smaller the layer removed in one pass, the higher the quality of the surface.
- The slower you move the plane over the surface, the less likely it is to get a “wave” from the knives on the planed timber.
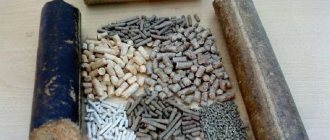
Grinding
For rough sanding of wood, you can use not only sandpaper, but also a sanding mesh. It is better to grind only along the grain: with a transverse movement, a coarse abrasive will leave deep scratches that will take a long time to remove with fine-grained paper.
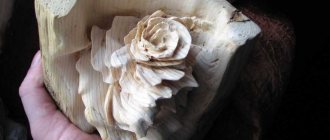
Brushing
This technology allows you to make a cabinet or table from timber with your own hands, giving them the appearance of old products with pronounced surface wear.
The procedure is as follows:
- We process the front surface of the part with a metal brush. The pressure on the brush should be minimal, and its movement should be as uniform as possible. This will remove the softest wood fibers; a relief texture will stand out on the timber;
- Then the stain is applied - in one or several layers until the desired tone is achieved;
- The next stage is sanding with fine sandpaper. The pressure on the sander should be insignificant: our task is not to level the surface, but to grind off the texture protruding above it, highlighting it with color.
The photo shows the brushed surface of the ceiling beam.
Varnishing
The varnish is applied last, after the product is completely assembled. If you try to glue pre-varnished parts, the varnish will interfere with the adhesion of the glue to the wood, severely weakening the joints.
When varnishing, you should follow a few simple rules.
- The coating is applied in 5-6 thin layers with intermediate drying. There is no point in trying to varnish the surface with a thick layer in one go: the total drying time will not decrease, but will increase;
- If possible, the varnish is applied to the surface in a horizontal position. This will avoid drips;
- After drying the first layer of varnish, intermediate sanding with zero paper is required. Humidification raises the lint (fibers of the top layer of wood), which will make the surface rough to the touch.
Intermediate sanding will make the varnished surface perfectly smooth.